
Currant syrup is a delightful way to capture the vibrant flavor of fresh currants and enjoy it all year round. This versatile syrup adds a burst of tart sweetness to drinks, desserts, and breakfast favorites. Whether you’re drizzling it over pancakes or mixing it into cocktails, currant syrup brings a unique twist that’s both refreshing and rich in flavor.
Making currant syrup at home is surprisingly simple and lets us control the sweetness and intensity. Using just a few ingredients, we can transform fresh currants into a beautiful, ruby-red syrup that brightens up any dish. Plus, it’s a fantastic way to use up an abundant currant harvest or add something special to your pantry. Let’s dive into this easy recipe and start crafting our own delicious currant syrup.
Ingredients
To make our vibrant Currant Syrup, we rely on simple yet thoughtfully selected ingredients that bring out the syrup’s natural tart sweetness and rich color. Here is everything we need to create this versatile syrup at home:
- Fresh currants (preferably red for that signature ruby hue) — 4 cups, washed and stems removed
- Granulated sugar — 2 cups
- Water — 1 ½ cups
- Fresh lemon juice — 2 tablespoons, to brighten and balance the syrup
- Optional: vanilla bean or a small cinnamon stick — adds depth to flavor if desired
| Ingredient | Quantity | Notes |
|---|---|---|
| Fresh currants | 4 cups | Red currants, washed and stemmed |
| Granulated sugar | 2 cups | Adjust for sweetness preference |
| Water | 1 ½ cups | For simmering the berries |
| Fresh lemon juice | 2 tablespoons | Adds acidity and brightness |
| Vanilla bean / cinnamon stick | 1 (optional) | For enhanced flavor complexity |
Each ingredient plays a crucial role in developing a syrup that is lusciously sweet with a tart bite. Using fresh currants ensures the syrup carries that characteristic fresh fruit essence, while the lemon juice prevents it from tasting flat or overly sweet.
We recommend measuring precisely to maintain the perfect balance between sweet and tart—the hallmark of great currant syrup. Armed with these ingredients, we’re ready to craft a deliciously vibrant homemade syrup that elevates any dish or drink.
Equipment Needed
To ensure we craft the perfect currant syrup, having the right equipment on hand is essential. Each tool helps us extract maximum flavor and achieve the ideal consistency for our ruby-red syrup.
Essential Tools for Making Currant Syrup
- Large Saucepan
We use a heavy-bottomed saucepan to evenly heat the currants, water, and sugar mixture. This prevents scorching and promotes even simmering, which is key for extracting the fruit’s vibrant flavor.
- Fine-Mesh Strainer or Cheesecloth
Straining is crucial. A fine-mesh strainer or cheesecloth efficiently separates the currant pulp and seeds from the liquid, leaving us with a clear, smooth syrup.
- Wooden Spoon or Silicone Spatula
We stir gently to dissolve the sugar and prevent the mixture from sticking to the pan. A wooden spoon or heat-resistant silicone spatula is perfect for this.
- Measuring Cups and Spoons
Precision is vital when following the recipe for sweetness and acidity balance. Accurate measuring cups and spoons ensure we get the right amounts of sugar, water, and lemon juice.
- Sterilized Glass Bottles or Jars
For storing our finished currant syrup, we use sterilized glass containers. This keeps the syrup fresh and preserves its vibrant color and flavor.
- Ladle
A ladle helps us transfer the hot syrup into bottles cleanly and safely without spills.
Equipment Summary Table
| Equipment | Purpose |
|---|---|
| Large heavy-bottomed saucepan | Even heating, prevents scorching |
| Fine-mesh strainer/Cheesecloth | Straining pulp and seeds for smooth syrup |
| Wooden spoon/Silicone spatula | Stirring gently to dissolve sugar |
| Measuring cups and spoons | Precise ingredient measurement |
| Sterilized glass bottles/jars | Storing syrup safely to preserve freshness |
| Ladle | Pouring syrup neatly into containers |
Prep Work
Before we dive into making our delicious currant syrup we must complete a few essential preparation tasks. Proper Prep Work ensures our syrup turns out vibrant and smooth.
Preparing the Currants
We start by preparing the fresh red currants, the heart of our currant syrup recipe. Follow these steps:
- Rinse thoroughly under cold running water to remove any dirt and debris.
- Remove stems carefully by pinching or cutting them off to avoid any bitterness.
- Inspect the currants and discard any damaged or underripe berries to maintain a pure flavor.
- Place cleaned currants in a large bowl ready for cooking.
Proper preparation of the currants guarantees a bright ruby-red color and preserves the tart, fruity essence that defines our currant syrup.
Sterilizing Containers
To keep our syrup fresh and safe for storage, Sterilizing Containers is crucial. Here’s how we do it:
| Step | Instructions |
|---|---|
| Choose containers | Use glass bottles or jars with airtight lids. |
| Wash thoroughly | Wash containers and lids in hot soapy water. |
| Sterilize | Boil containers and lids for 10 minutes or bake jars at 250°F for 15 minutes. |
| Dry | Allow containers to air dry on a clean towel or rack. |
| Use immediately | Fill with syrup while still warm for best sealing results. |
This step prevents contamination and extends the shelf life of our homemade currant syrup. Having sterilized containers at hand also makes the final bottling process smooth and hygienic.
By carefully prepping the currants and sterilizing our storage jars we set a solid foundation for crafting a perfect batch of luscious currant syrup.
Cooking the Currant Syrup
Now that we have our ingredients prepped and equipment ready, let’s dive into the essential cooking process that transforms fresh currants into a rich, flavorful syrup perfect for enhancing any dish. Precision and attention during this stage ensure our currant syrup achieves the ideal balance of sweetness and tartness.
Combining Ingredients
Begin by placing the 4 cups of fresh red currants in our large heavy-bottomed saucepan. Add the measured 2 cups of granulated sugar and 1 ½ cups of water. If you opt for extra flavor, now is the time to add a vanilla bean or small cinnamon stick. Finally, pour in the 2 tablespoons of fresh lemon juice, which will brighten the syrup and stabilize its color.
- Stir gently with a wooden spoon or silicone spatula to evenly combine all ingredients.
- Ensure the sugar begins to dissolve by mixing thoroughly, helping to prevent graininess later.
Simmering the Mixture
Place the saucepan over medium heat. Here is how we’ll bring the syrup to life:
| Step | Description |
|---|---|
| Heat Level | Medium heat to gradually dissolve sugar and release currant juices |
| Duration | About 15-20 minutes |
| Stirring Frequency | Stir every 2-3 minutes to prevent sticking and encourage even heating |
| Observation | Look for the mixture to bubble gently and currants to burst |
As the mixture simmers, the currants will soften and release their vibrant juices, creating a ruby-red liquid fragrant with tart fruitiness. The syrup will thicken as water evaporates, so patience is key.
Testing for Doneness
To know when our currant syrup is perfectly cooked:
- Visual Test: The liquid should have deepened in color and slightly thickened, enough to coat the back of a spoon.
- Temperature Check: Use a candy thermometer if available. The syrup is done around 220°F (104°C), the soft-ball stage.
- Spoon Test: Dip a chilled spoon into the syrup, then run your finger down the back of the spoon. If the line stays clear without the syrup running back together, it’s ready.
“The perfect currant syrup has a balance—richly sweet yet pleasantly tart with a texture that’s smooth yet slightly syrupy.“
Once done, promptly remove the saucepan from heat to prevent overcooking. We are now ready to strain and bottle our homemade currant syrup.
Straining and Bottling
Once our currant syrup has reached the perfect consistency and flavor, the next critical step is straining and bottling. These steps ensure a smooth syrup free of seeds and pulp, ready to enhance any dish or drink.
Straining the Syrup
To achieve a silky, clear currant syrup we need to carefully strain out the solids. Here’s how we do it:
- Place a fine-mesh strainer or a double layer of cheesecloth over a large heatproof bowl or pitcher.
- Slowly pour the hot syrup mixture through the strainer, letting gravity separate the liquid from currant skins and seeds.
- Use a spoon or spatula to gently press the pulp against the strainer to release as much juice as possible without forcing solids through.
- Discard the leftover solids; do not squeeze too hard, as it can cause the syrup to become cloudy.
- If you prefer an extra clear syrup, strain the liquid a second time through a clean cheesecloth.
This process refines the syrup’s texture, giving us that luxurious, glossy finish that clings perfectly to pancakes, yogurt, or cocktails.
Bottling and Storing
Proper bottling and storage are essential for preserving the fresh-tart flavor and vibrant color of our homemade currant syrup. Follow these steps:
| Step | Action | Details |
|---|---|---|
| 1. Prepare bottles | Use sterilized glass bottles or jars with tight lids | Sterilize by boiling for 10 minutes or using a dishwasher’s sanitize cycle |
| 2. Transfer syrup | Use a ladle to pour syrup into bottles | Leave about ½ inch of headspace at the top to allow for expansion |
| 3. Seal tightly | Secure lids immediately to prevent contamination | Avoid using plastic lids as they may not seal properly |
| 4. Cool & label | Let bottles cool at room temperature, then label with date | Store in a cool dark place or refrigerate after opening |
We can expect our syrup to keep refrigerated for up to 3 weeks or frozen for up to 3 months without losing its fresh-tart character.
“Straining the syrup gently is key to maintaining the syrup’s beautiful clarity while bottling in sterilized containers ensures it stays fresh and safe to enjoy.”
By following these straining and bottling steps meticulously, we preserve both the integrity and the vibrant ruby color of our currant syrup, ready for anytime use.
Serving Suggestions
Our homemade currant syrup opens up a world of delightful uses in your kitchen. Let’s explore some of the best ways to enjoy its vibrant flavor and enhance your favorite dishes.
Breakfast Boost
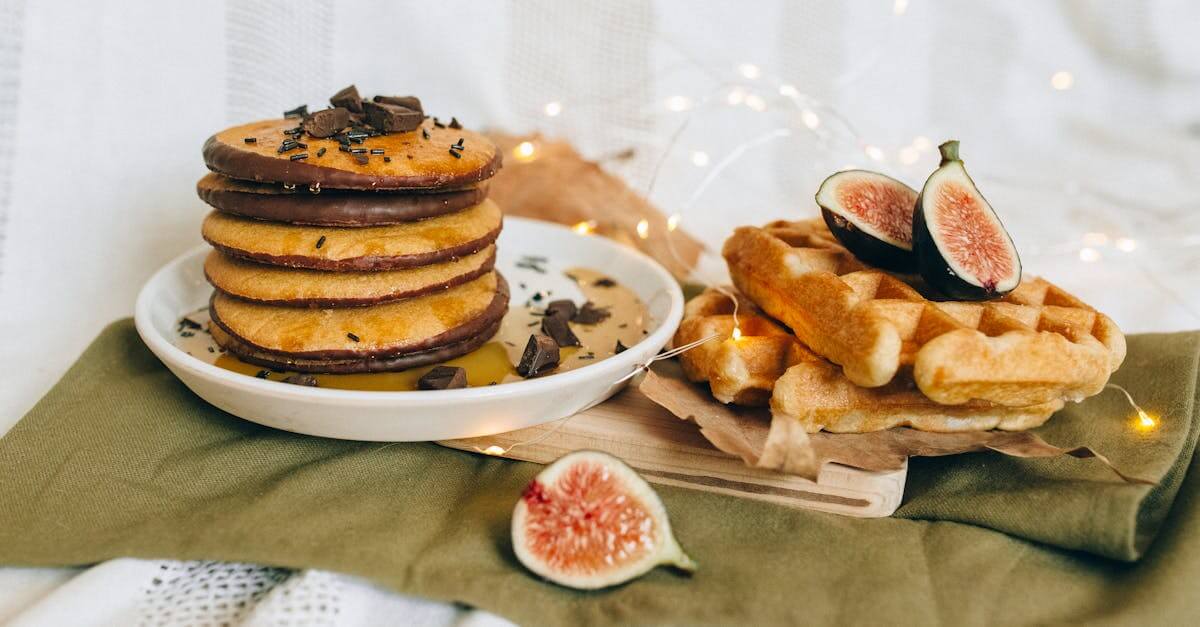
Drizzle currant syrup over pancakes, waffles, or French toast to add a tangy-sweet zing. It also pairs beautifully with Greek yogurt or oatmeal for a fruity twist to your morning routine.
Beverage Enhancer
Mix 2 tablespoons of currant syrup with sparkling water or lemonade for a refreshing homemade soda. It’s perfect for spring and summer gatherings. You can also stir it into cocktails like gin and tonic or add to iced tea for a natural fruit infusion.
Dessert Delight
Use it as a topping for vanilla ice cream, cheesecake, or panna cotta to create an elegant dessert. Spoon over fresh berries or blend into smoothies for extra depth and color.
Savory Pairing
Surprisingly, currant syrup complements savory dishes like roasted meats or grilled vegetables. Brush it over lamb chops or roasted chicken in the final minutes of cooking to achieve a glossy, flavorful glaze.
Portion Guidelines
| Serving Suggestion | Recommended Amount per Serving |
|---|---|
| Pancakes/Waffles | 2-3 tablespoons |
| Yogurt/Oatmeal | 1-2 tablespoons |
| Sparkling Water/Lemonade | 2 tablespoons per 8 oz |
| Cocktails | 1-2 tablespoons |
| Desserts (Ice Cream, etc) | 1-3 tablespoons |
| Meat Glaze | 1 tablespoon brushed on before serving |
“A splash of currant syrup transforms everyday meals into memorable experiences.”
By incorporating our bright and flavorful currant syrup in these ways, we create a versatile staple that elevates both sweet and savory dishes. Let’s embrace its tart-sweet essence in every bite and sip.
Make-Ahead Tips and Storage
To keep our currant syrup fresh and flavorful, it is essential to follow proper make-ahead tips and storage techniques. These guidelines help preserve the vibrant color, tart-sweet balance, and smooth texture of the syrup for extended use.
Make-Ahead Tips
- Prepare the syrup in small batches unless you plan to use it frequently. This maintains optimal freshness and prevents waste.
- Allow the syrup to cool completely before transferring it to containers. Hot syrup can cause condensation which promotes spoilage.
- Use sterilized glass bottles or jars with airtight lids for bottling. Proper sterilization helps prevent contamination and extends shelf life.
- Label the containers with the date of preparation to track freshness and prioritize use.
Storage Guidelines
| Storage Method | Duration | Temperature | Notes |
|---|---|---|---|
| Refrigerated in Glass | Up to 3 weeks | 35°F–40°F (2°C–4°C) | Keep sealed airtight; refrigerate promptly |
| Frozen in Airtight Bags | Up to 3 months | 0°F (-18°C) | Thaw in fridge; shake gently before use |
| Pantry (Unopened) | Up to 1 month | Cool, dark, dry place | Only if syrup was hot-packed airtight |
Important Storage Considerations
- After opening, always refrigerate the syrup to maintain quality and extend shelf life.
- Avoid direct sunlight or heat sources, which can degrade the syrup’s flavor and color.
- When freezing, use freezer-safe containers and leave space at the top to allow for expansion.
- If the syrup develops an off smell, cloudy appearance, or mold growth, discard immediately.
“Proper storage is key to preserving the luscious tartness and ruby-red brilliance of our currant syrup.“
By following these make-ahead tips and storage guidelines, our delicious homemade currant syrup will be ready to elevate breakfasts, desserts, and drinks whenever we desire.
Troubleshooting Common Issues
Creating the perfect currant syrup at home is rewarding, but occasionally, we encounter challenges during the process. Below, we address some of the most frequent issues and offer clear solutions to help ensure our syrup turns out beautifully every time.
Syrup Too Thin or Runny
If the syrup lacks the desired thickness or feels watery, this often means the cooking time was insufficient, or the syrup was not reduced enough.
- Solution: Return the syrup to the saucepan and simmer gently for an additional 5-10 minutes. Stir regularly to prevent burning.
- Use the spoon test: dip a spoon into the syrup and let it cool slightly. If it runs off quickly, it needs more reducing. It should coat the back of the spoon thickly but smoothly.
- Avoid adding too much water during preparation. Adding precise amounts listed in the recipe maintains balance.
Syrup Too Thick or Crystallized
A syrup that is overly thick or sugar-crusted may result from overcooking or improper storage.
- Solution: Warm the syrup gently over low heat while stirring in a splash of hot water until it loosens to the desired consistency.
- Store syrup in a clean airtight container at room temperature or refrigeration to avoid crystallization.
Cloudy or Sediment-Filled Syrup
A cloudy appearance or sediment settling at the bottom can detract from the syrup’s vibrant clarity.
- Cause: Pulp and seeds not fully strained out or too much pressure applied when pressing.
- Solution: Use a fine-mesh strainer or cheesecloth and strain slowly without forcing the pulp to release particles.
- Allow the syrup to rest for 15 minutes before straining to let solids settle naturally.
Sour or Off Flavor
Sometimes the syrup may taste too sour or develop off-flavors due to ingredient imbalance or spoilage.
- Preventive measure: Measure lemon juice carefully (2 tablespoons is optimal). Excess lemon juice can overpower the syrup’s balance.
- Ensure fresh, undamaged currants are used to avoid fermentation or unwanted flavors.
- Store the syrup properly in sterilized containers and refrigerate for extended freshness.
- Discard syrup if it smells fermented or shows mold.
Quick Reference: Troubleshooting Table
| Issue | Possible Cause | Solution | Prevention |
|---|---|---|---|
| Syrup Too Thin or Runny | Under-reduced syrup | Simmer longer until syrup thickens | Follow timing and measurements precisely |
| Syrup Too Thick or Crystallized | Overcooked or improper storage | Gently reheat with hot water | Store airtight at proper temperature |
| Cloudy or Sediment-Filled Syrup | Incomplete straining or pressing | Strain slowly with fine mesh or cheesecloth | Use correct straining method and tools |
| Sour or Off Flavor | Excess lemon juice or spoilage | Adjust lemon juice, discard spoiled syrup | Use fresh ingredients, store syrup properly |
By carefully addressing these common issues, we ensure our currant syrup remains a delicious and vibrant addition to our kitchen creations. Let’s keep these troubleshooting tips handy as we perfect our homemade syrup craft.
Conclusion
Making currant syrup at home is a rewarding way to capture the fresh, vibrant flavors of the season. With just a few simple ingredients and some careful preparation, we can create a versatile syrup that brightens everything from breakfast plates to cocktails.
By mastering the techniques and tips shared, we ensure a smooth, balanced syrup every time. Whether we’re preserving a bountiful harvest or simply experimenting in the kitchen, currant syrup adds a unique tartness and sweetness that’s hard to beat.
Let’s keep exploring new ways to enjoy this delightful homemade treat and make the most of every batch we craft.
Frequently Asked Questions
What ingredients do I need to make currant syrup at home?
You need fresh red currants, granulated sugar, water, lemon juice, and optionally a vanilla bean or cinnamon stick for extra flavor.
What equipment is essential for making currant syrup?
A heavy-bottomed saucepan, fine-mesh strainer or cheesecloth, wooden spoon or silicone spatula, measuring cups and spoons, sterilized glass jars or bottles, and a ladle.
How do I prepare red currants before making syrup?
Rinse them thoroughly, remove stems, and discard any damaged berries to ensure the best flavor and quality.
How long do I need to cook the currant syrup?
Simmer the mixture for about 15-20 minutes over medium heat, stirring regularly until the syrup thickens and the currants release their juices.
How do I test if the currant syrup is done?
Look for a richly sweet and tart flavor, a smooth texture, and use spoon or temperature tests to confirm proper thickness.
Why is straining the syrup important?
Straining removes seeds and pulp, ensuring a smooth, clear syrup with a vibrant color and fresh taste.
How should I store homemade currant syrup?
Store in sterilized, airtight glass containers in the refrigerator for up to a month, or freeze for longer storage to maintain freshness.
What are some serving ideas for currant syrup?
Drizzle over pancakes and waffles, mix into sparkling water or lemonade, use as a dessert topping, or glaze roasted meats.
Can currant syrup be made ahead of time?
Yes, make it in small batches, cool completely, then bottle and store properly to keep it fresh and flavorful.
What should I do if my syrup is too runny or too thick?
If too runny, simmer longer to thicken; if too thick or crystallized, gently warm and stir to smooth it out.
How do I prevent my syrup from becoming cloudy?
Avoid pressing the pulp too hard during straining and use clean, sterilized containers to maintain clarity.
What causes a sour or off flavor in currant syrup?
Using overripe or damaged berries, improper cooking times, or poor storage can affect flavor—use fresh ingredients and follow guidelines closely.