
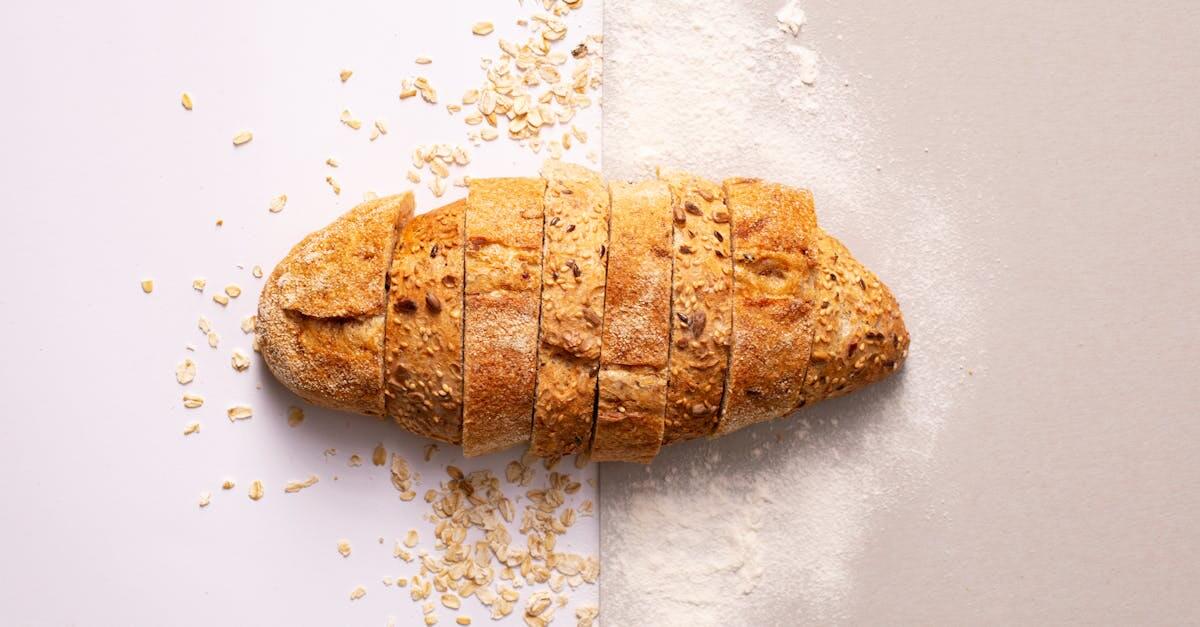
Corsica bread captures the rustic charm of the Mediterranean island with its simple ingredients and hearty texture. This traditional bread has a crisp crust and a soft, airy crumb that makes it perfect for everything from sandwiches to dipping in olive oil. Its roots run deep in Corsican culture where baking bread is a cherished daily ritual.
We love how this recipe brings a taste of Corsica right into our kitchen. It’s straightforward to make and uses basic pantry staples, yet delivers authentic flavor and that satisfying homemade touch. Whether you’re new to artisan bread or a seasoned baker, this Corsica bread recipe will quickly become a favorite. Let’s dive in and bake a loaf that’s as warm and inviting as the island itself.
Corsica Bread Recipe
To master the art of Corsica Bread, we follow a precise method that highlights its rustic texture and authentic flavor. This recipe combines simple ingredients for a crisp crust and tender crumb that define this traditional bread.
Ingredients
- 4 cups (480 g) all-purpose flour, sifted
- 1 ½ cups (360 ml) warm water (around 105°F / 40°C)
- 2 tsp active dry yeast
- 1 ½ tsp salt
- 1 tbsp olive oil
Step-by-Step Instructions
- Activate the Yeast
In a small bowl, combine the warm water and active dry yeast. Stir gently then let it sit for 5–10 minutes until foamy. This ensures our yeast is live and ready to create that perfect rise.
- Mix Dry Ingredients
In a large mixing bowl, blend the sifted flour and salt. Salt not only enhances flavor but strengthens the dough network.
- Combine Wet and Dry
Create a well in the center of the flour mixture and pour in the activated yeast water and olive oil. Stir with a wooden spoon until it forms a rough dough.
- Knead the Dough
Turn the dough onto a floured surface and knead vigorously for about 10 minutes. The dough should become smooth and elastic, which is crucial for developing the structure beneath the crust.
- First Rise
Place the dough ball in a lightly oiled bowl. Cover it with a clean kitchen towel or plastic wrap. Let it rise in a warm place for 1 to 1.5 hours, or until doubled in size.
- Shape the Loaf
Gently deflate the dough. Shape it into an oval or round loaf depending on your preference. Place the shaped dough on a parchment-lined baking sheet.
- Second Rise
Cover and let the loaf rise again for 30–45 minutes. This final proofing will ensure an open crumb and light texture.
- Prepare for Baking
Preheat your oven to 450°F (230°C). Place a shallow pan of water at the bottom of the oven to generate steam. This moisture helps create the crispy crust Corsica Bread is known for.
- Bake
Using a sharp knife or lame, score the top of the loaf with 2 to 3 diagonal slashes. Bake for 25–30 minutes. The crust should turn a deep golden brown, and the bread will sound hollow when tapped on the bottom.
- Cool
Transfer the bread to a wire rack. Allow cooling for at least 1 hour to finish setting the crumb and avoid sogginess.
Baking Summary Table
| Step | Temperature/Time | Key Detail |
|---|---|---|
| Activate Yeast | 105°F / 40°C, 5–10 minutes | Yeast foams, confirming activation |
| First Rise | Room temp, 1 to 1.5 hours | Dough doubles in size |
| Second Rise | Room temp, 30–45 minutes | Dough puffs up for light texture |
| Bake | 450°F / 230°C, 25–30 minutes | Use steam for crust |
| Cool | At least 1 hour | Set crumb and crust balance |
“The magic of Corsica Bread lies in patience; each rise builds the flavor and texture uniquely.”
By following these detailed steps we can recreate the rustic allure and signature texture of Corsica Bread right in our kitchens. Let’s enjoy the rewarding process of making bread that offers more than nourishment—it brings tradition to the table.
Ingredients
To craft authentic Corsica bread with its signature crisp crust and tender crumb, we need to gather the following essential ingredients, each playing a crucial role in achieving the perfect texture and flavor.
- 4 cups (480g) all-purpose flour, plus extra for dusting
- 1 ½ teaspoons salt to enhance the natural flavors
- 2 teaspoons active dry yeast to activate the rise
- 1 ½ cups (360ml) warm water at 105-110°F (40-43°C) for optimal yeast activation
- 1 tablespoon olive oil for subtle richness and softness
Ingredient Specifications Table
| Ingredient | Quantity | Role in Recipe |
|---|---|---|
| All-purpose flour | 4 cups (480g) | Provides structure and body |
| Salt | 1 ½ teaspoons | Enhances flavor |
| Active dry yeast | 2 teaspoons | Leavens the bread, creates rise |
| Warm water | 1 ½ cups (360ml) | Activates yeast, hydrates dough |
| Olive oil | 1 tablespoon | Adds moisture and tenderness |
We recommend using fresh active dry yeast to ensure a vigorous rise. The warm water temperature is pivotal; too hot and it will kill the yeast, too cold and it may not activate properly.
By assembling these simple yet vital ingredients, we set the foundation for a hearty loaf, echoing the traditional character of Corsica bread.
Equipment Needed
To make authentic Corsica bread successfully, having the right equipment is essential. Each tool plays a vital role in achieving the perfect texture and crust that this rustic bread is known for. Below is a checklist of what we need to gather before starting:
- Large mixing bowl
Ideal for combining and kneading the dough comfortably.
- Measuring cups and spoons
For precise measurement of flour, yeast, salt, and liquids.
- Digital kitchen scale (optional)
Helps ensure exact ingredient weights for consistent results.
- Wooden spoon or dough scraper
Useful for mixing the ingredients initially and handling sticky dough.
- Clean kitchen towel or plastic wrap
To cover the dough while it rises, maintaining moisture and warmth.
- Proofing basket or bowl lined with a floured cloth
Encourages the dough to hold its shape during the second rise.
- Baking stone or heavy-duty baking sheet
Provides even heat distribution for a crisp crust.
- Oven thermometer (optional but recommended)
Ensures the oven is at the right temperature for baking.
- Sharp serrated bread knife
For slicing the finished loaf cleanly without crushing it.
Equipment Summary Table
| Equipment | Purpose | Notes |
|---|---|---|
| Large Mixing Bowl | Mixing & kneading dough | Sturdy and spacious |
| Measuring Cups/Spoons | Accurate measurement | Use for dry and wet ingredients |
| Digital Kitchen Scale | Precise ingredient weighing | Optional but ideal for consistency |
| Wooden Spoon/Dough Scraper | Combining & handling sticky dough | Durable and easy to clean |
| Kitchen Towel/Plastic Wrap | Covering dough during fermentation | Retains moisture and warmth |
| Proofing Basket/Lined Bowl | Shaping dough during final rise | Flour cloth prevents sticking |
| Baking Stone/Sheet | Baking surface for crust development | Preheat before baking |
| Oven Thermometer | Verifying oven temperature | Ensures optimal baking heat |
| Serrated Bread Knife | Slicing bread after baking | Clean cuts preserving crumb texture |
Tip: Using a baking stone can dramatically improve your Corsica bread’s texture and crust by mimicking a traditional stone oven’s heat. If you don’t own one, preheating a heavy baking sheet works well as an alternative.
Having all of these tools ready before we begin streamlines our baking process and sets us up for success in crafting this iconic Corsica bread with its signature crispy crust and tender crumb.
Prep Work
Before we dive into baking our authentic Corsica bread, proper Prep Work sets the foundation for a perfectly textured and flavorful loaf. This stage ensures the dough develops the ideal structure and the yeast activates correctly for optimal rise.
Preparing the Dough
We begin by measuring all ingredients precisely. Using a digital kitchen scale helps maintain accuracy, especially for flour and water—key for the bread’s consistency.
- Combine the all-purpose flour and salt in a large mixing bowl.
- Gradually add the warm water and olive oil while mixing with a wooden spoon or dough scraper.
- Mix just until ingredients come together, then transfer to a lightly floured surface.
- Knead the dough for about 8-10 minutes until it becomes smooth and elastic.
- Form the dough into a ball and place it in an oiled bowl, turning once to coat all sides. Cover with a clean kitchen towel or plastic wrap.
This kneading stage develops gluten, contributing to the bread’s signature crisp crust and soft crumb.
Activating the Yeast
Activating the yeast is a critical step for proper fermentation and rise.
- Heat water to approximately 105°F-110°F (40°C-43°C); this temperature range is warm enough to wake the yeast without killing it.
- In a small bowl, sprinkle the active dry yeast over the warm water.
- Let it sit undisturbed for 5 to 10 minutes.
- The mixture should become foamy and bubbly, indicating the yeast is alive and active.
| Step | Detail | Notes |
|---|---|---|
| Water Temperature | 105°F to 110°F (40°C to 43°C) | Use a thermometer for accuracy |
| Yeast Activation Time | 5 to 10 minutes | Wait for foam to confirm activation |
| Yeast Type | Active dry yeast | Use fresh yeast for best results |
“The foamy yeast signifies a healthy start for our Corsica bread dough, ensuring a rich, flavorful rise.“
Once activated, we combine the yeast mixture into our flour blend, beginning the fermentation that will give our Corsica bread its traditional rustic charm.
Directions
Follow these clear and precise steps to craft our authentic Corsica bread with its signature crisp crust and soft crumb. Patience and attention to detail during each stage will ensure the best results.
Mixing the Ingredients
- In a large mixing bowl, combine 3 1/2 cups (440g) all-purpose flour, 2 tsp salt, and 1 packet (2 1/4 tsp) active dry yeast.
- Gradually add 1 1/2 cups (360 ml) warm water (95°F–105°F) while stirring with a wooden spoon or dough scraper. The water temperature must be warm, not hot, to activate the yeast effectively.
- Add 2 tbsp olive oil and continue mixing until the ingredients come together into a shaggy dough.
- Transfer the dough onto a lightly floured surface and knead for about 8–10 minutes until the dough is smooth, elastic, and slightly tacky.
Tip: Kneading develops gluten which is essential for the bread’s characteristic chewy texture.
| Ingredient | Measurement | Note |
|---|---|---|
| All-purpose flour | 3 1/2 cups (440g) | Sifted or unbleached preferred |
| Salt | 2 tsp | Adds flavor |
| Active dry yeast | 2 1/4 tsp (1 packet) | Fresh and not expired |
| Warm water | 1 1/2 cups (360 ml) | 95°F-105°F for proper activation |
| Olive oil | 2 tbsp | Enhances softness and flavor |
First Rise
- Lightly oil a large bowl and place the dough inside, turning it to coat with oil.
- Cover the bowl tightly with plastic wrap or a clean kitchen towel.
- Let the dough rise in a warm, draft-free area for 1 to 1 1/2 hours or until it has doubled in size.
“Patience during this stage breeds depth of flavor and opens the crumb structure.”
Shaping the Dough
- Gently punch down the dough to release excess air.
- Turn it out onto a lightly floured surface.
- Shape the dough into a round boule or an elongated oval to reflect the traditional Corsica bread shape.
- Place the shaped dough seam-side down in a proofing basket or on a parchment-lined baking sheet if you don’t have one.
Second Rise
- Cover the shaped dough loosely with a kitchen towel.
- Allow it to rise for 45 minutes to 1 hour until it nearly doubles again.
- During this time, preheat the oven to 450°F (230°C) with a baking stone or heavy-duty baking sheet inside to heat thoroughly.
Baking the Bread
- Score the top of the dough with a sharp serrated knife to allow for expansion.
- Slide the dough onto the preheated baking stone or baking sheet.
- Quickly place a shallow pan with water on the bottom rack of the oven to create steam for a crispy crust.
- Bake for 25 to 30 minutes until the bread is golden brown and sounds hollow when tapped on the bottom.
- Remove the bread and cool on a wire rack for at least 1 hour before slicing.
Remember: The steam and high initial oven temperature are key to achieving the rustic crisp crust typical of Corsica bread.
Tips for Perfect Corsica Bread
To achieve the authentic texture and flavor of Corsica Bread, keep these essential tips in mind throughout the baking process.
1. Use Fresh, High-Quality Ingredients
The foundation of perfect Corsica Bread begins with fresh ingredients. Always use:
- Fresh active dry yeast for reliable fermentation.
- High-grade all-purpose flour or bread flour for optimal gluten development.
- Pure olive oil to enhance flavor and improve crumb softness.
2. Water Temperature Is Critical for Yeast Activation
Activate yeast in water heated between 105°F and 110°F. Water outside this range may kill the yeast or slow fermentation.
| Water Temperature | Outcome |
|---|---|
| Below 105°F | Slow or no yeast activation |
| 105°F – 110°F | Optimal yeast activation |
| Above 115°F | Yeast killed |
3. Kneading Technique Develops the Crust and Crumb
Knead the dough for 10 to 12 minutes until it is smooth, elastic, and slightly tacky but not sticky. This step:
- Develops the gluten network.
- Creates the crispy crust and soft crumb that define Corsica bread.
4. Be Patient During Proofing
Allow the dough to rise twice:
- First Rise: Let the dough double in size in a warm, draft-free area (about 1 to 1.5 hours).
- Second Rise: After shaping, allow the dough to rise again for 45 to 60 minutes.
Remember, patience here deeply impacts flavor and texture. Do not rush the rising times.
5. Create Steam for a Crispy Crust
To achieve the iconic crisp crust:
- Place a shallow pan with hot water on the oven bottom during the first 10 minutes of baking.
- Alternatively, spray the oven walls with water immediately after placing the dough inside.
“Steam keeps the dough surface moist allowing for maximum oven spring and a beautifully crisp crust.”
6. Scoring the Dough for Controlled Expansion
Score the dough with a sharp serrated knife just before it goes into the oven. This:
- Helps control expansion.
- Adds a rustic appearance typical of Corsica bread.
7. Use a Baking Stone or Heavy-Duty Baking Sheet
Preheat a baking stone or heavy sheet in the oven to 450°F. Bake the bread on this hot surface for even heat distribution and a superior crust texture.
| Equipment | Purpose | Notes |
|---|---|---|
| Baking stone | Even heat and crispy crust | Preheat for at least 30 minutes |
| Serrated bread knife | Accurate scoring | Use fresh and sharp blade |
| Shallow water pan | Generate steam | Add water as oven preheats |
8. Let the Bread Cool Completely Before Slicing
Cooling allows the crumb to set. Slice the bread too soon and it will be gummy inside. Wait at least one hour before cutting.
By applying these tips carefully, we ensure our Corsica Bread emerges with its signature rustic charm, crispy crust, and soft, flavorful crumb every time.
Storing and Serving Suggestions
To enjoy our Corsica bread at its best, proper storage and creative serving are essential. Let’s explore how we can keep this rustic loaf fresh and make the most of its distinctive flavor and texture.
Storing Corsica Bread
Freshness is key to preserving the crisp crust and tender crumb of our bread. Follow these steps to store it properly:
- Short-term storage (1-2 days):
Wrap the cooled loaf loosely in a clean kitchen towel or parchment paper. Store it at room temperature in a bread box or a cool, dry place. This method helps retain the crust’s crunch while preventing the crumb from drying out.
- Medium-term storage (up to 1 week):
Place the bread in a breathable paper bag inside an airtight container to balance moisture retention and crust preservation. Avoid plastic bags unless placed in the freezer, as they encourage sogginess.
- Freezing for long-term storage:
Slice the bread before freezing for convenience. Wrap slices tightly in plastic wrap or aluminum foil, then place them in a freezer-safe zip-lock bag. To thaw, leave slices at room temperature or toast directly from frozen to revive the crustiness.
| Storage Duration | Method | Key Tip |
|---|---|---|
| 1-2 days | Wrapped in kitchen towel | Retains crispy crust |
| Up to 1 week | Paper bag inside airtight box | Balances moisture & crunch |
| Several months | Sliced, wrapped, frozen | Toast frozen slices to refresh texture |
Serving Suggestions for Corsica Bread
Our Corsica bread offers a versatile base that complements a variety of dishes. Here are some ways to serve it to enhance every meal:
- Classic Toast with Olive Oil and Herbs:
Lightly toast slices, then brush with high-quality extra virgin olive oil. Sprinkle with fresh herbs like rosemary or thyme and a pinch of sea salt for a simple, authentic Corsican treat.
- Accompaniments for Cheese and Charcuterie Boards:
Serve Corsica bread alongside strong cheeses such as brocciu or aged roccou and cured meats like figatellu or lonzu. The bread’s crusty exterior and soft crumb provide the perfect contrast to rich flavors.
- Hearty Sandwich Base:
Use thick slices to build sandwiches stuffed with grilled vegetables, cured meats, or tangy mustard. The bread’s structure holds fillings without becoming soggy.
- Rustic Bruschetta:
Top toasted slices with diced tomatoes, garlic, olives, and a drizzle of olive oil for a vibrant appetizer.
- Soup and Stew Companion:
Tear chunks of warm bread to dip into hearty Corsican soups or stews. The bread absorbs flavors while maintaining a satisfying chew.
Additional Tips
- Always allow the bread to cool completely before wrapping to prevent moisture buildup that softens the crust.
- To refresh stale bread, mist the loaf lightly with water and warm it in an oven at 350°F (175°C) for 10 minutes.
- Pair your bread with traditional Corsican ingredients to create an authentic dining experience and celebrate the island’s culinary heritage.
By following these storage and serving suggestions, we make sure every slice of our Corsica bread remains a delicious celebration of rustic French baking.
Conclusion
Making Corsica bread at home lets us connect with a rich culinary tradition while enjoying a truly satisfying baking experience. With simple ingredients and a bit of patience, we can create a loaf that boasts a crisp crust and tender crumb, perfect for any meal.
By following the steps carefully and using the right tools, we ensure each batch turns out just right. Whether serving it fresh or storing it for later, this bread brings a rustic touch to our table that’s hard to beat.
Embracing this recipe means more than baking bread—it means celebrating the flavors and heritage of Corsica in our own kitchens.
Frequently Asked Questions
What is Corsica bread, and why is it special?
Corsica bread is a traditional rustic bread from Corsica, known for its crisp crust and soft crumb. It reflects Corsican culture and culinary heritage, making it a favorite for its authentic flavor and versatility.
What are the main ingredients in Corsica bread?
The key ingredients include all-purpose flour, salt, active dry yeast, warm water, and olive oil. Each contributes to the bread’s texture, flavor, and fermentation process.
How do I activate yeast for Corsica bread?
Use warm water (about 100°F or 38°C) to dissolve the yeast and let it sit for 5-10 minutes until foamy. This ensures healthy fermentation.
What equipment is needed for making Corsica bread?
Essential tools include a large mixing bowl, measuring cups/spoons, a wooden spoon or dough scraper, proofing basket, baking stone or heavy-duty baking sheet, and a serrated bread knife.
How long should I let the dough rise?
The dough should rise twice: the first rise until doubled in size (about 1-2 hours) and the second rise after shaping for 45-60 minutes to develop the texture and flavor.
How do I get a crispy crust on Corsica bread?
Create steam in the oven during baking and score the dough before placing it inside to allow controlled expansion and a crisp crust.
Can beginners make Corsica bread successfully?
Yes, the recipe is straightforward, using simple ingredients and clear steps, making it perfect for both novice and experienced bakers.
How should I store Corsica bread to keep it fresh?
Wrap the cooled loaf in a kitchen towel and store at room temperature for short-term. For longer storage, use a paper bag inside an airtight container or freeze sliced bread.
What are some serving suggestions for Corsica bread?
Enjoy it with olive oil and herbs, use it in sandwiches, or serve alongside cheese and charcuterie boards for a traditional Corsican experience.
Why is patience important in making Corsica bread?
Patience during proofing allows the dough to develop gluten and flavor fully, resulting in an authentic texture and taste essential to Corsica bread.