
Cloudberry jelly is a delightful treat that brings a taste of the Nordic wilderness right to our table. These rare amber berries grow in the Arctic and subarctic regions, prized for their unique sweet-tart flavor and vibrant golden color. Making cloudberry jelly allows us to capture this distinct taste and enjoy it year-round.
This recipe is simple yet rewarding, perfect for anyone looking to add a touch of elegance to their breakfast or dessert spread. Whether spread on toast, paired with cheese, or used as a glaze, cloudberry jelly offers a burst of flavor that’s both refreshing and rich. Let’s dive into creating this exquisite jelly and savor a true taste of nature’s hidden gems.
Ingredients
To create our vibrant Cloudberry Jelly, we focus on a short list of quality ingredients that highlight the unique flavor of these rare berries. Each component plays a crucial role in balancing sweetness and acidity while preserving the jelly’s natural aroma and texture.
- Fresh or frozen cloudberries – 4 cups (ensure they are ripe and soft for easier cooking)
- Granulated sugar – 3 cups (adjustable to taste, but essential for proper gel formation)
- Lemon juice – 2 tablespoons (freshly squeezed for bright acidity and to enhance gel setting)
- Pectin powder – 1 tablespoon (helps achieve the perfect jelly consistency)
| Ingredient | Quantity | Purpose |
|---|---|---|
| Cloudberries | 4 cups | Main fruit, provides flavor and color |
| Granulated sugar | 3 cups | Sweetens and preserves the jelly |
| Lemon juice | 2 tablespoons | Adds acidity, improves gel setting |
| Pectin powder | 1 tablespoon | Ensures desired jelly texture |
“The purity of ingredients is key to reflecting the delicate, tart-sweet flavor of cloudberries in our jelly.“
Using these ingredients together guarantees a smooth, flavorful jelly with that signature vibrant orange-gold hue, perfect for spreading or enhancing your favorite dishes.
Equipment Needed
To make our Cloudberry Jelly Recipe with precision and ease, we rely on a straightforward set of essential tools. These ensure perfect texture, flavor balance, and safe handling throughout the cooking and preserving process.
Here is the detailed list of equipment needed:
- Large saucepan or jam pot: Choose a heavy-bottomed pan to prevent scorching while cooking the cloudberries and sugar mixture evenly.
- Fine mesh strainer or food mill: To remove seeds and achieve the smooth, clear jelly texture.
- Measuring cups and spoons: Accurate measurements of ingredients like sugar, lemon juice, and pectin are critical for consistent results.
- Wooden spoon or heat-resistant spatula: Ideal for stirring the jelly mixture during cooking without damaging cookware.
- Candy thermometer: Helps monitor the mixture temperature for proper setting of the jelly.
- Sterilized jars with lids: For safely storing the finished cloudberry jelly and preserving freshness.
- Jar funnel: Makes transferring the hot jelly into jars cleaner and reduces spillage.
- Ladle: For scooping the cooked jelly into jars efficiently.
- Clean kitchen towels or pot holders: To handle hot jars and pots safely.
- Timer: Assists in precise cooking times for perfect jelly consistency.
Equipment Overview Table
| Equipment | Purpose | Tips |
|---|---|---|
| Large saucepan / jam pot | Cooking cloudberries and sugar | Use heavy-bottomed to avoid burning |
| Fine mesh strainer / food mill | Straining seeds for smooth jelly | Press gently to extract juice without pulp |
| Measuring cups & spoons | Measuring ingredients accurately | Level off for best precision |
| Wooden spoon / spatula | Stirring the jelly mixture | Heat-resistant recommended |
| Candy thermometer | Monitoring cooking temperature | Crucial for hitting jelly setting point |
| Sterilized jars & lids | Storing finished jelly | Sterilize jars before use for safety |
| Jar funnel | Transferring jelly into jars | Prevents mess and waste |
| Ladle | Scooping jelly | Use with steady grip |
| Kitchen towels / pot holders | Handling hot items safely | Essential for avoiding burns |
| Timer | Keeping track of cooking time | Set alarms for cooking stages |
By preparing these tools in advance, we set ourselves up for success to create a luscious, perfectly set cloudberry jelly that captures the vibrant golden essence and tart-sweet taste of these rare Arctic berries. Each piece of equipment plays a pivotal role in achieving that flawless jelly texture and preserving quality for us to enjoy all year round.
Prep Work
Before we start crafting our cloudberry jelly, it’s crucial to prepare both the berries and our jars properly. This ensures a clean, flavorful result with a perfect set.
Washing and Preparing Cloudberries
First, we gently rinse 4 cups of fresh or frozen cloudberries under cool running water. Pat them dry using a clean kitchen towel to avoid extra moisture that could affect the jelly’s consistency. If we use frozen cloudberries, we let them thaw completely at room temperature to release their natural juices fully.
Next, we inspect the berries carefully, removing any stems, leaves, or damaged fruit. This step is essential to maintain the jelly’s pure flavor and vibrant amber color. After cleaning, we place the prepared cloudberries in a large saucepan ready for cooking.
| Step | Action | Purpose |
|---|---|---|
| Rinse | Use cool running water | Remove dirt and impurities |
| Dry | Pat with a clean towel | Prevent extra moisture |
| Thaw (if frozen) | Leave at room temperature | Ensure even cooking and juice release |
| Inspect and Remove Debris | Pick out stems, leaves, bad fruit | Preserve jelly flavor and appearance |
Sterilizing Jars and Lids
Proper sterilization prevents contamination and helps preserve our cloudberry jelly safely. We start by washing jars and lids with warm soapy water, then rinsing thoroughly.
For sterilization, place jars upright in a large pot of boiling water for 10 minutes. We keep them submerged and covered with boiling water during this time. Afterward, we carefully remove the jars with tongs and place them upside down on a clean kitchen towel to dry.
Simultaneously, we sterilize lids by placing them in a small pot of simmering (not boiling) water for 5 minutes. Avoid boiling the lids as this can damage their sealing compound.
| Item | Sterilization Method | Time | Notes |
|---|---|---|---|
| Jars | Boiling water immersion | 10 minutes | Keep submerged and covered |
| Lids | Simmering water immersion | 5 minutes | Do not boil to preserve seal |
Once jars and lids are sterilized, we keep them warm until ready to fill. This step ensures the jars won’t crack when hot jelly is added and improves the vacuum seal during cooling.
Cooking Instructions
Follow these precise steps to transform fresh cloudberries into a vibrant cloudberry jelly with a perfect balance of sweet and tart flavors. Our approach ensures clarity and ease throughout the cooking process.
Making the Cloudberry Jelly
- Prepare the Cloudberries:
Place the 4 cups of fresh or frozen cloudberries into a large saucepan or jam pot.
- Heat the Berries:
Gently warm the cloudberries over medium heat, mashing them lightly with a wooden spoon or heat-resistant spatula until they release their juice—approximately 5 minutes.
- Extract the Juice:
Pour the mashed berry mixture through a fine mesh strainer or food mill into a clean bowl to remove seeds and skins, pressing firmly to extract maximum juice.
- Combine Ingredients:
Return the cloudberry juice to the saucepan. To this, add the following:
| Ingredient | Quantity |
|---|---|
| Granulated sugar | 3 cups |
| Freshly squeezed lemon juice | 2 tablespoons |
| Pectin powder | 1 tablespoon |
- Cook the Mixture:
Stir the mixture constantly over medium heat until the sugar dissolves completely.
- Boil and Monitor:
Increase the heat to bring the mixture to a rolling boil. Attach a candy thermometer to the side of the saucepan to closely monitor temperature.
- Add Pectin at the Right Time:
Sprinkle the pectin powder evenly into the boiling mixture. Whisk briskly to dissolve completely and maintain a steady boil for 1 minute to activate the gelling process.
Checking the Jelly Consistency
- Temperature Check:
The jelly should reach 220°F (104°C)—the gel point for most fruit jellies.
- Plate Test:
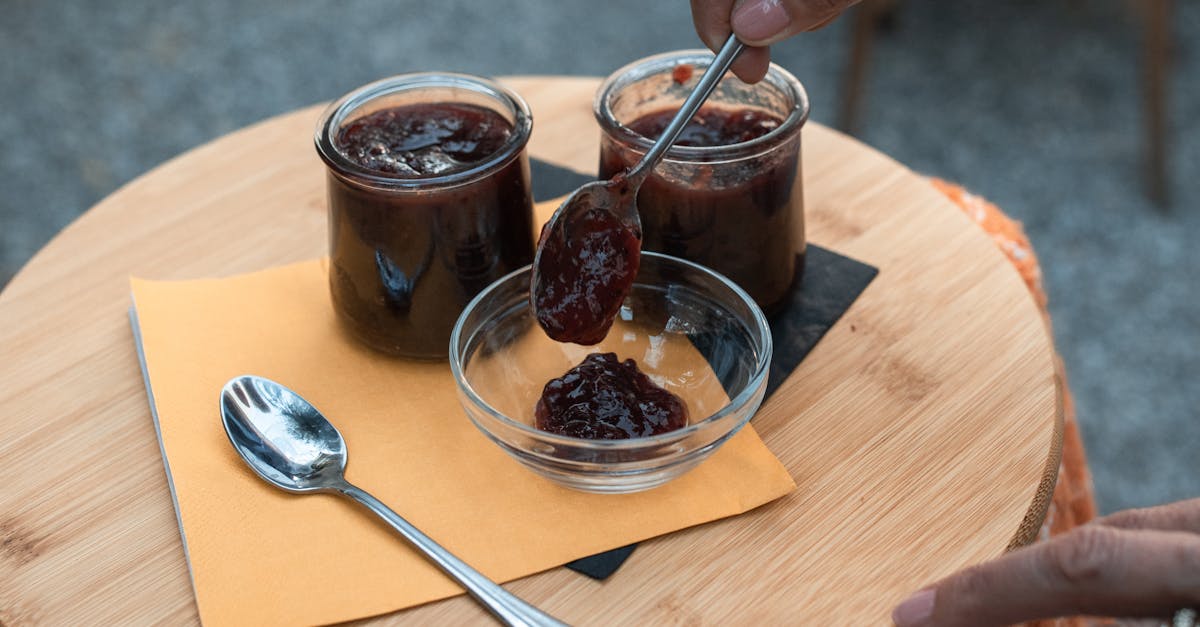
Place a cold plate in the freezer before starting. After 1 minute of boiling, spoon a small amount of jelly onto the chilled plate. Let it sit for 2 minutes, then gently push with your finger. If the surface wrinkles without running, the jelly is ready.
- Adjust if Necessary:
If the jelly is too runny, continue boiling for an additional 1–2 minutes and test again.
- Remove from Heat:
Once the desired consistency is achieved, promptly remove the saucepan from heat to prevent overcooking.
- Jar the Jelly:
Use a jar funnel and ladle to pour the hot cloudberry jelly into sterilized jars, leaving 1/4 inch headspace. Wipe rims clean to ensure a proper seal.
- Seal and Cool:
Secure lids tightly and place jars upside down for 5 minutes for sterilization. Then turn upright and cool completely at room temperature.
By carefully monitoring temperature and texture with these methods, we achieve a luscious cloudberry jelly bursting with natural richness and a perfect set every time.
Canning and Storing
Proper Canning and Storing are essential to preserve the vibrant flavor and texture of our cloudberry jelly. Following these steps ensures long-lasting freshness and safety for enjoying this unique treat year-round.
Filling the Jars
We start by filling the sterilized jars with hot cloudberry jelly, leaving the right amount of headspace. This step is crucial to allow for jelly expansion during processing and avoid overflow.
- Use a jar funnel to pour the jelly neatly and reduce spills.
- Leave 1/4 inch (0.6 cm) of headspace at the top of each jar.
- Remove air bubbles by running a non-metallic spatula around the inside edge.
- Wipe the rim of the jar with a clean damp cloth to ensure a clean sealing surface.
- Place the sterilized lids on jars immediately to maintain hygiene.
| Step | Detail |
|---|---|
| Headspace | 1/4 inch (0.6 cm) |
| Jelly Temperature | Hot (180°F / 82°C) |
| Tools for Filling | Jar funnel, ladle |
| Rim Cleaning | Damp cloth |
Proper Sealing and Storage Tips
Sealing and storing correctly protects our cloudberry jelly’s delicate flavor and prevents spoilage.
- Secure lids with sterilized screw bands, tightened finger-tight (not overly tight).
- Process jars in a boiling water bath for 10 minutes to ensure airtight sealing.
- Allow jars to cool undisturbed on a towel or cooling rack.
- Confirm proper seals—lid should be concave and not flex up/down when pressed.
- Label each jar with the date for easy tracking of freshness.
- Store sealed jars in a cool, dark, and dry place such as a pantry or cellar.
- Refrigerate after opening and consume within 3 weeks for best flavor.
| Sealing Step | Time/Temperature |
|---|---|
| Boiling Water Bath Processing | 10 minutes |
| Jelly Cooling Time | Until room temperature |
| Storage Location | Cool, dark, dry place |
| After Opening Shelf Life | 3 weeks (refrigerated) |
By carefully following these Canning and Storing guidelines, our cloudberry jelly will remain perfectly fresh, beautifully textured, and ready to elevate our meals whenever we desire.
Serving Suggestions
Our Cloudberry Jelly boasts a unique sweet-tart flavor and a vibrant golden hue. To fully appreciate its remarkable taste and texture, consider the following serving ideas that transform everyday dishes into elegant delights.
Classic Breakfast Pairings
- Spread a generous layer of cloudberry jelly over warm, toasted buttery croissants or freshly baked English muffins.
- Dollop on creamy Greek yogurt or ricotta cheese for a flavorful, fruit-infused start to your day.
- Swirl into oatmeal or pancake batter just before cooking to infuse a subtle, fruity hint.
Elegant Dessert Enhancements
- Serve chilled with vanilla ice cream or panna cotta for a striking contrast between tartness and creaminess.
- Use as a glaze over cheesecakes or tarts to add a glossy, amber-gold finish and a burst of natural berry flavor.
- Pair with dark chocolate desserts such as brownies or mousse for complex layers of taste.
Savory and Cheese Pairings
- Accompany aged cheeses like sharp cheddar, blue cheese, or brie with a spoonful of cloudberry jelly on a rustic cheese board.
- Spread on gourmet sandwiches with roasted turkey or ham to introduce a delicate, fruity sweetness balancing savory notes.
- Use as a condiment for grilled meats such as pork or lamb, applying just before serving for a tangy glaze.
Cocktail and Beverage Ideas
- Stir into sparkling water or lemonade for a refreshing, naturally flavored drink.
- Mix with gin or vodka as a syrup in cocktails for a unique Arctic-inspired twist.
| Serving Idea | Recommended Pairings | Flavor Note |
|---|---|---|
| Breakfast | Croissants, yogurt, pancakes | Sweet-tart, bright |
| Dessert | Ice cream, cheesecake, chocolate | Creamy contrast, glossy finish |
| Cheese & Savory | Aged cheeses, sandwiches, grilled meats | Balanced sweet & savory |
| Beverages & Cocktails | Sparkling water, gin, vodka | Refreshing, fruity twist |
“The versatility of cloudberry jelly lets us explore both sweet and savory culinary creations. Its rich flavor and luscious texture make it a prized addition to our kitchen repertoire.”
Let’s embrace these serving suggestions to celebrate the unique charm of this rare Nordic treasure on every plate.
Tips and Variations for Cloudberry Jelly
Enhancing and customizing our cloudberry jelly experience is easy when we apply a few key tips and explore exciting variations. These adjustments help us tailor the jelly’s sweetness, texture, and flavor profile to complement a variety of dishes.
Tips for Perfect Cloudberry Jelly
- Use ripe cloudberries: Always choose fully ripe or perfectly thawed frozen cloudberries. Their natural tart and sweet balance sets the foundation for an exceptional jelly.
- Control sugar levels: Adjust the sugar quantity slightly to taste, but avoid reducing it too much as sugar is crucial for proper gel formation and preservation.
- Monitor cooking temperature: Keep an eye on the candy thermometer aiming for 220°F (104°C) to ensure proper setting without overcooking.
- Perform the plate test: Place a small amount of jelly on a cold plate and check if it wrinkles when pushed lightly — this confirms readiness.
- Remove air bubbles: Stir gently to minimize bubbles that cause cloudiness and use a ladle tip or spoon to pop those that form in jars before sealing.
- Allow complete cooling before sealing: This prevents condensation inside the jars which can lead to spoilage.
Variations to Elevate Cloudberry Jelly
| Variation | Description | Adjustments |
|---|---|---|
| Spiced Cloudberry Jelly | Add a warm spicy note by incorporating cinnamon sticks or whole cloves during cooking. | Simmer 1-2 cinnamon sticks or 3-4 cloves with the berries, removing before juicing. |
| Citrus-Enhanced Jelly | Brighten flavor by blending orange or lime zest with lemon juice for a zesty twist. | Use 1 tsp grated orange or lime zest alongside lemon juice. |
| Low-Sugar Option | Use pectin designed for low-sugar jams, keeping tartness intact without excess sweetness. | Substitute sugar with a low-calorie sweetener and follow low-sugar pectin instructions strictly. |
| Mixed Berry Jelly | Combine cloudberries with complementary berries such as raspberries or blueberries to add depth. | Reduce cloudberries to 2 cups and add 2 cups mixed berries, adjust sugar accordingly. |
| Herbal Infused Jelly | Steep fresh herbs like thyme or rosemary briefly in the berry mixture for subtle aromatic notes. | Add 1-2 sprigs during simmering then strain before jarring. |
Pro Tips for Storage and Serving
- Store sealed jars in a cool dark place for up to 12 months to preserve flavor and texture.
- Once opened refrigerate and consume within three weeks to enjoy optimal freshness.
- Experiment by pairing the jelly with soft cheeses such as brie or cream cheese for an elegant appetizer.
- Use cloudberry jelly as a glaze over roasted meats or desserts to add a beautiful amber sheen and tart contrast.
“Cloudberry jelly shines brightest when we balance sweetness with its natural tartness and respect its delicate aroma.“
By incorporating these tips and variations we enhance the unique qualities of cloudberry jelly, making it a versatile and cherished component in our culinary creations.
Conclusion
Making cloudberry jelly is a rewarding way to bring a unique Arctic flavor into our kitchens. With its vibrant color and perfect balance of sweet and tart, this jelly adds a special touch to any meal or treat. By following the right steps and using quality ingredients, we can create a delicious preserve that lasts and delights.
Exploring variations and serving ideas opens up even more possibilities to enjoy cloudberry jelly. Whether it’s a simple spread or a gourmet addition, this recipe invites us to savor nature’s hidden gems in every jar. Let’s embrace the process and enjoy the rich flavors that cloudberries offer year-round.
Frequently Asked Questions
What are cloudberries and where do they grow?
Cloudberries are rare amber-colored berries with a sweet-tart flavor, found mainly in Arctic and subarctic regions.
What ingredients do I need to make cloudberry jelly?
You need cloudberries, granulated sugar, freshly squeezed lemon juice, and pectin powder to balance flavor and texture.
What equipment is essential for making cloudberry jelly?
Key tools include a large saucepan, strainer or food mill, measuring tools, wooden spoon, candy thermometer, sterilized jars with lids, ladle, and kitchen towels.
How do I prepare the cloudberries before cooking?
Rinse the berries under cool water, dry them thoroughly, and inspect for debris to ensure a pure flavor and color.
How do I know when the jelly is ready?
Use the plate test: place a small amount of jelly on a cold plate; if it wrinkles when pushed, it’s ready.
What’s the best way to store cloudberry jelly?
Store sealed jars in a cool, dark place. Once opened, refrigerate and consume within three weeks for optimal freshness.
Can I customize the flavor of cloudberry jelly?
Yes, you can add spices, citrus, reduce sugar, mix berries, or infuse herbs for different taste variations.
How can I serve cloudberry jelly?
It’s great on croissants, yogurt, ice cream, cheesecakes, with aged cheese, in sandwiches, or mixed into cocktails for a unique twist.