
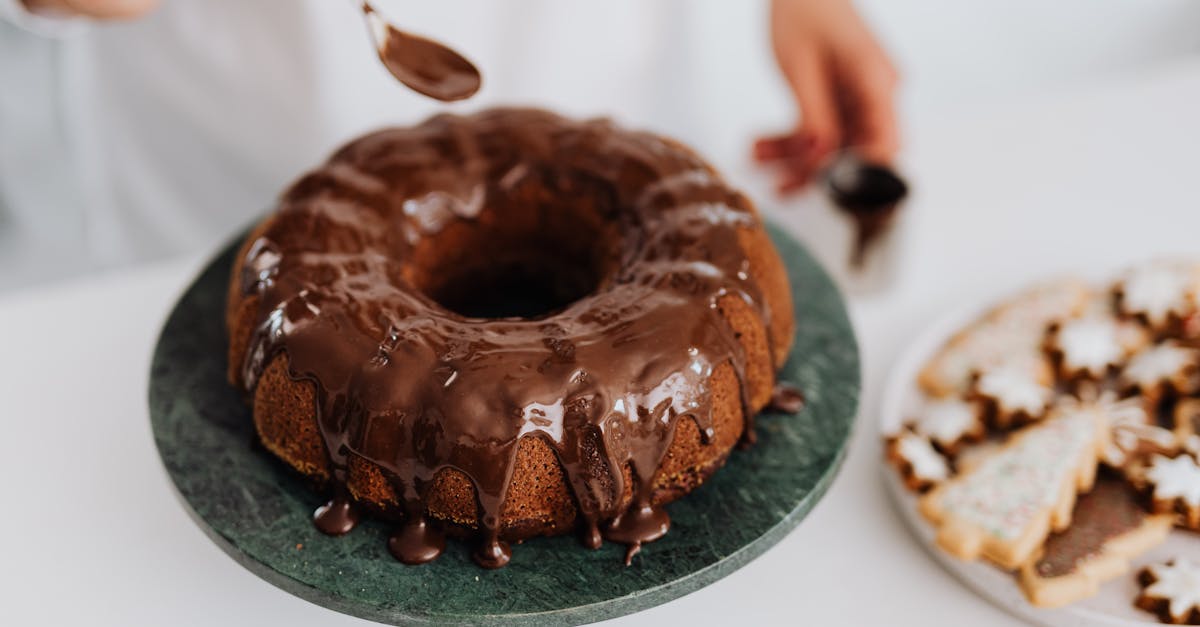
There’s something magical about the way a rich, glossy chocolate glaze transforms a simple biscotti into an irresistible treat. Whether we’re serving them alongside a steaming cup of coffee or gifting them during the holidays, this glaze takes our favorite crunchy cookies to a whole new level. It’s the perfect finishing touch that adds just the right amount of indulgence.
Chocolate Glaze For Biscotti Recipe
Creating a velvety chocolate glaze to coat or drizzle onto biscotti is simpler than you may think. This rich glaze enhances the crunchy texture of biscotti, adding a layer of luxurious sweetness that’s perfect for any occasion. Follow our step-by-step instructions to craft this decadent glaze effortlessly.
Ingredients
To create the perfect chocolate glaze, gather the following:
- 1 cup semi-sweet chocolate chips or chopped semi-sweet chocolate
- 2 tablespoons unsalted butter
- 2 tablespoons heavy cream or whole milk
- 1 teaspoon pure vanilla extract
- A pinch of salt to enhance the flavor
Step-by-Step Instructions
- Prepare a double boiler:
- Fill a medium saucepan with 1–2 inches of water and bring it to a gentle simmer over medium heat.
- Place a heatproof bowl over the saucepan, ensuring the bottom does not touch the water.
- Melt the chocolate:
- Add the chocolate chips or chopped chocolate into the bowl. Stir continuously with a spatula to help it melt evenly.
- Incorporate the butter and cream:
- Once the chocolate has melted halfway, add the butter and heavy cream. Continue stirring until the mixture becomes smooth and glossy.
- Enhance with vanilla and salt:
- Remove the bowl from the heat and stir in the vanilla extract and a pinch of salt. This step deepens the flavor of the chocolate glaze.
- Cool slightly:
- Allow the glaze to cool for 2–3 minutes. It should still be warm and pourable but not too hot to handle.
- Dip or drizzle the biscotti:
- For dipping: Tilt the bowl to create a pool of glaze and dip one end of each biscotti. Let any excess drip off.
- For drizzling: Use a spoon or piping bag to create thin streams of glaze over the biscotti.
- Set the glaze:
- Place the glazed biscotti on a parchment-lined baking sheet. Leave them at room temperature for about 30 minutes or until the chocolate has hardened.
Quick Tip
If you wish to add a decorative touch, sprinkle crushed nuts, decorative sugar, or even shredded coconut onto the glaze before it sets.
Troubleshooting the Glaze
| Issue | Cause | Solution |
|---|---|---|
| Glaze too thick | Too much chocolate or cooled off | Add a teaspoon of warmed cream and mix thoroughly. |
| Glaze not setting | Humid environment or excessive cream | Chill the biscotti in the refrigerator for 10-15 minutes to firm the glaze. |
| Grainy texture | Overheated chocolate | Melt chocolate gently and stir constantly to prevent overheating. |
The chocolate glaze is now ready to enhance your biscotti, transforming them into a truly indulgent treat.
Ingredients
Creating the perfect chocolate glaze for biscotti requires a balance of rich flavors and smooth texture. Here is the lineup of carefully selected ingredients you’ll need to achieve that glossy finish and velvety consistency:
- 1 cup (170g) semi-sweet chocolate chips or chopped semi-sweet chocolate
- 2 tablespoons (28g) unsalted butter – Softened for easy melting
- 3 tablespoons (45ml) heavy cream – Ensures a creamy and glossy finish
- 1 teaspoon vanilla extract – For added depth of flavor
- Pinch of salt – Balances the sweetness perfectly
Each ingredient brings a unique quality to the glaze, ensuring a balance of flavors and texture that complements the crispy biscotti. Always use high-quality chocolate for the best results, as it serves as the base of this indulgent recipe.
Tools And Equipment
To achieve a perfectly smooth and glossy chocolate glaze for biscotti, having the right tools and equipment is crucial. Here’s a list of what we’ll need to create this delectable glaze and ensure a mess-free, enjoyable process:
Essential Tools
- Double Boiler or Heatproof Bowl with Saucepan:
For gently melting the chocolate without scorching, use a double boiler or place a heatproof bowl over a saucepan with simmering water.
- Silicone Spatula:
A heat-resistant spatula is ideal for stirring the ingredients to ensure a smooth, lump-free glaze.
- Whisk:
Helps in achieving a silky texture when combining the butter and cream with the melted chocolate.
- Baking Sheet or Tray:
Use this for arranging biscotti after glazing. Line it with parchment or wax paper for easy cleanup.
- Cooling Rack:
Needed to allow the glazed biscotti to set properly and prevent pooling of chocolate.
- Parchment or Wax Paper:
Place under the cooling rack to catch any drips from the glaze for effortless cleanup.
Optional, but Handy Tools
- Chocolate Dipping Fork or Fork:
A dipping tool makes it easier to coat biscotti evenly when immersing them in the glaze.
- Squeeze Bottle or Piping Bag:
For precise drizzling of glaze, these tools are great alternatives to dipping.
- Small Offset Spatula or Butter Knife:
Useful for smoothing out the glaze for an even coat.
Equipment Placement Checklist
To stay organized and improve workflow, here’s a table for an easy setup of our tools:
| Tool/Equipment | Purpose | Placement in Workspace |
|---|---|---|
| Double Boiler/Bowl | Melt the chocolate without burning | Left side of stove for easy stirring |
| Silicone Spatula | Stir the mixture for smooth texture | Beside double boiler |
| Baking Sheet + Parchment | Set glazed biscotti to dry | Center of workspace |
| Cooling Rack + Wax Paper | Allow chocolate to set and drip | Next to baking sheet |
| Whisk | Achieve a creamy and lump-free glaze | Beside mixing area |
Directions
Creating a luxurious chocolate glaze to coat biscotti is a methodical yet straightforward process. Let’s walk through the steps together to ensure a velvety-smooth, glossy finish that elevates these crunchy treats.
Prep
- Prepare the workspace: Cover a baking sheet with parchment paper and place a cooling rack on top. This setup ensures the excess glaze drips off neatly without mess.
- Gather tools and ingredients: Arrange all equipment, such as a heatproof bowl, whisk, and optional dipping fork, within easy reach. Ensure your biscotti is completely cooled to prevent melting the glaze.
- Chop the chocolate: If using a chocolate bar, chop it into small uniform pieces for even melting.
Make The Chocolate Glaze
- Set up a double boiler: Fill a saucepan with about 1 inch of water and bring it to a low simmer. Place a heatproof bowl over the saucepan, ensuring the bottom of the bowl does not touch the water.
- Melt the chocolate: Add 1 cup of semi-sweet chocolate (chopped or chips) to the bowl, stirring occasionally with a silicone spatula to ensure even melting.
- Incorporate butter and cream: Add 2 tablespoons of unsalted butter and ¼ cup of heavy cream to the melted chocolate. Stir continuously until the mixture is shiny and smooth.
- Enhance flavor: Add ½ teaspoon of vanilla extract and a pinch of salt to complement the chocolate’s richness. Whisk to combine fully.
- Check consistency: The glaze should be thick yet pourable. If it’s too thick, add a teaspoon of warm cream; if too thin, let it cool for a few minutes until it thickens slightly.
Applying The Glaze To Biscotti
- Dipping method: Hold each biscotti by one end and dip it halfway into the chocolate glaze. Rotate slightly to ensure an even coating. Gently tap the biscotti on the edge of the bowl to remove excess glaze.
- Drizzling method: Transfer the warm glaze to a squeeze bottle or use a fork to drizzle the chocolate over the biscotti in thin, decorative lines.
- Set the biscotti: Place the glazed biscotti on the cooling rack, ensuring they do not touch. Allow the chocolate to set at room temperature for about 1 hour or refrigerate for faster results.
| Step | Details |
|---|---|
| Prep | Assemble tools, line baking sheet, and ensure biscotti are cool. |
| Make Chocolate Glaze | Melt chocolate with butter and cream, then add flavorings for a smooth texture. |
| Apply Glaze to Biscotti | Dip or drizzle glaze, then allow it to set on a cooling rack. |
Make-Ahead Instructions
To ensure a seamless experience while preparing chocolate glaze for biscotti, we can easily make the glaze ahead of time. This method saves effort, especially when hosting gatherings or preparing treats for gifting. Here’s how to do it:
Preparing the Glaze in Advance
- Follow the recipe instructions to create the smooth, velvety chocolate glaze, ensuring it has the desired consistency.
- Allow the glaze to cool completely at room temperature before transferring. This step prevents condensation from forming, which can alter the texture.
- Store the glaze in an airtight container to maintain freshness. We recommend using a container with a tight seal to prevent air exposure.
Refrigeration Storage
- Place the airtight container in the refrigerator for up to 5 days. The cold environment ensures the glaze remains fresh and ready to use.
- Before using, bring the glaze back to room temperature to lose its firmness. A quick stir will help restore its glossy and smooth texture.
Freezing Option
- For long-term storage, freeze the chocolate glaze for up to 3 months. Use a freezer-safe, airtight container or a resealable freezer bag. Ensure you press out any excess air before sealing.
- Label the container with the date of preparation for easy tracking.
| Storage Method | Suitable Duration | Preparation Before Use |
|---|---|---|
| Refrigeration | Up to 5 days | Bring to room temperature, stir well |
| Freezing | Up to 3 months | Thaw overnight in the fridge, stir |
Reheating Tips
- If the stored glaze has solidified too much, gently reheat it.
- Use a double boiler to heat it slowly, stirring constantly to maintain its silky texture.
- Alternatively, warm in the microwave on low-power setting, stirring every 15 seconds to avoid overheating.
- Adjust the consistency if needed. Add a teaspoon of warm heavy cream or milk to thin it out slightly while reheating.
Tips For The Perfect Chocolate Glaze
Creating a perfect, glossy chocolate glaze requires attention to detail and a few smart techniques. Below, we’ve gathered some must-know tips to ensure your glaze not only looks stunning but also enhances the flavor and texture of your biscotti.
1. Choose High-Quality Chocolate
The star of your glaze is the chocolate, so using premium-quality semi-sweet or dark chocolate is crucial. Cheaper chocolates often lack the smooth melting properties, resulting in a grainy or dull finish. Look for chocolate with at least 60% cocoa content for a rich flavor and silky texture.
2. Maintain the Right Temperature
Melting techniques matter! Avoid overheating the chocolate as it can cause it to seize or scorch. Use a double boiler or a heatproof bowl set over simmering water to gently melt the chocolate. The chocolate should feel slightly warm to the touch—not hot.
3. Incorporate Fat for Shine
Adding unsalted butter or heavy cream not only improves the glaze’s flavor but also creates that beautiful, glossy finish. This small addition is key to achieving professional-looking results. Be sure to mix thoroughly until the fats are fully integrated.
4. Adjust Consistency Carefully
A chocolate glaze that’s too thick can overwhelm the biscotti, while one that’s too thin may not adhere well. If your glaze feels overly thick, stir in a teaspoon of warm cream or milk at a time. For a thinner glaze, add liquids slowly to avoid making it too runny.
5. Enhance with Flavorings
A few drops of pure vanilla extract or a pinch of sea salt elevate the chocolate’s flavor. For a creative twist, consider adding a splash of coffee liqueur, orange zest, or even a hint of almond extract to complement your biscotti.
6. Prep Your Workspace
Place parchment paper under a cooling rack to catch drips and make cleanup effortless. Keep all tools—such as tongs or a dipping fork—within reach for an efficient glazing process. Organized preparation saves time and minimizes mess.
7. Test Before Fully Dipping
Before glazing all your biscotti, test the consistency with just one piece. This allows you to adjust the thickness or flavor before committing to the entire batch. Patience here leads to a flawless presentation.
8. Work Quickly
Once the glaze is ready, work efficiently. Chocolate begins to harden as it cools, so dipping or drizzling your biscotti immediately ensures a smooth and even coating.
9. Set Properly
Allow the glazed biscotti to set completely on a cooling rack. For quicker results, place the rack in the refrigerator for 10-15 minutes. This helps the glaze firm up without losing its shine.
Troubleshooting Common Issues:
| Problem | Solution |
|---|---|
| Glaze is too thick | Stir in warm cream or milk, 1 teaspoon at a time, until the desired consistency is achieved. |
| Glaze is dull | Ensure chocolate is not overheated; incorporate butter or cream for added gloss. |
| Chocolate seizes | Add 1 tablespoon of warm cream or melted butter while gently stirring until smooth. |
| Mid-glazing hardening | Keep the bowl of glaze over a pot of warm water to retain fluidity. |
By following these expert tips, you’ll craft a chocolate glaze that’s velvety, shiny, and irresistibly flavorful, making every biscotti an indulgent experience.
Variations And Substitutions
Exploring Variations And Substitutions for our chocolate glaze ensures versatility for every taste preference and dietary need. We can adapt the classic recipe to create new flavor profiles or accommodate specific requirements without compromising that signature glossy finish. Here’s how:
1. Chocolate Options
The type of chocolate we use directly impacts the glaze’s flavor and texture. Experimenting with different chocolates can create exciting variations:
| Type of Chocolate | Flavor Notes |
|---|---|
| Dark Chocolate (70% cacao) | Rich, intense, and slightly bitter. Ideal for sophisticated flavor. |
| Milk Chocolate | Sweeter and creamier. Perfect for a milder option. |
| White Chocolate | Creamy and sweet with a buttery profile. A unique, decadent twist. |
| Vegan Chocolate | Dairy-free alternative. Choose high-quality brands for best results. |
For a more complex taste, we can even mix chocolates, such as semi-sweet and dark, to balance sweetness with deep cocoa flavors.
2. Dairy-Free and Vegan Adaptations
Making the chocolate glaze dairy-free or vegan-friendly is simple with the right substitutions:
- Butter Substitute: Swap unsalted butter with plant-based butter or coconut oil for a smooth finish.
- Heavy Cream Alternative: Replace heavy cream with coconut cream or soy-based cream for a similar velvety texture.
- Select vegan chocolate chips or bars to ensure no dairy content.
3. Sweetener Adjustments
If we prefer a less sweet glaze or need refined sugar-free options, adjust the sweetness:
- Bittersweet Chocolate Chips: Use darker chocolate with minimal added sugar.
- Natural Sweeteners: Incorporate maple syrup or agave nectar instead of vanilla extract for extra sweetness. Adjust the cream amount to maintain consistency.
- Sugar-Free Options: Use sugar-free chocolate or sweeten with monk fruit syrup for a low-carb version.
4. Flavor Enhancements
We can infuse exciting flavors into the glaze by experimenting with extracts and spices:
- Extracts: Switch vanilla extract with almond, orange, or peppermint extract for unique variations.
- Spices: Add a pinch of cinnamon, espresso powder, or even a dash of chili powder for a bold, warming kick.
- Liquor Additions: A teaspoon of coffee liqueur or orange liqueur can deepen the glaze’s flavor for adult indulgence.
5. Texture Tweaks and Topping Pairings
Enhancing the texture and complementing the glaze with toppings adds a delightful twist:
- Crunch Factor: Sprinkle crushed nuts, toasted coconut flakes, or seeds onto the glazed biscotti for added texture.
- Fruit Flavors: Drizzle the glaze over biscotti studded with dried fruits like cranberries or apricots to create a harmonious tasting experience.
- Salted Finish: For a gourmet touch, top the wet glaze with flaky sea salt.
6. Gluten-Free and Allergy Modifications
For those avoiding allergens, the chocolate glaze can still be enjoyed:
- Use certified gluten-free chocolate to avoid cross-contamination.
- Opt for nut-free toppings to ensure the biscotti are safe for nut allergy sufferers.
Conclusion
A beautifully crafted chocolate glaze can transform biscotti into a truly indulgent treat, perfect for any occasion. With the right ingredients, tools, and techniques, creating a smooth, glossy glaze becomes an enjoyable and rewarding process. Whether you’re dipping, drizzling, or experimenting with variations, the possibilities are endless.
By taking the time to prepare and personalize your glaze, you can elevate your biscotti to new heights of flavor and presentation. From gifting to savoring with coffee, these glazed delights are sure to impress. Let’s make every batch a masterpiece!
Frequently Asked Questions
What is the purpose of a chocolate glaze on biscotti?
A chocolate glaze elevates biscotti by adding a rich, glossy, and indulgent layer of flavor. It enhances the taste and presentation, making these crunchy cookies perfect for pairing with coffee, gifting, or serving at special occasions.
What ingredients are needed for a chocolate glaze?
The key ingredients for a chocolate glaze include semi-sweet chocolate, unsalted butter, heavy cream, vanilla extract, and a pinch of salt. These ingredients ensure a smooth texture and balanced flavor. High-quality chocolate is essential for the best results.
What tools are required to make a chocolate glaze?
You’ll need a double boiler or heatproof bowl, silicone spatula, whisk, baking sheet, cooling rack, and parchment paper. Optional tools include a chocolate dipping fork and squeeze bottle for precise drizzling. Preparing your workspace with these tools ensures a smooth glazing process.
How do I melt chocolate for the glaze?
Melt chocolate using a double boiler or a heatproof bowl over simmering water. Stir continuously to prevent burning, and once melted, incorporate butter, cream, vanilla, and salt for a smooth, glossy finish.
Can I make the chocolate glaze ahead of time?
Yes, you can prepare the chocolate glaze in advance and store it in an airtight container. Refrigerate it for up to a week or freeze it for longer. Reheat gently to restore its glossy texture before use.
How can I apply the glaze to biscotti?
You can either dip the biscotti into the glaze for a thick coating or drizzle it on using a spoon or squeeze bottle for a decorative finish. Allow the glaze to set on a cooling rack lined with parchment paper.
What should I do if the glaze is too thick?
If the glaze is too thick, thin it with small amounts of heated cream or milk until the desired consistency is achieved. Avoid adding cold liquids, as it may cause the chocolate to seize.
Can the chocolate glaze be made vegan or dairy-free?
Yes, substitute the chocolate with dairy-free or vegan chocolate, and replace butter and heavy cream with plant-based alternatives like coconut cream or vegan butter. Use unsweetened varieties for better control of sweetness.
How do I ensure a glossy glaze finish?
Use high-quality chocolate, maintain a stable melting temperature, and incorporate butter or cream for a shiny finish. Avoid overheating the chocolate, as it can dull the glaze.
Can the chocolate glaze be customized?
Absolutely! Experiment with different flavors by adding extracts like almond, orange, or peppermint. You can also mix in spices, zest, or nuts for unique variations while maintaining the rich, glossy texture.