
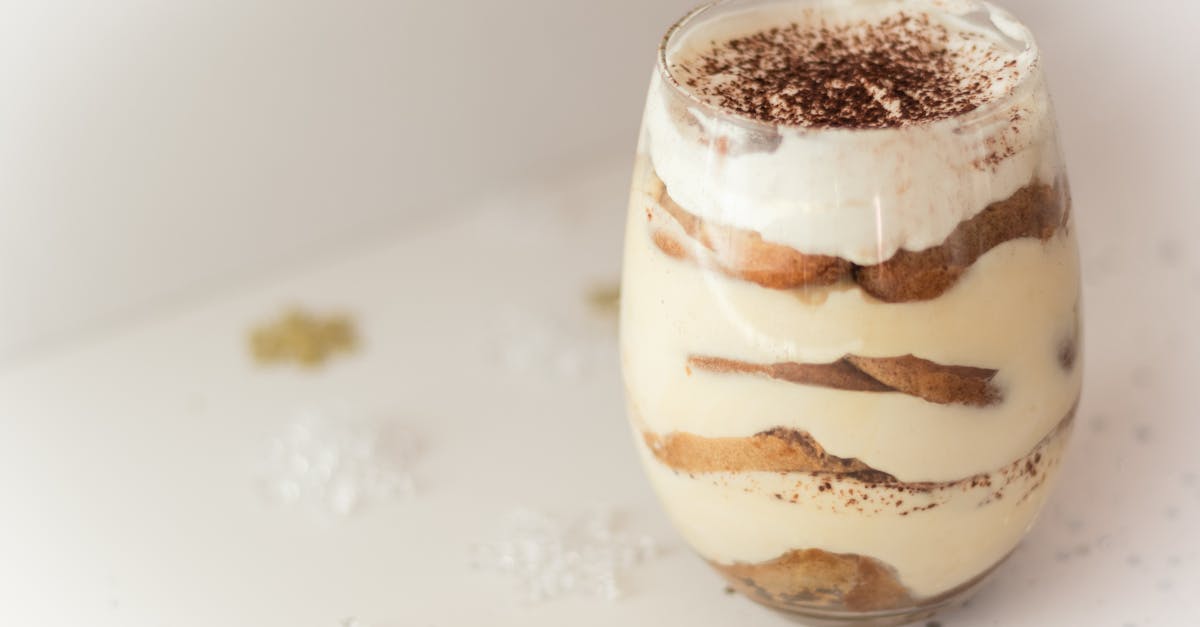
When it comes to elegant desserts that impress both the eyes and the palate, the Chocolate Espresso Dacquoise stands in a league of its own. This French-inspired treat layers crisp, nutty meringue with luscious chocolate ganache and a hint of bold espresso, creating a perfect harmony of textures and flavors. It’s the kind of dessert that feels luxurious yet approachable.
Chocolate Espresso Dacquoise Recipe
Ingredients
For the Dacquoise Layers:
- 1 cup (120g) almond flour, sifted
- 1 ½ cups (150g) powdered sugar, sifted
- 6 large egg whites (room temperature)
- ½ teaspoon cream of tartar
- ¾ cup (150g) granulated sugar
For the Espresso-Chocolate Ganache:
- 8 oz (227g) semi-sweet chocolate, finely chopped
- ½ cup (120ml) heavy cream
- 1 tablespoon espresso powder
- 2 tablespoons unsalted butter, room temperature
For Garnish (Optional):
- 2 tablespoons unsweetened cocoa powder (dusting)
- 1 oz dark chocolate, shaved
- Fresh coffee beans (optional)
Instructions
Step 1: Prepare the Dacquoise Layers
- Preheat the oven to 300°F (150°C). Line two baking sheets with parchment paper. Draw three 8-inch circles (or desired size) on the parchment as a guide and flip the paper over so the lines don’t transfer.
- In a medium bowl, whisk together the almond flour and powdered sugar. Set aside.
- Using a stand mixer with a whisk attachment, beat the egg whites on medium speed until frothy. Add the cream of tartar, then gradually increase the mixer speed to high and slowly add the granulated sugar, 1 tablespoon at a time. Beat until stiff, glossy peaks form.
- Gently fold the almond flour mixture into the meringue in three additions, being careful not to deflate the volume.
- Transfer the meringue into a piping bag fitted with a large round tip. Pipe the batter onto the drawn circles in a spiral motion to form even layers.
- Bake the dacquoise layers for 1 hour, rotating the pans halfway through. Once done, turn off the oven and let the layers cool inside with the door slightly ajar to ensure they crisp.
Step 2: Make the Espresso-Chocolate Ganache
- Place the chopped chocolate in a heatproof bowl.
- In a small saucepan, warm the heavy cream over medium heat until it just begins to simmer. Remove from heat and stir in the espresso powder until fully dissolved.
- Pour the hot cream mixture over the chopped chocolate and let sit for 1 minute. Stir gently with a spatula until smooth and well combined.
- Add the butter to the mixture and continue stirring until glossy and silky. Allow the ganache to cool at room temperature until it reaches a spreadable consistency.
Step 3: Assemble the Dacquoise
- Place one dacquoise layer on a serving platter. Spread a generous layer of the espresso-chocolate ganache evenly across the top using an offset spatula.
- Repeat the process with the remaining dacquoise layers, ending with ganache on the top layer.
- For a decorative finish, dust the top with unsweetened cocoa powder, sprinkle dark chocolate shavings, or garnish with coffee beans.
Step 4: Chill and Serve
- Refrigerate the assembled dacquoise for at least 4 hours—or overnight—for the flavors to meld and develop.
- To serve, use a sharp serrated knife to slice through the crisp layers. Enjoy chilled for the perfect harmony of chocolate and espresso in every bite!
Baking Tips Table
| Tips | Details |
|---|---|
| Egg Whites | Use fresh eggs at room temperature for maximum volume in your meringue. |
| Folding Technique | Fold almond mixture gently to preserve the airy texture of the meringue. |
| Cooling the Layers | Leave the layers in the oven to avoid sudden temperature changes that can soften the meringue. |
| Ganache Consistency | Allow ganache to cool before spreading to avoid it dripping over the sides. |
This recipe transforms a handful of simple ingredients into an elegant dessert that combines textures and flavors for an indulgent experience. Each step ensures the dacquoise layers stay crisp while the ganache adds a luscious, velvety balance.
Ingredients
Creating the Chocolate Espresso Dacquoise requires attention to both the flavors and textures of each component. Below is a categorized breakdown of everything you’ll need.
For The Dacquoise Layers
- 4 large egg whites, at room temperature
- 3/4 cup (150 g) granulated sugar
- 1 cup (100 g) almond flour, finely sifted
- 1/4 cup (30 g) confectioners’ sugar, sifted
- 1/4 teaspoon cream of tartar
- 1 teaspoon pure vanilla extract
For The Chocolate Ganache
- 8 ounces (225 g) bittersweet chocolate, chopped
- 1 cup (240 ml) heavy cream
- 1 teaspoon pure vanilla extract
- 1 tablespoon unsalted butter, softened
For The Espresso Buttercream
- 1/2 cup (115 g) unsalted butter, softened
- 2 cups (240 g) confectioners’ sugar, sifted
- 1 tablespoon espresso powder, dissolved in 1 tablespoon hot water
- 2 tablespoons heavy cream
- 1 pinch of salt
Optional Toppings
- Shaved chocolate or cocoa powder, for garnish
- Espresso beans, whole or crushed
- A sprinkle of flaky sea salt (optional but enhances the flavor beautifully)
Tools And Equipment
To craft the perfect Chocolate Espresso Dacquoise, having the right tools and equipment on hand is essential. These items will not only streamline the preparation process but also ensure each component—from the dacquoise layers to the chocolate ganache and espresso buttercream—is executed flawlessly. Let’s gather everything we need:
Essential Tools
- Stand Mixer or Hand Mixer: For whipping the egg whites to stiff, glossy peaks required for the dacquoise layers.
- Large Mixing Bowls: To handle the meringue and other components without overflow issues.
- Silicone Spatula: For folding ingredients gently without deflating the meringue.
- Piping Bag with Round Tip: Essential for creating even dacquoise layers on the baking sheets.
- Rimmed Baking Sheets: These provide sturdy support for baking the meringue layers evenly.
- Parchment Paper: To line the baking sheets and prevent the dacquoise from sticking.
- Offset Spatula: Ideal for spreading the ganache and buttercream with precision.
Specialized Equipment
- Kitchen Scale: Baking requires precision; measuring ingredients by weight ensures uniformity.
- Fine-Mesh Sieve: To sift the almond flour and confectioners’ sugar for a smooth, lump-free meringue texture.
- Double Boiler or Heatproof Bowl: For melting the chocolate gently without scorching it.
Additional Items
- Cooling Racks: Crucial for letting the dacquoise layers cool without trapping moisture underneath.
- Whisk: For blending ganache and buttercream ingredients smoothly.
- Small Saucepan: To gently heat heavy cream for the ganache.
Organized Checklist
| Tool/Equipment | Usage |
|---|---|
| Stand Mixer/Hand Mixer | Whipping egg whites for dacquoise layers. |
| Piping Bag and Tip | Shaping uniform meringue layers. |
| Large Mixing Bowls | Mixing meringue and creams. |
| Rimmed Baking Sheets | Even support during meringue baking. |
| Double Boiler | Safe chocolate melting for ganache. |
| Offset Spatula | Precise ganache and buttercream spreading. |
Having all these tools prepped and ready ensures our Chocolate Espresso Dacquoise comes together seamlessly, balancing flavor and texture beautifully.
Directions
Follow these step-by-step instructions to create the perfect Chocolate Espresso Dacquoise. From prepping the ingredients to assembling the final dessert, every detail is covered for success.
Prep
- Preheat oven to 250°F (120°C). Line two rimmed baking sheets with parchment paper. Draw three equal-sized 8-inch circles on the parchment as guidelines.
- Gather all tools specified earlier, such as a stand mixer, piping bag, and offset spatula, for smooth preparation.
- Ensure all ingredients are measured accurately. We recommend using a kitchen scale for precision, especially for the meringue base.
- Sift the almond flour and confectioners’ sugar together using a fine-mesh sieve to remove lumps and create a smooth texture. Set aside.
Make The Dacquoise Layers
- In a large mixing bowl, beat 6 large egg whites with 1/4 teaspoon cream of tartar using a stand or hand mixer on medium speed until foamy.
- Gradually add 3/4 cup granulated sugar, one tablespoon at a time, while beating on high speed. Continue until stiff, glossy peaks form.
- Gently fold the sifted almond flour and confectioners’ sugar mixture into the meringue in three batches using a silicone spatula. Avoid overmixing to maintain the airiness.
- Add 1 teaspoon vanilla extract and fold lightly to incorporate.
- Transfer the mixture to a piping bag fitted with a round tip. Pipe concentric circles onto the pre-drawn parchment marks, filling each 8-inch circle completely.
- Bake in the preheated oven for 90-100 minutes or until the layers are crisp and firm to the touch. Turn off the oven and let the dacquoise cool completely inside for an additional hour to ensure they dry out.
Prepare The Chocolate Ganache
- Chop 8 ounces bittersweet chocolate finely and place in a heatproof bowl.
- In a small saucepan, heat 1 cup heavy cream over medium heat until it just begins to simmer (do not let it boil).
- Pour the hot cream over the chopped chocolate and let sit for 2 minutes. Stir slowly with a silicone spatula until smooth and glossy.
- Stir in 1 tablespoon unsalted butter and 1 teaspoon vanilla extract until fully incorporated.
- Allow the ganache to cool to room temperature. It should thicken to a spreadable consistency.
Make The Espresso Buttercream
- In a stand mixer, beat 1 cup unsalted butter (softened) on medium speed until creamy, approximately 3 minutes.
- Gradually add 2 1/2 cups confectioners’ sugar, 1/2 cup at a time, beating on low until combined. Scrape down the sides of the bowl as needed.
- Dissolve 2 teaspoons espresso powder in 2 tablespoons heavy cream, then slowly add to the butter-sugar mixture.
- Increase the speed to medium-high and beat for an additional 3-4 minutes until the buttercream is light and fluffy. Add a pinch of salt to enhance the flavor.
Assemble The Dacquoise
- Place the first dacquoise layer on a serving plate. Spread a thin, even layer of espresso buttercream over the top.
- Add a layer of chocolate ganache on top of the buttercream, spreading smoothly with an offset spatula.
- Repeat this process with the remaining dacquoise layers, finishing with buttercream on top. Optionally, spread ganache over the sides for a neat finish.
- Decorate the top with optional garnishes such as shaved chocolate, espresso beans, or a sprinkle of flaky sea salt for a touch of elegance.
| Component | Quantity | Notes |
|---|---|---|
| Dacquoise Layers | 3 layers, 8-inch each | Crisp, almond-based meringue |
| Chocolate Ganache | 8 ounces chocolate | Rich, glossy spread |
| Espresso Buttercream | Prepared batch | Fluffy and aromatic |
- Refrigerate the assembled dacquoise for 2-3 hours, allowing the layers to meld. Slice with a sharp knife for clean cuts and serve chilled.
Make-Ahead Instructions
Preparing this Chocolate Espresso Dacquoise in advance ensures a smooth and stress-free experience while maximizing the flavors and textures. Here’s how we can make each component ahead of time and assemble the dessert when needed:
1. Dacquoise Layers
The dacquoise layers can be prepared up to 3 days ahead of assembly.
- After baking, allow the meringue layers to cool completely on their parchment paper.
- Once cooled, store them in an airtight container lined with parchment paper between the layers to prevent sticking.
- Keep the container in a dry, cool spot; avoid places with high humidity to maintain their crispness.
2. Chocolate Ganache
The ganache can be made up to 5 days in advance.
- After preparing, let the ganache cool to room temperature before transferring it to an airtight container.
- Refrigerate it until needed.
- When ready to use, gently reheat the ganache in a double boiler or microwave in short intervals, stirring frequently, until it reaches a spreadable consistency.
3. Espresso Buttercream
Prepare the espresso buttercream up to 3 days ahead.
- Store it in an airtight container and refrigerate. Before using, bring it to room temperature.
- Whip it with a hand mixer or stand mixer briefly to restore its fluffy texture.
4. Assembled Dessert
The fully assembled Chocolate Espresso Dacquoise can be prepared 1 day in advance.
- Carefully stack the layers of meringue, ganache, and buttercream, following the assembly steps.
- Cover the entire dessert lightly with plastic wrap or store it in a cake carrier to avoid any moisture transfer.
- Place it in the refrigerator to chill for at least 2-3 hours, or overnight, to let the flavors meld beautifully.
Storage Recommendations at a Glance
| Component | Timeframe | Storage Method |
|---|---|---|
| Dacquoise Layers | Up to 3 days | Airtight container with parchment paper in a dry, cool spot |
| Ganache | Up to 5 days | Airtight container in the refrigerator |
| Buttercream | Up to 3 days | Airtight container in the refrigerator, whipped before use |
| Fully Assembled Cake | 1 day in advance | Covered with plastic wrap or in a cake carrier in the refrigerator |
Pro Tip: Assemble the dessert closer to serving time if you want the meringue to retain its full crispness. For a chewier texture, allow the layers to absorb more moisture during refrigeration.
Storage Tips
Proper storage ensures our Chocolate Espresso Dacquoise retains its crisp layers and rich, velvety flavors. Let’s break down the best storage methods for each component and the fully assembled dessert to maintain its excellence.
Storing Dacquoise Layers
- Allow the dacquoise layers to cool completely before storing.
- Place the layers in an airtight container to prevent them from absorbing moisture.
- Store them at room temperature for up to 3 days. Avoid refrigeration, as humidity can soften the meringue and compromise its signature crispiness.
Storing Chocolate Ganache
- Transfer the ganache to an airtight container after it cools.
- Refrigerate it for up to 5 days.
- When ready to use, gently reheat it in a double boiler or microwave in short intervals, stirring frequently, until smooth and spreadable.
Storing Espresso Buttercream
- Place the buttercream in an airtight container or cover it tightly with plastic wrap, ensuring there’s no air gap.
- Refrigerate it for up to 3 days. Before use, allow it to come to room temperature and whip it briefly to restore its creamy texture.
Storing the Fully Assembled Dessert
- Cover the dessert loosely with plastic wrap to avoid compressing the layers.
- Refrigerate it for up to 1 day. This allows the flavors to meld beautifully while maintaining the structural integrity of the meringue layers.
- For the best experience, we recommend serving it directly from the fridge or letting it sit at room temperature for 10-15 minutes before slicing.
| Component | Storage Method | Duration |
|---|---|---|
| Dacquoise Layers | Airtight container, room temp | Up to 3 days |
| Chocolate Ganache | Airtight container, refrigerate | Up to 5 days |
| Espresso Buttercream | Airtight container, refrigerate | Up to 3 days |
| Fully Assembled Dessert | Loosely covered, refrigerate | 1 day |
Pro Tips for Optimal Storage
- To prevent stickiness, layer parchment paper between dacquoise layers when storing them.
- Always assemble the dessert as close to serving time as possible if a crisp texture is desired for the meringue.
- For a chewier dacquoise, refrigerate the fully assembled dessert longer, allowing the meringue to absorb moisture from the ganache and buttercream.
- Use a sharp serrated knife for clean slicing, ensuring each layer remains intact as you serve.
Conclusion
The Chocolate Espresso Dacquoise is a true showstopper that combines elegance and flavor in every bite. With its crisp layers, rich ganache, and espresso-infused buttercream, this dessert is as delightful to look at as it is to taste. Whether you’re preparing it for a special occasion or simply indulging your love for sophisticated treats, it’s sure to impress.
By following the recipe and tips we’ve shared, you can create a dessert that balances texture and flavor beautifully. With a little planning and the right tools, this luxurious treat becomes an accessible masterpiece. Let’s savor every layer and enjoy the artistry of this decadent creation!
Frequently Asked Questions
What is a Chocolate Espresso Dacquoise?
The Chocolate Espresso Dacquoise is a sophisticated dessert made with layers of almond meringue (dacquoise), rich chocolate ganache, and espresso-infused buttercream. It’s an indulgent and visually stunning treat, perfect for special occasions.
Can I make Chocolate Espresso Dacquoise ahead of time?
Yes! You can prepare the dacquoise layers, chocolate ganache, and espresso buttercream in advance. The fully assembled dessert can be made up to 1 day ahead, but for best texture, assemble closer to serving time.
What tools do I need to make this dessert?
Essential tools include a stand mixer or hand mixer, mixing bowls, piping bag, baking sheets, parchment paper, and a spatula. Recommended tools for precision include a kitchen scale, fine-mesh sieve, and double boiler.
How should I store the Chocolate Espresso Dacquoise?
Dacquoise layers can be stored in an airtight container at room temperature for up to 3 days. Refrigerate ganache and buttercream for up to 5 and 3 days, respectively. Store the fully assembled dessert covered in the refrigerator for 1 day.
What are some optional toppings for the dessert?
Optional garnishes include shaved chocolate, whole espresso beans, and flaky sea salt. These toppings can enhance the dessert’s presentation and flavor.
How do I ensure my meringue achieves maximum volume?
Whip egg whites to stiff peaks and make sure your mixing bowl and tools are grease-free. Adding cream of tartar helps stabilize the egg whites for better volume.
What is the recommended chilling time for the dessert before serving?
The fully assembled dessert should chill in the refrigerator for 2-3 hours to allow the flavors to meld and achieve the perfect texture.
Can the recipe be adjusted for dietary restrictions?
Yes, you can consider substitutions like plant-based butter and cream for a dairy-free version, though results may vary. Ensure any ingredient swaps maintain the dessert’s structure and flavor.
What is the desired texture of the dacquoise layers?
The dacquoise layers should be crisp on the outside and slightly chewy on the inside. Proper baking and storage will preserve this texture.
How can I slice the dessert cleanly?
Use a sharp serrated knife and wipe the blade clean between slices for a neat presentation.