
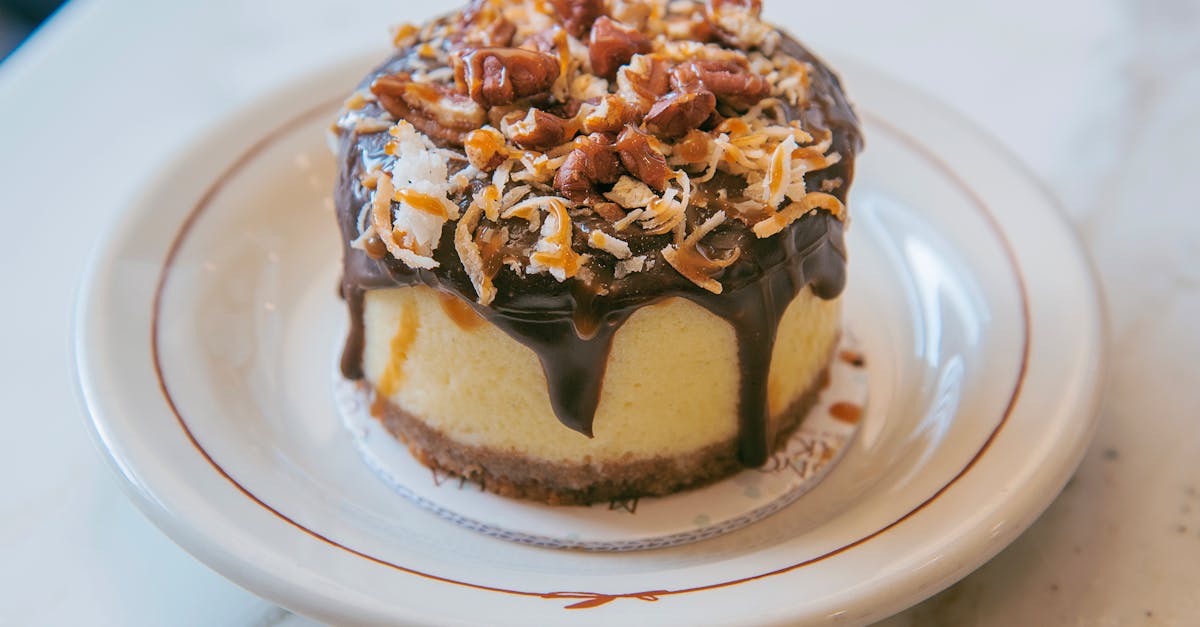
Who can resist the rich, creamy decadence of a cheesecake? Our chocolate coconut cheesecake takes this classic dessert to the next level with its dreamy combination of velvety chocolate, tropical coconut, and a buttery crust. It’s the perfect treat for special occasions or when we just want to indulge in something truly unforgettable.
Chocolate Coconut Cheesecake Recipe
Ingredients
For the Crust:
- 1 ½ cups graham cracker crumbs (about 10 crackers)
- ¼ cup unsweetened shredded coconut, toasted
- ⅓ cup granulated sugar
- ½ cup unsalted butter, melted
For the Filling:
- 3 (8-ounce) blocks of cream cheese, softened
- 1 cup granulated sugar
- 3 large eggs, room temperature
- 1 teaspoon pure vanilla extract
- ¾ cup full-fat coconut milk
- 1 ½ cups semi-sweet chocolate chips, melted and cooled
For the Topping:
- ½ cup heavy whipping cream
- ¾ cup semi-sweet chocolate chips
- ⅓ cup unsweetened coconut flakes, toasted
Instructions
1. Prepare the Crust
- Preheat the oven to 325°F (160°C). Line the bottom of a 9-inch springform pan with parchment paper and lightly grease the edges.
- In a mixing bowl, combine graham cracker crumbs, toasted coconut, and sugar. Pour in the melted butter and mix until it resembles wet sand.
- Press the mixture firmly into the bottom of the prepared pan to create an even layer. Use the bottom of a flat measuring cup for smoothness.
- Bake the crust for 10 minutes, then set aside to cool completely while preparing the filling.
2. Make the Filling
- In a large mixing bowl, beat the softened cream cheese and sugar with an electric mixer until smooth and creamy (about 2 minutes).
- Add the eggs one at a time, mixing well after each addition.
- Stir in the vanilla extract and coconut milk until fully combined.
- Gently fold in the melted chocolate chips until the mixture is smooth and evenly colored.
3. Bake the Cheesecake
- Pour the chocolate coconut filling over the cooled crust.
- Place the springform pan in a larger roasting pan and fill the roasting pan with 1-2 inches of hot water to create a water bath. This prevents cracks from forming during baking.
- Bake the cheesecake at 325°F (160°C) for 55–65 minutes, or until the center is just slightly jiggly and the edges are set.
- Turn off the oven, crack the door slightly, and let the cheesecake cool inside for 1 hour to prevent sudden temperature changes.
4. Prepare the Topping
- Heat the heavy whipping cream in a microwave-safe bowl until just simmering (about 40 seconds).
- Add the chocolate chips to the hot cream and let it sit for 3 minutes. Stir until smooth and glossy.
- Once the cheesecake is completely cool, pour the chocolate ganache over the top and spread evenly.
- Sprinkle the toasted coconut flakes on top for an extra layer of texture and flavor.
Tips for Success
- Room temperature ingredients are key for a smooth filling that blends easily.
- Use a water bath to achieve a crack-free and creamy cheesecake.
- For even toasted coconut, spread it on a baking sheet and bake at 325°F (160°C) for 5-7 minutes, stirring halfway.
Baking Schedule
| Preparation Step | Estimated Time |
|---|---|
| Preparing the Crust | 15 minutes |
| Making the Filling | 20 minutes |
| Baking the Cheesecake | 55-65 minutes |
| Cooling (oven + fridge) | 3 hours |
| Topping Preparation | 10 minutes |
Keep this Chocolate Coconut Cheesecake Recipe on hand for special occasions or days when indulgence is a must! The combination of rich chocolate, creamy coconut, and toasted textures is simply irresistible.
Ingredients
Let’s gather everything we need to create this indulgent, Chocolate Coconut Cheesecake. Below, we have split the ingredients into four parts for easy assembly: the crust, the cheesecake filling, the chocolate ganache topping, and optional garnishes.
For The Crust
- 1 ½ cups (150g) graham cracker crumbs
- ½ cup (40g) sweetened shredded coconut
- 6 tablespoons unsalted butter, melted
- ¼ cup (50g) granulated sugar
Tip: Toast the shredded coconut beforehand for extra flavor.
For The Cheesecake Filling
- 24 oz (680g) cream cheese, softened
- 1 cup (200g) granulated sugar
- ½ cup (120ml) coconut cream (not coconut milk)
- 1 teaspoon coconut extract (optional, for stronger coconut flavor)
- 4 large eggs, at room temperature
- 3 oz (85g) semi-sweet chocolate, melted and slightly cooled
- 2 tablespoons unsweetened cocoa powder
Pro Tip: Using room temperature ingredients ensures a smooth, lump-free filling.
For The Chocolate Ganache Topping
- 1 cup (175g) semi-sweet chocolate chips
- ½ cup (120ml) heavy cream
- 1 teaspoon coconut oil (optional, for a glossy finish)
Note: Stir until silky smooth for the ultimate finish.
Optional Garnishes
- Shaved chocolate or chocolate curls
- Toasted coconut flakes
- Whipped cream swirls
- Fresh berries for a pop of color
Tools And Equipment
To prepare this chocolate coconut cheesecake, we’ll need a few essential tools and equipment to ensure success. Having the right items on hand simplifies the process and guarantees smooth preparation and baking. Here’s a breakdown of everything required:
Kitchen Tools
- 9-inch springform pan: A must-have for baking cheesecakes, allowing easy release without damaging the edges.
- Mixing bowls (3): Various sizes for preparing the crust, filling, and toppings separately.
- Electric mixer or stand mixer: For achieving that ultra-creamy cheesecake filling. A handheld mixer will also work.
- Rubber spatula: Perfect for scraping batter and ensuring no ingredients go to waste.
- Whisk: For seamlessly blending ingredients in the filling and ganache.
- Measuring cups and spoons: Accurate measurements are critical for this recipe, especially for ingredients like butter, sugar, and cocoa powder.
- Food processor or blender: To finely crush graham crackers for the crust. (Optional if using packaged crumbs.)
- Saucepan: For gently warming heavy cream when making the chocolate ganache topping.
- Toothpicks or skewer: For testing doneness of the cheesecake center.
Specialty Items
- Water bath setup: You’ll need a large roasting pan and hot water to create a water bath. This prevents the cheesecake from cracking during baking by creating a moist cooking environment.
- Offset spatula (optional): Helps spread each layer smoothly, including the filling and ganache.
- Parchment paper: To line the bottom of the springform pan for easy transfer and cleanup.
Recommended Table of Tools
For an at-a-glance view, here is a comprehensive tool checklist:
| Tool/Equipment | Purpose |
|---|---|
| 9-inch springform pan | Easy release of cheesecake |
| Mixing bowls (3) | Separate mixtures: crust, filling, ganache |
| Electric mixer | Achieve creamy cheesecake texture |
| Rubber spatula | Scrape batter, smooth layers |
| Whisk | Blend ingredients, especially for ganache |
| Measuring cups/spoons | Ensure accurate ingredient quantities |
| Food processor/blender | Make fine crumbs for graham cracker crust |
| Saucepan | Heat cream for chocolate ganache |
| Roasting pan | Water bath setup for even baking |
| Offset spatula (optional) | Smooth layers evenly |
| Toothpicks/skewer | Test cheesecake doneness |
| Parchment paper | Line pan for easy release and cleanup |
Each item on this list plays a key role in crafting the perfect chocolate coconut cheesecake. This selection ensures our baking process is efficient and yields a dessert that’s not just delicious but visually irresistible.
Directions
Let’s create this decadent Chocolate Coconut Cheesecake step-by-step. Follow these instructions carefully for a perfectly creamy and rich dessert with a touch of tropical flair.
Prep
- Preheat the oven to 325°F (163°C).
- Wrap the outside of a 9-inch springform pan with aluminum foil to ensure no water leaks when using a water bath.
- Line the bottom of the pan with parchment paper for easy removal later.
- Gather all ingredients and ensure they’re at room temperature, especially the cream cheese, eggs, and coconut cream, for a smooth and lump-free batter.
Make The Crust
- Combine 1 ½ cups of graham cracker crumbs, ½ cup of toasted shredded coconut, ¼ cup of granulated sugar, and 6 tablespoons of melted butter in a mixing bowl.
- Mix thoroughly until the mixture resembles wet sand.
- Press the crust mixture firmly into the prepared pan’s bottom. Use the back of a spoon to smooth it out evenly.
- Bake the crust for 10 minutes, then remove and let cool completely while preparing the filling.
Prepare The Cheesecake Filling
- In a large mixing bowl, beat 24 ounces (3 blocks) of cream cheese and 1 cup of sugar together until smooth and creamy, about 2–3 minutes on medium speed.
- Add ½ cup of coconut cream and ½ teaspoon of coconut extract (optional). Blend until just combined.
- Mix in 4 large eggs, one at a time, scraping down the sides of the bowl after each addition.
- In a separate bowl, whisk together ¾ cup of melted chocolate and 2 tablespoons of unsweetened cocoa powder. Gradually fold this chocolate mixture into the batter until evenly combined. Be careful not to overmix.
- Pour the smooth filling over the crust in the prepared pan, leveling the surface with a spatula.
Bake The Cheesecake
- Place the springform pan in a large roasting pan. Carefully pour hot water into the roasting pan, about an inch deep, creating a water bath to ensure an evenly baked cheesecake and prevent cracking.
- Bake for 55–65 minutes, or until the edges are set, but the center is still slightly wobbly.
- Turn off the oven and leave the cheesecake in the oven, with the door slightly ajar, for another hour. This gradual cooling helps avoid cracks.
- Remove the cheesecake from the water bath, carefully unwrap the foil, and place it on a cooling rack to cool to room temperature.
Prepare The Chocolate Ganache Topping
- While the cheesecake is cooling, heat ¾ cup of heavy cream in a small saucepan over medium heat until it just begins to simmer (do not boil).
- Pour the hot cream over 1 cup of semi-sweet chocolate chips. Let it sit for 2 minutes.
- Add 1 teaspoon of coconut oil for a glossy finish (optional) and whisk until smooth and silky.
Assemble The Cheesecake
- Once the cheesecake is completely cooled, pour the prepared ganache over the top.
- Use an offset spatula to spread the ganache evenly, letting it gently drip over the edges for a dramatic look.
- Optionally, sprinkle the top with toasted coconut flakes or shaved chocolate for extra texture and presentation.
Chill And Set
- Cover the cheesecake with plastic wrap or foil and refrigerate for at least 4–6 hours, preferably overnight, to ensure it sets properly.
- Before serving, carefully release the springform pan and transfer the cheesecake to a serving plate. For clean slices, wipe your knife clean between cuts.
- Enjoy your irresistibly rich and creamy Chocolate Coconut Cheesecake!
Make-Ahead Instructions
Preparing a cheesecake can feel time-intensive, but with a few make-ahead strategies, we can save time and ensure the best results. Here’s how to plan ahead for our Chocolate Coconut Cheesecake:
1. Make the Crust Ahead
- After mixing the crust ingredients, press the mixture into the springform pan as directed.
- Bake the crust if required, then allow it to cool completely.
- Wrap the pan tightly with plastic wrap to prevent any odor transfer and refrigerate for up to 2 days.
2. Prepare the Cheesecake Filling in Advance
- The filling can be mixed and stored in an airtight container. Keep it in the refrigerator for up to 24 hours.
- When ready to assemble, give it a gentle stir to ensure smooth consistency before pouring it onto the crust.
3. Bake the Cheesecake and Chill Overnight
- Once baked, let the cheesecake cool to room temperature.
- Cover loosely with plastic wrap and chill in the refrigerator for at least 8 hours or overnight. This chilling time allows the flavors to meld and ensures a firm yet creamy texture.
4. Prepare the Chocolate Ganache Topping Early
- Make the ganache and let it thicken slightly before spreading it onto the chilled cheesecake.
- If preferred, ganache can be made up to 1 day in advance. Store it covered at room temperature and gently reheat it using a low-heat double boiler before application.
5. Storage Recommendations
To keep our cheesecake fresher longer, follow these storage tips:
| Item | Storage Method | Duration |
|---|---|---|
| Unbaked Crust | Wrap tightly, refrigerate | Up to 2 days |
| Cheesecake (Baked, Uncut) | Cover, refrigerate | Up to 5 days |
| Cheesecake (Cut, Slices) | Store in an airtight container | Up to 5 days |
| Ganache Only | Store covered, room temperature | 1 day |
6. Freeze for Long-Term Storage
- Once baked and fully cooled, the entire cheesecake (minus ganache topping) can be wrapped in plastic wrap and foil to avoid freezer burn. Freeze for up to 1 month.
- To defrost, transfer to the refrigerator and let it thaw overnight. Add the ganache just before serving for the best results.
Tips For The Best Chocolate Coconut Cheesecake
Creating the perfect chocolate coconut cheesecake requires attention to detail and a few expert techniques. We’ve listed essential tips below to ensure your cheesecake turns out rich, creamy, and flawlessly textured every time.
1. Use Room Temperature Ingredients
Always bring ingredients like cream cheese, eggs, and coconut cream to room temperature before mixing. This ensures they blend smoothly, resulting in a creamy filling without lumps. Cold ingredients can lead to overmixing, which introduces air bubbles and affects texture.
2. Toast the Coconut for Enhanced Flavor
Toasting the shredded coconut for the crust and garnishes amplifies its nutty, tropical flavor. Spread the coconut evenly on a baking sheet and toast at 350°F for 5–8 minutes, stirring occasionally. Keep a close watch to avoid burning. This simple step adds depth to your cheesecake.
3. Use a Springform Pan and Line It Properly
A 9-inch springform pan is ideal for easy removal without damaging the cheesecake. Line the bottom with parchment paper and lightly grease the sides. This helps prevent the crust from sticking and ensures flawless slices.
4. Employ a Water Bath to Avoid Cracks
A water bath maintains even baking temperature and provides moisture, reducing the risk of cracks. Wrap the outside of the springform pan in aluminum foil, place it in a larger roasting pan, and pour hot water halfway up the sides. This creates a humid environment for a smooth, crack-free top.
5. Don’t Overmix the Filling
Blend the batter until just combined. Overmixing incorporates air, leading to a soufflé-like texture that can collapse as it cools. Mix on low speed and scrape down the bowl to ensure a uniform, creamy consistency.
6. Allow Proper Chilling Time
Chilling the cheesecake for at least 6 hours (or overnight) is crucial for setting the filling and intensifying the flavors. Patience is key to achieving that perfect sliceable texture.
7. Use Quality Ingredients
Opt for high-quality semi-sweet chocolate, coconut cream, and cocoa powder. The better the ingredients, the richer and more decadent the final result will taste.
8. Slice with Precision
For clean, beautiful slices, use a sharp knife dipped in hot water. Wipe the blade clean between cuts. This technique ensures each piece looks as delightful as it tastes.
9. Make It Your Own with Toppings
Personalize your cheesecake by adding toppings like toasted coconut flakes, shaved chocolate, or whipped cream. For a pop of color and freshness, consider garnishing with fresh berries.
Table: Quick Reference for Top Tips
| Tip | Details |
|---|---|
| Room Temperature Ingredients | Ensures creamy, lump-free filling. |
| Toasted Coconut | Enhances flavor for crust and garnish. |
| Springform Pan | Easy release and clean slices. |
| Water Bath | Prevents cracks by baking evenly with moisture. |
| Avoid Overmixing | Prevents air bubbles for perfect texture. |
| Chill Time | At least 6 hours, preferably overnight, to set. |
| Quality Ingredients | Elevates the flavor and richness of the cheesecake. |
| Slicing Technique | Hot knife method for clean, precise cuts. |
| Creative Toppings | Customize with garnishes like coconut, berries, or chocolate. |
By following these expert tips, we can confidently achieve a show-stopping chocolate coconut cheesecake that’s as stunning as it is delicious.
Conclusion
Creating a chocolate coconut cheesecake is more than just baking; it’s crafting a dessert that combines elegance and indulgence. With its perfect balance of textures and flavors, it’s a showstopper that’s sure to impress. By following the steps and tips we’ve shared, you’ll have everything you need to achieve flawless results every time. Whether it’s for a celebration or a personal treat, this cheesecake is a true delight that’ll leave everyone craving another slice.
Frequently Asked Questions
1. What makes a chocolate coconut cheesecake unique?
Chocolate coconut cheesecake combines the richness of chocolate with the tropical flavor of coconut, creating a luscious and indulgent dessert perfect for special occasions.
2. How do I prevent cracks in my cheesecake?
Using a water bath and ensuring your ingredients are at room temperature can help prevent cracks in the cheesecake.
3. Can I make this cheesecake ahead of time?
Yes, this cheesecake can be prepared ahead by baking it a day in advance and chilling it overnight for best results.
4. Can I freeze chocolate coconut cheesecake?
Yes, you can freeze the cheesecake. Wrap it tightly in plastic wrap and foil, and store in the freezer for up to 2 months. Thaw in the fridge before serving.
5. Do I have to use a water bath for baking the cheesecake?
While a water bath is recommended for even baking and to avoid cracks, it’s possible to bake without one by placing a pan of water on the oven’s lower rack for added moisture.
6. What tips can help achieve a creamy cheesecake texture?
Always use room temperature ingredients and avoid overmixing the filling to maintain a smooth, creamy texture.
7. What toppings pair well with chocolate coconut cheesecake?
Shaved chocolate, toasted coconut flakes, whipped cream, and fresh berries make excellent garnishes for this cheesecake.
8. How long should the cheesecake chill before serving?
The cheesecake should chill in the refrigerator for at least 4-6 hours, but overnight chilling is ideal for the best texture and flavor.
9. What tools do I need to make this cheesecake?
You’ll need a 9-inch springform pan, mixing bowls, an electric mixer, a rubber spatula, parchment paper, and a water bath setup for best results.
10. Can I customize the recipe to suit dietary needs?
Yes! You can use gluten-free graham crackers for the crust or dairy-free alternatives for the filling to suit dietary preferences.