
Who says we can’t have a treat that’s both delicious and packed with protein? Our chocolate chip protein muffins are the perfect answer to those mid-morning cravings or post-workout hunger pangs. They’re soft, fluffy, and loaded with melty chocolate chips, making them feel indulgent while fueling us with the nutrients we need.
These muffins combine the comfort of a classic chocolate chip treat with the power of protein to keep us energized throughout the day. Whether we’re meal-prepping for the week or need a quick grab-and-go snack, this recipe fits right into a busy lifestyle. Plus, they’re so easy to make, even beginners will feel like pros in the kitchen.
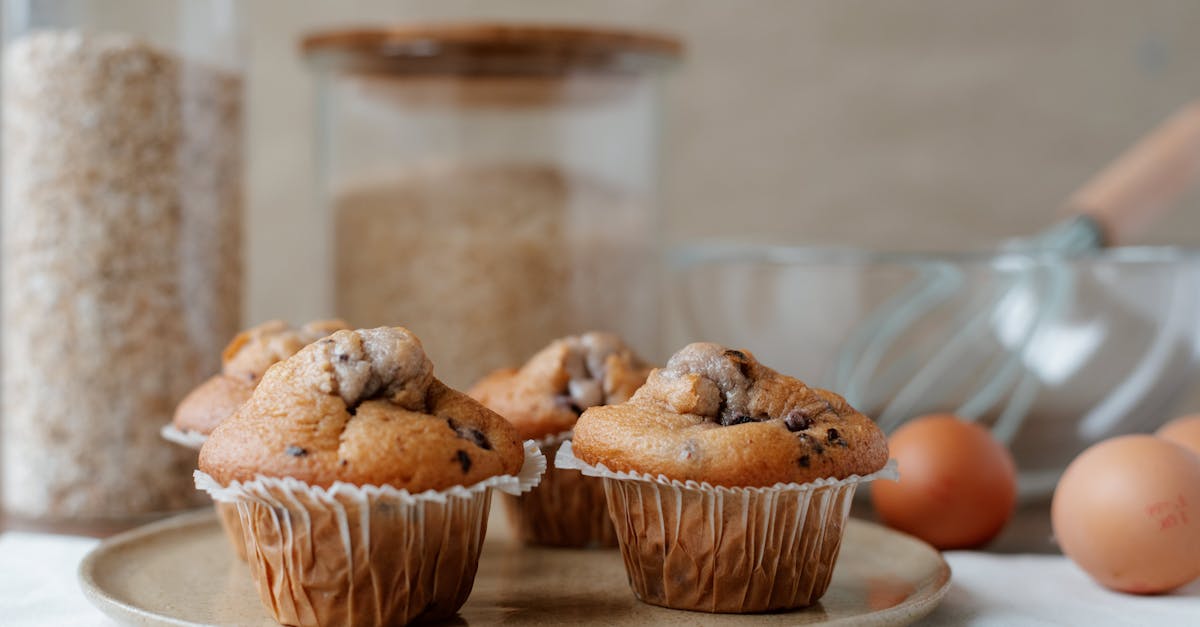
Chocolate Chip Protein Muffin Recipe
Follow these step-by-step instructions to create soft, fluffy chocolate chip protein muffins that are packed with protein and irresistible chocolate flavor. This recipe is quick, beginner-friendly, and perfect for meal prep or an on-the-go snack.
Ingredients
Here’s what we’ll need for this recipe:
-
Dry Ingredients:
- 1 ½ cups oat flour (or blend rolled oats to a fine flour)
- 1 scoop (about 30g) vanilla protein powder
- 1 tsp baking powder
- ½ tsp baking soda
- ¼ tsp salt
- ⅓ cup mini chocolate chips (reserve 1 tbsp for topping)
-
Wet Ingredients:
- 2 large eggs
- ¾ cup unsweetened almond milk (or any milk of your choice)
- ¼ cup plain Greek yogurt
- 2 tbsp honey or maple syrup
- 1 tsp vanilla extract
Step-by-Step Instructions
- Preheat and Prepare:
Preheat your oven to 350°F. While waiting, line a 12-cup muffin tin with paper liners or grease them lightly with non-stick spray.
- Mix Dry Ingredients:
In a large mixing bowl, whisk together the oat flour, protein powder, baking powder, baking soda, and salt. Make sure the ingredients are evenly combined for a light, fluffy texture.
- Combine Wet Ingredients:
In a separate bowl, whisk the eggs. Add the unsweetened almond milk, Greek yogurt, honey, and vanilla extract. Mix until smooth.
- Create the Batter:
Gradually pour the wet mixture into the dry ingredients. Stir gently until just combined—avoid overmixing. Fold in the chocolate chips, keeping some aside for topping.
- Fill the Muffin Tin:
Spoon the batter evenly into the prepared muffin tin, filling each cup about ¾ full. Sprinkle the reserved chocolate chips on top of each muffin for a decorative and indulgent finish.
- Bake:
Place the muffin tin in the preheated oven and bake for 18-22 minutes. Check for doneness by inserting a toothpick into the center of a muffin—it should come out clean or with just a few moist crumbs.
- Cool:
Once baked, remove the tray from the oven and allow the muffins to cool in the tin for 5 minutes. Then transfer them to a wire rack to cool completely.
Nutritional Highlights (per muffin)
| Nutrient | Amount |
|---|---|
| Calories | ~120 kcal |
| Protein | 6g |
| Carbs | 15g |
| Fat | 4g |
| Fiber | 2g |
These muffins are a delicious combination of indulgence and nourishment! Keep a batch on hand for a quick breakfast or a post-workout snack.
Ingredients
Here’s everything we need to make these delicious chocolate chip protein muffins. Make sure to gather and prepare them as listed for a smooth baking experience:
Dry Ingredients:
- 1 cup oat flour (or finely ground oats)
- 2 scoops vanilla protein powder (about 60g)
- 1 tsp baking powder
- 1/2 tsp baking soda
- 1/4 tsp salt
Wet Ingredients:
- 2 large eggs (at room temperature)
- 1/2 cup almond milk (unsweetened or your preferred milk)
- 1/2 cup plain Greek yogurt (provides moisture and boosts protein)
- 1/3 cup honey or maple syrup (natural sweetness option)
- 1 tsp vanilla extract
Chocolate Chips:
- 1/2 cup mini or regular dark chocolate chips (plus extra for sprinkling on top, optional)
Optional Add-Ins:
If you want to customize, here are some ideas:
- 1/4 cup chopped walnuts or pecans (for crunch)
- 1/2 tsp cinnamon (adds warmth)
- 2 tbsp chia seeds or flaxseed meal (extra fiber and nutrition)
Ingredient Overview Table:
| Category | Ingredients | Purpose |
|---|---|---|
| Dry | Oat flour, protein powder, baking powder/soda, salt | Structure, rise, and texture |
| Wet | Eggs, almond milk, yogurt, honey/maple syrup, vanilla | Moisture, sweetness, and flavor |
| Chocolate Chips | Dark/milk chocolate | Sweet bursts in every bite |
| Optional Add-Ins | Nuts, spices, seeds | Personalization and nutritional boost |
With these nutritious ingredients ready, we’re well-prepared to whip up our soft and protein-packed muffins! Gather, measure, and prep to save time during the process.
Tools And Equipment
Before we dive into preparing our Chocolate Chip Protein Muffins, let’s ensure we have the right Tools And Equipment to make the process seamless. Having these items ready will streamline the baking experience and guarantee perfect muffins every time.
Essential Tools
Here’s a list of the key tools you’ll need:
- Mixing Bowls: One large and one medium-size bowl for combining wet and dry ingredients.
- Measuring Cups and Spoons: For accurate measurements of your ingredients, especially the protein powder.
- Whisk or Fork: To thoroughly mix wet ingredients and break up any clumps.
- Spatula: A silicone or rubber spatula for scraping down the sides of the bowl and folding the chocolate chips into the batter.
- Muffin Tin: A 12-cup standard-size muffin pan. Non-stick works best, or you can line it with paper liners.
- Baking Liners or Cooking Spray: To prevent the muffins from sticking to the tin.
- Oven Mitts: To safely remove the hot muffin tin from the oven.
Optional Tools
Although not essential, these tools could elevate your baking process:
- Electric Hand Mixer: If you prefer to save time mixing.
- Cookie Scoop or Ice Cream Scoop: For evenly portioning out the batter into the muffin tin.
- Cooling Rack: To cool the muffins evenly, ensuring they maintain their fluffy texture.
Quick Tool Checklist
For easy reference, here’s a breakdown in table format:
| Tool | Purpose | Tip |
|---|---|---|
| Mixing Bowls | For mixing wet and dry ingredients separately. | Use sturdy bowls to avoid spills. |
| Measuring Cups/Spoons | Ensures precise measurements for balanced muffins. | Level off dry ingredients for accuracy. |
| Whisk or Fork | Helps avoid lumps in the wet ingredients. | Opt for a whisk for smoother blends. |
| Spatula | Folding chocolate chips and scraping batter. | Use a flexible spatula for better mixing. |
| Muffin Tin | Shapes the muffins to perfection. | Grease or use liners to prevent sticking. |
| Oven Mitts | Ensures safe handling while baking. | Keep them nearby during the bake time. |
These tools ensure the process is easy, efficient, and mess-free. With everything assembled, we’re perfectly equipped to bake our soft, protein-packed muffins.
Directions
Let’s dive into the step-by-step process of making these Chocolate Chip Protein Muffins. Follow these clear instructions for a hassle-free and delicious baking experience.
Prep The Ingredients
- Preheat the oven to 350°F (175°C) to ensure it’s ready to bake the muffins.
- Lightly spray a 12-cup muffin tin with non-stick spray or line it with muffin liners to prevent sticking.
- Measure and gather all the ingredients. Use the following tips for better preparation:
- Sift the dry ingredients: Sift oat flour, vanilla protein powder, baking powder, and a pinch of salt into a large bowl to avoid lumps.
- Prepare the wet ingredients: In another bowl, whisk together eggs, almond milk, Greek yogurt, honey (or maple syrup), and vanilla extract.
| Pro Tip: Make sure all wet ingredients are at room temperature for smoother mixing and even baking. |
Mix The Batter
- In a large mixing bowl, gently combine the dry ingredients.
- Slowly pour the wet ingredients into the dry mixture while stirring continuously with a whisk or spatula.
- Stir until no dry spots remain. Do not overmix; it’s okay if the batter looks slightly lumpy, as overmixing can make the muffins dense.
“The consistency you’re aiming for is slightly thick but pourable.”
Fold In The Chocolate Chips
- Add ¾ cup of semi-sweet chocolate chips to the batter and gently fold with a spatula until evenly distributed.
- For extra indulgence, save a small handful of chocolate chips to sprinkle on top of the muffins before baking.
| Optional Add-ins: Mix in chopped nuts, dried fruits, or seeds for additional flavor and texture. |
Prepare The Muffin Tin
- Using a spoon, ice cream scoop, or measuring cup, evenly divide the batter among the muffin tin slots, filling each about ¾ full.
- Gently tap the muffin tin on the counter to release any air bubbles and ensure the batter settles evenly.
Baking Instructions
Let’s dive into the process of baking these chocolate chip protein muffins. Follow these simple steps carefully to ensure soft, fluffy, and golden muffins every time.
Step 1: Preheat the Oven
Set your oven to 350°F (175°C) and allow it to fully preheat. This ensures an even baking environment for our muffins. Meanwhile, lightly grease a 12-cup muffin tin or line it with paper muffin liners for easy cleanup.
Step 2: Prepare Dry Ingredients
In a large mixing bowl, sift together:
- 1 cup oat flour
- 1 scoop (about 30g) vanilla protein powder
- ½ teaspoon baking soda
- 1 teaspoon baking powder
- ¼ teaspoon salt
Sifting removes clumps and aerates the flour for a lighter texture.
Step 3: Combine Wet Ingredients
In a separate bowl, whisk:
- 2 large eggs
- ½ cup unsweetened almond milk
- ½ cup Greek yogurt (plain or vanilla)
- 3 tablespoons honey or maple syrup
- 1 teaspoon vanilla extract
Tip: Ensure the wet ingredients are at room temperature to mix smoothly.
Step 4: Mix the Batter
Slowly pour the wet mixture into the dry ingredient bowl. Use a rubber spatula to gently fold the ingredients until just combined. Do not overmix, as this can lead to dense muffins instead of fluffy ones.
Step 5: Add Chocolate Chips
Fold in ½ cup of chocolate chips using a spatula. Feel free to mix in optional add-ins like chopped nuts or dried fruits for extra flavor and texture.
Step 6: Fill the Muffin Tin
Using a spoon or a cookie scoop, evenly distribute the batter into the prepared muffin tin, filling each cup about ¾ full. This ensures the muffins have space to rise without spilling over.
Step 7: Bake
Place the muffin tin in the preheated oven and bake for 18-22 minutes. You’ll know they’re done when the tops are golden and a toothpick inserted into the center of a muffin comes out clean or with a few moist crumbs. Avoid overbaking, as this can dry out the muffins.
Step 8: Cool the Muffins
Remove the muffin tin from the oven using oven mitts and place it on a cooling rack. Let the muffins cool in the tin for about 5 minutes, then transfer them directly onto the rack to cool completely. This prevents soggy bottoms and ensures balanced cooling.
Baking Time and Yield Table
| Bake Time (minutes) | Yield |
|---|---|
| 18-22 | 12 standard muffins |
Make-Ahead And Storage Tips
Preparing chocolate chip protein muffins ahead of time can save us effort and ensure we have a quick, nutritious snack available anytime. Here are our key tips to keep them fresh and delicious:
1. Storing Freshly Baked Muffins
- Allow the muffins to cool completely on a wire rack before storing to prevent condensation, which can cause sogginess.
- Place the muffins in an airtight container or sealable plastic bag to protect them from air and moisture.
- Store them at room temperature for up to 3 days.
Pro Tip: Add a paper towel at the bottom of the container and on top of the muffins to absorb excess moisture.
2. Long-Term Freezer Storage
Chocolate chip protein muffins freeze exceptionally well. To preserve their flavor and texture:
- Wrap each muffin in plastic wrap or aluminum foil to prevent freezer burn.
- Place the wrapped muffins in a freezer-safe airtight container or a zip-top freezer bag.
- Store in the freezer for up to 3 months.
When you’re ready to enjoy, remove the muffin from the freezer:
- Let it thaw at room temperature for about 30 minutes.
- For a warm, freshly-baked experience, microwave it for 15-20 seconds.
3. Meal Prep and Portioning
- If we bake muffins in bulk for the week, portion them into grab-and-go freezer bags. This keeps them organized and avoids the hassle of unwrapping multiple muffins daily.
- For pre-workout snacks or busy mornings, label each bag with the date and portion size.
4. Refrigeration Tips
While refrigeration is not necessary for storing protein muffins, doing so can extend their freshness:
- Store in an airtight container in the fridge for up to 7 days.
- Allow refrigerated muffins to come to room temperature or heat gently in the microwave before eating.
Here’s a quick storage reference table for easy planning:
| Storage Method | Duration | Tips |
|---|---|---|
| Room Temperature | Up to 3 days | Use airtight containers and paper towels for moisture |
| Refrigerator | Up to 7 days | Store in airtight containers |
| Freezer | Up to 3 months | Individually wrap muffins to avoid freezer burn |
Expert Suggestion: Always date freezer bags or containers to track freshness and batch rotation.
By following these storage tips, we can enjoy moist, protein-rich muffins all week or even months ahead, without compromising their texture or flavor.
Conclusion
These chocolate chip protein muffins are the perfect blend of taste, nutrition, and convenience. Whether you’re meal prepping for the week or looking for a quick, satisfying snack, they check all the boxes. With their soft texture and customizable options, they’re a treat that fits seamlessly into a busy lifestyle.
Let’s get baking and enjoy the balance of indulgence and nourishment these muffins bring to the table!
Frequently Asked Questions
1. Are chocolate chip protein muffins healthy?
Yes, chocolate chip protein muffins are healthy! They provide approximately 120 calories, 6g of protein, and 2g of fiber per muffin, making them a nutritious option for breakfast or a post-workout snack. They’re made with wholesome ingredients like oat flour, Greek yogurt, and protein powder.
2. Can I use a different type of protein powder?
Absolutely. You can substitute the vanilla protein powder with any flavor or type, such as whey, plant-based, or casein protein. Keep in mind that the flavor and texture of the muffins may vary slightly.
3. How long do these muffins stay fresh?
At room temperature, the muffins stay fresh for up to 3 days in an airtight container. You can refrigerate them for about a week or freeze them for up to 3 months for long-term storage.
4. Can I make these muffins gluten-free?
Yes, you can make these muffins gluten-free by using certified gluten-free oat flour and ensuring that all other ingredients, such as protein powder, are also gluten-free.
5. Can I customize this recipe?
Definitely! You can add nuts, dried fruits, or seeds for extra flavor and texture. You can even use dark chocolate chips or sugar-free chocolate for a lower-sugar option.
6. How do I know when the muffins are done baking?
The muffins are done when they’re golden brown and a toothpick inserted into the center comes out clean. This usually takes 18–22 minutes at 350°F.
7. Can I skip the chocolate chips?
Yes, you can skip the chocolate chips if desired. The muffins will still be delicious and retain their sweet flavor from honey or maple syrup.
8. What’s the best way to freeze the muffins?
Let the muffins cool completely, wrap them individually in plastic wrap, and place them in an airtight freezer-safe bag or container. This prevents freezer burn and makes portioning easy.
9. Can I use regular flour instead of oat flour?
Yes, you can use regular flour, like all-purpose or whole wheat flour, but the texture may be slightly different. Adjust the liquid ingredients if needed to maintain consistency.
10. Do I need special equipment to make these muffins?
No special equipment is required. Basic kitchen tools like mixing bowls, a whisk or fork, a spatula, a muffin tin, and oven mitts are enough. Optionally, you can use a cooling rack or an electric hand mixer for convenience.