
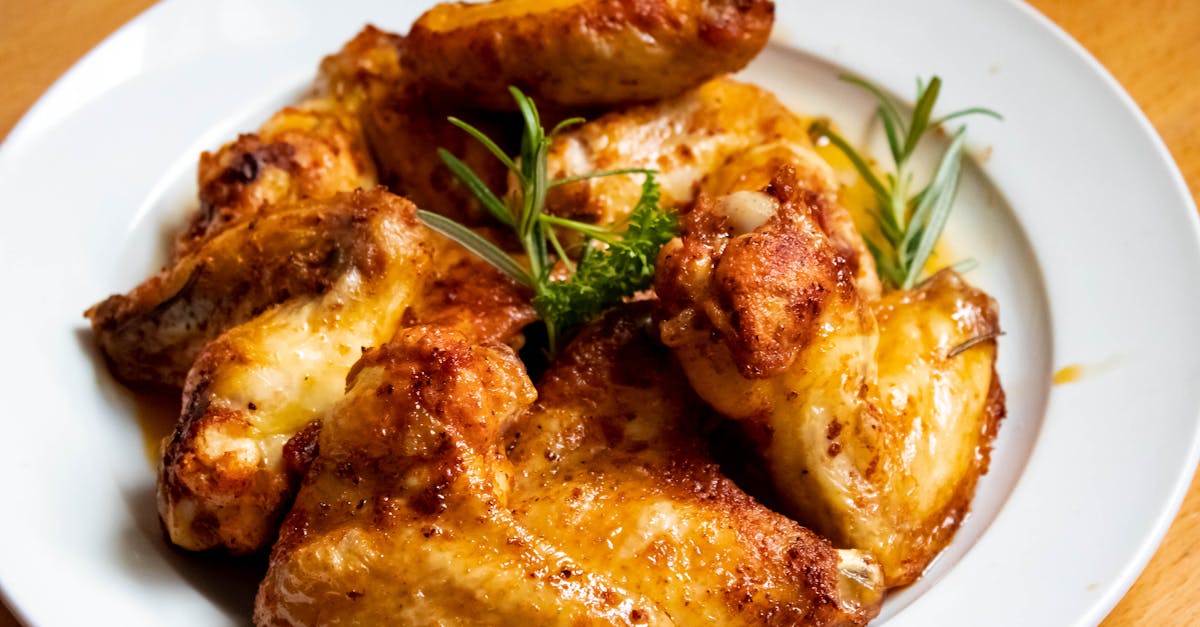
There’s something undeniably satisfying about a Chicken Finger Sub. Crispy golden chicken fingers tucked inside a soft, fresh sub roll create the perfect handheld meal that’s both comforting and delicious. This recipe takes a classic favorite and turns it into a hearty sandwich that’s perfect for lunch, dinner, or even game day.
We love how versatile this sub can be. You can load it with your favorite toppings like lettuce, tomato, cheese, and a tangy sauce to make every bite bursting with flavor. Plus, it’s easy to customize to your taste and quick to prepare, making it a go-to option for busy weeknights or casual gatherings. Let’s dive into making this crave-worthy Chicken Finger Sub that’s sure to become a staple in your recipe collection.
Ingredients
To master the Chicken Finger Sub, we start by gathering the essentials. Each component plays a crucial role in crafting that perfect balance of texture and flavor.
For the Chicken Fingers
- 1 lb boneless skinless chicken breasts, cut into 3-inch strips
- 1 cup all-purpose flour
- 2 tsp paprika
- 1 tsp garlic powder
- 1 tsp onion powder
- 1/2 tsp salt
- 1/2 tsp black pepper
- 2 large eggs
- 1 cup buttermilk
- 2 cups panko breadcrumbs
- Vegetable oil, for frying
For the Sub Sandwich
- 4 soft sub rolls, about 6 inches each
- 1 cup shredded lettuce
- 1 large tomato, thinly sliced
- 4 slices cheddar or Monterey Jack cheese
- Pickles, optional
For the Sauce
- 1/2 cup mayonnaise
- 2 tbsp ketchup
- 1 tbsp Dijon mustard
- 1 tsp honey
- 1/2 tsp smoked paprika
- Salt and pepper, to taste
| Ingredient Group | Key Ingredients |
|---|---|
| Chicken Fingers | Chicken strips, flour, paprika, garlic powder, eggs, panko |
| Sub Sandwich | Sub rolls, lettuce, tomato, cheese, pickles (optional) |
| Sauce | Mayonnaise, ketchup, Dijon mustard, honey, smoked paprika |
By preparing these ingredients carefully we ensure every bite of our Chicken Finger Sub delivers the crispy crunch, creamy richness, and fresh zest that make this sandwich irresistible.
Equipment Needed
To create the perfect Chicken Finger Sub, having the right equipment is essential. Each tool plays a crucial role in achieving that crispy texture and assembling the sandwich efficiently. Here’s what we recommend:
- Mixing Bowls: For coating the chicken fingers, we use separate bowls for the flour mixture, beaten eggs, and panko breadcrumbs. Multiple bowls ensure an even and clean breading process.
- Whisk or Fork: To thoroughly beat the eggs and combine the ingredients in the sauce, a whisk or fork is indispensable.
- Cutting Board and Sharp Knife: We need these to trim the chicken breasts into uniform finger-sized strips and to slice fresh veggies and sub rolls.
- Frying Pan or Deep Skillet: A heavy-bottomed pan preferred for shallow frying the chicken fingers to crispy golden perfection.
- Tongs or Slotted Spoon: Essential for safely flipping the chicken strips during frying and removing them without excess oil.
- Paper Towels: We line a plate with paper towels to drain the fried chicken fingers, ensuring they stay crispy and not greasy.
- Baking Sheet: Optional—used if you prefer baking the chicken fingers instead of frying.
- Measuring Spoons and Cups: Accurate seasoning and sauce preparation depend on precise measurements.
- Spatula or Butter Knife: To spread the sauce evenly on the sub roll.
Below is a summary table of our essential equipment:
| Equipment | Purpose |
|---|---|
| Mixing Bowls | Coating chicken fingers |
| Whisk or Fork | Beating eggs and mixing sauce |
| Cutting Board & Knife | Slicing chicken and vegetables |
| Frying Pan or Skillet | Cooking chicken fingers |
| Tongs or Slotted Spoon | Flipping and removing chicken fingers |
| Paper Towels | Draining excess oil |
| Baking Sheet (optional) | Baking chicken fingers as an alternative method |
| Measuring Spoons/Cups | Accurate ingredient measurement |
| Spatula/Butter Knife | Spreading sauce on the sub roll |
Prep Work
To create the perfect Chicken Finger Sub we must prepare each component meticulously. This ensures every bite combines crispy, flavorful chicken with fresh toppings and a creamy sauce.
Preparing the Chicken Fingers
- Slice boneless chicken breasts into uniform strips about 3 inches long and 1 inch wide. This size guarantees even cooking and a satisfying bite.
- Set up three bowls: one with seasoned flour (flour, salt, black pepper, garlic powder, smoked paprika), one with beaten eggs, and one with panko breadcrumbs.
- Dredge each chicken strip in the flour mixture, then dip into the egg wash, and finally coat thoroughly with panko breadcrumbs. Press gently to ensure the crumbs adhere well.
- Allow the breaded chicken fingers to rest on a plate for 10 minutes before cooking. This helps the coating bind and crisp up nicely when fried or baked.
Preparing the Sub Bread and Toppings
- Slice your soft sub rolls lengthwise but not all the way through, creating a hinge to hold fillings securely.
- Wash and dry crisp iceberg lettuce leaves, tear into sandwich-sized pieces.
- Slice ripe tomatoes into thin, even rounds to add juicy freshness without sogginess.
- Prepare optional toppings such as dill pickles or sliced red onions to layer extra zest.
- Arrange the toppings on a platter for easy assembly after cooking the chicken fingers.
Making the Sauce
- In a small bowl, combine the following ingredients:
| Ingredient | Amount |
|---|---|
| Mayonnaise | ½ cup |
| Ketchup | 2 tablespoons |
| Dijon mustard | 1 tablespoon |
| Honey | 1 teaspoon |
| Smoked paprika | ½ teaspoon |
- Whisk thoroughly until smooth and creamy.
- Taste and adjust seasonings if desired, adding a pinch of salt or more honey for sweetness.
- Chill the sauce while preparing the rest of the sub to allow flavors to meld perfectly.
Cooking Instructions
Follow these steps carefully to achieve perfectly crispy Chicken Finger Subs with juicy chicken fingers and a flavorful, satisfying bite.
Cooking the Chicken Fingers
- Heat the oil: Pour enough vegetable or canola oil into a deep skillet or frying pan to create a 1-inch-deep layer. Heat the oil over medium-high heat until it reaches 350°F (175°C) for optimal frying temperature.
- Prepare the chicken fingers: While the oil heats, ensure the breaded chicken strips have rested for 10 minutes, allowing the coating to adhere properly.
- Fry the chicken fingers: Using tongs, carefully place 4-5 chicken fingers into the hot oil without overcrowding the pan. Fry them for 3-4 minutes per side or until they turn a crispy golden brown and the internal temperature reaches 165°F (74°C).
- Drain excess oil: Remove the cooked chicken fingers and place them on a plate lined with paper towels to absorb excess oil, preserving their crispiness.
- Repeat: Continue frying the remaining chicken fingers in batches, maintaining the oil temperature between 340°F and 350°F to ensure consistent cooking.
Toasting the Sub Bread (Optional)
- Slice the sub rolls: Cut the soft sub rolls lengthwise without slicing completely through, creating a hinge to hold fillings securely.
- Preheat the oven or skillet: For an oven, preheat to 375°F (190°C). If using a skillet, warm it over medium heat.
- Toast the bread: Lightly brush the inside of each roll with butter or olive oil. Place rolls cut-side down onto a baking sheet or skillet. Toast for 3-4 minutes until the bread is crisp and golden.
- Cool briefly: Remove toasted rolls and let them cool for 1-2 minutes before assembling. This step enhances the texture contrast between the crispy chicken fingers and the soft, toasted bread.
Temperature Guide for Chicken Fingers Frying
| Stage | Temperature (°F) | Temperature (°C) | Time per Side |
|---|---|---|---|
| Oil heating target | 350 | 175 | – |
| Cooking temperature | 340-350 | 171-175 | 3-4 minutes |
| Chicken doneness | 165 (internal) | 74 (internal) | – |
By carefully managing oil temperature and toasting the sub rolls, we guarantee a crispy and flavor-packed Chicken Finger Sub every time.
Assembling the Chicken Finger Sub
Now that our chicken fingers are perfectly cooked and our toppings are prepped, it’s time to bring everything together. Assembling the Chicken Finger Sub carefully ensures every bite delivers the ideal balance of textures and flavors.
Layering the Ingredients
We start by opening our soft sub roll horizontally, creating a sturdy base for the layers to come. First, we add a generous layer of crisp lettuce to provide fresh crunch. Next, we arrange ripe tomato slices evenly to add juiciness and vibrant color.
Then, we layer the hot, crispy chicken fingers directly on top to maintain their crunch and warmth. To enhance richness, a few slices of cheese like cheddar or provolone go next—letting them slightly melt from the residual heat of the chicken fingers. Optional pickles can be added for a tangy contrast if desired.
| Ingredient | Quantity | Preparation |
|---|---|---|
| Sub roll | 1 soft roll | Sliced horizontally |
| Lettuce | 1 leaf or handful | Washed and dried |
| Tomato | 2–3 slices | Fresh and evenly sliced |
| Chicken fingers | 4–5 pieces | Hot and crispy |
| Cheese slices | 1–2 slices | Optional, slightly melted |
| Pickles | 2–3 slices (optional) | Thinly sliced |
Adding the Sauce
Our signature sauce ties the entire Chicken Finger Sub together with creamy, smoky, and slightly sweet notes. Using a spatula or butter knife, we spread a generous layer of the sauce on both the top and bottom halves of the sub roll before closing the sandwich. This ensures every bite is perfectly coated.
Tip: For an extra layer of flavor, drizzle a little sauce directly onto the chicken fingers before adding the cheese.
If desired, we can add extra sauce after assembly for dipping or a little more moisture.
Serving Suggestions
To elevate our Chicken Finger Sub experience, we can pair it with complementary sides and beverages that balance its crispy and savory profile.
Ideal Side Dishes
- Crispy French Fries
A classic combination. Choose either shoestring or waffle fries for added texture contrast.
- Coleslaw
Its cool crunch and tangy dressing offer a refreshing counterpoint to the hot sandwich.
- Pickle Spears
Their sharpness cuts through the richness of the fried chicken fingers.
- Onion Rings
For those who love double the crunch, onion rings add a sweet-savory dimension.
Recommended Beverages
- Iced Tea
Unsweetened or lightly sweetened to cleanse the palate.
- Lemonade
Its tartness complements the smoky and spicy notes in the sauce.
- Craft Beer
A lager or pale ale enhances the savory flavors.
Serving Temperature & Presentation Tips
| Component | Ideal Temperature | Presentation Tip |
|---|---|---|
| Chicken finger sub | Serve hot, just assembled | Slice diagonally to reveal layers |
| Side dishes | Fries and rings hot | Serve in small baskets or ramekins |
| Sauce | Slightly chilled | Provide extra sauce in a small bowl for dipping |
| Garnishes | Fresh | Add fresh herbs like parsley or chives for color |
“Serving our Chicken Finger Sub with thoughtfully chosen sides and drinks transforms a simple sandwich into a satisfying meal perfect for casual lunches or gatherings.“
By coordinating the temperature, textures, and flavors, we ensure every bite remains exciting and balanced. Let’s set the table with these suggestions to impress any guest or family member.
Make-Ahead and Storage Tips
Proper make-ahead and storage techniques ensure our Chicken Finger Sub remains fresh, crisp, and flavorful, even after preparation or leftovers. Here’s how we do it:
Preparing Chicken Fingers Ahead of Time
- Bread and store uncooked chicken fingers in an airtight container or zip-top bag. Arrange strips in a single layer with parchment paper between layers to prevent sticking.
- Keep them refrigerated for up to 24 hours before frying for optimal freshness.
- Alternatively, freeze breaded chicken fingers on a baking sheet for 1-2 hours, then transfer to a freezer-safe bag or container. They last up to 1 month frozen.
- When ready, cook directly from frozen by adjusting frying time by a few minutes.
Sauce and Toppings Storage
- Store the signature sauce in a sealed container in the fridge for up to 5 days.
- Prepare fresh toppings like lettuce and tomato on the day of serving for the best texture and flavor.
- If necessary, slice tomatoes and store them in a shallow airtight container lined with paper towels to absorb moisture for up to 1 day.
Assembling in Advance
- For make-ahead subs, fry chicken fingers fully, then allow them to cool completely.
- Store assembled sandwiches wrapped tightly in plastic wrap or foil and refrigerate for up to 12 hours.
- To avoid sogginess, keep the sauce and fresh veggies separate until serving. Add just before eating.
Reheating Leftovers
- Reheat fried chicken fingers in a preheated oven at 375°F (190°C) for 8-10 minutes on a wire rack placed over a baking sheet to maintain crispiness.
- Avoid microwaving as it softens the breading.
- Toast the sub roll lightly before assembling leftover subs to refresh the bread.
Storage Time Summary
| Item | Storage Method | Duration | Notes |
|---|---|---|---|
| Breaded uncooked chicken | Refrigerated airtight | Up to 24 hours | Use parchment between layers |
| Breaded chicken (frozen) | Frozen airtight container | Up to 1 month | Fry directly from frozen |
| Signature sauce | Refrigerated sealed container | Up to 5 days | Stir well before use |
| Fresh lettuce/tomatoes | Refrigerator (separate) | Up to 1 day | Store separately to maintain crispness |
| Assembled chicken finger sub | Refrigerated wrapped | Up to 12 hours | Sauce added just before serving |
“Tip: To maintain the iconic crunch of our Chicken Finger Sub, always reheat chicken fingers in the oven on a wire rack instead of the microwave.”
By following these make-ahead and storage tips, we can enjoy our Chicken Finger Sub with the same satisfying crunch, fresh toppings, and balanced flavors any time we want.
Conclusion
Crafting the perfect Chicken Finger Sub is all about balancing textures and flavors with fresh ingredients and that signature sauce. Whether you’re making it for a quick lunch or a casual get-together, this recipe offers flexibility and deliciousness in every bite.
With the right prep and cooking techniques, you’ll consistently achieve crispy chicken fingers and a satisfying sandwich experience. Plus, the make-ahead tips make it easy to enjoy anytime without sacrificing quality.
We’re confident this Chicken Finger Sub will become a favorite go-to in your kitchen, delivering comfort and flavor whenever you need it.
Frequently Asked Questions
What makes a Chicken Finger Sub so appealing?
A Chicken Finger Sub combines crispy chicken fingers with a soft sub roll, offering a satisfying texture contrast. Its versatility lets you add toppings like lettuce, tomato, cheese, and sauce, creating a flavorful and customizable sandwich perfect for lunch, dinner, or casual gatherings.
What ingredients do I need to make Chicken Finger Subs?
You’ll need boneless chicken breasts, flour, spices, eggs, panko breadcrumbs, soft sub rolls, lettuce, tomato, cheese, and optional pickles. The signature sauce includes mayonnaise, ketchup, Dijon mustard, honey, and smoked paprika for added flavor.
What equipment is necessary to prepare the sub?
Essential tools include mixing bowls, a whisk or fork, cutting board, sharp knife, frying pan or deep skillet, tongs or slotted spoon, paper towels, a baking sheet (optional), measuring spoons and cups, and a spatula or butter knife for spreading sauce.
How do you prepare the chicken fingers for the sub?
Slice boneless chicken breasts into uniform strips, dredge them in flour, dip in egg, and coat with panko breadcrumbs. Let the breaded chicken rest briefly before frying to ensure crispiness and proper cooking.
What is the best way to cook chicken fingers for the sub?
Heat oil to 350°F (175°C) and fry the breaded chicken strips in batches until golden brown and fully cooked. Drain excess oil on paper towels for a crispy result. Optionally, you can bake the chicken fingers on a baking sheet.
How do you assemble a Chicken Finger Sub?
Start with a soft sub roll, layer crisp lettuce, ripe tomato slices, hot chicken fingers, and optional cheese. Spread the signature sauce generously on both halves of the roll for a balanced flavor in every bite.
What are good side dishes and drinks to serve with the sub?
Serve with crispy French fries, coleslaw, pickle spears, or onion rings. Pair the meal with beverages like iced tea, lemonade, or craft beer to complement the flavors and enhance your dining experience.
Can I prepare Chicken Finger Subs ahead of time?
Yes, store uncooked chicken fingers in an airtight container or freeze them. The sauce can be refrigerated for up to five days. Assemble fully cooked subs in advance and add sauce and fresh toppings just before serving.
How should I reheat Chicken Finger Subs without losing crunch?
Reheat in an oven instead of a microwave to maintain the chicken’s crispy texture. Preheat the oven to 350°F (175°C) and warm the sub for about 10-15 minutes for best results.
Is the Chicken Finger Sub suitable for casual gatherings?
Absolutely! Its quick preparation, customizable toppings, and delicious flavor make the Chicken Finger Sub ideal for casual lunches, dinners, or social events with family and friends.