
Chestnuts have a unique, sweet flavor that adds a cozy touch to any dessert. Our Chestnut Cup recipe brings out the best of this seasonal favorite in a simple yet elegant treat. Perfect for fall and winter gatherings, these cups are as delightful to look at as they are to eat.
We’ve crafted this recipe to highlight the rich, nutty taste of chestnuts combined with creamy textures that melt in your mouth. Whether you’re serving them at a holiday party or enjoying a quiet night in, these chestnut cups make every moment special. Let’s dive into a recipe that’s both comforting and impressive.
Ingredients
To create our Chestnut Cup Recipe, we must gather ingredients that bring out the rich, nutty flavor and smooth texture of chestnuts. Below are the components divided by their role in the dessert.
For the Chestnut Filling
- 2 cups cooked and peeled chestnuts (fresh or vacuum-packed)
- 1/2 cup granulated sugar
- 1/4 cup whole milk or heavy cream
- 1 teaspoon pure vanilla extract
- 2 tablespoons unsalted butter
- 1/4 teaspoon ground cinnamon (optional)
- Pinch of salt
For the Cup Base
- 1 1/2 cups all-purpose flour
- 1/2 cup unsalted butter, cold and cubed
- 1/4 cup granulated sugar
- 1 large egg yolk
- 2–3 tablespoons cold water
- Pinch of salt
For the Toppings and Garnishes
- 1 cup heavy whipping cream
- 2 tablespoons powdered sugar
- 1/2 teaspoon pure vanilla extract
- Shelled roasted chestnuts, chopped (for garnish)
- Shaved dark chocolate or cocoa powder (optional)
- Fresh mint leaves (optional)
| Ingredient Group | Key Ingredients |
|---|---|
| Chestnut Filling | Cooked chestnuts, sugar, milk/cream, vanilla, butter, cinnamon, salt |
| Cup Base | Flour, butter, sugar, egg yolk, cold water, salt |
| Toppings/Garnishes | Whipping cream, powdered sugar, vanilla, roasted chestnuts, chocolate, mint |
This carefully selected list ensures our dessert will feature the distinct chestnut flavor with complementary textures from the buttery base and the rich, airy toppings.
Equipment Needed
To create the perfect Chestnut Cup, having the right equipment is essential. Each tool plays a key role in achieving the delicate texture and rich flavors of this fall-inspired dessert. Below we list and explain the essential tools we rely on throughout the recipe.
| Equipment | Purpose |
|---|---|
| Mixing Bowls | For combining chestnut filling and cup base ingredients |
| Food Processor | To finely blend cooked chestnuts into a smooth paste |
| Saucepan | For warming milk or cream when preparing the filling |
| Whisk | To incorporate air into whipping cream and mix ingredients smoothly |
| Pastry Cutter or Blender | To cut cold butter into flour for flaky cup base crust |
| Measuring Cups & Spoons | For accurate ingredient measuring |
| Rolling Pin | To roll out the dough evenly |
| Tart Molds or Muffin Tin | For shaping and baking individual chestnut cups |
| Oven | To bake the cup base until golden and crisp |
| Cooling Rack | To cool baked cups before filling and decorating |
| Electric Mixer (optional) | For whipping cream to stiff peaks |
| Spatula | For folding ingredients carefully and scraping bowls |
Using these tools allows us to work with precision and ease. A food processor ensures our chestnut filling is luxuriously smooth without lumps. The pastry cutter helps achieve that flaky texture in the crust by evenly distributing cold butter. A rolling pin combined with tart molds shapes our cups uniformly, delivering a consistent presentation.
We recommend preparing all equipment before starting the recipe. This keeps the process moving smoothly and helps us focus on crafting the perfect Chestnut Cup layers with confidence.
Prep Work
Before we dive into assembling our Chestnut Cup, careful preparation is key. This ensures we achieve the perfect texture and rich flavor that make this dessert so special.
Preparing the Chestnuts
We start by handling the star ingredient: the chestnuts. To maximize their natural sweetness and creaminess:
- Score the Chestnuts: Using a sharp knife, cut an “X” on the flat side of each chestnut. This prevents bursting while roasting and makes peeling easier.
- Roast or Boil:
| Method | Time | Notes |
|———-|————–|——————————-|
| Roast | 20-25 minutes| 350°F (175°C), chestnuts face down on a baking sheet |
| Boil | 15-20 minutes| In boiling water until tender | - Peel While Warm: Remove shells and the thin brown skin immediately while the chestnuts are warm. This task is easier and helps achieve a smooth filling.
- Prepare for Filling: Once peeled, roughly chop chestnuts or blend into a paste using a food processor for a creamy consistency.
Preparing the Cup Base
Our buttery, flaky cup base provides the perfect vessel for the chestnut filling. Here’s how we prep it efficiently:
- Mix Dry Ingredients: Combine 1 cup flour, 2 tablespoons sugar, and a pinch of salt in a mixing bowl.
- Cut in Cold Butter: Cube ½ cup cold unsalted butter and cut into the flour mixture using a pastry cutter or fingers until it resembles coarse crumbs.
- Add Egg Yolk and Cold Water: Mix in 1 egg yolk for richness, then slowly add 2-3 tablespoons of ice-cold water. Use just enough to bring the dough together without making it sticky.
- Chill the Dough: Shape dough into a disk, wrap in plastic wrap, and refrigerate for at least 30 minutes to relax gluten and firm up the butter.
- Roll and Shape: On a lightly floured surface, roll out the dough to about ⅛ inch thickness. Cut circles slightly larger than the tart molds.
- Assemble and Chill: Carefully place dough into molds pressing gently to shape. Chill again for 15 minutes before baking.
Following these prep work steps carefully ensures our Chestnut Cup base is delightfully tender and holds the luscious filling perfectly.
Directions
Follow these detailed steps to create our delicious Chestnut Cup. Each stage builds layers of texture and flavor to bring out the best in every bite.
Making the Chestnut Filling
- Warm the milk or cream in a saucepan over medium heat until it barely simmers. Remove from heat.
- In a food processor, combine the cooked and peeled chestnuts, sugar, vanilla extract, and optional cinnamon and salt.
- Slowly stream in the warm milk or cream while pulsing until you achieve a smooth, creamy chestnut paste.
- Transfer the chestnut filling to a bowl and stir in the butter until fully incorporated, enhancing the richness.
- Cover and refrigerate the filling to let it thicken and chill while we prepare the cup base.
Baking the Cup Base
| Step | Details | Temperature/Time |
|---|---|---|
| Prepare the oven | Preheat to 350°F (175°C) | |
| Roll out dough | On a lightly floured surface, roll dough to 1/8 inch thick | |
| Shape dough | Cut dough into circles slightly larger than tart molds | |
| Fit dough into molds | Gently press dough circles into each tart mold ensuring even edges | |
| Blind bake | Line tart shells with parchment, fill with pie weights or beans | 12 minutes |
| Remove weights and bake | Continue baking until golden and crisp | Additional 8-10 minutes |
Allow the baked cup bases to cool completely before filling.
Assembling the Chestnut Cups
- Spoon the chilled chestnut filling into the cooled cup bases, filling each cup generously but neatly to avoid spills.
- Smooth the tops with the back of a spoon or spatula to create a clean surface for toppings.
- Place the filled cups in the refrigerator to firm up for at least 30 minutes before decorating.
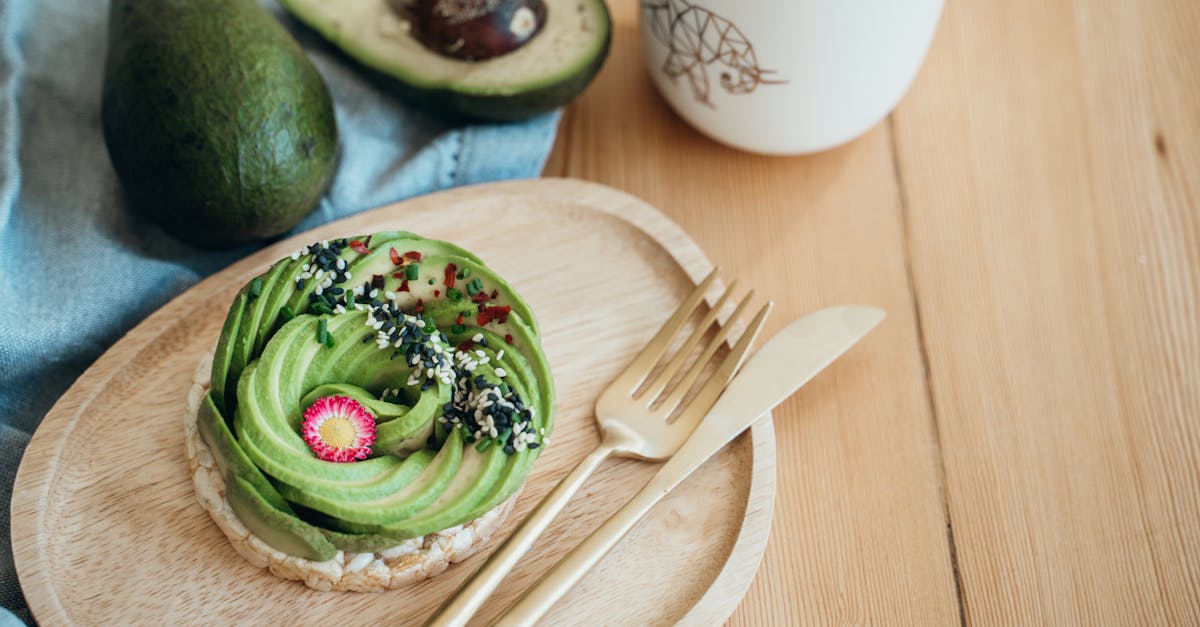
Adding Toppings and Garnishes
- In a chilled mixing bowl, whip the heavy whipping cream with powdered sugar and vanilla extract until soft peaks form.
- Pipe or spoon the whipped cream over each chestnut-filled cup generously, creating a light, fluffy contrast.
- Garnish with chopped roasted chestnuts for texture and a nutty crunch.
- Optionally, shave or sprinkle dark chocolate on top for a rich, decadent finish.
- Add a fresh mint leaf for color and a hint of freshness.
“The visual appeal and layered flavors make these Chestnut Cups a memorable dessert centerpiece.“
Serve immediately or refrigerate until ready to enjoy.
Serving Suggestions
To fully enjoy our Chestnut Cup recipe, we recommend these serving ideas that enhance its rich, nutty flavor and creamy texture.
Ideal Temperature
Serve the chestnut cups chilled or slightly chilled. This temperature balances the silky filling with the crisp buttery crust perfectly.
Complementary Drinks
Pair the dessert with:
| Drink Option | Description |
|---|---|
| Hot espresso or coffee | Cuts through sweetness with bold bitterness. |
| Warm spiced tea | Complements chestnuts with subtle aromatic notes. |
| Sweet dessert wine | Enhances the natural sweetness and nuttiness. |
Garnish Enhancements
Add texture and a pop of color by garnishing with:
- Whipped cream dusted with powdered sugar
- Chopped roasted chestnuts for crunch
- Shavings or small curls of dark chocolate
- Fresh mint leaves to add freshness and visual appeal
Plate Presentation
For a sophisticated touch, serve on a plate with:
- A drizzle of caramel or chocolate sauce around the cup
- A sprinkle of crushed nuts or cinnamon beside the cup
- A few fresh berries for tartness and color contrast
Serving Occasions
This dessert shines at:
- Fall and winter holiday dinners
- Elegant dinner parties
- Cozy family gatherings by the fire
Let’s serve Chestnut Cups with attention to detail to showcase their unique texture and flavor and impress guests with every bite.
Storage and Make-Ahead Tips
Proper storage and make-ahead planning are key to enjoying our Chestnut Cup at its freshest and most flavorful. Here are our top recommendations:
Storing the Chestnut Cups
- After assembling the chestnut cups, place them in an airtight container.
- Store the cups in the refrigerator to maintain the creamy chestnut filling and prevent the buttery crust from becoming soggy.
- For best taste and texture, consume within 2 to 3 days.
| Storage Duration | Temperature | Container Type |
|---|---|---|
| 2 to 3 days | Refrigerator (36°F – 40°F) | Airtight container |
| Up to 1 month (crust only) | Freezer (-0°F – 0°F) | Wrapped tightly, freezer-safe bag |
Freezing Tips
- To freeze for longer storage, freeze the unfilled tart shells separately.
- Wrap tart shells tightly with plastic wrap and place in freezer-safe bags.
- When ready to use, thaw tart shells in the fridge overnight.
- Fill with fresh chestnut filling before serving.
- Avoid freezing the filled cups to preserve the whipped cream toppings and filling texture.
Make-Ahead Instructions
- Prepare the tart shells up to 3 days in advance.
- Store the shells in an airtight container in the refrigerator.
- Make the chestnut filling a day ahead and refrigerate it in a sealed bowl.
- Whip the cream and assemble just before serving to keep toppings light and fresh.
- Garnish with chestnuts and mint leaves immediately prior to serving for the best presentation.
“Planning ahead lets us savor every bite of these seasonal delights without any last-minute stress.”
Key Reminders to Maintain Texture and Flavor
- Keep the chestnut filling covered to prevent it from absorbing fridge odors.
- Avoid assembling far in advance if using delicate toppings like whipped cream.
- Bring the cups to a slightly chilled temperature before serving for optimal balance between crust crispness and filling creaminess.
By following these storage and make-ahead tips we ensure our Chestnut Cup Recipe retains its signature texture, rich nuttiness, and visual allure every time.
Conclusion
The Chestnut Cup is a delightful way to bring warmth and elegance to any dessert table. Its combination of creamy chestnut filling and crisp buttery crust creates a balanced treat that’s both comforting and impressive.
With thoughtful preparation and attention to detail, this recipe becomes a go-to for festive occasions or quiet nights in. We encourage you to try it out and enjoy the rich flavors that chestnuts uniquely offer.
Frequently Asked Questions
What are the main ingredients needed for Chestnut Cups?
Chestnut Cups require cooked and peeled chestnuts, sugar, milk or cream, vanilla extract, butter, flour, cold butter, egg yolk, cold water, heavy whipping cream, powdered sugar, and optional cinnamon, salt, dark chocolate, chopped roasted chestnuts, and fresh mint leaves.
How do you prepare chestnuts for the recipe?
Score chestnuts to prevent bursting, roast or boil them, then peel while warm for easy removal of shells before using them in the filling.
What equipment is essential for making Chestnut Cups?
You’ll need mixing bowls, a food processor, a saucepan, a whisk, a pastry cutter, measuring cups, a rolling pin, tart molds, and an oven.
How do you make the cup base for Chestnut Cups?
Mix dry ingredients, cut in cold butter, add egg yolk and cold water, chill the dough, roll it out, shape into molds, and blind bake until golden and crisp.
What is the best way to assemble Chestnut Cups?
Fill cooled tart shells with chilled chestnut filling, smooth the tops, then add whipped cream, chopped chestnuts, chocolate shavings, and fresh mint for garnish.
How should Chestnut Cups be served?
Chill or serve slightly chilled to balance the creamy filling and crisp base, paired well with hot espresso, spiced tea, or dessert wine.
Can Chestnut Cups be prepared ahead of time?
Yes, store assembled cups in an airtight container in the fridge for 2-3 days. Tart shells can be frozen for up to a month and filling made a day ahead.
How do you store leftover Chestnut Cups?
Keep them refrigerated in an airtight container and consume within 2-3 days to maintain freshness and texture.
What occasions are best for serving Chestnut Cups?
They are perfect for holiday dinners, elegant parties, and cozy family gatherings thanks to their festive flavor and impressive presentation.
Are there any tips for better presentation of Chestnut Cups?
Drizzle caramel or chocolate sauce around the plate, add fresh berries for color, and garnish with whipped cream, powdered sugar, chopped chestnuts, or mint leaves.