
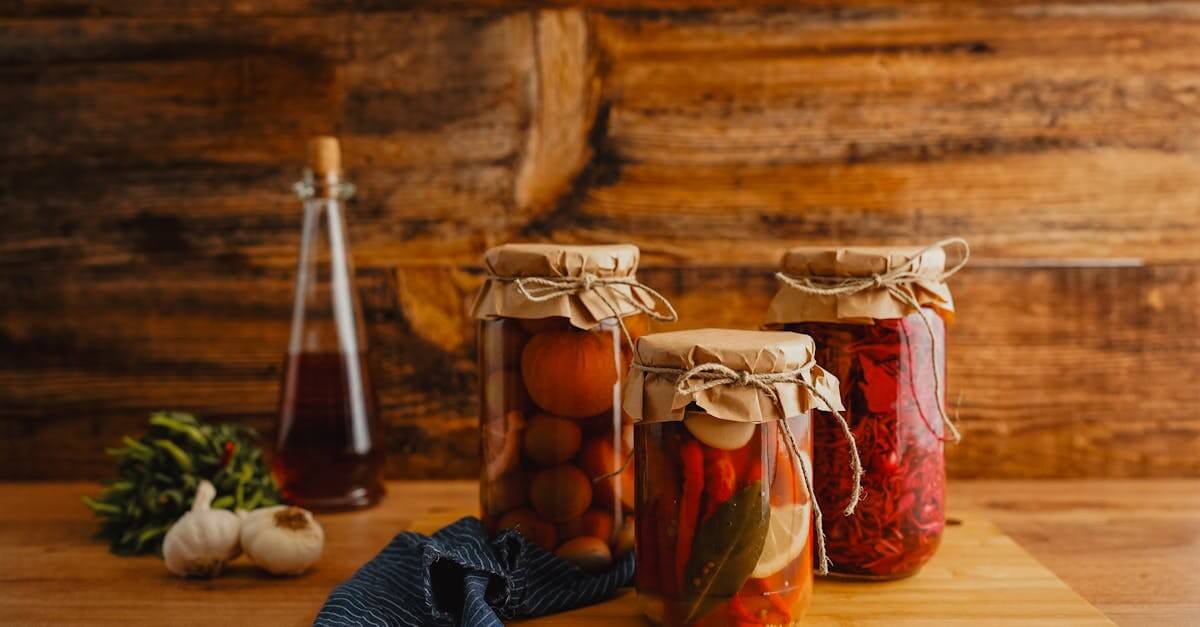
Cherry peppers bring a perfect balance of heat and sweetness that makes them ideal for pickling. When pickled, their vibrant flavor intensifies, adding a zesty kick to sandwiches, salads, and charcuterie boards. We love how easy it is to transform fresh cherry peppers into a tangy treat that lasts for weeks.
Ingredients
To create our Cherry Peppers Pickled Recipe, we need fresh and vibrant ingredients that enhance the natural sweetness and heat of the peppers. Below is a detailed list of what we’ll use to achieve that perfect tangy flavor and crunchy texture.
Core Ingredients for Pickling Cherry Peppers
| Ingredient | Quantity | Preparation |
|---|---|---|
| Cherry Peppers | 1 pound (about 20-25) | Washed, stems trimmed |
| White Vinegar | 2 cups | Use 5% acidity for optimal pickling |
| Water | 1 cup | Filtered for best taste |
| Granulated Sugar | 2 tablespoons | Balances acidity and heat |
| Kosher Salt | 1 tablespoon | Enhances flavor and preserves |
| Garlic Cloves | 3 cloves | Peeled and smashed |
| Black Peppercorns | 1 teaspoon | Whole, adds subtle spiciness |
| Mustard Seeds | 1 teaspoon | Adds a warm, slightly tangy note |
| Dried Oregano | 1 teaspoon | For an aromatic herbal hint |
| Bay Leaf | 1 leaf | Infuses depth to the brine |
Additional Notes on Ingredient Quality
- Choose bright red, firm cherry peppers for maximum flavor and crunch.
- Always prefer high-quality vinegar; white vinegar with 5% acidity is traditional and effective.
- Use kosher salt rather than table salt to avoid overly salty results and ensure clear brine.
- Fresh garlic and whole spices bring out the best in our pickling brine, adding complexity.
Equipment Needed
To successfully prepare our Cherry Peppers Pickled Recipe with perfect texture and flavor, gathering the right equipment is essential. Each tool plays a crucial role in ensuring the pickling process is smooth and safe.
Essential Tools Checklist
- Glass jars with airtight lids
We recommend using mason jars for safe storage and extended shelf life. Their clear glass lets us admire the vibrant peppers as they pickle.
- Large pot or saucepan
This is necessary to prepare the hot pickling brine—white vinegar, water, sugar, and spices—and to later sterilize the jars if needed.
- Tongs
To safely handle the hot jars and peppers without compromising our fingers or jars.
- Cutting board and sharp knife
For trimming and prepping our fresh cherry peppers and garlic precisely.
- Measuring cups and spoons
Accurate measurement of vinegar, sugar, salt, and spices is crucial for balancing sweetness and acidity.
- Funnel
A wide-mouth funnel helps us fill jars cleanly and efficiently without spills.
- Kitchen towel or cloth
Useful to wipe jar rims before sealing to ensure airtight closures.
Equipment Table
| Equipment | Purpose | Notes |
|---|---|---|
| Mason Jars with lids | Safe storage and preservation | Use sterilized jars |
| Large Pot/Saucepan | Boiling brine and sterilizing jars | Heat-resistant |
| Tongs | Handling hot jars and peppers | Insulated handles preferred |
| Cutting Board & Knife | Preparing peppers and garlic | Sharp knife for clean cuts |
| Measuring Cups/Spoons | Precise ingredient measurement | Use for liquids and solids |
| Funnel | Filling jars without spills | Preferably wide-neck |
| Kitchen Towel | Wiping jar rims before sealing | Lint-free cloth recommended |
Bonus Tip
Sterilizing your jars before use not only extends shelf life but ensures the safety of our pickled cherry peppers. Boil jars and lids for at least 10 minutes and handle them with sanitized tongs.
By preparing this essential equipment, we lay the foundation for a successful pickling experience. Next, we can move on to crafting the perfect brine that makes these cherry peppers delightfully tangy and crunchy.
Prep Work
Before we begin pickling, thorough prep work ensures our cherry peppers pickled recipe turns out perfectly crisp and flavorful. Let’s get everything clean and ready to create that ideal tangy crunch.
Washing and Sterilizing Jars
We start by washing our glass jars thoroughly to remove any dust or residual odors. Use hot soapy water and a clean sponge to scrub both jars and lids. Rinse well with hot water.
Next, we sterilize jars to maintain safety and extend shelf life:
- Preheat oven to 275°F (135°C)
- Place washed jars on a baking sheet, spacing evenly
- Bake for 10-15 minutes
- Simmer lids and bands in hot water, but avoid boiling to preserve seals
Alternatively, sterilize jars by boiling them in water for 10 minutes. Always handle sterilized jars with clean hands or tongs to avoid contamination.
| Step | Details |
|---|---|
| Washing jars | Hot soapy water, rinse hot |
| Oven sterilizing | 275°F, 10-15 minutes |
| Lid preparation | Simmer in hot water (no boiling) |
| Avoid contamination | Use tongs or clean hands |
Preparing the Cherry Peppers
Our fresh cherry peppers are the star ingredient. We start with selecting firm bright red peppers. Then proceed as follows:
- Rinse peppers under cold running water to remove dirt
- Pat dry with paper towels to prevent excess moisture
- Using a sharp knife, slice off tops (stem ends)
- For milder heat, we carefully remove seeds with a small spoon or knife
- Optionally, slice peppers in halves or quarters for quicker brine absorption
Removing seeds minimizes some heat but keeps the characteristic pepper flavor. We wear gloves during this process to protect our hands from capsaicin’s warmth.
With sterilized jars and prepped peppers ready, we can now craft the flavorful brine that will bring our cherry peppers pickled recipe to life.
Pickling Brine Preparation
To create the perfect pickling brine that enhances our cherry peppers’ natural sweetness and heat, we follow precise steps ensuring a balanced tangy flavor and crunchy texture.
Ingredients for the Brine
- 2 cups white vinegar (5% acidity)
- 2 cups water
- 3 tablespoons granulated sugar
- 2 tablespoons kosher salt
- 4 garlic cloves, peeled and lightly crushed
- 1 teaspoon black peppercorns
- 1 teaspoon mustard seeds
- 1 teaspoon dried oregano
- 1 bay leaf
Step-by-Step Brine Preparation
- Combine Liquids and Seasonings
In a medium-sized saucepan, pour 2 cups of white vinegar and 2 cups of water. Add 3 tablespoons of granulated sugar and 2 tablespoons of kosher salt. We heat the mixture over medium flame.
- Dissolve Sugar and Salt
Stir constantly until the sugar and salt fully dissolve. This ensures our brine has an even sweetness and saltiness that perfectly complements the cherry peppers.
- Add Aromatics and Spices
Once dissolved, add the garlic cloves, black peppercorns, mustard seeds, dried oregano, and bay leaf to the saucepan. These ingredients infuse the brine with deep earthy and spicy notes.
- Bring to a Slow Boil
Increase the heat to bring the brine to a slow boil. Let it boil gently for 5 minutes to fully release the flavors of the spices and aromatics.
- Cool Slightly
After boiling, remove the saucepan from heat and let the brine cool for about 5 minutes. This temperature is ideal when adding the hot brine to the sterilized jars with cherry peppers — hot enough to extract flavor but not so hot as to soften the peppers excessively.
Summary Table of Brine Composition
| Ingredient | Quantity | Purpose |
|---|---|---|
| White vinegar (5%) | 2 cups | Provides acidity and tang |
| Water | 2 cups | Dilutes vinegar for balance |
| Granulated sugar | 3 tablespoons | Adds subtle sweetness |
| Kosher salt | 2 tablespoons | Enhances flavor and preserves |
| Garlic cloves | 4 cloves, crushed | Adds pungent aroma and depth |
| Black peppercorns | 1 teaspoon | Adds mild heat and spice |
| Mustard seeds | 1 teaspoon | Adds slight tangy bitterness |
| Dried oregano | 1 teaspoon | Introduces herbal notes |
| Bay leaf | 1 leaf | Adds earthy, aromatic flavor |
Pro Tip: Use five percent acidity white vinegar for consistent tartness that preserves the peppers’ crunch and prevents spoilage.
By following these precise steps, our pickling brine forms a vibrant base that penetrates the cherry peppers, transforming them into a zesty tangy delight perfect for any dish.
Directions
Follow these precise steps to transform fresh cherry peppers into perfectly pickled delights that burst with tangy flavor and satisfying crunch.
Combining Brine Ingredients
- In a large saucepan, combine the following pickling brine ingredients:
- White vinegar (5% acidity) – 2 cups
- Water – 2 cups
- Granulated sugar – 2 tablespoons
- Kosher salt – 1 tablespoon
- Heat the mixture over medium heat.
- Stir continuously until the sugar and kosher salt dissolve completely.
- Add aromatics and spices:
- 3 peeled garlic cloves
- 1 tablespoon black peppercorns
- 1 tablespoon mustard seeds
- 1 teaspoon dried oregano
- 1 bay leaf
- Bring the brine to a slow boil.
- Reduce heat and simmer for 5 minutes to fully infuse flavors.
- Remove from heat and let the brine cool slightly, about 5-10 minutes.
| Ingredient | Purpose |
|---|---|
| White vinegar (5%) | Tangy acidity and preservation |
| Water | Dilutes vinegar for balanced flavor |
| Granulated sugar | Adds sweetness to counter vinegar |
| Kosher salt | Enhances flavor, preserves texture |
| Garlic cloves | Infuses savory aroma |
| Black peppercorns | Adds mild heat and spiciness |
| Mustard seeds | Provides warmth and crunch |
| Dried oregano | Adds herbal depth |
| Bay leaf | Imparts aromatic earthiness |
Packing Peppers into Jars
- Use sterilized glass jars with airtight lids for safety.
- Gently pack the prepared cherry peppers into each jar.
- Leave about ½ inch of headspace at the top to allow room for the brine.
- Distribute the garlic cloves and whole spices evenly among the jars for balanced flavor.
- Avoid overcrowding jars to maintain crisp texture.
Adding Brine to Jars
- Using a funnel, carefully pour the hot pickling brine over the packed cherry peppers.
- Pour slowly to cover the peppers completely while minimizing air bubbles.
- Leave ¼ inch headspace between the brine and the jar rim.
- Use a clean utensil (like a chopstick) to gently release any trapped air bubbles by sliding it around the jar’s edges.
- Wipe the jar rims with a damp cloth to remove any residue to ensure a clean seal.
Sealing and Storing Jars
- Place sterilized lids on the jars.
- Screw the bands on until they are fingertip tight—do not overtighten.
- Let jars cool to room temperature on a kitchen towel to prevent cracking.
- Store the jars in a cool, dark place for at least 2 weeks to allow flavors to develop fully.
- After opening, refrigerate jars and consume within 1 month for maximum freshness.
Make-Ahead Instructions
Properly planning our Cherry Peppers Pickled Recipe ensures bold flavors and optimal texture when we finally enjoy our tangy treats. Here are the key steps to prepare ahead for the best results:
- Allow Flavors to Develop
After sealing the jars with the pickled cherry peppers and brine, we store them in a cool, dark place for at least 2 weeks. This resting time lets the vinegar, spices, and peppers meld perfectly, creating that signature zesty balance of heat and sweetness.
- Refrigeration After Opening
Once opened, we keep the jar refrigerated. This slows down any spoilage and keeps the cherry peppers crisp and flavorful for up to 3 months.
- Check for Quality Before Use
Before using, inspect the jar for any signs of spoilage such as off smells, cloudiness, or mold. Proper sterilization and sealing minimize risks, but due diligence ensures safety.
| Step | Details | Timeframe |
|---|---|---|
| Resting (unopened) | Store in cool dark place | Minimum 2 weeks |
| Refrigeration (opened) | Keep refrigerated | Up to 3 months |
| Quality Check | Inspect jar before consumption | Every use |
- Label Your Jars
Don’t forget to mark the date of pickling on the jars. This helps us track freshness and consume the peppers while they are at their peak flavor.
- Batch Preparation Tip
We can make large batches in advance and keep unopened jars stored properly for months. This way, we always have a zesty jar ready to elevate sandwiches, salads, or charcuterie boards.
“Patience is the secret ingredient — waiting at least two weeks after pickling unlocks the full depth of flavor in cherry peppers.”
By working ahead with these Make-Ahead Instructions, we maximize the flavor impact and shelf life of our delicious pickled cherry peppers.
Serving Suggestions
Our pickled cherry peppers offer a vibrant burst of flavor that enhances a wide variety of dishes. Here are some tried-and-true ways to enjoy these zesty delights:
Add Brightness to Sandwiches and Burgers
Layer pickled cherry peppers on sandwiches or burgers to introduce a perfect balance of heat and acidity. Their crunch and tangy kick elevate classic combinations like turkey, ham, or roast beef with melted cheese.
Enhance Charcuterie and Cheese Boards
Scatter slices of our pickled cherry peppers across charcuterie boards for an eye-catching and flavorful accent. They pair especially well with cured meats, creamy cheeses, and olives, adding a sharp contrast to rich, savory bites.
Spice Up Salads and Grain Bowls
Toss a handful of chopped pickled cherry peppers into mixed greens, grain bowls, or pasta salads. Their sweet-spicy tang brightens fresh vegetables and adds complexity to simple dressings.
Jazz Up Pizza and Flatbreads
Top your homemade or store-bought pizza with sliced pickled cherry peppers for a zesty lift. They complement rich tomato sauces and melted mozzarella, bringing a fresh pop of flavor and a satisfying crunch.
Complement Grilled and Roasted Proteins
Serve pickled cherry peppers alongside grilled chicken, pork, or seafood to cut through smoky, fatty flavors. Their acidity refreshes the palate while the moderate heat adds depth.
Creative Uses in Recipes
Experiment by blending our pickled cherry peppers into spreads, dips, and sauces. They complement mayonnaise or cream cheese bases well, transforming simple appetizers into flavor-packed treats.
| Serving Idea | Description | Suggested Pairings |
|---|---|---|
| Sandwiches & Burgers | Adds crunch and tangy heat | Turkey, ham, roast beef, cheddar |
| Charcuterie & Cheese Boards | Provides color and sharp, piquant contrast | Cured meats, creamy cheeses, olives |
| Salads & Grain Bowls | Brightens dressings and fresh veggies | Mixed greens, quinoa, pasta salads |
| Pizza & Flatbreads | Introduces zesty crunch | Tomato sauce, mozzarella |
| Grilled & Roasted Proteins | Cuts through richness with acidity and heat | Chicken, pork, seafood |
| Spreads, Dips & Sauces | Adds complexity and spice to creamy bases | Mayonnaise, cream cheese, hummus |
“Our pickled cherry peppers are not just a condiment — they’re a versatile ingredient that transforms everyday meals into exciting, flavorful experiences.”
We recommend keeping a jar on hand to effortlessly enhance your meals. Their bold, zesty profile and crisp texture make them an essential pantry staple for any flavor enthusiast.
Storage Tips
Proper storage is crucial for preserving the vibrant flavor and crisp texture of our pickled cherry peppers. Let’s cover the essential steps to ensure freshness and safety.
Cool, Dark Place Before Opening
Store sealed jars in a cool, dark place such as a pantry or cupboard. Ideal temperature ranges between 50°F and 70°F (10°C to 21°C). This environment slows down spoilage and helps flavors mature fully. Avoid exposure to direct sunlight or heat, which can degrade quality.
Refrigeration After Opening
Once opened, always refrigerate the jars to maintain optimal freshness, flavor, and texture. The cool temperature inhibits bacterial growth and slows down oxidation. Keep the lids tightly sealed and consume within 3 months for best taste.
Labeling for Tracking
Label each jar with the pickling date. This simple step helps us keep track of freshness and prioritize consumption. Here’s a quick guideline for storage duration in refrigerator after opening:
| Storage Condition | Duration |
|---|---|
| Unopened (pantry) | Up to 1 year |
| Opened (refrigerated) | Up to 3 months |
Check for Quality Before Use
Before using the pickled cherry peppers, always check for signs of spoilage. Look for:
- Off or sour smell
- Mold or unusual discoloration
- Bulging or damaged lids
If any of these appear, discard the jar promptly.
Batch Preparation and Convenience
We recommend batch pickling. Preparing multiple jars at once guarantees a ready supply of zesty pickled cherry peppers. Store extras according to the above guidelines to enjoy our tangy treat in a pinch.
“Proper storage enhances the shelf life and flavor of our pickled cherry peppers, letting us enjoy that perfect balance of heat and sweetness whenever we want.“
By following these Storage Tips we keep our pickled cherry peppers flavorful and safe, ready to brighten any meal.
Conclusion
Pickling cherry peppers is a straightforward way to elevate their natural flavor and add a versatile ingredient to our kitchen. With just a few quality ingredients and simple steps, we can create a tangy, crunchy treat that enhances countless dishes.
By following proper preparation and storage tips, these pickled peppers stay fresh and flavorful for weeks, making them a convenient pantry staple. Whether we’re spicing up sandwiches or adding zest to salads, pickled cherry peppers bring a vibrant punch that’s hard to beat.
Let’s keep a batch ready to enjoy the perfect balance of heat and sweetness anytime we want.
Frequently Asked Questions
What makes cherry peppers ideal for pickling?
Cherry peppers have a perfect balance of heat and sweetness that intensifies when pickled, creating a tangy, flavorful treat with a satisfying crunch.
What ingredients are essential for pickling cherry peppers?
Key ingredients include fresh cherry peppers, white vinegar (5% acidity), water, sugar, kosher salt, garlic, black peppercorns, mustard seeds, dried oregano, and bay leaf.
Why is vinegar acidity important in pickling?
Vinegar with 5% acidity ensures the right tang and preserves the peppers safely by preventing bacterial growth.
What equipment do I need to pickle cherry peppers?
You’ll need sterilized glass jars with airtight lids, a large pot or saucepan, tongs, cutting board and knife, measuring cups/spoons, a funnel, and a kitchen towel.
How do I sterilize jars for pickling?
Sterilize jars by boiling them in water or heating in an oven, then handle with clean tongs to avoid contamination.
Should I remove seeds from cherry peppers before pickling?
Removing seeds is optional but reduces heat, resulting in milder pickled peppers.
How do I prepare the pickling brine?
Combine white vinegar, water, sugar, and kosher salt; heat until dissolved. Add garlic, peppercorns, mustard seeds, oregano, and bay leaf, then boil briefly.
How long should pickled cherry peppers be stored before eating?
Store sealed jars in a cool, dark place for at least two weeks to develop full flavor.
How should pickled cherry peppers be stored after opening?
Refrigerate after opening and consume within three months for best freshness.
What dishes pair well with pickled cherry peppers?
They enhance sandwiches, salads, charcuterie boards, pizzas, burgers, grain bowls, and grilled meats with their crunchy, zesty flavor.
Can I make pickled cherry peppers ahead of time?
Yes, batch preparation is encouraged to ensure you always have flavorful pickled peppers on hand.
How do I know if my pickled cherry peppers have spoiled?
Check for off smells, mold, or discoloration; if any are present, discard immediately.