
Cheesecake logs are a delightful twist on the classic cheesecake that’s perfect for parties and gatherings. Instead of baking in a traditional pan, this recipe shapes the creamy filling into a log, making it easy to slice and serve. It’s a fun and elegant way to enjoy cheesecake without the fuss of cutting wedges.
We love how versatile this dessert is—you can customize the flavors and toppings to suit any occasion. Whether you’re craving a rich chocolate swirl or fresh berry topping this cheesecake log delivers on both taste and presentation. Plus it’s surprisingly simple to make with just a few ingredients and no baking required.
Ingredients
To craft the perfect cheesecake log, we need simple yet high-quality ingredients that come together easily. Below, you’ll find everything divided into clear sections so we can prepare each element confidently.
For the Cheesecake Filling
We want the filling to be creamy and smooth, providing the rich base for our cheesecake log.
- 16 oz cream cheese, softened
- 1 cup powdered sugar
- 1 tsp vanilla extract
- 1 cup heavy whipping cream, chilled
For the Crust
The crust forms a sturdy and flavorful foundation to hold our cheesecake log intact.
- 1 1/2 cups graham cracker crumbs
- 1/4 cup granulated sugar
- 6 tbsp unsalted butter, melted
For the Coating and Toppings
Our coating and toppings add texture and visual appeal to the cheesecake log, making it irresistible.
- 1 cup finely chopped nuts (such as pecans or almonds)
- 1/2 cup mini chocolate chips or finely grated chocolate
- Fresh berries (optional, for garnish)
- Powdered sugar (optional, for dusting)
| Ingredient Category | Key Ingredients | Quantity |
|---|---|---|
| Cheesecake Filling | Cream cheese, powdered sugar, vanilla, cream | 16 oz, 1 cup, 1 tsp, 1 cup |
| Crust | Graham cracker crumbs, sugar, butter | 1.5 cups, 1/4 cup, 6 tbsp |
| Coating and Toppings | Nuts, chocolate chips, berries, powdered sugar | 1 cup, 1/2 cup, optional |
Equipment Needed
To create our Cheesecake Log flawlessly, having the right equipment is crucial for smooth preparation and presentation. Below is a detailed list of essential tools for each stage of making the cheesecake log.
| Equipment | Purpose |
|---|---|
| Mixing Bowl (Large) | To blend the cream cheese, powdered sugar, and vanilla |
| Electric Hand Mixer or Stand Mixer | To whip the heavy cream until stiff peaks form and to combine all filling ingredients smoothly |
| Measuring Cups and Spoons | For precise measurement of ingredients |
| Spatula | For folding and scraping sides of the bowl |
| 9×13-inch Baking Dish | To shape the crust layer evenly |
| Parchment Paper or Plastic Wrap | To line the dish for easy removal of the cheesecake log |
| Rolling Pin or Food Processor | To crush graham crackers into fine crumbs if not pre-crushed |
| Small Bowl | To mix the coating ingredients such as nuts and chocolate chips |
| Sharp Knife | For clean slicing of the cheesecake log before serving |
| Serving Platter or Board | To display the cheesecake log attractively |
We recommend preparing all equipment and ingredients before starting to mix. This ensures a seamless, efficient assembly process and a beautiful Cheesecake Log every time.
Make-Ahead Tips
To ensure our Cheesecake Log is perfect and stress-free on serving day, following these make-ahead tips will guarantee the best texture and flavor.
Chill Thoroughly for Perfect Slicing
After assembling the cheesecake log, wrap it tightly in plastic wrap or parchment paper to prevent drying out and absorbing odors. Place it in the refrigerator for at least 4 hours, but preferably overnight. This chilling time allows the cream cheese filling to firm up, making it easier to slice cleanly.
| Step | Time Required | Purpose |
|---|---|---|
| Wrap & Chill | 4 hours minimum | Firm up filling & meld flavors |
| Overnight Chill | 8-12 hours | Achieve optimal texture |
Prepare the Crust and Toppings in Advance
To streamline the assembly, prepare the graham cracker crust mixture and toppings up to 2 days before. Store the crust crumbs in an airtight container at room temperature. Nuts and chocolate chips can be kept separately in sealed containers to preserve crunch and freshness.
Assemble Just Before Serving for Maximum Freshness
While we recommend making the filling and chilling the assembled log ahead of time, adding fresh berries and the final powdered sugar dusting should happen just before serving. This keeps the garnish vibrant and avoids sogginess.
Freezing instructions
If you want to prepare well in advance, freeze the cheesecake log wrapped securely in plastic wrap and aluminum foil to prevent freezer burn. Freeze for up to 1 month. Before serving, thaw overnight in the refrigerator and let stand 15 minutes at room temperature for best consistency.
“Patience is our ally; chilling unlocks the creamy, rich texture we expect from an outstanding cheesecake log.“
By planning our timing carefully and employing these tips, we ensure every slice of our cheesecake log is as delicious and visually stunning as intended.
Instructions
Follow these step-by-step directions to create our delicious cheesecake log, ensuring each component comes together perfectly for a visually stunning and flavorful dessert.
Preparing the Crust
- In a medium bowl, combine 1.5 cups graham cracker crumbs and 1/4 cup granulated sugar.
- Pour in 6 tablespoons melted unsalted butter and mix thoroughly until the mixture resembles wet sand.
- Line a 9×13-inch baking dish with parchment paper, leaving some overhang for easy removal.
- Press the crumb mixture evenly into the bottom of the dish using the back of a spoon or flat-bottomed glass, forming a compact and smooth crust layer.
- Place the crust in the refrigerator to chill and firm up while we prepare the filling.
Making the Cheesecake Filling
- In a large mixing bowl, beat 16 ounces softened cream cheese with an electric mixer on medium speed until smooth and creamy.
- Gradually add 1 cup powdered sugar, mixing until fully incorporated and silky.
- Stir in 1 teaspoon vanilla extract to enhance flavor depth.
- In a separate chilled bowl, whip 1 cup heavy whipping cream on high speed until stiff peaks form.
- Gently fold the whipped cream into the cream cheese mixture using a spatula, preserving the light and airy texture without deflating the filling.
Assembling the Cheesecake Log
- Remove the crust-lined baking dish from the refrigerator.
- Spoon the cheesecake filling evenly over the chilled crust, smoothing the top with a spatula.
- Carefully lift the parchment paper overhang to form a log shape by rolling the filling and crust layer into a tight cylinder.
- Wrap the assembled log tightly in plastic wrap to maintain shape and prevent drying.
- Refrigerate the log for a minimum of 4 hours, preferably overnight, to allow the flavors to meld and texture to set perfectly.
Adding the Coating and Toppings
- Once chilled and firm, unwrap the cheesecake log and transfer it to a serving platter.
- Roll the log gently in a shallow bowl containing 1 cup finely chopped nuts or 1/2 cup mini chocolate chips or finely grated chocolate for a flavorful coating.
- Press the coating evenly onto the surface to create a textured and appealing finish.
- Optionally, garnish with fresh berries and a light dusting of powdered sugar immediately before serving to add freshness and color contrast.
| Component | Ingredients | Preparation Note |
|---|---|---|
| Crust | Graham cracker crumbs, sugar, butter | Press firmly, chill to set |
| Filling | Cream cheese, powdered sugar, vanilla, heavy cream | Fold whipped cream gently |
| Coating & Toppings | Nuts, chocolate chips, berries, powdered sugar | Apply coating firmly just before serving |
Directions for Chilling and Setting
To ensure our Cheesecake Log achieves the perfect texture and flavor, chilling and setting are crucial steps we must follow precisely. Here is a detailed guide to help us master this stage.
Step 1: Initial Chill After Assembly
Once we have rolled the crust and cheesecake filling into the log shape, wrap the log tightly in plastic wrap or parchment paper. This prevents moisture loss and keeps the log firm.
- Place the wrapped log on a flat serving platter or baking sheet to maintain its shape.
- Chill the log in the refrigerator for at least 4 hours. For best results, we recommend an overnight chill.
“Patience here is key; the longer chilling time allows the cream cheese filling to firm up and the crust to meld beautifully, giving us a clean slice every time.”
Step 2: Applying the Coating and Toppings
After the initial chilling:
- Unwrap the cheesecake log carefully.
- Roll the log in our chosen coating such as finely chopped nuts or mini chocolate chips, pressing gently to adhere the toppings evenly.
- Optionally, add fresh berries and a dusting of powdered sugar right before serving for freshness and visual appeal.
Step 3: Final Chill for Setting and Flavor Infusion
- Return the coated log to the refrigerator for an additional 1 to 2 hours.
- This final chill allows the coating to set firmly on the surface and enables the flavors to fully meld.
Optional Freezing for Make-Ahead Convenience
If we want to prepare our Cheesecake Log well in advance:
- After applying the coating, wrap the log tightly in plastic wrap and then foil.
- Freeze for up to 1 month to maintain quality.
When ready to serve:
- Move the cheesecake log from the freezer to the refrigerator.
- Thaw slowly for 8 to 12 hours.
- Add fresh berries and powdered sugar only after thawing.
| Chilling and Setting Times | Purpose |
|---|---|
| 4+ hours (overnight preferred) | Firm up filling and meld crust |
| 1–2 hours final chill | Set coating and enhance flavor integration |
| 8–12 hours thaw (if frozen) | Gentle thaw to maintain texture and freshness |
By carefully following these chilling and setting steps, our Cheesecake Log will achieve a smooth creamy texture, firm crust, and that irresistible moist finish we all love.
Serving Suggestions
To fully enjoy our Cheesecake Log, presentation and pairing play a vital role. Here are expert tips to elevate your serving experience:
Slicing and Plating
- Use a sharp knife warmed under hot water for smooth cutting.
- Slice the cheesecake log into 1-inch thick pieces to maintain structure while allowing creamy texture to shine.
- Plate slices on a light-colored serving platter to enhance the log’s vibrant coating and garnishes.
Garnishing Ideas
Enhance visual appeal and flavors with these garnishing options:
| Garnish Type | Suggested Quantity | Notes |
|---|---|---|
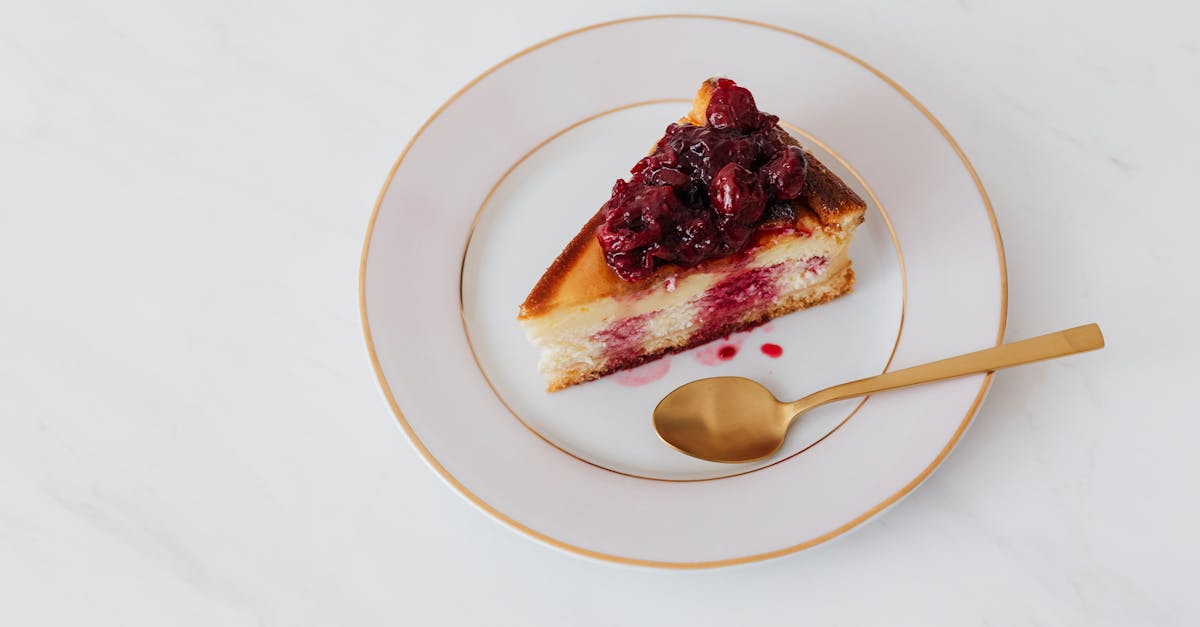
| Fresh Berries | 1/4 cup per serving | Raspberries, blueberries, or sliced strawberries work well |
| Powdered Sugar | Light dusting | Sprinkle just before serving for a fresh look |
| Chocolate Drizzle | 1 tablespoon per slice | Use melted dark or white chocolate for contrast |
| Mint Leaves | 1-2 leaves per slice | Adds freshness and color contrast |
“A light dusting of powdered sugar combined with fresh berries instantly transforms our Cheesecake Log into a show-stopping dessert.”
Beverage Pairings
We recommend pairing the cheesecake log with beverages that balance richness and sweetness:
| Beverage Type | Pairing Notes |
|---|---|
| Coffee | Medium roast with nutty undertones complements creaminess |
| Dessert Wine | Sweet Riesling or Moscato enhances fruity toppings |
| Sparkling Water | Cleanses palate between bites |
| Herbal Tea | Chamomile or mint adds subtle refreshing notes |
Serving for Gatherings
- Serve buffet-style by placing the cheesecake log on a cutting board with a sharp knife for guests to slice easily.
- Offer a selection of toppings on the side like chopped nuts, mini chocolate chips, and berries to customize slices.
- Keep chilled until just before serving to maintain the perfect texture.
Storage After Serving
Store any leftovers in an airtight container in the refrigerator for up to 3 days. Allow chilled slices to sit at room temperature for 10 to 15 minutes before serving again to soften the creamy filling.
Our Cheesecake Log proves itself a versatile and crowd-pleasing dessert, perfect for elegant dinner parties or casual celebrations alike.
Storage and Shelf Life
Proper storage of our cheesecake log ensures it maintains its creamy texture and rich flavor. To keep the dessert fresh and safe for consumption, follow these storage guidelines:
- Refrigeration: Store the cheesecake log in an airtight container or tightly wrapped in plastic wrap. This prevents it from absorbing other odors and drying out.
- Shelf Life in Refrigerator: Our cheesecake log stays fresh for up to 3 to 4 days when refrigerated properly.
- Freezing: For longer storage, wrap the cheesecake log securely in plastic wrap followed by aluminum foil to prevent freezer burn. Place it in a freezer-safe container or bag.
Thawing and Serving After Freezing
Slow thawing is crucial to preserve the texture and flavor:
- Transfer the frozen cheesecake log to the refrigerator.
- Thaw for 12 to 24 hours depending on size.
- Avoid thawing at room temperature to maintain quality and safety.
| Storage Method | Temperature | Shelf Life | Notes |
|---|---|---|---|
| Refrigeration | 35°F to 40°F (2°C-4°C) | 3 to 4 days | Use airtight wrapping to prevent drying and odor absorption |
| Freezing | 0°F (-18°C) | Up to 1 month | Wrap tightly in plastic and foil, thaw in refrigerator |
“Refrigerating promptly after serving is key to maintaining the cheesecake log’s luscious texture and taste.”
Additional Tips for Storage
- Avoid cutting the cheesecake log until ready to serve to minimize exposure to air and moisture.
- When wrapping, make sure the plastic wrap covers all surfaces without gaps.
- After thawing, serve chilled for the best experience.
Storing and handling our cheesecake log correctly ensures each slice delivers that smooth, indulgent bite we all love.
Conclusion
Creating a cheesecake log offers a fun and elegant twist on a classic dessert that’s sure to impress. Its no-bake simplicity combined with endless customization options makes it perfect for any occasion. With just a little preparation and patience, we can enjoy a creamy, flavorful treat that’s easy to slice and share.
Whether you’re serving it fresh or preparing ahead, this recipe adapts well to your schedule and taste preferences. Let’s embrace this versatile dessert to add a delicious and visually stunning centerpiece to our next gathering.
Frequently Asked Questions
What is a cheesecake log?
A cheesecake log is a no-bake dessert shaped like a log, featuring a creamy cheesecake filling rolled in a graham cracker crust and coated with nuts or chocolate. It’s easy to slice, serve, and customize for parties and gatherings.
What ingredients do I need to make a cheesecake log?
You’ll need cream cheese, powdered sugar, vanilla extract, heavy whipping cream, graham cracker crumbs, granulated sugar, melted butter, and toppings like chopped nuts, mini chocolate chips, fresh berries, and powdered sugar.
Is baking required for this cheesecake log recipe?
No, this cheesecake log recipe requires no baking. It’s a no-bake dessert that sets in the refrigerator, making preparation simple and fast.
How long should I chill the cheesecake log?
Chill the assembled cheesecake log for at least 4 hours, preferably overnight, to allow it to firm up properly before serving or adding toppings.
Can I make the cheesecake log ahead of time?
Yes, you can prepare the crust and filling in advance. Chill the entire log overnight and add fresh toppings just before serving for best results.
How do I store leftover cheesecake log?
Store leftovers in an airtight container in the refrigerator for 3 to 4 days. For longer storage, wrap the log securely and freeze for up to one month.
What is the best way to slice a cheesecake log?
Use a sharp knife warmed briefly under hot water for clean, smooth slices. Wipe the knife between cuts for the best presentation.
Can I freeze the cheesecake log?
Yes, the cheesecake log can be frozen for up to one month. Wrap it tightly to prevent freezer burn and thaw slowly in the refrigerator before serving.
What toppings work well on a cheesecake log?
Popular toppings include chopped nuts, mini chocolate chips, fresh berries, powdered sugar, chocolate drizzle, and mint leaves to enhance both flavor and appearance.
What drinks pair well with a cheesecake log?
Try pairing the cheesecake log with coffee, dessert wine, sparkling water, or herbal tea to complement its rich and creamy flavor.