
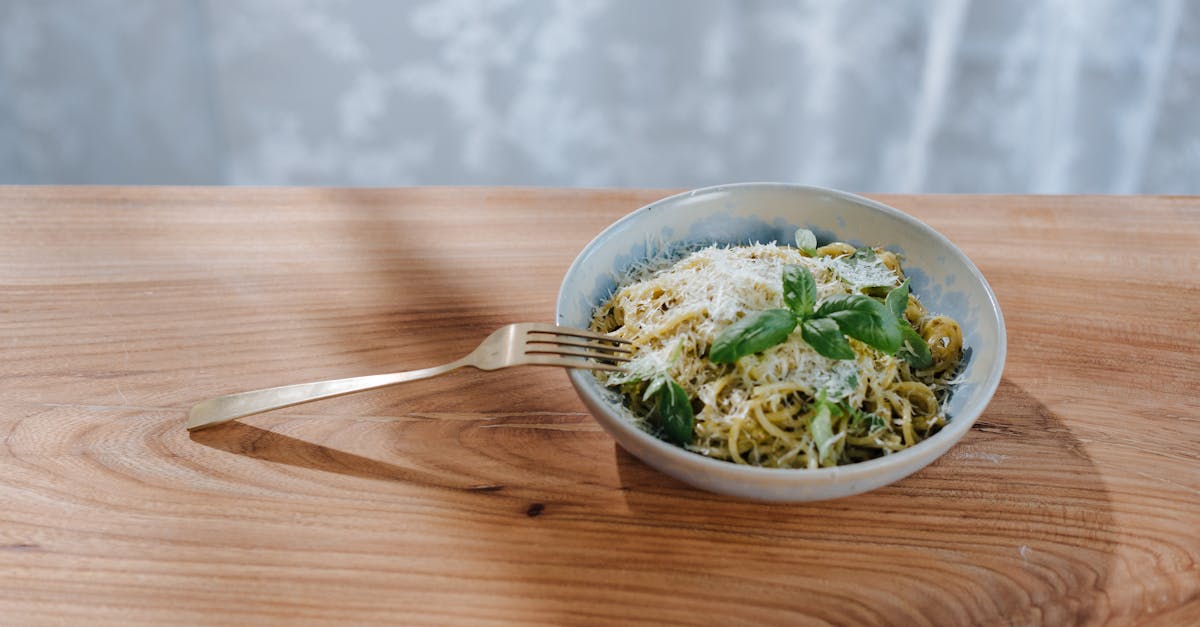
Cheese bowls are the ultimate crowd-pleaser for any gathering or cozy night in. Combining gooey melted cheese with a crispy, edible bowl creates a fun and delicious way to enjoy your favorite dips and toppings. Whether you’re serving up a spicy salsa, creamy spinach dip, or a savory chili, a cheese bowl adds that extra wow factor to your spread.
We love how simple ingredients transform into an impressive appetizer that’s both flavorful and visually appealing. Plus, making cheese bowls at home means you can customize them to suit your taste and dietary needs. Let’s dive into this easy recipe that’s sure to become a staple in your entertaining arsenal.
Ingredients
To create the perfect Cheese Bowl, we need just a few simple and high-quality ingredients. Below you will find everything required both for crafting the crispy cheese bowl and for preparing delicious fillings or dips that will complement it beautifully.
For the Cheese Bowl
We focus on cheeses that melt well and crisp up nicely to hold their shape. Here are the essentials:
- 1 cup shredded sharp Cheddar cheese (for flavor and crispness)
- 1 cup shredded Parmesan cheese (adds nuttiness and helps with structure)
- Optional: ½ teaspoon garlic powder or smoked paprika for a subtle kick
| Ingredient | Quantity | Notes |
|---|---|---|
| Sharp Cheddar cheese | 1 cup shredded | Use freshly shredded for best melt |
| Parmesan cheese | 1 cup shredded | Parmigiano-Reggiano preferred |
| Garlic powder (optional) | ½ teaspoon | Enhances flavor profile |
| Smoked paprika (optional) | ½ teaspoon | Adds smokiness and color |
For the Filling or Dip
- ½ cup sour cream or Greek yogurt (for creamy bases)
- ¼ cup diced tomatoes (fresh and vibrant)
- 2 tablespoons chopped green onions (adds crisp freshness)
- 2 tablespoons cooked bacon bits (for savory, smoky flavor)
- 1 small avocado, diced (smooth texture, mild taste)
- 1 tablespoon chopped fresh cilantro (optional, for a fresh herb note)
- Salt and pepper to taste
| Ingredient | Quantity | Purpose |
|---|---|---|
| Sour cream or Greek yogurt | ½ cup | Base for creamy dips |
| Diced tomatoes | ¼ cup | Adds freshness and color |
| Chopped green onions | 2 tablespoons | Provides crisp, slightly sharp contrast |
| Cooked bacon bits | 2 tablespoons | Brings savory smoky flavor |
| Diced avocado | 1 small | Adds creaminess and richness |
| Fresh cilantro | 1 tablespoon | Optional herbaceous touch |
| Salt and pepper | To taste | Enhances overall flavor |
Tools and Equipment
To craft the perfect Cheese Bowl Recipe, having the right Tools and Equipment is essential. This ensures every step is executed precisely for optimal texture and flavor. Below is a detailed list and explanation of what we need in our kitchen arsenal to make crisp, edible cheese bowls and prepare the accompanying dips efficiently.
Essential Tools
- Non-stick skillet or frying pan
We use a non-stick skillet to melt and shape the cheese without sticking or burning. A smooth, flat surface is key for even cooking and easy removal of the cheese bowl.
- Spatula
A thin, flexible spatula helps us lift the delicate cheese rounds gently to transfer them for shaping or serving.
- Mixing bowls
Multiple bowls allow us to mix ingredients for both the cheese bowls and fillings without cross-contamination.
- Measuring cups and spoons
Accurate measurement keeps the cheese-to-seasoning ratio perfect, ensuring consistent texture and flavor.
- Parchment paper or silicone baking mat
We use these on a baking sheet if baking cheese bowls to prevent sticking and promote even crisping.
- Baking sheet (optional)
If opting for baking rather than stovetop cooking, this flat sheet provides an ideal base to crisp cheese bowls evenly.
Shaping Tools
- Small heatproof bowls or ramekins
After melting, we drape the warm cheese over inverted ramekins to form bowls while it cools and hardens.
- Oven mitts or kitchen towels
Handling hot pans and ramekins safely requires protection.
Optional But Helpful
- Food processor or grater
Freshly shredding cheese enhances melt quality and flavor.
- Serving plates or boards
Presenting cheese bowls attractively adds to the dining experience.
Tools Overview Table
| Tool | Purpose | Optional/Essential |
|---|---|---|
| Non-stick skillet | Melting and crisping cheese | Essential |
| Spatula | Lifting cheese bowls gently | Essential |
| Mixing bowls | Combining ingredients | Essential |
| Measuring cups and spoons | Precision in ingredient amounts | Essential |
| Parchment paper/Silicone mat | Prevent cheese from sticking when baking | Essential if baking |
| Baking sheet | Base for baking cheese rounds | Optional |
| Small heatproof bowls/Ramekins | Shaping warm cheese into bowls | Essential |
| Oven mitts/Kitchen towels | Safe handling of hot equipment | Essential |
| Food processor/Grater | Freshly shred cheese for better melt | Optional |
| Serving plates/Boards | Attractive presentation | Optional |
By gathering these essential tools, we prepare to make delicious cheese bowls that are crispy, flavorful, and perfectly shaped to hold any dip or topping. Equipped properly, each step flows smoothly from melting to serving.
Instructions
Follow these step-by-step instructions to create the perfect cheese bowl. From prepping ingredients to assembling the final dish, we’ll ensure your cheese bowls come out crispy, flavorful, and ready to impress every time.
Prep Work
- Shred the cheeses: Combine 1 cup of shredded sharp Cheddar and 1 cup of shredded Parmesan cheese. For best results, shred fresh cheese using a fine grater or food processor.
- Dice and chop: Prepare ¼ cup diced tomatoes, 2 tablespoons chopped green onions, 2 tablespoons cooked bacon bits, and 1 small diced avocado.
- Measure: Accurately measure ½ cup of sour cream or Greek yogurt based on your preference.
- Season: Have garlic powder or smoked paprika ready (optional) along with salt and pepper to taste.
- Gather tools: Ensure your non-stick skillet, spatula, and mixing bowls are clean and ready for use.
Making the Cheese Bowl
- Heat the skillet: Place your non-stick skillet over medium heat and allow it to warm evenly.
- Add cheese mixture: Sprinkle a thin, even layer of the combined shredded sharp Cheddar and Parmesan cheese into the skillet to form a circle about 5 inches in diameter.
- Season: Lightly dust the cheese with garlic powder or smoked paprika for an extra flavor boost.
- Melt & crisp: Cook for 2-3 minutes without stirring until the edges turn golden brown and the cheese melts into a solid disc.
- Shape the bowl: Using a spatula, carefully lift the melted cheese disc and invert it over a heat-resistant bowl or cup to mold the cheese into a bowl shape.
- Cool to crisp: Let the shaped cheese cool for 1-2 minutes. It will harden into a crisp, edible bowl.
Preparing the Filling or Dip
- Mix base: In a mixing bowl, combine ½ cup sour cream or Greek yogurt.
- Add mix-ins: Stir in ¼ cup diced tomatoes, 2 tablespoons green onions, 2 tablespoons cooked bacon bits, and 1 small diced avocado.
- Season: Add salt and pepper to taste and optionally mix in a few chopped fresh cilantro leaves for brightness.
- Combine gently: Fold ingredients carefully to maintain chunks of avocado and avoid mashing.
Assembling the Cheese Bowl
- Place cheese bowl: Set the cooled, crispy cheese bowl on a serving plate.
- Fill: Spoon the prepared filling or dip generously into the cheese bowl.
- Garnish: Add a sprinkle of chopped green onions or extra bacon bits on top to enhance texture and appearance.
- Serve immediately: Enjoy the crispiness of the cheese bowl paired with the creamy, flavorful filling for the best experience.
| Step | Time Required | Temperature |
|---|---|---|
| Heating skillet | 2 minutes | Medium heat |
| Melting & crisping | 2-3 minutes | Medium heat |
| Cooling shape | 1-2 minutes | Room temp |
| Mixing filling | 3-5 minutes | N/A |
| Assembling | 2 minutes | N/A |
Serving Suggestions
To fully enjoy our Cheese Bowl Recipe, we recommend pairing the crispy, flavorful bowls with an array of fresh and vibrant toppings. Here are some expert serving suggestions to elevate your cheese bowls and impress your guests:
Classic Savory Fillings
Start with familiar flavors to complement the rich, crispy cheese bowl.
- Sour cream or Greek yogurt – adds creaminess and balance
- Diced tomatoes – provide freshness and acidity
- Chopped green onions – add a mild sharpness and crunch
- Cooked bacon bits – offer smoky, savory notes
- Diced avocado – contributes creaminess and richness
- Fresh cilantro – enhances with a bright herbal touch
- Salt and pepper to taste for seasoning
Bold Flavor Variations
For guests craving a twist, try these alternative fillings:
| Topping | Description | Suggested Quantity |
|---|---|---|
| Spicy salsa | Adds heat and depth | ½ cup |
| Black beans | Increases protein and texture | ¼ cup |
| Corn kernels | Introduces sweetness and color | ¼ cup |
| Pickled jalapeños | Brings acidity and spice | To taste |
| Crumbled blue cheese | Offers sharp, tangy flavor | 2 tbsp |
Presentation Tips
The visual appeal of our cheese bowls enhances the overall experience.
- Serve immediately after assembling to retain crispiness
- Use small plates or wooden boards for an inviting presentation
- Garnish with extra chopped herbs or a sprinkle of paprika for color
- Accompany with a side of fresh vegetable sticks or crisp crackers
Beverage Pairings
To complement the savory richness, consider these beverages:
| Beverage Type | Suggested Pairing |
|---|---|
| White wine | Sauvignon Blanc or Chardonnay |
| Light beer | Pilsner or Lager |
| Non-alcoholic | Sparkling water with lemon or lime |
“Our cheese bowls shine brightest when paired with balanced, fresh ingredients that enhance their crispy, cheesy goodness.” This approach ensures each bite bursts with flavor while keeping the texture delightful.
By experimenting with these Serving Suggestions we can tailor the cheese bowl experience to any occasion — from casual snacking to elegant entertaining.
Storage and Make-Ahead Tips
Proper storage and strategic make-ahead preparation help us enjoy our cheese bowls without sacrificing crispiness or flavor.
Storing Cheese Bowls
To keep our cheese bowls crunchy and fresh, follow these steps:
- Allow the cheese bowls to cool completely on a wire rack.
- Store them in an airtight container at room temperature.
- Use wax paper or parchment paper between layers to prevent sticking.
- Consume within 24 to 48 hours for best texture.
Avoid refrigeration, as moisture will make bowls soggy and compromise their texture.
Storing Fillings and Dips
Since fillings often contain fresh ingredients, we store them separately:
- Transfer dips or toppings into sealed containers.
- Refrigerate for up to 3 days.
- Give them a quick stir before assembling to restore consistency.
Make-Ahead Assembly
We can streamline service with these tips:
- Prepare and bake cheese bowls up to a day in advance; leave uncovered on a cooling rack.
- Keep fillings chilled but ready to serve.
- Assemble bowls just before serving to maintain that signature crunch.
| Item | Storage Method | Duration |
|---|---|---|
| Cheese bowls (unfilled) | Airtight container, room temp | 24-48 hours |
| Fillings and dips | Sealed container, refrigerated | Up to 3 days |
Pro Tip: If bowls lose crispiness after storage, reheat in a dry skillet or oven for a few minutes to revive their crunch.
Applying these storage and make-ahead tips allows us to enjoy crispy, flavorful cheese bowls with minimal last-minute effort.
Conclusion
Cheese bowls are a versatile and tasty way to elevate any snack or meal. Their crispy texture and customizable fillings make them perfect for sharing or enjoying solo. With just a few simple ingredients and tools, we can create a crowd-pleasing dish that’s both fun and flavorful.
By experimenting with different dips and toppings, we keep things exciting and tailor the experience to any occasion. Plus, with smart storage tips, we can prepare ahead without losing that satisfying crunch. Let’s make cheese bowls a regular part of our entertaining and snacking repertoire.
Frequently Asked Questions
What is a cheese bowl?
A cheese bowl is an edible, crispy container made by melting and shaping cheese. It serves as a unique vessel for dips, toppings, or fillings, adding flavor and crunch to your snacks or meals.
What kinds of cheese are best for making cheese bowls?
Sharp Cheddar and Parmesan are ideal due to their flavor and melting properties. Combining one cup each creates a crispy, flavorful bowl that holds well.
Can I customize the fillings in a cheese bowl?
Yes! You can use various dips and toppings like sour cream, diced tomatoes, bacon bits, avocado, or even spicy salsa to fit your taste and dietary needs.
What tools do I need to make a cheese bowl?
Essential tools include a non-stick skillet, a spatula, mixing bowls, and measuring cups. Optional items like a food processor and serving plates can help with preparation and presentation.
How long does it take to prepare and assemble cheese bowls?
The entire process, including prepping ingredients, melting the cheese, shaping the bowls, preparing fillings, and assembly, usually takes around 30-40 minutes.
How should I store cheese bowls to keep them crispy?
Let the bowls cool completely, then store them in an airtight container with wax or parchment paper at room temperature. Consume within 24-48 hours for best crispiness.
Can I make cheese bowls ahead of time?
Yes, you can bake the cheese bowls a day ahead and store them properly. Assemble with fillings just before serving to maintain crunch.
How do I re-crisp cheese bowls if they become soggy?
Reheat them briefly in a dry skillet or in the oven at low heat. This will restore their crispiness without burning.
What are some recommended beverage pairings with cheese bowls?
Light white wines and light beers pair well, complementing the rich, savory flavors of the cheese bowls and their fillings.
Are cheese bowls suitable for special diets?
Cheese bowls are naturally gluten-free and can be customized to suit keto or low-carb diets, depending on the fillings used.