
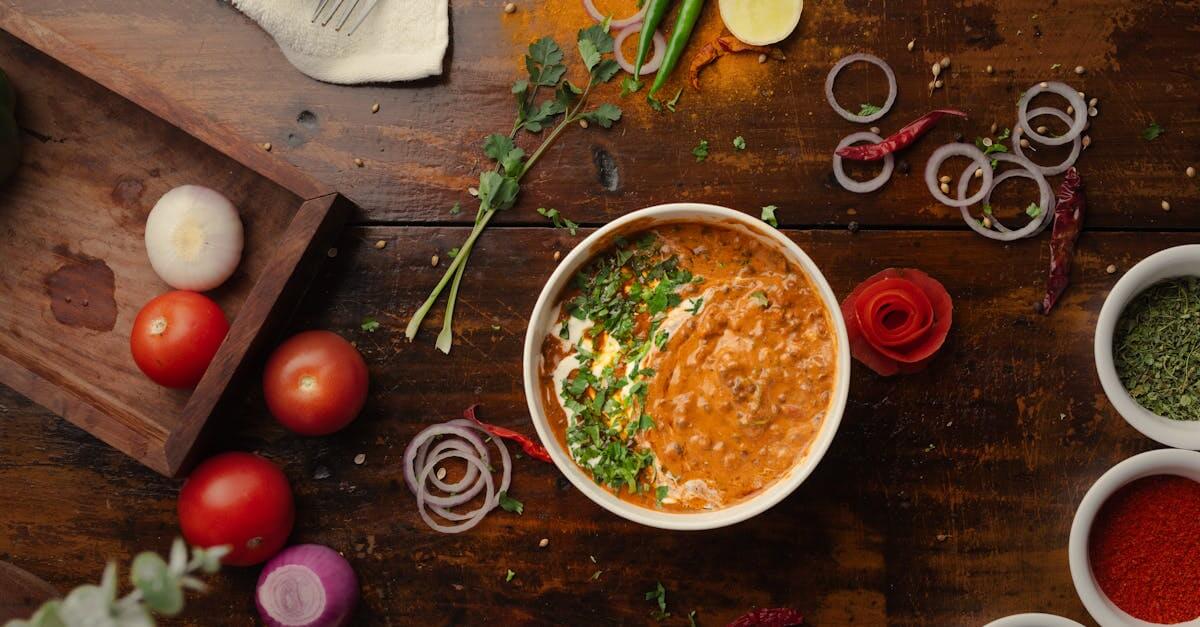
Carlos O’Kelly’s Chili Con Queso has long been a favorite for those craving a rich and flavorful Tex-Mex experience. This creamy cheese dip combines melted cheeses with a spicy chili kick, creating the perfect balance that keeps us coming back for more. Whether you’re hosting a game day party or just want a comforting snack, this recipe delivers that authentic taste right at home.
We love how simple ingredients come together to create something so satisfying and versatile. It’s not just a dip but a crowd-pleaser that pairs perfectly with chips, veggies, or even as a topping for tacos and nachos. Let’s dive into making this iconic dish that brings a little bit of Carlos O’Kelly’s right into our kitchens.
Ingredients
To recreate the authentic Carlos O’Kelly’s Chili Con Queso at home, we start with simple yet bold ingredients that deliver the signature creamy texture and spicy flavor. Below are the essential components categorized for clarity.
Main Ingredients
- 8 oz processed cheese (such as Velveeta) – cubed for easy melting
- 1 cup shredded sharp cheddar cheese – adds depth and sharpness
- 1 (10 oz) can diced tomatoes and green chilies – drained to balance moisture
- 1/2 cup evaporated milk – for smooth creaminess
- 1 tbsp butter – to sauté and enrich the base
Spices and Seasonings
- 1/2 tsp cumin powder – brings a warm earthy flavor
- 1/4 tsp garlic powder – for subtle aromatic notes
- 1/4 tsp onion powder – enhances savoriness
- 1/4 tsp chili powder – infuses gentle heat and complexity
- Salt to taste – to enhance all flavors evenly
Optional Toppings and Garnishes
| Topping/Garnish | Purpose |
|---|---|
| Chopped fresh cilantro | Adds fresh, herbaceous brightness |
| Diced jalapeños | Introduces extra spicy kick |
| Sliced green onions | Offers mild sharpness and color contrast |
| Crumbled tortilla chips | Adds crunchy texture for serving contrast |
| Sour cream dollop | Balances spice with cool creaminess |
These elements combine to create the unmistakable Chili Con Queso that’s creamy, flavorful, and ready to elevate any snack or meal.
Equipment Needed
To recreate the Carlos O’Kelly’s Chili Con Queso recipe perfectly, having the right equipment is essential. Below is a list of tools that will help us achieve the creamy, smooth texture and rich flavor this iconic dish demands.
| Equipment | Purpose |
|---|---|
| Medium Saucepan | To melt the cheeses and combine ingredients evenly |
| Wooden Spoon or Silicone Spatula | For stirring the queso without scratching the pan |
| Measuring Cups & Spoons | To ensure precise measurements of ingredients |
| Cutting Board & Knife | To chop fresh toppings like cilantro and jalapeños |
| Small Bowl | To mix spices or hold toppings before adding |
| Serving Bowl | To present the finished Chili Con Queso |
| Slow Cooker (optional) | For keeping the queso warm during parties or gatherings |
When working with melted cheese, consistent stirring is crucial to avoid sticking or burning. Using a wooden spoon or silicone spatula helps maintain smoothness and control heat distribution.
For best results, we suggest starting with a medium saucepan that has a thick base. This prevents hot spots and ensures the cheese melts evenly, delivering a seamless Chili Con Queso experience true to the original flavor.
If serving at a party, transferring the queso to a slow cooker set on low helps maintain that perfect, creamy consistency throughout the event.
Remember: Precise measurements using measuring cups and spoons support balancing flavors every time we prepare this dish. Having a clean cutting board and sharp knife ready allows us to quickly add those finishing garnishes like diced jalapeños or chopped cilantro to elevate the presentation and taste.
Prep Work
Before we dive into making the Carlos O’Kelly’s Chili Con Queso, it’s essential to get our prep work right. Proper preparation ensures smooth cooking and helps us bring out the full flavor and creamy texture of this iconic Tex-Mex dip.
Preparing the Ingredients
To achieve the signature taste of Chili Con Queso, we need to prepare each ingredient precisely and in order. Here’s a clear list and specifications:
- Processed cheese – cut into cubes for easy melting
- Sharp cheddar cheese – shredded finely for smooth integration
- Diced tomatoes and green chilies – drained to avoid excess liquid, ensuring the dip’s perfect consistency
- Evaporated milk – measured for creaminess and perfect texture
- Butter – softened to help meld ingredients
- Spices: cumin, garlic powder, onion powder, chili powder – pre-measured to guarantee balanced flavor
- Optional toppings: chopped cilantro, diced jalapeños, sliced green onions, crumbled tortilla chips, sour cream dollop – prepared and ready for garnishing
| Ingredient | Prep Detail | Purpose |
|---|---|---|
| Processed cheese | Cubed | Melts evenly |
| Sharp cheddar | Finely shredded | Smooth texture |
| Diced tomatoes & green chilies | Drained | Maintains dip creaminess |
| Evaporated milk | Measured | Adds richness |
| Butter | Softened | Binds ingredients |
| Spices (cumin, garlic, onion, chili) | Pre-measured | Ensures balanced flavor |
| Optional toppings | Chopped/diced/prepped | Enhances texture and flavor |
Prepping the Cooking Area
Creating Carlos O’Kelly’s Chili Con Queso requires a well-organized cooking space. Let’s set up efficiently:
- Use a medium saucepan on a stove burner – ideal for melting cheeses evenly without burning.
- Have a wooden spoon or silicone spatula ready for consistent stirring to avoid any sticking or scorching.
- Keep measuring cups and spoons at hand to add ingredients precisely according to the recipe.
- Arrange a slow cooker nearby if planning to keep the queso warm during serving.
- Clear the workspace of any clutter, ensuring quick access to all ingredients and tools without distractions.
Instructions
Follow these step-by-step instructions to craft the authentic Carlos O’Kelly’s Chili Con Queso. Each phase builds layers of flavor, ensuring a rich and creamy dip that is perfect for any occasion.
Cooking the Chili
- Heat a medium saucepan over medium heat.
- Add 1 tablespoon butter, allowing it to melt and bubble gently.
- Stir in diced tomatoes and green chilies (drained) to the pan.
- Sprinkle in the following spices evenly:
- 1 teaspoon cumin
- 1/2 teaspoon chili powder
- 1/2 teaspoon garlic powder
- 1/2 teaspoon onion powder
- Cook the mixture for 4-5 minutes, stirring frequently with a wooden spoon or silicone spatula to combine flavors and reduce excess moisture.
- Once thickened slightly, remove from heat and set aside.
Making the Queso Cheese Sauce
- In a clean medium saucepan, melt 8 ounces processed cheese (cubed) over low heat.
- Gradually whisk in 8 ounces shredded sharp cheddar cheese until fully melted and smooth.
- Slowly pour in 1 cup evaporated milk, whisking continuously to achieve a silky consistency.
- Continue to cook on low heat, stirring regularly to prevent scorching, for about 5 minutes or until the cheese sauce is smooth and creamy.
- Season with a pinch of salt to taste.
Combining Chili and Queso
- Return the prepared chili mixture to low heat.
- Slowly pour the queso cheese sauce into the saucepan with the chili.
- Stir thoroughly to combine both components into a uniform, vibrant dip.
- Maintain gentle heat and stir frequently for an additional 3-4 minutes to meld flavors perfectly.
- Transfer the Chili Con Queso to a serving bowl or a slow cooker to keep warm.
- Garnish with your choice of toppings such as:
- Chopped cilantro
- Diced jalapeños
- Sliced green onions
- Crumbled tortilla chips
- A dollop of sour cream
| Step | Ingredient/Action | Time/Measurement |
|---|---|---|
| Cook chili | Butter, tomatoes, chilies, spices | 4-5 minutes |
| Melt cheese | Processed & sharp cheddar cheese | 5 minutes |
| Combine & heat | Chili and queso mixture | 3-4 minutes |
Directions for Serving
Now that we have perfectly combined the rich flavors of Carlos O’Kelly’s Chili Con Queso, it’s time to focus on serving this crowd-pleaser in the best way possible. Let’s explore the ideal serving suggestions and how to maintain that creamy warmth throughout your gathering.
Serving Suggestions
To maximize the classic appeal and bold flavors of Carlos O’Kelly’s Chili Con Queso, consider these serving ideas:
- Tortilla chips: Sturdy, crisp chips perfectly scoop up the creamy queso, making them a top pairing.
- Fresh vegetables: Sliced bell peppers, celery sticks, and carrot batons add a refreshing crunch.
- Toppings and garnishes: Sprinkle chopped cilantro, diced jalapeños, sliced green onions, or crumbled tortilla chips to elevate texture and flavor profile.
- Taco and nacho topping: Spoon warm queso over your tacos or nachos for an indulgent Tex-Mex experience.
- Soft pretzels or breadsticks: Offer alternative dippables to delight a variety of palates.
“Serving your queso hot and with complementary dippers enhances its creamy, spicy character and brings the fiesta to your table.”
Tips for Keeping It Warm
Maintaining the ideal temperature is crucial to preserve the smooth texture and rich taste of Carlos O’Kelly’s Chili Con Queso during your event. Here are our top tips:
| Method | Description | Ideal For |
|---|---|---|
| Slow Cooker (Low) | Set on low to gently keep queso warm without scorching. | Parties and long events |
| Double Boiler | Use a heat-safe bowl over simmering water for steady warmth. | Intimate gatherings |
| Warm Oven | Keep queso in an oven-safe dish at 170°F (77°C) covered with foil. | Short-term warming |
| Microwave Refresh | Heat in 30-second intervals, stirring between each to maintain consistency. | Quick reheats |
- Stir gently every 15-20 minutes to avoid separation or burning.
- Avoid direct high heat which can cause the cheese to become grainy.
- Cover your serving dish loosely with foil or a lid to retain moisture.
Incorporating these serving and warming tips will ensure our Carlos O’Kelly’s Chili Con Queso stays irresistibly creamy and flavorful from the first dip to the last bite.
Make-Ahead and Storage Instructions
Proper make-ahead and storage techniques are essential to preserving the rich flavor and creamy texture of Carlos O’Kelly’s Chili Con Queso. Follow these detailed steps to ensure your dip stays fresh and delicious.
Preparing Chili Con Queso Ahead of Time
- Allow the queso to cool slightly at room temperature after cooking.
- Transfer the dip to an airtight container to prevent exposure to air that can dry out the cheese.
- Refrigerate promptly within 2 hours of cooking to maintain food safety and quality.
- The dip can be made up to 3 days in advance without losing its signature flavor.
Refrigeration Details
Store the queso carefully following these guidelines:
| Storage Condition | Duration | Container Type | Notes |
|---|---|---|---|
| Refrigerated (34-40°F) | Up to 3 days | Airtight container | Preserve creaminess, avoid contamination |
| Freezer (-0°F or below) | Up to 1 month | Freezer-safe container | May alter texture slightly after thaw |
Reheating Instructions
To maintain the luscious, smooth consistency:
- Remove the queso from the refrigerator and let it sit at room temperature for 15-20 minutes.
- Reheat slowly over low heat on the stove in a saucepan, stirring continuously to prevent scorching.
- Alternatively, use a microwave-safe bowl, reheating in 30-second intervals, stirring well after each interval.
- Add a splash of evaporated milk or whole milk if the dip thickens too much during reheating, stirring gently until smooth.
Pro tip: Use a double boiler or slow cooker on the “warm” setting to gently reheat and keep your queso creamy throughout serving.
Freezing & Thawing Tips
Freezing can extend the dip’s life, but it requires care:
- Freeze the queso in a shallow, freezer-safe container to expedite thawing.
- To thaw, place the container in the refrigerator overnight.
- After thawing, reheat with gentle stirring to minimize texture changes.
Summary Table: Make-Ahead & Storage Best Practices
| Step | Description | Timeframe | Tips |
|---|---|---|---|
| Cooling | Cool slightly at room temperature | 15-20 min | Avoid sealing hot queso to prevent condensation |
| Refrigerating | Store in airtight container | Up to 3 days | Keep temperature steady (34-40°F) |
| Freezing | Freeze in shallow freezer-safe containers | Up to 1 month | Slight texture change expected |
| Reheating (Stove) | Low heat stirring continuously | Until warmed | Add milk if needed to restore creaminess |
| Reheating (Microwave) | 30-second increments stirring well after each | Until warmed | Avoid overheating to prevent separation |
Following these Make-Ahead and Storage Instructions will help us enjoy Carlos O’Kelly’s Chili Con Queso as fresh and creamy as when first made — from prep day to game day and every delicious bite beyond.
Conclusion
Carlos O’Kelly’s Chili Con Queso is a timeless dip that brings bold flavors and creamy comfort to any table. With just a handful of ingredients and straightforward steps, we can recreate this classic Tex-Mex favorite right at home.
Whether it’s for a casual snack or a festive gathering, this queso never fails to impress. By following the tips and techniques shared, we ensure every batch turns out smooth, flavorful, and perfectly spicy. Let’s keep this delicious tradition alive and enjoy the warmth and zest it adds to our meals.
Frequently Asked Questions
What is Carlos O’Kelly’s Chili Con Queso?
Carlos O’Kelly’s Chili Con Queso is a creamy Tex-Mex cheese dip that combines melted cheeses with a spicy chili kick. It’s popular for snacks, parties, and as a topping for tacos or nachos.
What are the main ingredients in the dip?
The key ingredients include processed cheese, sharp cheddar, diced tomatoes with green chilies, evaporated milk, butter, and spices like cumin, garlic powder, onion powder, and chili powder.
Can I add toppings to this Chili Con Queso?
Yes, optional toppings such as chopped cilantro, diced jalapeños, sliced green onions, crumbled tortilla chips, or sour cream can enhance the flavor and texture.
What equipment is needed to make the dip?
You’ll need a medium saucepan, a wooden spoon or silicone spatula for stirring, and measuring cups and spoons for accurate ingredient measurement. A slow cooker is optional for keeping it warm.
How do I prepare the ingredients for the dip?
Cube the processed cheese for easier melting, finely shred the sharp cheddar, drain the diced tomatoes and green chilies, and measure evaporated milk precisely to ensure the right texture.
What is the cooking process for the chili con queso?
First, cook the chili with butter, diced tomatoes, green chilies, and spices for 4-5 minutes. Then melt the cheeses and whisk in evaporated milk to create the cheese sauce. Finally, combine and heat the chili and queso together for 3-4 minutes.
What are the best serving suggestions?
Serve the dip with sturdy tortilla chips or fresh vegetables. It also works well as a topping for tacos and nachos, with optional spicy or fresh garnishes.
How can I keep the queso warm during a party?
Use a slow cooker, double boiler, warm oven, or microwave on low heat to maintain its creamy consistency and warmth throughout the event.
How do I store leftover Chili Con Queso?
Cool slightly and transfer to an airtight container. Refrigerate within 2 hours and consume within 3 days. You can also freeze it for up to 1 month.
What’s the best way to reheat the dip?
Reheat gently in a microwave or on the stove over low heat, stirring frequently to restore the creamy texture without burning or separating.