
Baking cakes that are both delicious and healthier is easier than ever when we use stevia as a natural sweetener. Stevia offers a great alternative to sugar without sacrificing sweetness or flavor. It’s perfect for those looking to reduce calories or manage blood sugar levels without giving up their favorite treats.
Ingredients for Cake Recipes Using Stevia
When baking with stevia, selecting the right ingredients ensures a moist, flavorful, and balanced cake. Below we break down the essential components you’ll need, how to properly substitute sugar with stevia, and optional flavor enhancers to elevate your cake.
Common Cake Ingredients
Our cake base uses classic ingredients tailored for stevia baking, providing structure and flavor:
- Flour – 2 cups (all-purpose or gluten-free as preferred)
- Baking powder – 1 ½ teaspoons (leavening agent)
- Salt – ¼ teaspoon (enhances flavor)
- Eggs – 3 large (adds richness and binds batter)
- Butter or oil – ½ cup (unsalted butter softened or vegetable oil)
- Milk – 1 cup (whole or plant-based for moisture)
- Vanilla extract – 1 teaspoon (for aroma)
- Stevia – see substitution guide below for quantity adjustments
Stevia Substitutes and Measurements
Using stevia requires adjusting quantities since it is more potent than sugar. Here’s a clear comparison to help us measure precisely:
| Ingredient | Traditional Sugar | Stevia Powder Equivalent | Stevia Liquid Equivalent |
|---|---|---|---|
| White Granulated Sugar | 1 cup | 1 teaspoon | 1 teaspoon |
| Brown Sugar | 1 cup | 1 teaspoon | 1 teaspoon |
| Powdered Sugar | 1 cup | 1.5 teaspoons | 1.5 teaspoons |
Tip: Start with less stevia, then adjust to taste as stevia varieties differ in sweetness intensity.
Optional Flavor Add-Ins
To enhance our cakes while balancing sweetness with stevia, consider adding one or more of these flavor boosters:
- Cinnamon – 1 teaspoon for warm spice notes
- Lemon or orange zest – 2 teaspoons for fresh citrus aroma
- Unsweetened cocoa powder – ⅓ cup for rich chocolate flavor
- Almond extract – ½ teaspoon for a nutty depth
- Chopped nuts or berries – ½ cup mixed for texture and bursts of natural sweetness
Incorporating these ingredients can complement the clean sweetness of stevia and bring delightful complexity to our homemade cakes.
Tools and Equipment Needed
To create delicious cakes using stevia, having the right tools and equipment is essential for achieving the perfect texture and flavor. Let’s break down the must-have items for a smooth baking process.
Mixing and Measuring Tools
Accurate measurement is critical when working with stevia, as its sweetness differs significantly from sugar. Use these tools for precise ingredient handling:
- Digital kitchen scale – for weighing flour, stevia, and other dry ingredients accurately
- Measuring cups and spoons – essential for liquids, baking powder, and stevia powder forms
- Mixing bowls – preferably glass or stainless steel, medium and large sizes for combining ingredients
- Electric hand mixer or stand mixer – to thoroughly blend batter and incorporate air for a fluffy cake
Baking and Preparation Equipment
Proper baking equipment ensures even cooking and helps maintain optimal moisture when baking with stevia, which can sometimes alter typical cake textures.
- Cake pans – use the recommended size (usually 8 or 9-inch round pans) for best results
- Parchment paper – prevents sticking and simplifies cleanup
- Cooling rack – allows cakes to cool evenly without becoming soggy
- Spatulas – silicone spatulas for folding and scraping batter smoothly from bowls
Additional Essentials
These supplementary tools enhance the baking experience when using stevia in cake recipes.
- Sifter or fine mesh sieve – to aerate flour and baking powder, ensuring lighter texture
- Zester or grater – for adding optional citrus zest to balance stevia’s sweetness
- Toothpick or cake tester – checks doneness without disturbing cake structure
| Tool/Equipment | Purpose | Why Important with Stevia |
|---|---|---|
| Digital Kitchen Scale | Precise weighing of ingredients | Stevia requires exact measurements |
| Measuring Cups & Spoons | Liquid and dry ingredient measuring | Avoids overpowering sweetness |
| Mixing Bowls | Combining ingredients | Prevents uneven blending |
| Electric Mixer | Incorporate air into batter | Compensates for texture changes with stevia |
| Cake Pans | Baking cakes | Ensures even cooking |
| Parchment Paper | Prevent sticking | Helps with delicate cakes using stevia |
| Cooling Rack | Even cooling | Keeps cake from sogginess |
| Spatulas | Mixing and folding | Gentle mixing maintains cake integrity |
| Sifter | Aerates dry ingredients | Lightens batter for soft crumb |
| Zester | Adds flavor enhancers | Balances sweetness of stevia |
| Toothpick | Tests cake doneness | Ensures perfectly baked cake |
Preparation Steps
Mastering cake recipes using stevia requires precise preparation to achieve the perfect balance of sweetness and texture. Let’s walk through the essential steps to prep our ingredients and mix a flawless batter.
Prepping Stevia for Baking
To ensure even sweetness in our cakes, we must prepare stevia correctly:
- Choose the right form: Use stevia powder or granulated stevia formulated for baking rather than liquid stevia to avoid altering batter consistency.
- Measure accurately: Stevia is much sweeter than sugar; precise measurement is critical. Use a digital scale or baking-specific measuring spoons for best results.
- Pre-mix with dry ingredients: Blend stevia evenly with flour and baking powder before wet ingredient incorporation. This promotes uniform sweetness distribution.
“Proper handling of stevia at this stage sets the foundation for a moist moist and evenly sweet cake.”
Preparing the Cake Batter
Follow these step-by-step directions to create an airy and tender cake batter using stevia:
- Preheat oven and prepare pans: Set oven to 350°F (175°C). Grease cake pans and line with parchment paper.
- Combine dry ingredients: In a large bowl, sift together flour, baking powder, and stevia, ensuring no lumps remain.
- Mix wet ingredients: In a separate bowl, whisk eggs, softened butter, and vanilla extract until smooth and creamy.
- Incorporate liquids into dry: Gradually fold wet mixture into dry ingredients. Stir gently but thoroughly to blend.
- Avoid overmixing: Mix just until combined to maintain fluffiness. Overmixing can produce a dense texture.
- Test batter consistency: Batter should be smooth but thick enough to hold shape. Adjust with a tablespoon of milk if too stiff.
- Pour into pans: Evenly distribute batter between prepared pans for uniform baking.
- Bake: Insert into preheated oven and bake for 25-30 minutes or until a toothpick inserted into center comes out clean.
- Cool properly: Let cakes cool in pans 10 minutes before transferring to wire racks.
| Step | Temperature | Time | Notes |
|---|---|---|---|
| Preheat Oven | 350°F (175°C) | – | Grease and line pans with parchment |
| Bake | 350°F (175°C) | 25-30 minutes | Test with toothpick for doneness |
| Cooling | Room temperature | 10 minutes | In pans before wire rack transfer |
Tips for Using Stevia in Baking
To maximize the benefits of stevia in our cake recipes, keep these tips in mind:
- Balance sweetness: Since stevia has zero calories but high sweetness intensity, balance with natural flavor enhancers such as citrus zest, cinnamon, or vanilla extract to enrich taste.
- Add moisture: Stevia lacks the bulk sugar provides, so incorporate extra egg yolk, apple sauce, or Greek yogurt to keep cakes moist.
- Watch baking time: Cakes with stevia can bake slightly faster; check doneness 5 minutes earlier than usual.
- Mix gently: Overmixing after adding stevia can cause crumbly texture due to lack of sugar structure.
- Experiment gradually: Replace sugar with stevia in increments, adjusting to personal sweetness preference and texture needs.
Baking Instructions
Mastering the art of baking cakes using stevia requires precise control over the baking time and temperature as these elements directly influence texture, moisture, and flavor. Let’s break down the essential steps for perfect results every time.
Baking Time and Temperature
To achieve a tender, moist cake when substituting sugar with stevia, we recommend baking at a slightly lower temperature than traditional recipes. This adjustment helps prevent over-browning and drying out due to stevia’s different caramelization properties.
- Preheat your oven to 325°F (162°C). This temperature gently cooks the cake without drying the delicate crumb.
- For typical 8 or 9-inch round cake pans, bake for 25 to 35 minutes.
- For loaf cakes or denser cakes, increase baking time to 40 to 50 minutes.
It’s essential to keep a close watch towards the end of the baking time because cakes sweetened with stevia often bake quicker than their sugar counterparts.
| Cake Type | Oven Temperature | Baking Time |
|---|---|---|
| Layer Cake (8-9″) | 325°F (162°C) | 25-35 minutes |
| Loaf Cake | 325°F (162°C) | 40-50 minutes |
| Cupcakes | 325°F (162°C) | 18-22 minutes |
Checking for Doneness
Checking for doneness is critical when baking with stevia since traditional visual and timing cues might slightly differ. Use these reliable methods to confirm when your cake is perfectly baked:
- Toothpick Test: Insert a toothpick or thin skewer into the center. If it comes out clean or with a few moist crumbs, the cake is done.
- Touch Test: Gently press the cake surface with your finger. It should spring back without leaving a dent.
- Edges Pulling Away: Observe if the cake’s edges start pulling away from the pan, signaling readiness.
Remember, avoid opening the oven door frequently to maintain an even baking environment, which is especially important when using stevia to keep consistent heat.
“Baking cakes with stevia requires patience and precise timing to ensure a moist texture and balanced sweetness.“
By carefully monitoring baking time and employing these doneness checks, we can create delightful cakes that highlight stevia’s benefits without sacrificing taste or texture.
Decorating and Serving
Decorating and serving cakes using stevia calls for a thoughtful approach to enhance the natural sweetness without overpowering it. Let’s explore Frosting Options Compatible with Stevia and creative Presentation Ideas that maintain the cake’s healthy profile while delighting the senses.
Frosting Options Compatible with Stevia
Choosing the right frosting is essential when working with stevia-sweetened cakes. We want frostings that complement the reduced sugar content and preserve a rich flavor and appealing texture. Here are our top frosting choices:
- Cream Cheese Frosting with Stevia
Use full-fat cream cheese combined with unsalted butter and powdered stevia. Beat until smooth and creamy for a tangy, balanced frosting that doesn’t overwhelm the cake’s flavor.
- Whipped Coconut Cream
Chill the coconut cream, then whip with vanilla extract and stevia to taste. This dairy-free option is light, airy, and adds subtle sweetness without refined sugars.
- Greek Yogurt and Honey Glaze
Mix thick Greek yogurt with a small amount of honey or stevia and a splash of lemon juice. This glaze adds moisture and a tangy finish, perfect for complementing cakes using stevia.
- Sugar-Free Chocolate Ganache
Combine sugar-free dark chocolate with heavy cream and a stevia blend. Gently heat and mix to a glossy finish that adds richness without sugar spikes.
| Frosting Type | Key Ingredients | Benefits |
|---|---|---|
| Cream Cheese Frosting | Cream cheese, butter, powdered stevia | Tangy, creamy, sugar-free |
| Whipped Coconut Cream | Coconut cream, vanilla, stevia | Dairy-free, light, naturally sweet |
| Greek Yogurt Glaze | Greek yogurt, honey/stevia, lemon juice | Low calorie, tangy, moistening |
| Sugar-Free Ganache | Dark chocolate, heavy cream, stevia | Rich, glossy, sugar-free |
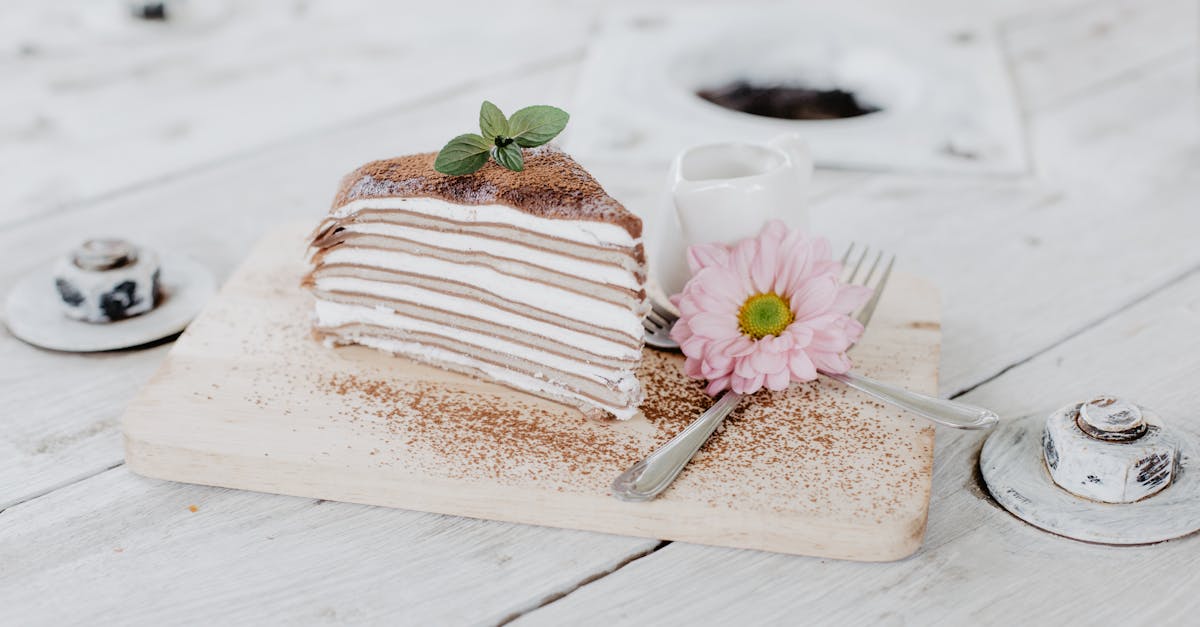
Presentation Ideas
Presentation elevates the experience of cake recipes using stevia. Here are ways we can serve these cakes to highlight their health benefits while creating visual appeal:
- Fresh Fruit Garnishes
Top with berries, sliced kiwi, or citrus segments to add vibrant color and natural sweetness that pairs well with stevia’s subtle flavor.
- Edible Flowers and Herbs
Decorate with edible flowers such as pansies or violets and fresh mint or basil leaves. This adds freshness and an elegant touch.
- Nut Crumbles and Seeds
Sprinkle toasted almonds, pistachios, or chia seeds on the frosting for crunch and nutritional boost that contrasts beautifully with soft cake layers.
- Minimalist Layers
For layer cakes, keep decoration simple to showcase the crumb texture and moistness achieved with stevia. Use light frosting spreads between layers and a dusting of cocoa powder or cinnamon on top.
- Elegant Plating
Serve cake slices on white or pastel plates with a drizzle of homemade berry coulis or a dollop of whipped coconut cream on the side.
Combining these decorating and serving tips ensures our cake recipes using stevia look as good as they taste, creating enjoyable treats that suit both health goals and aesthetic pleasures.
Make-Ahead and Storage Tips
To maintain the freshness and flavor of our cake recipes using stevia, proper make-ahead and storage techniques are essential. These tips ensure our cakes retain their moist texture and delicate sweetness over time.
Make-Ahead Tips
- Bake in advance: We can prepare our stevia-sweetened cakes up to 2 days ahead. After baking, allow the cake to cool completely on a wire rack.
- Wrap tightly: Use plastic wrap or aluminum foil to cover the cooled cake, preventing moisture loss and absorbing odors from other foods.
- Refrigerate if needed: If our cake contains perishable fillings or frostings like cream cheese, store it in the refrigerator. Otherwise, room temperature storage is sufficient for up to 2 days.
Storing Cakes Using Stevia
| Storage Method | Duration | Key Tips |
|---|---|---|
| Room Temperature | 1-2 days | Wrap tightly, avoid direct sunlight |
| Refrigeration | Up to 1 week | Seal in airtight container, frostings require cool temperature |
| Freezing | 2-3 months | Wrap in plastic wrap + foil, thaw overnight in fridge |
- Freezing cakes: For long-term storage, freezing our cakes is ideal. Wrap cakes twice — first with plastic wrap to lock in moisture, then foil for protection against freezer burn.
- Thawing: Always thaw frozen cakes overnight in the refrigerator to maintain texture and flavor. Avoid microwaving as it can dry out the cake.
Additional Tips
- Moisture is critical when storing cakes made with stevia because the lack of sugar bulk can sometimes cause faster drying.
- We can add a slice of bread in the storage container to help retain moisture naturally. Replace the bread slice every couple of days.
- Stevia-sweetened cakes may benefit from a slightly more humid environment to keep their tender crumb intact.
“Proper storage preserves the unique moistness and natural sweetness of cakes made with stevia, allowing us to enjoy these healthier treats anytime.“
Using these make-ahead and storage strategies, we maximize the quality and enjoyment of our delightful cake recipes using stevia.
Conclusion
Baking with stevia opens up a world of healthier dessert options without compromising on flavor or texture. By mastering the right techniques and ingredient balances, we can create cakes that satisfy our sweet cravings while supporting better health. With thoughtful preparation and attention to detail, stevia-sweetened cakes become a delicious staple in our baking repertoire.
Embracing stevia also encourages creativity in flavor combinations and presentation, allowing us to enjoy guilt-free indulgence. Whether for everyday treats or special occasions, these recipes prove that healthier choices can be just as delightful and rewarding. Let’s keep experimenting and sharing our love for baking with stevia!
Frequently Asked Questions
What is stevia and why use it in baking cakes?
Stevia is a natural sweetener derived from the leaves of the Stevia plant. It is used in baking as a healthier alternative to sugar because it contains zero calories and does not raise blood sugar levels, making it ideal for those managing weight or diabetes.
How do I substitute sugar with stevia in cake recipes?
Substitute sugar with stevia by using the equivalent stevia measurements provided on the product’s packaging. Generally, stevia is much sweeter than sugar, so use significantly less—often a fraction of the sugar amount.
What ingredients do I need to bake cakes with stevia?
Essential ingredients include flour, baking powder, eggs, butter, and stevia. Optional flavor enhancers like cinnamon, citrus zest, or cocoa powder can balance sweetness and add depth to the cake’s flavor.
Are there special tools required for baking with stevia?
Accurate measuring tools such as a digital kitchen scale, measuring cups and spoons, mixing bowls, and an electric mixer are important for precise ingredient handling and a fluffy cake texture.
How can I ensure my stevia-sweetened cake stays moist?
Add moisture-rich ingredients like yogurt or applesauce, and monitor baking time closely. Baking at a slightly lower temperature (around 325°F) can prevent over-drying.
What is the best way to check if my cake is fully baked?
Use the toothpick test by inserting it into the cake center; it should come out clean. Also, check if the edges pull away from the pan and the cake springs back when lightly touched.
What frostings work best with cakes made using stevia?
Frostings like cream cheese, whipped coconut cream, Greek yogurt glaze, and sugar-free chocolate ganache complement the reduced sugar content while maintaining rich texture and flavor.
How should I store stevia-sweetened cakes to keep them fresh?
Store cakes at room temperature wrapped tightly or in an airtight container with a slice of bread to maintain moisture. Refrigerate or freeze for longer storage, ensuring proper sealing to avoid dryness.
Can I prepare cakes with stevia in advance?
Yes, you can bake stevia-sweetened cakes ahead of time. Wrap them well and store according to the desired duration—room temperature for short-term or refrigeration/freezing for longer storage.