
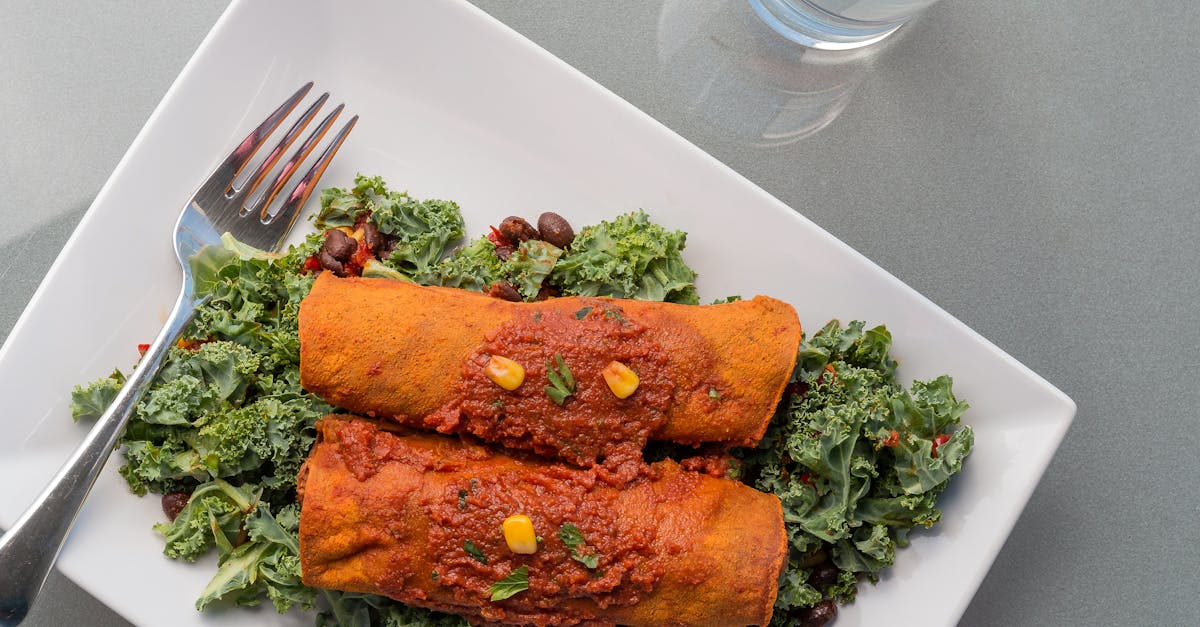
Brisket enchiladas bring together the rich, smoky flavors of slow-cooked beef with the vibrant, zesty taste of classic Mexican cuisine. This dish transforms tender brisket into a comforting, cheesy filling wrapped in soft tortillas and smothered with a savory enchilada sauce. It’s a perfect way to elevate your dinner table with bold flavors and satisfying textures.
We love how this recipe combines the heartiness of brisket with the ease of enchiladas, making it ideal for family meals or special gatherings. Whether you’re a fan of traditional Mexican dishes or looking to try something new, these brisket enchiladas deliver a delicious punch that’s sure to impress. Let’s dive in and make a dish that’s both flavorful and unforgettable.
Ingredients
To create our signature brisket enchiladas, we gather a set of carefully selected ingredients. These components ensure a perfect balance of rich, tender brisket and flavorful enchilada sauce wrapped in warm tortillas.
For the Brisket
- 3 pounds beef brisket, trimmed and cut into large chunks
- 2 tablespoons olive oil
- 1 large onion, finely chopped
- 4 cloves garlic, minced
- 1 cup beef broth
- 1 tablespoon ground cumin
- 1 tablespoon smoked paprika
- 1 teaspoon chili powder
- Salt and freshly ground black pepper, to taste
For the Enchilada Sauce
| Ingredient | Amount | Notes |
|---|---|---|
| 3 tablespoons | vegetable oil | |
| 3 tablespoons | all-purpose flour | |
| 1/4 cup | chili powder | Use a good quality for bold flavor |
| 1 teaspoon | ground cumin | |
| 1/2 teaspoon | garlic powder | |
| 1/4 teaspoon | dried oregano | Mexican oregano preferred |
| 2 cups | beef broth | Adds richness to the sauce |
| 1 can (8 oz) | tomato sauce | |
| Salt, to taste | Adjust after simmering |
For the Enchilada Filling
- 2 cups shredded cooked brisket (from above)
- 1 1/2 cups shredded Monterey Jack cheese
- 1 cup shredded sharp cheddar cheese
- 1/2 cup chopped fresh cilantro
- 1/2 cup diced green chilies (mild or hot based on preference)
Additional Ingredients
- 12 corn tortillas (6-inch size), warmed
- 1 cup sour cream, for serving
- Sliced jalapeños (optional), for garnish
- Extra cilantro leaves, for garnish
We combine these ingredients to build our brisket enchiladas layered in bold flavor and rich textures — making every bite a savory delight.
Equipment Needed
To prepare our Brisket Enchiladas recipe with precision and ease, we need to gather the right kitchen tools. Ensuring all essential equipment is ready helps us maintain an efficient workflow and achieve the perfect texture and flavor balance.
| Equipment | Purpose |
|---|---|
| Slow Cooker or Dutch Oven | To cook the brisket low and slow until tender |
| Large Skillet | To sauté spices and warm tortillas |
| Mixing Bowls | For combining brisket filling and cheese |
| Measuring Cups and Spoons | To measure spices, liquids, and other ingredients accurately |
| Sharp Knife | To shred cooked brisket finely |
| Cutting Board | For safe and clean brisket shredding |
| 9×13 Inch Baking Dish | To assemble and bake the enchiladas |
| Ladle or Spoon | To pour enchilada sauce evenly over assembled dish |
| Aluminum Foil or Lid | To cover the baking dish while baking to retain moisture |
| Cheese Grater | To shred Monterey Jack and sharp cheddar cheeses |
Tip: For optimum results, we recommend using a slow cooker to achieve that melt-in-your-mouth brisket texture. If unavailable, a Dutch oven followed by low-temperature oven braising works just as well.
By using these essential tools, we set ourselves up for success, ensuring every component of our brisket enchiladas is cooked and assembled perfectly before baking to bubbly, cheesy perfection.
Make-Ahead Instructions
Preparing Brisket Enchiladas in advance saves time and enhances the depth of flavors. Here’s how we recommend making this dish ahead for stress-free cooking and maximum taste:
Step 1: Slow Cook and Shred the Brisket
Cook the 3 pounds of beef brisket in the slow cooker or Dutch oven until tender, about 8 hours on low heat. Let it cool slightly, then shred the meat finely.
Pro Tip: Prepare the brisket up to 3 days before assembly and refrigerate in an airtight container to maintain freshness.
Step 2: Prepare the Enchilada Sauce
Make the enchilada sauce from vegetable oil, flour, chili powder, and beef broth as instructed. Cool completely before storing.
Store the sauce separately in a sealed container for up to 4 days in the refrigerator or freeze for longer storage.
Step 3: Assemble but Do Not Bake
Warm the corn tortillas until pliable. Combine shredded brisket, Monterey Jack, cheddar cheese, cilantro, and green chilies as the filling.
- Divide the filling evenly among tortillas.
- Roll each tortilla tightly and place seam-side down in the baking dish.
- Pour the enchilada sauce evenly over the top and sprinkle extra cheese.
Step 4: Storage Before Baking
Cover the baking dish tightly with aluminum foil or plastic wrap.
| Storage Option | Refrigeration Time | Freezing Time | Notes |
|---|---|---|---|
| Assembled Enchiladas | Up to 24 hours | Up to 3 months | Thaw overnight in fridge if frozen |
| Shredded Brisket | Up to 3 days | Up to 6 months | Store in airtight container |
| Enchilada Sauce | Up to 4 days | Up to 3 months | Stir well before using if frozen or chilled |
Step 5: Baking from Make-Ahead
Remove the assembled dish from the fridge about 30 minutes before baking to bring to room temperature.
Bake at 350°F (175°C) for 25 to 30 minutes covered, then uncover and bake an additional 10 minutes until bubbly and golden.
Remember: “Allowing the sauce to soak into the tortillas overnight intensifies the rich, savory flavors of our brisket enchiladas.”
By following these make-ahead instructions we streamline our cooking process while preserving the signature tender brisket and cheesy goodness of our favorite brisket enchiladas recipe.
Instructions
Follow these detailed steps to craft richly flavored Brisket Enchiladas that deliver tender beef, zesty sauce, and melty cheese in every bite. We will guide you through preparing the brisket, making the sauce, assembling, baking, and serving.
Preparing the Brisket
- Season the brisket evenly with salt, pepper, garlic powder, cumin, and smoked paprika. Press the spices gently into the meat to maximize flavor absorption.
- Heat vegetable oil in a large skillet over medium-high heat until shimmering.
- Sear the brisket on all sides until deeply browned, about 4 minutes per side. This step locks in juices.
- Transfer the brisket to your slow cooker or Dutch oven.
- Add beef broth and a few sprigs of fresh thyme to the brisket.
- If using a slow cooker, cook on low for 8 hours or on high for 4-5 hours until the brisket is fork-tender.
- For the Dutch oven, cover and braise in a 300°F oven for about 3-4 hours.
- Once cooked, remove brisket and let it rest 10 minutes. Then shred the meat using two forks, discarding excess fat.
Tip: Slow cooking ensures the brisket is tender enough to melt in your mouth, perfect for enchiladas.
Making the Enchilada Sauce
- In a medium saucepan, heat 1/4 cup vegetable oil over medium heat.
- Whisk in 1/4 cup all-purpose flour continuously for 2 minutes to create a roux, avoiding any lumps.
- Gradually add 3 tablespoons chili powder, stirring constantly for even spice distribution.
- Slowly pour in 2 cups beef broth, whisking to blend smoothly.
- Add 1 teaspoon ground cumin, 1 teaspoon garlic powder, and salt to taste.
- Simmer uncovered, stirring often, for 10 minutes or until sauce thickens to a pourable consistency.
- Remove from heat and set aside.
| Ingredient | Measurement | Purpose |
|---|---|---|
| Vegetable oil | 1/4 cup | Roux base |
| All-purpose flour | 1/4 cup | Thickener |
| Chili powder | 3 tablespoons | Primary spice |
| Beef broth | 2 cups | Liquid base |
| Ground cumin | 1 teaspoon | Earthy depth |
| Garlic powder | 1 teaspoon | Flavor enhancement |
| Salt | To taste | Balance seasoning |
Assembling the Enchiladas
- Preheat your oven to 350°F.
- Warm 12 corn tortillas briefly in a skillet or microwave to make them pliable.
- In a bowl, combine shredded brisket, 1 cup Monterey Jack cheese, 1 cup sharp cheddar cheese, chopped cilantro, and diced green chilies.
- Dip each tortilla into the enchilada sauce to coat generously.
- Spoon approximately 1/4 cup of the brisket and cheese filling down the center of each tortilla.
- Roll tortillas tightly and place seam-side down in a greased 9×13-inch baking dish in a single layer.
- Pour remaining enchilada sauce evenly over the rolled tortillas.
- Sprinkle remaining cheese on top for a golden cheesy crust.
Baking the Enchiladas
- Cover the baking dish with foil.
- Bake enchiladas for 20 minutes covered to heat through and allow sauce absorption.
- Remove foil and bake for an additional 10-15 minutes until cheese is bubbly and slightly browned.
- Let rest for 5 minutes before serving to thicken the sauce.
Serving Suggestions
- Garnish enchiladas with fresh cilantro, sliced avocado, and a dollop of sour cream.
- Serve alongside Mexican rice, refried beans, or a crisp green salad.
- Pair with a cold light beer or our favorite margarita to balance the rich flavors.
Enhance your dining experience by allowing the enchiladas to sit covered at room temperature for 10 minutes after baking, this melds the flavors even more.
Tips for the Best Brisket Enchiladas
To craft the ultimate brisket enchiladas, we focus on key techniques that elevate the dish’s flavor, texture, and presentation. Follow these expert tips to make every bite rich and satisfying.
1. Choose the Right Cut and Cook It Low and Slow
Selecting a 3-pound beef brisket with good marbling is crucial. Marbling ensures juiciness and tenderness after slow cooking.
- We recommend using a slow cooker set to low for 8-10 hours or a Dutch oven simmered at 275°F for 3-4 hours.
- Pat the brisket dry then season generously with salt, cumin, chili powder, garlic powder, and black pepper before searing it in a hot skillet to lock in flavor.
2. Prepare the Enchilada Sauce with Depth
Our recipe’s homemade enchilada sauce balances smokiness and heat with rich beef broth.
- Use freshly ground chili powder for a vibrant flavor profile.
- Make the sauce ahead and refrigerate overnight to let the flavors meld beautifully.
3. Warm Tortillas for Flexibility
Warm your corn tortillas on a dry skillet or wrapped in damp paper towels in the microwave. This prevents cracking when rolling.
- Warming tortillas also helps them absorb the sauce for a moist texture.
4. Perfect the Filling Texture
The filling should be moist but not soggy. Combine shredded tender brisket, melted Monterey Jack cheese, diced green chilies, and fresh cilantro for a flavorful balance.
| Ingredient | Role | Tip |
|---|---|---|
| Shredded brisket | Main filling protein | Use warm brisket to mix |
| Monterey Jack | Creamy, mild cheese | Grate fresh for melt |
| Green chilies | Subtle heat and moisture | Drain excess liquid |
| Cilantro | Freshness and color | Add right before filling |
5. Assemble with Care
- Spoon enough sauce on the bottom of the baking dish to prevent sticking.
- Roll each enchilada tightly but gently to avoid tearing tortillas.
- Pour remaining sauce evenly over the rolled enchiladas to saturate every layer.
6. Bake Covered, Then Uncover
Cover the dish with foil during baking at 375°F for 20 minutes, then uncover and bake for another 10 minutes to let cheese bubble and slightly brown on top.
7. Let It Rest Before Serving
Allow the enchiladas to rest 5-10 minutes after baking for the sauce to thicken slightly and flavors to settle.
“Slow cooking the brisket until it’s fork-tender and allowing the flavors to marry overnight”
is our secret to truly unforgettable brisket enchiladas.
8. Serve with Complementary Sides
Fresh garnishes like diced avocado, sliced jalapeños, and a sprinkle of chopped cilantro enhance the dish. Pair with Mexican rice, refried beans, or a zesty slaw for a complete meal.
By combining these techniques, we ensure our brisket enchiladas deliver bold robust flavor and tender melt-in-your-mouth texture every time.
Conclusion
Brisket enchiladas bring together bold, comforting flavors that make any meal feel special. With the right techniques and quality ingredients, this dish delivers a perfect balance of tender meat, cheesy goodness, and savory sauce.
Taking the time to prepare and assemble thoughtfully ensures every bite is packed with rich texture and flavor. Whether for a family dinner or a festive gathering, brisket enchiladas are sure to impress and satisfy.
Frequently Asked Questions
What makes brisket enchiladas different from regular enchiladas?
Brisket enchiladas use slow-cooked, tender beef brisket as the filling, offering rich, smoky flavors. Unlike traditional chicken or cheese fillings, the brisket adds a hearty, melt-in-your-mouth texture paired with a savory enchilada sauce.
Can I prepare brisket enchiladas ahead of time?
Yes, you can. Cooked brisket and sauce can be refrigerated or frozen. Assembled enchiladas can be made up to 24 hours in advance or frozen for up to 3 months, allowing flavors to deepen and saving cooking time on serving day.
What equipment do I need to make brisket enchiladas?
Essential tools include a slow cooker or Dutch oven for cooking the brisket, a large skillet for sauce preparation, mixing bowls, and measuring tools. These make the cooking process precise and manageable.
How do I get the best flavor in brisket enchiladas?
Use a well-marbled brisket and cook it low and slow to tender perfection. Prepare a homemade enchilada sauce and warm the tortillas before assembling to prevent cracking. Let the sauce soak into the enchiladas for deeper flavor.
Can I freeze brisket enchiladas?
Yes, you can freeze both assembled and cooked brisket enchiladas. Store assembled enchiladas in the freezer for up to 3 months and cooked shredded brisket for up to 6 months for easy meal prep.
What cheeses are used in brisket enchiladas?
The recipe typically uses a combination of Monterey Jack and sharp cheddar cheese. This blend offers a creamy texture with a bold, melty finish that complements the rich brisket filling perfectly.
What sides go well with brisket enchiladas?
Great side dishes include Mexican rice, refried beans, fresh guacamole, or a crisp green salad. Garnishes like cilantro, diced onions, or sour cream can also enhance the flavors and presentation.
Why should I warm the tortillas before assembling enchiladas?
Warming tortillas makes them more pliable, preventing cracks and tears during rolling. It also helps the tortillas absorb the sauce better, improving texture and flavor in the finished dish.