
Baking bread at home has never been easier thanks to the Thermomix. This versatile kitchen appliance takes the guesswork out of kneading and mixing, allowing us to enjoy fresh, homemade bread with minimal effort. Whether you’re a beginner or an experienced baker, the Thermomix streamlines the process and delivers consistent results every time.
Our Bread Thermomix Recipe combines simple ingredients with the appliance’s smart functions to create a soft, flavorful loaf perfect for any meal. From crusty artisan styles to soft sandwich bread, this recipe adapts to your preferences while saving time. Let’s explore how the Thermomix can transform your baking routine and bring the comforting aroma of fresh bread into your home.
Ingredients
To create the perfect loaf using our Bread Thermomix Recipe, having the right balance of ingredients is essential. Below we break down the components into dry, wet, and optional add-ins, ensuring every loaf turns out flavorful and textured to perfection.
Dry Ingredients
We start by measuring the essential dry ingredients that form the backbone of our bread:
- Bread flour – 500g, preferably unbleached for better gluten development
- Instant yeast – 7g (1 packet), active dry yeast also works but requires activation
- Salt – 10g (about 1 ½ tsp), crucial for flavor enhancement and yeast control
- Sugar – 15g (1 tbsp), to feed the yeast and balance the taste
| Dry Ingredient | Measurement | Purpose |
|---|---|---|
| Bread flour | 500g | Structure and texture |
| Instant yeast | 7g (1 packet) | Leavening |
| Salt | 10g (1 ½ tsp) | Flavor and yeast regulation |
| Sugar | 15g (1 tbsp) | Yeast nourishment and sweetness |
Wet Ingredients
Wet ingredients bring the dough together, enhancing texture and moisture:
- Water – 350ml lukewarm (approx. 110°F/45°C), temperature-controlled to activate yeast effectively
- Olive oil – 30ml (2 tbsp), for a tender crumb and subtle richness
- Milk – 50ml (optional), adds softness and improves crust color
| Wet Ingredient | Measurement | Purpose |
|---|---|---|
| Water | 350ml lukewarm | Activates yeast and hydrates flour |
| Olive oil | 30ml (2 tbsp) | Tenderizes dough, adds flavor |
| Milk | 50ml (optional) | Softens crumb and enhances crust |
Optional Add-Ins
Personalize your Bread Thermomix Recipe by adding these delicious extras:
- Herbs – 1 tbsp chopped rosemary, thyme, or oregano for aromatic notes
- Seeds – 2 tbsp sunflower, flax, or poppy seeds for crunch and nutrition
- Cheese – 50g grated cheddar or parmesan to enrich taste
- Garlic – 1 clove minced for a savory boost
We recommend adding optional ingredients after the initial kneading cycle to keep the texture balanced. These additions help us tailor our bread to suit diverse palates while maintaining the perfect crumb and crust.
Equipment Needed
When baking bread with the Thermomix, having the right equipment ensures a smooth process and optimal results. Below we outline the essential tools and recommend models that work best for our bread recipe.
Thermomix Model Recommendations
To achieve the best texture and consistency for our Bread Thermomix Recipe, we recommend the following Thermomix models:
| Model | Key Features | Why We Recommend It |
|---|---|---|
| Thermomix TM6 | Advanced heating & kneading functions | Precision temperature control, ideal for dough rising and kneading |
| Thermomix TM5 | Powerful motor with automated programs | Reliable kneading and mixing cycles for perfect dough consistency |
| Thermomix TM31 | Classic model with sturdy performance | Affordable option with efficient kneading capabilities |
Tip: Models with integrated temperature sensors and kneading cycles simplify bread-making by ensuring the dough is mixed and proofed to perfection every time.
Additional Tools
In addition to the Thermomix, these tools help us handle the dough effectively, measure ingredients accurately, and ensure a perfect bake:
- Digital Kitchen Scale: Precise measuring is critical for bread success; even small deviations affect dough texture.
- Dough Scraper: Essential for handling sticky dough and cleaning mixing bowls without wasting ingredients.
- Bread Proofing Basket (Banneton): Helps maintain dough shape during the final rise and adds attractive patterns.
- Silicone Baking Mat or Parchment Paper: Prevents sticking and promotes even baking on your tray or stone.
- Oven Thermometer: Confirms the exact oven temperature, ensuring the bread bakes evenly.
- Loaf Pan (optional): Perfect for sandwich-style bread or when a structured shape is desired.
We find that equipping our kitchen with these tools complements the Thermomix‘s capabilities, streamlining the bread-making process and improving the final loaf quality.
Prep Work
Before we dive into making our perfect Bread Thermomix Recipe, it’s essential to prepare everything thoroughly. Proper prep ensures smooth workflow and consistent results for every loaf we bake.
Preparing Ingredients
We begin by assembling all our ingredients to guarantee accuracy and ease during baking. Precision in measuring and preparation is key when creating flawless bread with the Thermomix.
| Ingredient | Preparation Detail |
|---|---|
| Bread flour | Measure exactly using a digital scale for precision. |
| Instant yeast | Check expiry date; use fresh for optimal rise. |
| Salt | Measure carefully to balance flavor without inhibiting yeast. |
| Sugar | Use granulated sugar; adds subtle sweetness and feeds yeast. |
| Lukewarm water | Heat to 95°F–105°F (35°C–40°C) for best yeast activation. |
| Olive oil | Use extra virgin for flavor; measure accurately. |
| Optional milk | Warm to lukewarm if included; improves crumb softness. |
| Add-ins (herbs, seeds, cheese, garlic) | Chop or prepare finely; add after initial kneading cycle. |
Tip: We always recommend using a digital kitchen scale for measuring dry ingredients to achieve the right dough consistency every time.
Setting Up Your Thermomix
Before adding ingredients, let’s get our Thermomix ready to create the perfect dough:
- Secure Thermomix bowl firmly to avoid movement during the knead cycle.
- Attach the kneading blade (Simmering Basket removed) for precise mixing and kneading.
- Pre-set the machine by selecting the appropriate kneading mode for our bread type:
- For most recipes, we use Dough Mode or knead for 3–4 minutes at speed 2.
- Ensure the Thermomix lid is tightly locked to prevent ingredient spillage.
- Position the measuring cup in the lid to keep the dough moist and regulate temperature.
We find that a clean, clutter-free workspace around the Thermomix significantly improves our baking flow and minimizes disruption.
Remember: Always double check settings before starting the machine to ensure correct kneading time and speed for our Bread Thermomix Recipe. This setup primes us for successful dough formation and an excellent rise.
Instructions
Follow these step-by-step instructions to create the perfect Bread Thermomix Recipe. Precision and timing are key to achieving a beautiful loaf with the ideal texture and flavor.
Making the Dough
- Add dry ingredients to the Thermomix bowl: bread flour, instant yeast, salt, and sugar in the order listed.
- Pour in the wet ingredients: lukewarm water, olive oil, and optional milk.
- Secure the kneading blade and lock the lid.
- Select the kneading mode on your model (TM6, TM5, or TM31) and set the timer for 3 minutes on speed spoon/gently knead.
- After the initial kneading, add any optional add-ins like herbs, seeds, or cheese.
- Knead for an additional 30 seconds to 1 minute on the same speed to incorporate add-ins evenly.
- Remove the kneading blade and transfer the dough to a lightly floured surface for shaping or container for rising.
First Rise
- Lightly grease a large bowl with olive oil.
- Place the dough inside and cover it with a clean, damp kitchen towel or plastic wrap.
- Let it rest in a warm draft-free area for 60 to 90 minutes or until the dough has doubled in size.
- Ideal rising temperature: 75°F to 80°F (24°C to 27°C).
| Step | Duration | Notes |
|---|---|---|
| Cover dough | Immediately after kneading | Use damp towel or plastic wrap |
| First rise time | 60 to 90 minutes | Double in size |
| Ideal temp | 75°F to 80°F | Warm, draft-free environment |
Shaping the Bread
- Gently deflate the dough by pressing down with your hands.
- Turn out the dough onto a lightly floured surface.
- Shape the dough into your desired form: boule, batard, or loaf.
- For loaves, tuck edges underneath to create tension on the surface.
- Place the shaped dough onto a silicone baking mat or into a greased loaf pan.
- Cover again with a damp cloth to prevent drying out.
Second Rise
- Allow the shaped dough to rise a second time, uncovered or loosely covered.
- Let it rest at room temperature (70°F to 75°F) for 30 to 45 minutes, or until it visibly puffs up but does not necessarily double.
- During this period, preheat your oven to 375°F (190°C) to prepare for baking.
- Perform a gentle poke test: if the indentation springs back slowly and partially remains, the dough is ready to bake.
| Step | Duration | Notes |
|---|---|---|
| Second rise time | 30 to 45 minutes | Dough puffs up, indentation test |
| Baking temp | 375°F (190°C) | Preheat oven before baking |
By following these instructions carefully, we harness the true potential of the Thermomix bread recipe to deliver consistently impressive results every time.
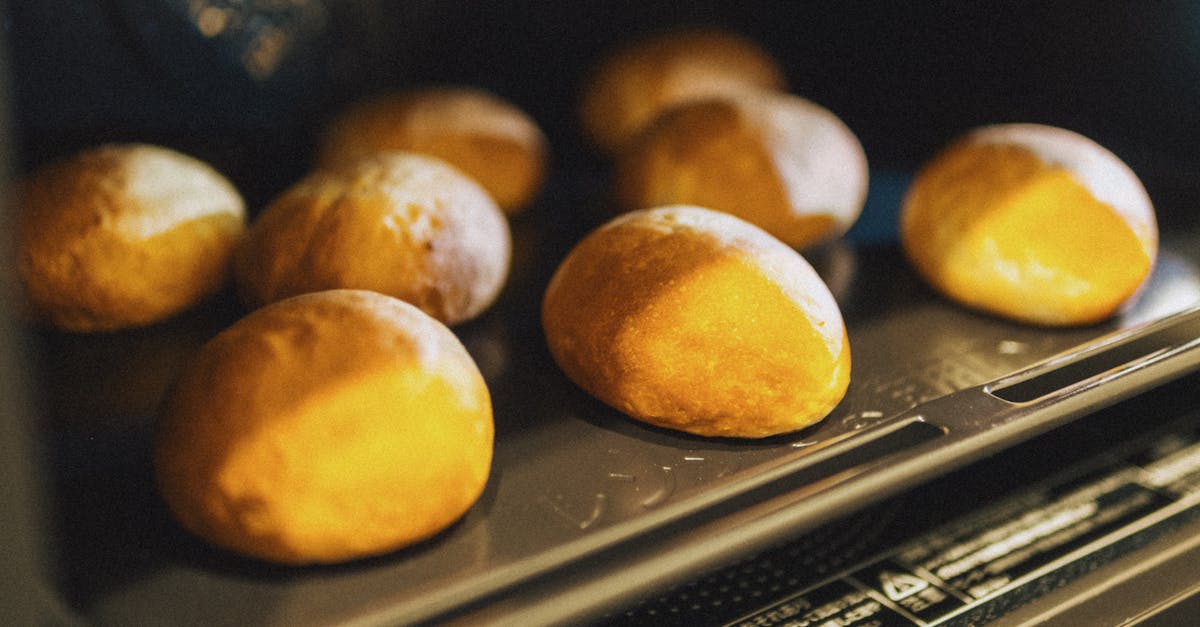
Baking Directions
Baking bread with the Thermomix is straightforward once the dough is ready. By following precise oven settings and proper cooling techniques, we ensure every loaf achieves its best texture and flavor.
Oven Preheating
To bake perfect bread, we must preheat the oven thoroughly. Set the oven to 425°F (220°C) at least 20 minutes before placing the dough inside. This step guarantees a hot environment that promotes optimal oven spring, allowing the bread to rise properly and develop a crisp crust.
“A well-preheated oven is the secret to achieving that artisan crust and beautiful crumb texture.“
If you are using a baking stone or steel, place it on the middle rack during preheating to absorb and evenly distribute heat.
Baking Time and Temperature
Baking time varies according to the bread size and type. For a standard Thermomix bread loaf, follow the table below:
| Bread Type | Oven Temperature | Baking Time | Rack Position |
|---|---|---|---|
| Standard Loaf | 425°F (220°C) | 25-30 minutes | Middle rack |
| Artisan-style Loaf | 425°F (220°C) | 30-35 minutes | Middle rack |
| Sandwich Bread | 375°F (190°C) | 20-25 minutes | Middle rack |
Midway through baking, rotate the pan 180° for even browning. For an extra-crisp crust, we can spray water inside the oven just before closing the door to create steam.
Test for doneness by tapping the bread’s bottom—it should sound hollow.
Cooling the Bread
Once baked, cool the bread on a wire rack to prevent sogginess from steam buildup. Leave it uncovered for at least 1 hour to set the crumb and enhance flavor. Avoid slicing too early as hot bread can compress and lose its airy texture.
“Patience in cooling rewards us with perfect slices and a wonderful eating experience.“
Using these baking directions enhances the performance of our Thermomix bread recipe, helping us create consistent and delicious loaves every time.
Tips for Best Results
To achieve perfect bread with our Bread Thermomix Recipe every time, focusing on key details during preparation and baking is essential. Here are valuable tips that enhance dough texture, flavor, and freshness for consistent success.
Dough Consistency Tips
- Ensure your flour is accurately measured using a digital kitchen scale for precise hydration ratios.
- The dough should feel soft and slightly tacky but not sticky. If it clings excessively to your fingers, add flour 1 tablespoon at a time during the kneading cycle.
- Conversely, if the dough is too dry and crumbly, add lukewarm water sparingly in the same gradual manner.
- Always use lukewarm water (about 95°F or 35°C) to activate yeast effectively. Too hot water kills yeast while too cold slows rising.
- Use the Thermomix kneading function for the full cycle recommended in the recipe to develop gluten structure perfectly.
- After kneading, the dough should be smooth and elastic. Test this by gently stretching it; it should hold without tearing easily.
| Dough Scenario | Adjustment | Amount to Add |
|---|---|---|
| Too sticky/damp | Add bread flour | 1 tablespoon increments |
| Too dry/cracky | Add lukewarm water | 1 tablespoon increments |
Flavor Variations
- Personalize your bread by incorporating optional add-ins right after the first kneading cycle:
- Fresh or dried herbs such as rosemary, thyme, or oregano add fragrant notes.
- Toasted seeds like sunflower, sesame, or poppy enhance texture and nuttiness.
- Grated cheese (Parmesan or cheddar) enriches flavor and creates a golden crust.
- Minced garlic or caramelized onions impart savory depth.
- Experiment with substitutions like whole wheat flour or rye flour to create unique taste profiles.
- Adding natural sweeteners such as honey or molasses (substitute part of sugar) introduces subtle sweetness and moisture.
- When using strong flavor ingredients, reduce salt slightly to balance taste.
Storage and Shelf Life
- Store your freshly baked bread at room temperature in a paper bag or bread box to retain its crisp crust and soft crumb.
- Avoid plastic wrap immediately after baking as it traps moisture and softens the crust.
- For longer storage, slice bread and freeze it in an airtight bag for up to 3 months. Thaw slices at room temperature and refresh in the oven for a crisp finish.
- Use this table as a guide for bread storage:
| Storage Method | Duration | Notes |
|---|---|---|
| Room Temperature | 2 to 3 days | Store in paper bag/bread box |
| Refrigeration | Not recommended | Dries out bread quickly |
| Freezing | Up to 3 months | Slice before freezing for easy use |
Following these targeted tips will empower us to bake artisan-quality bread using the Thermomix with flavorful, consistent, and fresh results every time.
Conclusion
Baking bread with the Thermomix transforms a traditionally time-consuming process into an enjoyable and efficient experience. With the right ingredients, tools, and techniques, we can consistently create delicious, fresh loaves that suit any taste.
Embracing this recipe opens up endless possibilities for customization and creativity in our baking journey. Whether we’re beginners or seasoned bakers, the Thermomix helps us achieve professional-quality bread right in our own kitchens.
Let’s keep experimenting and savoring the wonderful aroma and taste of homemade bread made easy with the Thermomix.
Frequently Asked Questions
What is the Thermomix and how does it help in baking bread?
The Thermomix is a versatile kitchen appliance that simplifies bread baking by automating kneading, mixing, and temperature control. It saves time and effort, making bread baking easier for both beginners and experienced bakers.
What are the basic ingredients needed for baking bread with Thermomix?
Basic ingredients include bread flour, instant yeast, salt, sugar (dry ingredients), lukewarm water, olive oil, milk (wet ingredients), and optional add-ins like herbs, seeds, or cheese for flavor.
Which Thermomix models are best for baking bread?
The TM6, TM5, and TM31 models are recommended, each with features that enhance bread-making through precise temperature control, kneading functions, and programmable settings.
What equipment is essential for successful bread baking with Thermomix?
Essential tools include a digital kitchen scale, dough scraper, bread proofing basket, silicone baking mat, oven thermometer, and optionally a loaf pan for shaping.
How important is ingredient preparation in Thermomix bread recipes?
Thorough preparation and accurate measuring of ingredients are critical. Properly prepared ingredients ensure consistent dough texture and a flawless final loaf.
What are the basic steps for making bread dough in the Thermomix?
Add dry ingredients first, then wet ones. Knead according to recipe times using Thermomix functions. Incorporate optional add-ins after initial kneading to preserve texture.
How long should the bread rise before baking?
Allow a first rise until doubled in size, usually 1-2 hours, followed by shaping and a second rise of about 45 minutes to 1 hour for optimal texture.
At what temperature and time should Thermomix bread be baked?
Preheat the oven to 425°F (220°C) for at least 20 minutes. Bake times vary by bread type but generally range from 25 to 35 minutes to achieve a crisp crust and golden color.
How should freshly baked Thermomix bread be cooled?
Cool bread on a wire rack for at least one hour to prevent sogginess and improve flavor and texture before slicing.
What storage methods keep Thermomix bread fresh?
Store bread at room temperature in a paper bag or bread box to maintain crust crispness. Freeze leftovers for long-term storage; avoid plastic wrap to prevent moisture buildup.