
If you’ve got a Ninja kitchen appliance, you know how versatile it can be. But did you know it’s also perfect for baking fresh, homemade bread? This bread recipe for Ninja is designed to make the process simple and foolproof, whether you’re a beginner or a seasoned baker.
Ingredients
To bake perfect bread using our Ninja kitchen appliances, gathering the right ingredients is essential. Here we break down the components for a foolproof Bread Recipe for Ninja.
Dry Ingredients
The dry ingredients form the base of our bread dough. Use precise measurements for best results:
| Ingredient | Quantity | Notes |
|---|---|---|
| All-purpose flour | 3 cups | Sifted for lighter texture |
| Instant yeast | 2 ¼ teaspoons | Also called rapid-rise yeast |
| Granulated sugar | 2 tablespoons | Feeds the yeast |
| Salt | 1 ½ teaspoons | Enhances flavor |
Wet Ingredients
Wet ingredients activate the yeast and hydrate the flour. Maintain exact amounts for consistent dough:
- Warm water – 1 ¼ cups (110°F or 43°C) to activate yeast efficiently
- Vegetable oil – 2 tablespoons for moisture and tenderness
- Optional: Honey – 1 tablespoon for a slight sweetness and golden crust
Optional Add-ins
To customize our bread recipe for Ninja, consider these flavorful additions. Add during the mixing phase:
- Chopped fresh herbs (rosemary, thyme) – 1–2 tablespoons
- Seeds (sunflower, flaxseed) – ¼ cup for texture and nutrients
- Minced garlic – 1 teaspoon for aroma
- Grated cheese – ½ cup for rich taste
These ingredients ensure our bread is not only easy to make but also delicious and tailor-made for the capabilities of our Ninja appliances.
Equipment Needed
To create perfect homemade bread using your Ninja appliance, having the right equipment is essential. Here we highlight the key tools that ensure smooth preparation and baking.
Ninja Bread Maker or Ninja Foodi Model
Our go-to for this recipe is the Ninja Bread Maker or a compatible Ninja Foodi model. These appliances deliver consistent heat and precise baking controls tailored for bread dough.
- They feature programmable settings for dough kneading, proofing, and baking.
- Their non-stick baking pan ensures easy bread release and cleanup.
- The built-in timer helps us monitor baking stages without guesswork.
Measuring Cups and Spoons
Accuracy in measuring ingredients is crucial for bread baking success. We use a set of standard measuring cups and spoons to maintain balance between dry and wet components.
| Equipment Type | Purpose | Notes |
|---|---|---|
| Measuring Cups | Measure flour, sugar, liquids | Use dry cups for flour and sugar, liquid cups for water and oil |
| Measuring Spoons | Measure yeast, salt, optional add-ins | Precision is vital for yeast and salt quantities |
Mixing Bowls
Using sturdy, non-reactive Mixing Bowls is important when combining ingredients before transferring to the Ninja appliance.
- We prefer bowls made of glass or stainless steel to avoid flavor alterations.
- Large enough to handle the dough expansion during kneading and initial rising.
- Easy to cover with a clean towel or plastic wrap for proofing steps.
With our Ninja Bread Maker or Foodi, precise measuring tools, and reliable mixing bowls ready, we can confidently proceed to transform the ingredients into fresh, flavorful bread.
Prep Work
Before we begin baking, proper Prep Work lays the foundation for flawless results with our Bread Recipe For Ninja. Preparing the dough correctly and setting up our Ninja appliance carefully ensures every step runs smoothly.
Preparing the Dough
To create the perfect dough, we start by measuring and combining ingredients precisely:
- Use warm water (110°F) to activate the yeast without killing it.
- Mix instant yeast, sugar, and warm water in a large bowl. Let it sit for 5 minutes until frothy. This confirms the yeast is alive and ready.
- In a separate bowl, combine the dry ingredients: all-purpose flour and salt.
- Gradually add the dry mix to the yeast mixture while stirring with a wooden spoon or spatula.
- Add vegetable oil and optional honey to enhance texture and flavor.
- Mix until a sticky dough forms.
- Transfer dough onto a lightly floured surface. Knead for 8-10 minutes by hand or use the kneading option on the Ninja appliance for consistent results.
Key Tip: Dough should be smooth and slightly tacky—not overly sticky or dry. This balance makes baking easier and the final bread tender and airy.
| Step | Action | Notes |
|---|---|---|
| Yeast Activation | Combine yeast, sugar, warm water | Frothy within 5 minutes |
| Dry Ingredients Mix | Mix flour and salt | Evenly distributed salt |
| Combine & Knead | Mix wet and dry, knead for 8-10 mins | Use Ninja kneading function if preferred |
Setting Up the Ninja Appliance
Our Ninja appliance setup is crucial for a seamless bread-making experience:
- Ensure the non-stick baking pan is clean and dry. Lightly grease if needed to prevent sticking.
- Attach the kneading blade securely. This helps mix and knead dough evenly.
- Select the appropriate program: most Ninja models have a “Dough” or “Bread” cycle which handles mixing, kneading, proofing, and baking.
- Preheat the appliance if your model requires it (consult your manual for specifics).
- Place the dough inside the pan after kneading and set the program timer accordingly.
“Using the Ninja Bread Maker program guarantees consistent temperature control and humidity, vital for perfect yeast activation and bread rise.”
Be sure to place the appliance on a stable, heat-resistant surface with plenty of ventilation to avoid overheating.
| Appliance Component | Preparation Step | Importance |
|---|---|---|
| Non-stick Baking Pan | Clean & lightly grease | Prevents dough from sticking |
| Kneading Blade | Attach securely | Ensures consistent kneading |
| Appliance Program | Select Dough/Bread cycle | Automates mixing and baking |
| Placement | Stable, ventilated countertop | Safety and performance |
Instructions
Follow these precise steps to transform our Bread Recipe for Ninja into perfectly baked homemade bread with ease and consistent results.
Mixing the Ingredients
- Begin by activating the instant yeast: combine it with warm water (105°F to 110°F) and a pinch of sugar in a small bowl. Let it sit for 5 minutes until frothy and bubbly.
- In a large, non-reactive mixing bowl, blend the all-purpose flour, granulated sugar, and salt evenly.
- Add the activated yeast mixture, vegetable oil, and optional honey to the dry ingredients.
- Stir the mixture slowly using a wooden spoon or silicone spatula until a shaggy dough forms.
Tip: For an added flavor boost, incorporate your chosen herbs, seeds, or grated cheese during this phase.
Kneading the Dough
- Transfer the dough into the Ninja’s non-stick baking pan fitted with the kneading blade.
- Set your Ninja appliance to the Knead mode or use the dough setting if available.
- Allow the appliance to knead the dough for about 8 to 10 minutes until the dough becomes smooth, elastic, and slightly tacky but not sticky.
- If kneading by hand, turn the dough onto a floured surface and push-fold-turn repeatedly for 10 minutes to develop gluten.
| Kneading Duration | Method | Desired Dough Texture |
|---|---|---|
| 8-10 minutes | Ninja appliance | Smooth, elastic, slightly tacky |
| 10 minutes | Hand kneading | Same as above |
First Rise
- Remove the kneading blade and cover the dough inside the pan with a clean, damp kitchen towel or plastic wrap.
- Set your Ninja to the Proof mode or place the pan in a warm, draft-free spot.
- Allow the dough to rise until it doubles in size. This usually takes 60 to 90 minutes depending on your room temperature.
- Avoid disturbing the dough during this period to ensure proper fermentation.
| Step | Action | Time Estimate |
|---|---|---|
| First Rise | Cover dough and proof | 60 to 90 minutes |
Shaping the Dough
- Gently punch down the risen dough to release built-up gases without deflating it completely.
- Turn the dough onto a lightly floured surface carefully.
- Shape the dough into your preferred form: a loaf or rolls.
- Place the shaped dough back into the greased non-stick baking pan.
- Smooth the surface with dampened fingers to create an even top.
Second Rise
- Cover the shaped dough loosely with a damp cloth or plastic wrap again.
- Select the Second Rise or proof setting on your Ninja appliance or leave it at room temperature in a warm area.
- Let the dough rise until it visibly puffs up and almost doubles in size, usually about 30 to 45 minutes.
- Preheat the Ninja oven or bread maker to the recommended baking temperature while the dough finishes rising for an optimal crust.
| Step | Action | Time Estimate |
|---|---|---|
| Second Rise | Cover and proof the dough | 30 to 45 minutes |
Directions for Baking in the Ninja
Baking bread in a Ninja appliance combines convenience with delicious results. Below, we outline step-by-step directions to guide us through baking using either the Bread Maker function or the versatile Air Crisp/Bake function if our model supports it.
Using the Bread Maker Function
- Prepare the Ninja Bread Maker
Ensure the non-stick baking pan is clean and securely placed inside the bread maker. Attach the kneading blade firmly to the pan.
- Add Ingredients in Order
Start by pouring warm water (110°F/43°C) into the pan. Next add the vegetable oil and optional honey. Then, carefully add the dry ingredients on top—all-purpose flour, instant yeast, sugar, and salt. This layering keeps the yeast separated from the salt until mixing begins.
- Select the Bread Type and Crust Setting
Use the control panel to select the “Basic” bread setting for a simple loaf. Choose your preferred crust color: light, medium, or dark.
- Start the Bread Maker
Press “Start” to initiate the kneading, rising, and baking cycles. The machine will automatically knead the dough for approximately 15–20 minutes, then allow it to rise until doubled in size, and finally bake the bread.
- Monitor the Process
While the Ninja appliance handles most work, we can peek occasionally through the viewing window to ensure the dough forms a cohesive ball. If dough is too sticky or dry, add flour or water in small increments.
- Cool Before Slicing
When baking ends and the bread is golden brown, remove the pan carefully, then transfer the loaf to a wire rack. Cool for 20 to 30 minutes to ensure the crumb sets properly before slicing.
| Step | Action | Details |
|---|---|---|
| 1. Prepare | Attach kneading blade and place pan | Non-stick surface ensures easy release |
| 2. Add Ingredients | Warm water, oil, honey, then dry mix | Layering prevents premature yeast activation |
| 3. Select Settings | Basic bread and crust preference | Light, medium, or dark crust |
| 4. Start | Press Start | Automatic kneading, rising and baking |
| 5. Monitor | Optional observation | Adjust hydration if needed |
| 6. Cool | Remove and cool loaf | 20-30 minutes cooling before slicing |
Using the Air Crisp or Bake Function (If Applicable)
- Prepare the Dough Separately
Mix and knead the dough using the manual kneading instructions or the dough function if available. Let it rise in a warm place until doubled in size, approximately 1 to 2 hours.
- Shape the Dough
After the first rise, punch down the dough gently to release air. Shape it into a loaf or rolls according to preference.
- Preheat the Ninja Appliance
Select the Air Crisp or Bake function then preheat the appliance to 350°F (175°C) for about 5 minutes.
- Place Dough in the Baking Pan
Lightly grease the non-stick baking pan or use parchment paper to prevent sticking. Transfer the shaped dough to the pan and cover loosely with a kitchen towel for the second rise.
- Second Rise
Let the dough rise in the Ninja promptly for 30-45 minutes until it gains volume again.
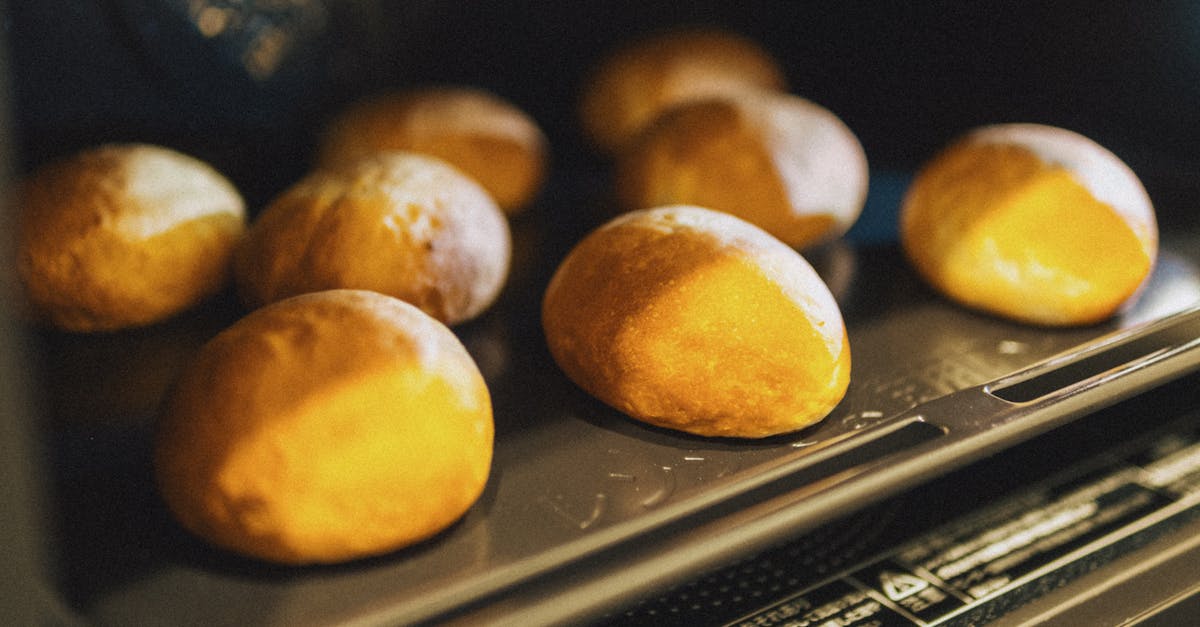
- Bake the Bread
Insert the pan inside the Ninja basket or baking drawer. Set the timer for 25 to 30 minutes depending on the dough size. Check at 20 minutes for browning and texture.
- Check for Doneness
Use a digital thermometer to confirm internal temperature reaches 190°F to 200°F (88°C to 93°C) ensuring the bread is fully cooked.
- Cool Properly
Remove the bread carefully onto a rack for at least 20 minutes to cool before slicing for optimum texture and flavor.
| Step | Action | Details |
|---|---|---|
| 1. Prepare Dough | Knead and first rise | 1-2 hours at warm temperature |
| 2. Shape Dough | Punch down and form loaf | Choose loaf or rolls |
| 3. Preheat | Air Crisp or Bake function | 350°F (175°C) for 5 minutes |
| 4. Place Dough | In greased pan | Use parchment for easy removal |
| 5. Second Rise | Cover and let rise inside Ninja | 30-45 minutes |
| 6. Bake | 25-30 minutes baking | Check at 20 minutes for browning |
| 7. Check Doneness | Internal temperature 190°F-200°F | Use thermometer for precision |
| 8. Cool | Cool on wire rack | 20 minutes before slicing |
Cooling and Serving
Proper Cooling and Serving are crucial steps in enjoying our bread recipe for Ninja at its best. Let’s ensure our homemade bread has the perfect texture and flavor with the following tips.
Cooling the Bread
Once the baking cycle completes in our Ninja appliance, remove the bread promptly using oven mitts to avoid burns. Place the loaf on a wire cooling rack to allow air circulation beneath the bread. This prevents the crust from becoming soggy and helps the bread cool evenly.
We recommend cooling the bread for at least 30 to 45 minutes before slicing. Cutting the bread too soon can cause it to compress and become gummy because the interior is still setting. Patience here improves final texture and flavor.
| Cooling Step | Details |
|---|---|
| Remove from pan | Right after baking finishes |
| Place on rack | Use wire rack for air flow |
| Cooling duration | 30 to 45 minutes |
| Avoid | Slicing while hot |
Serving Suggestions
Our Ninja-baked bread pairs wonderfully with a variety of accompaniments. Whether for breakfast, lunch, or dinner, here are some serving ideas to enhance your experience:
- Toasted with butter or jam for a simple breakfast or snack
- Sandwich base for deli meats, fresh veggies, and cheese
- Side for soups and stews to soak up rich flavors
- Garlic bread variation by brushing with olive oil, minced garlic, and herbs before a quick reheat in the Ninja appliance
For an extra touch, sprinkle seeds or herbs on the crust before baking to add flavor and texture. Enjoy your homemade bread fresh or store it properly in an airtight container to maintain softness over several days.
Make-Ahead and Storage Tips
To enjoy our bread recipe for Ninja at its freshest longer, understanding make-ahead and storage strategies is essential. Here’s how we can keep our homemade bread delicious and ready whenever we want it.
Make-Ahead Tips
- Prepare dough in advance: We can mix and knead the dough in our Ninja appliance, then refrigerate it for up to 24 hours. This slow rise enhances flavor complexity.
- Use the fridge for the first rise: After kneading, cover the dough tightly with plastic wrap or a damp cloth and place it in the refrigerator. This slows fermentation and allows us to bake fresh bread the next day.
- Bring dough to room temperature before baking: Remove dough from the fridge about 1 hour before baking to let it warm and activate yeast for a perfect rise.
- Freeze shaped dough: For longer storage, shape the dough, place it on a parchment-lined tray, and freeze. Once frozen, transfer to a freezer-safe bag for up to 3 months.
Storage Tips
| Storage Method | Duration | Instructions |
|---|---|---|
| Room Temperature | 1–2 days | Store in a paper bag or bread box to maintain crust crispness. |
| Refrigeration | Up to 1 week | Wrap bread tightly in plastic wrap or place in airtight container to prevent drying. |
| Freezing Bread | Up to 3 months | Slice before freezing for easy portion use, wrap in foil, then plastic wrap or freezer bag. |
Reheating Tips for Stored Bread
“Refreshing our overnight or frozen bread is key to bringing back that oven-fresh softness and aroma.”
- Oven reheat: Preheat the oven to 350°F (175°C), wrap bread in foil, warm for 10–15 minutes.
- Toaster reheat: For sliced bread, a quick toast restores crispness and warmth.
- Microwave: Use with caution (10-15 seconds) to avoid rubbery texture.
Important Notes
- Always cool the bread completely on a wire rack before storing to prevent moisture build-up.
- Avoid storing bread in plastic at room temperature for extended periods as this softens the crust and encourages mold.
- Label frozen dough or baked bread with the date to track freshness.
By applying these make-ahead and storage tips tailored for our Ninja bread recipe, we can enjoy bakery-quality homemade bread conveniently and reduce waste effectively.
Conclusion
Baking bread with Ninja appliances opens up a world of convenience and creativity in our kitchens. With the right tools and techniques, we can easily achieve homemade bread that’s fresh, flavorful, and perfectly textured every time.
By embracing the versatility of our Ninja devices, we’re not just making bread—we’re crafting delicious moments to share with family and friends. Whether it’s a simple loaf or a customized creation, the process becomes enjoyable and rewarding.
Let’s keep experimenting and refining our skills, knowing that great bread is always within reach thanks to the power and precision of Ninja appliances.
Frequently Asked Questions
What Ninja appliances are best for making homemade bread?
The Ninja Bread Maker and compatible Ninja Foodi models are ideal for bread-making, offering programmable settings, consistent heat, and non-stick pans for easy cleanup.
What ingredients do I need for the Ninja bread recipe?
You’ll need all-purpose flour, instant yeast, granulated sugar, salt, warm water, vegetable oil, and optionally honey, herbs, seeds, garlic, or cheese for flavor.
How do I prepare the dough using a Ninja appliance?
Activate yeast in warm water, mix dry and wet ingredients, then knead using the Ninja’s dough setting or by hand until smooth and elastic.
Can I customize the bread with extras?
Yes! Add fresh herbs, seeds, minced garlic, or grated cheese to the dough for extra flavor tailored to your taste.
How long should the dough rise?
Allow the dough to rise undisturbed until it doubles in size, usually 1 to 2 hours, depending on room temperature.
What are the baking options with Ninja appliances?
Use the Bread Maker function for a hands-off process or Air Crisp/Bake function after shaping the dough manually for custom baking.
How should I cool and serve homemade bread?
Remove bread from the pan immediately after baking and cool on a wire rack for 30-45 minutes to prevent sogginess. Serve toasted, as sandwiches, or with garlic butter.
Can I make the bread dough ahead of time?
Yes, prepare dough in advance by refrigerating during the first rise or freezing shaped dough for later baking.
What’s the best way to store homemade bread?
Store bread wrapped in cloth or paper at room temperature, refrigerate for up to a week, or freeze for longer storage. Always cool completely before storing.
How do I reheat homemade bread?
Reheat bread in an oven or air fryer at low temperature to restore freshness and crispness, avoiding microwaving to keep the crust intact.