
Making pie dough from scratch can feel intimidating but with a bread machine it becomes effortless and foolproof. This Bread Machine Pie Dough Recipe takes the guesswork out of mixing and kneading so we can focus on creating delicious pies with flaky, tender crusts every time.
Using a bread machine not only saves time but ensures consistent results whether we’re baking sweet or savory pies. The dough comes together quickly with minimal hands-on effort, making it perfect for beginners and busy bakers alike.
Ingredients
To create the perfect Bread Machine Pie Dough, gathering the right ingredients with precise measurements is essential. Using our bread machine simplifies the process, but the quality of the pie dough depends on these core components.
Here is the list of Ingredients we use for a flaky, tender, and easy-to-handle pie crust:
| Ingredient | Quantity | Preparation Notes |
|---|---|---|
| All-purpose flour | 2 ½ cups (300 g) | Measure carefully for accuracy |
| Cold unsalted butter | 1 cup (226 g) | Cut into small cubes, chilled |
| Salt | 1 teaspoon | Adds flavor |
| Granulated sugar | 1 tablespoon | Optional, for a touch of sweetness |
| Ice-cold water | ½ cup to ⅔ cup (120-160 ml) | Add gradually in the bread machine |
Key points to remember:
- Use cold unsalted butter to ensure a flaky texture.
- Ice-cold water is crucial to prevent the butter from melting during mixing.
- The optional sugar rounds out flavor for sweet pies but can be omitted for savory versions.
- The amount of water may vary depending on humidity and flour type; add slowly.
With these ingredients ready and prepped, we can move confidently to setting up our bread machine to mix and knead the perfect pie dough effortlessly.
Equipment Needed
To achieve the perfect Bread Machine Pie Dough, having the right equipment is essential. Below we outline the primary tools that help us create a flawless, flaky pie crust with ease.
Bread Machine
A reliable Bread Machine is the cornerstone for mixing and kneading our dough effortlessly. Choose a model with the following features for best results:
| Feature | Importance |
|---|---|
| Dough cycle | Ensures correct kneading and resting times |
| Capacity | Accommodates ingredients without overflow |
| Non-stick pan | Facilitates easy dough removal |
| Temperature control | Maintains optimal conditions during kneading |
Using a bread machine takes the guesswork out of dough preparation and frees us from manual labor while ensuring consistent texture and proper gluten development in the pie dough.
Pie Pan
Selecting the right Pie Pan is equally important for shaping and baking the dough. We recommend:
- A glass or metal pie pan, 9 inches in diameter, for even heat distribution
- A pan with fluted edges if you want a decorative crust border
- A deep-dish pan when making pies with thick fillings or multiple layers
The pan’s material affects how the crust bakes; metal pans yield a crispier crust while glass pans allow better visual monitoring during baking.
Rolling Pin
To roll out the dough evenly and achieve a smooth, thin crust, we rely on a Rolling Pin with these qualities:
- A solid wooden or marble rolling pin for balanced weight and smooth rolling
- A length of at least 18 inches for greater surface contact and control
- Optional rolling pin rings to maintain consistent dough thickness, usually around 1/8 inch
Using the right rolling pin ensures the dough is rolled out without cracks or tears, contributing to the final flaky texture of our bread machine pie dough.
Equipping ourselves well with these essentials sets the stage for successful pie-making, making the process efficient and stress-free.
Dough Preparation
Preparing perfect pie dough with our Bread Machine Pie Dough Recipe starts with meticulous steps that ensure a flaky, tender crust every time. Let’s break down the process for seamless execution.
Measuring Ingredients
Accurate measurement is crucial to creating consistent pie dough. Here’s what we use and how much:
| Ingredient | Quantity | Notes |
|---|---|---|
| All-purpose flour | 2 ½ cups (310 grams) | Sifted for lightness |
| Unsalted butter | 1 cup (226 grams) | Cold and cut into small cubes |
| Salt | 1 tsp | Enhances flavor |
| Granulated sugar | 1 tbsp (optional) | Adds subtle sweetness |
| Ice-cold water | ½ cup (120 ml) | Added gradually for texture |
Tip: Use a kitchen scale for precision. Cold ingredients are key for a flaky pie crust.
Adding Ingredients to Bread Machine
We add ingredients in this order to safeguard texture and proper mixing:
- Water – Pour ice-cold water into the bread machine pan first to prevent premature butter melting.
- Butter – Add cold butter cubes on top of the water.
- Dry Ingredients – Sprinkle flour evenly, then add salt and sugar on separate corners of the pan to avoid direct contact.
“Layering ingredients this way helps maintain the dough’s delicate balance and flaky texture.”
Selecting the Dough Cycle
Once everything is in the pan, choose the dough cycle on your bread machine:
- Select the dough or pizza dough setting, typically lasting 20 to 30 minutes.
- The machine will mix, knead, and rest the dough automatically.
- Monitor the dough’s consistency during the kneading phase; if it seems dry, add a tablespoon of ice-cold water.
| Step | Action | Duration |
|---|---|---|
| Mixing & Kneading | Bread machine operation | 20-30 minutes |
| Resting | Included in cycle | Allows gluten to relax |
Pro tip: Avoid overriding the bread machine’s cycle to preserve dough integrity.
By following these exact preparation steps, our Bread Machine Pie Dough Recipe yields a dough that’s easy to roll and produces that sought-after flaky, buttery crust every time.
Preparing the Dough for Pie
Once the bread machine completes its cycle, it’s time to move forward with shaping our Bread Machine Pie Dough. Following precise steps ensures perfect texture and ease in handling.
Removing Dough from Machine
Carefully open the bread machine lid once the dough cycle finishes. Using a silicone spatula or lightly floured hands, gently release the dough from the kneading blade and sides of the pan. Be sure to:
- Handle the dough gently to preserve its flakiness.
- Avoid overworking it at this stage.
- Place the dough ball on a lightly floured surface for easier rolling.
If the dough sticks excessively, sprinkle a touch more flour but avoid adding too much to keep the dough tender.
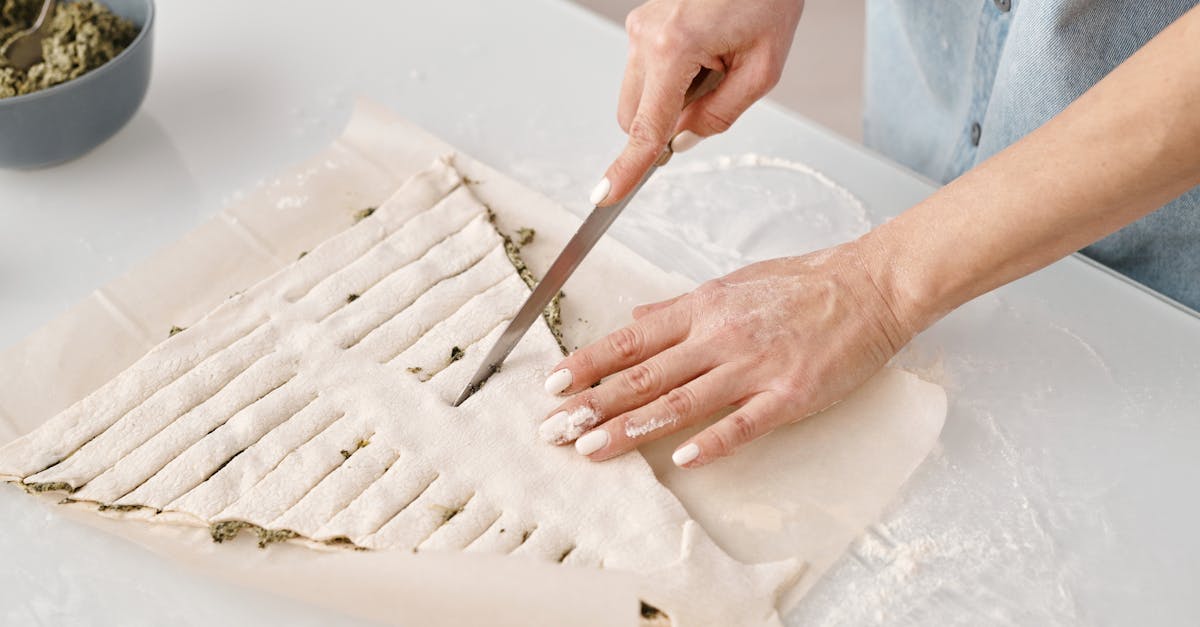
Rolling Out the Dough
We want an even thickness for a consistent bake. Here is the step-by-step technique:
- Lightly flour the rolling pin and surface to prevent sticking.
- Pat the dough into a flat disk before rolling.
- Roll from the center outwards applying gentle, even pressure.
- Rotate the dough a quarter turn every few rolls to maintain a round shape.
- Aim for about ¼ inch thickness — thin enough to crisp but thick enough to support the filling.
Tip: If the dough becomes sticky or tears, chill it wrapped in plastic for 10-15 minutes to relax the gluten.
| Rolling Out Dough Parameters | Description |
|---|---|
| Flour on Surface | Light dusting |
| Dough Thickness | Approximately ¼ inch (6 mm) |
| Rolling Directions | Outward from center, rotate 90° |
| Chill Time if Sticky | 10–15 minutes wrapped in plastic |
Transferring Dough to Pie Pan
Transferring the dough without stretching or tearing is crucial:
- Fold the rolled dough gently into quarters or halves.
- Lift carefully and place into the 9-inch pie pan.
- Unfold the dough inside the pan, letting it settle naturally.
- Press lightly into the edges and corners without stretching.
- Trim excess dough 1 inch from the edge, fold under, and crimp as desired.
Remember, handling pie dough gently preserves its flaky texture and yields a beautifully crisp crust after baking.
Baking Instructions
With the Bread Machine Pie Dough prepared and rolled, it’s time to move on to baking. Proper baking ensures a flaky, golden crust that holds your pie filling perfectly. We cover both prebaking techniques and baking with filling for flawless results.
Prebaking (Blind Baking) the Crust
Prebaking, or blind baking, is essential for pies with custard or no-bake fillings, ensuring a crisp, cooked-through crust.
Steps for Prebaking:
- Chill the Dough: After transferring the rolled dough to your 9-inch pie pan, refrigerate for at least 30 minutes. This helps maintain its shape while baking.
- Dock the Dough: Use a fork to prick the bottom and sides lightly. This prevents air bubbles from forming.
- Line the Crust: Place parchment paper or aluminum foil over the chilled dough. Fill it with pie weights, dried beans, or uncooked rice to keep the crust flat.
- Bake: Preheat your oven to 375°F (190°C). Bake the crust with weights for 15 minutes.
- Remove Weights and Continue Baking: Carefully remove the weights and lining. Bake for another 8–10 minutes or until the crust edges are golden and the surface looks dry.
Tip: For an extra flaky crust, brush the prebaked shell lightly with beaten egg white and bake for 1-2 minutes to create a moisture barrier.
| Step | Temperature | Time | Notes |
|---|---|---|---|
| Preheat oven | 375°F (190°C) | – | |
| Initial bake with weights | 375°F (190°C) | 15 minutes | Use parchment and weights |
| Second bake (uncovered) | 375°F (190°C) | 8–10 minutes | Until lightly golden and dry |
Baking with Filling
When baking pies with filling, proper technique ensures the crust cooks evenly without sogginess or burning.
Guidelines for Baking with Filling:
- Preheat Oven: Always preheat your oven to the temperature specified in your recipe, typically between 350°F (175°C) and 425°F (220°C).
- Prepare the Pie: After adding the filling, trim excess dough, and crimp edges to seal.
- Prevent Over-Browning: Cover crust edges with foil or a pie shield to avoid burning, especially during longer bakes.
- Place on a Baking Sheet: Position your pie pan on a baking sheet to catch drips and prevent spills in your oven.
- Bake: Follow the specific recipe time, usually 40 to 60 minutes, until the filling bubbles and crust is golden brown.
- Cooling: Let the pie cool on a wire rack for at least 2 hours to let the filling set and enhance sliceability.
Remember: Every oven bakes differently. Start checking your pie 5-10 minutes before the recipe’s minimum time to prevent overbaking.
| Step | Temperature | Time | Notes |
|---|---|---|---|
| Oven Preheat | 350°F to 425°F | – | According to pie filling requirements |
| Bake Pie with Filling | Oven temperature | 40–60 minutes | Use foil shield on edges if needed |
| Cooling | Room temperature | Minimum 2 hours | Sets filling for easy slicing |
By mastering these baking instructions, we ensure our bread machine pie dough transforms into the perfect, flaky pie crust every time.
Tips and Tricks for Perfect Pie Dough
Mastering bread machine pie dough hinges on a few essential techniques. Let’s dive into key tips that ensure flaky, tender, and perfectly textured pie crusts every time.
Handling Dough Temperature
Maintaining the right temperature is crucial for creating flakiness in our bread machine pie dough. Here’s how we manage it:
- Use cold ingredients: Always start with cold unsalted butter and ice-cold water. This preserves butter layers, which melt during baking and create flaky pockets.
- Chill the dough afterward: Once the dough cycle completes, wrap it in plastic wrap and refrigerate for at least 30 minutes. This relaxes gluten, making rolling easier and preventing shrinkage.
- Avoid warming dough: Handle dough with cool hands and keep your workspace cool to prevent butter from melting prematurely.
“Cold butter is the secret to flaky pie crusts. Warm butter means tough dough.”
Avoiding Over-Kneading
Our bread machine effortlessly kneads the dough but stopping at the right time is key to tender results:
- The dough cycle on our bread machine is designed to mix and knead just enough without overdoing it.
- Over-kneading develops too much gluten leading to a tough crust rather than flaky.
- If your bread machine allows manual stops, watch for a smooth, slightly tacky but not sticky dough ball before halting.
| Signs of Proper Kneading | Signs of Over-Kneading |
|---|---|
| Smooth elastic dough | Very dense and tough texture |
| Slightly tacky but not sticky | Very stretchy and difficult to shape |
| Holds shape well without tearing | Shrinks back when rolled |
Storing and Freezing Dough
To maximize convenience and maintain quality, store or freeze our bread machine pie dough properly:
- Refrigerating: Wrap dough tightly in plastic wrap and refrigerate up to 3 days. Bring to room temperature before rolling.
- Freezing: Wrap dough twice with plastic wrap and place in a freezer-safe bag. Freeze up to 1 month.
- Thawing: Move frozen dough to the fridge overnight before use. Let rest 15-20 minutes at room temperature to soften for easier rolling.
| Storage Method | Wrapping | Duration | Notes |
|---|---|---|---|
| Refrigerate | Plastic wrap | Up to 3 days | Use within time to prevent dryness |
| Freeze | Double wrap + bag | Up to 1 month | For best results, thaw slowly overnight |
Using these strategic tips keeps our bread machine pie dough consistent, flaky, and ready for any delicious filling.
Conclusion
Using a bread machine for pie dough takes the hassle out of traditional methods and guarantees reliable, flaky results. With the right ingredients and equipment, we can streamline the process and enjoy more time focusing on our favorite fillings and flavors.
By following simple steps and paying attention to temperature and handling, we ensure our crusts come out tender and perfectly golden every time. This approach not only saves time but also makes pie-making accessible to all skill levels.
Let’s embrace this easy technique and elevate our baking with consistently delicious pies that impress every time.
Frequently Asked Questions
Can I make pie dough using a bread machine?
Yes, a bread machine can mix and knead pie dough easily, simplifying the process and ensuring consistent, flaky results without manual effort.
What ingredients are essential for bread machine pie dough?
The key ingredients are all-purpose flour, cold unsalted butter, salt, optional sugar, and ice-cold water. Cold butter and water help create a flaky crust.
How important is ingredient temperature for pie dough?
Very important. Using cold butter and ice-cold water prevents the fat from melting too soon, resulting in a tender, flaky crust.
What equipment do I need besides the bread machine?
You’ll need a reliable bread machine with a dough cycle, a 9-inch pie pan (glass or metal), and a solid wooden or marble rolling pin for best results.
How do I add ingredients to the bread machine?
Add ingredients in a specific order, typically liquids first, then flour, salt, sugar, and butter last, to help maintain the dough’s balance and texture.
What is the recommended dough cycle on a bread machine?
Use the dough cycle which mixes, kneads, and allows the dough to rest, ensuring it’s ready for rolling out and shaping.
How do I handle pie dough after the bread machine finishes?
Remove dough gently to avoid warming or overworking it. Roll out evenly, prevent sticking by chilling or flouring surfaces, and transfer carefully to the pie pan.
Should I prebake the pie crust?
Prebaking (blind baking) is recommended for some pies, especially custard or cream pies. It involves chilling, docking, weighing down the dough, and baking at 375°F until set.
How do I avoid over-baking or burning the crust?
Use an oven thermometer, cover crust edges with foil if browning too fast, and remove pie promptly when done. Proper monitoring ensures a golden, flaky crust.
Can I freeze bread machine pie dough?
Yes, wrap the dough tightly after shaping or portioning, then freeze. Thaw in the refrigerator before use to preserve texture and quality.
What are signs of over-kneading dough?
Over-kneaded dough feels very elastic and tough, not crumbly or tender. It can lead to a chewy crust instead of flaky.
How do I store unused pie dough?
Wrap the dough tightly in plastic wrap and refrigerate for up to 2 days. For longer storage, freeze and thaw before use.
Can beginners use a bread machine for pie dough?
Absolutely. The bread machine simplifies mixing and kneading, making pie dough accessible and less intimidating for new bakers.