
Nothing beats the aroma of freshly baked bread straight from the oven – and our banneton bread recipe takes home baking to the next level. A banneton basket isn’t just a simple bread-making tool; it’s a traditional baker’s secret weapon that transforms ordinary dough into an artisan masterpiece with beautiful texture and professional-looking design.
We’ve perfected this rustic sourdough technique that creates crusty exterior with stunning spiral patterns that’ll make your homemade bread look like it came straight from an artisan bakery. The key is understanding how to use the banneton’s woven rattan surface which helps shape the dough and creates those distinctive rings and ridges that professional bakers love. Whether you’re a seasoned baker or just starting your bread-making journey this recipe will help you achieve bakery-quality results right in your own kitchen.
What Is Banneton Bread
A banneton bread is a traditional proofing basket used to shape and support artisan-style bread dough during its final rise. These specialized baskets create beautifully textured loaves with distinctive spiral patterns and professional-grade appearance.
How Bannetons Work
Bannetons leverage the natural properties of woven rattan or cane to support and shape bread dough during the crucial proofing stage. The textured interior of the basket serves multiple critical functions:
- Absorbs excess moisture from the dough
- Provides structural support during final fermentation
- Creates intricate surface patterns on the bread’s exterior
- Helps maintain the bread’s shape before baking
The basket’s unique design allows air circulation around the dough while supporting its structure. As the bread rises, the banneton’s texture imprints delicate rings and spirals onto the loaf’s surface. This process not only enhances the bread’s visual appeal but also contributes to a more uniform and controlled rise.
Types of Bannetons
| Banneton Type | Shape | Size | Material | Best For |
|---|---|---|---|---|
| Round Banneton | Circular | Small (500g) | Rattan | Boules and round loaves |
| Oval Banneton | Elongated | Medium (750g) | Cane | Batards and oval breads |
| Rectangular Banneton | Oblong | Large (1kg) | Willow | Longer sandwich loaves |
| Combo Set | Multiple | Varied | Mixed | Versatile baking |
Each type of banneton offers unique characteristics:
- Rattan Bannetons: Traditional and most common
- Cane Bannetons: Lighter weight with similar performance
- Lined Bannetons: Include fabric lining for smoother dough release
- Wooden Bannetons: More decorative with similar functional properties
Pro Tip: “The right banneton transforms home baking from ordinary to extraordinary.” – Artisan Bread Experts
Choosing the appropriate banneton depends on your bread style bread type and desired final presentation. Understanding these nuanced differences helps bakers select the perfect proofing basket for their specific bread-making goals.
Equipment Needed
When crafting artisan-style banneton bread, having the right equipment can transform your baking experience from good to exceptional. We’ll outline the essential tools and special supplies needed to create bakery-quality bread at home.
Baking Tools
| Essential Baking Tools | Purpose | Recommended Type |
|---|---|---|
| Banneton Basket | Shaping and proofing dough | Rattan or cane, 9-inch round |
| Dutch Oven | Creating steam and crispy crust | Cast iron, 5-6 quart |
| Bench Scraper | Handling and cutting dough | Stainless steel with sharp edge |
| Digital Kitchen Scale | Precise ingredient measurements | Accuracy to 0.1 grams |
| Bread Lame | Scoring bread before baking | Curved blade with replaceable razor |
| Proofing Cloth | Covering and protecting dough | Lightweight linen or cotton |
| Oven Mitts | Safe handling of hot equipment | Heat-resistant silicone |
“The right tools are the baker’s secret weapon for creating professional-quality bread.” – Artisan Bread Masters
Special Supplies
| Special Supplies | Function | Pro Tips |
|---|---|---|
| Rice Flour | Preventing dough from sticking | Dust banneton generously |
| Parchment Paper | Easy bread transfer | Cut to fit Dutch oven |
| Spray Bottle | Creating steam in oven | Use filtered water |
| Dough Scraper | Handling wet dough | Plastic or metal options |
| Bread Proofing Basket Liner | Optional dough protection | Helps maintain basket condition |
Pro Tip: Invest in high-quality tools that will elevate your banneton bread baking technique and provide consistent results.
Ingredients
Crafting the perfect banneton bread requires a carefully curated selection of high-quality ingredients. Our artisan bread recipe focuses on premium components that will transform your home baking into a professional-level experience.
Flour Ingredients
| Ingredient | Amount | Notes |
|---|---|---|
| Bread Flour | 500g | High-protein flour for optimal gluten development |
| Whole Wheat Flour | 100g | Adds depth and nutty flavor |
| Rye Flour | 50g | Enhances complexity and texture |
Pro Tip: Choose unbleached, organic flours for the most authentic artisan bread flavor.
Liquid Ingredients
| Ingredient | Amount | Purpose |
|---|---|---|
| Filtered Water | 375ml | Lukewarm (around 90-100°F) |
| Active Sourdough Starter | 100g | Room temperature, recently fed |
Additional Add-Ins
| Ingredient | Optional | Quantity | Flavor Profile |
|---|---|---|---|
| Sea Salt | Required | 10g | Enhances overall taste |
| Vital Wheat Gluten | Optional | 15g | Improves bread structure |
| Seeds (mix of sesame poppy sunflower) | Optional | 50g | Adds crunch and nutrition |
- Use room temperature ingredients
- Measure precisely with a digital kitchen scale
- Select ingredients that are fresh and high-quality
Bread Preparation
Preparing artisan banneton bread requires precision and patience. Our carefully crafted technique transforms simple ingredients into a spectacular loaf with professional bakery-quality results.
Mixing the Dough
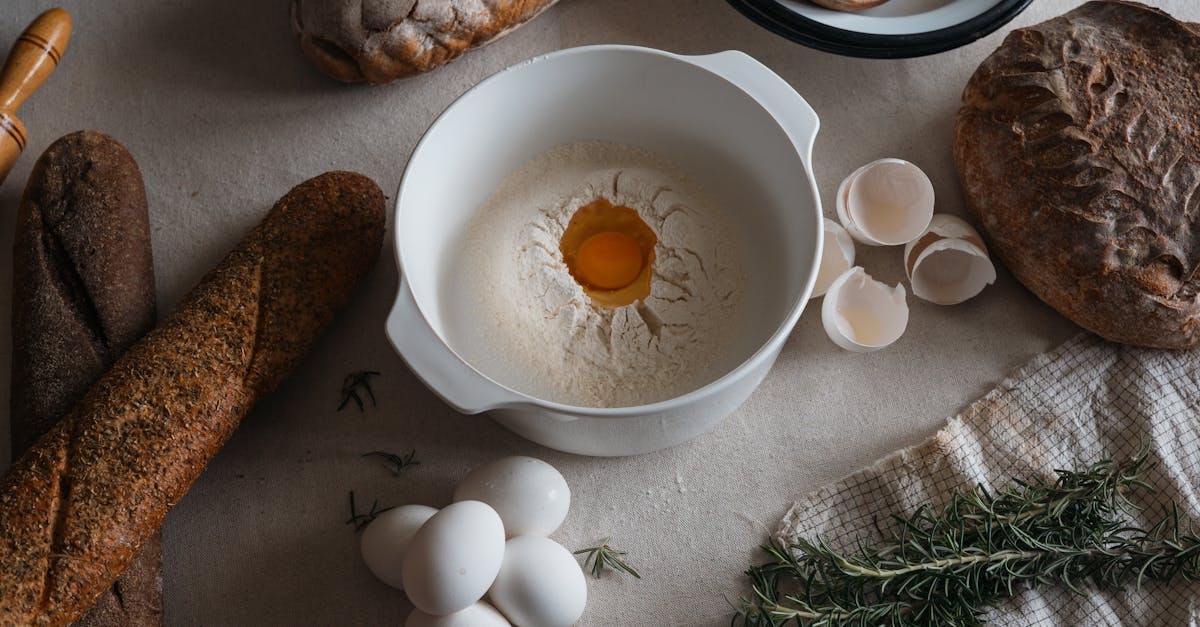
We begin by creating a robust flavor foundation through strategic ingredient combination. Mix the dry ingredients first:
| Ingredient | Measurement | Purpose |
|---|---|---|
| Bread Flour | 500g | Primary structure |
| Whole Wheat Flour | 100g | Depth of flavor |
| Sea Salt | 10g | Flavor enhancement |
Create a well in the center and gradually incorporate the liquid ingredients:
- Pour room temperature filtered water (350ml)
- Add active sourdough starter (100g)
- Gently mix using a wooden spoon until a shaggy dough forms
Pro Tip: Use a Danish dough whisk for more uniform ingredient integration and less gluten development at this stage.
Kneading Techniques
Kneading transforms our mixture from a loose mass into a cohesive dough with developed gluten networks. We recommend two primary methods:
- Traditional Hand Kneading
- Turn dough onto a lightly floured surface
- Push dough away with the heel of your hand
- Fold dough back onto itself
- Rotate 90 degrees
- Repeat for 10-12 minutes
- Stretch and Fold Method
- Rest dough for 30 minutes
- Perform 4-6 gentle stretch and fold sequences
- Allow 20-30 minute intervals between each sequence
- Develops strength without excessive manipulation
First Rise
The initial fermentation develops complex flavors and strengthens the dough’s structure:
| Rise Conditions | Ideal Parameters |
|---|---|
| Temperature | 70-75°F |
| Duration | 4-6 hours |
| Environment | Draft-free space |
Cover the bowl with a damp cloth to prevent surface drying. Look for a 50-75% volume increase and visible bubbles indicating active fermentation.
- Dough feels puffy and light
- Surface shows gentle dome-like expansion
- Bubbles visible underneath when gently lifted
Shaping the Bread
Transforming our carefully developed dough into a beautifully structured loaf requires precision and technique. The banneton becomes our secret weapon in creating artisan-quality bread with professional-looking results.
Using the Banneton
When preparing our banneton, we’ll first dust it generously with rice flour to prevent sticking. This crucial step ensures our delicate dough will release smoothly without losing its carefully developed structure. Key banneton preparation steps include:
- Coat the entire interior surface with a thin layer of rice flour
- Tap out excess flour to create an even, light coating
- Choose a banneton size matching your intended loaf volume
Pro Tip: Rice flour works best because it doesn’t incorporate into the dough like wheat flour, maintaining a clean release and preventing unwanted moisture absorption.
Proofing Process
The proofing stage transforms our raw dough into a perfectly risen loaf. We’ll follow these critical steps:
| Proofing Stage | Temperature | Duration | Key Indicators |
|---|---|---|---|
| Cold Proof | 38-45°F | 12-16 hours | Slow fermentation |
| Room Temp Proof | 68-72°F | 2-4 hours | Visible expansion |
| Final Proof | 70-75°F | 1-2 hours | 50% volume increase |
Proper Dough Handling
Gentle handling is paramount to maintaining our dough’s delicate structure. Our approach includes:
- Use a light touch when transferring dough
- Avoid deflating the carefully developed gases
- Shape using minimal pressure
- Utilize a bench scraper for precise movements
Techniques like the “stretch and fold” method help develop gluten without aggressive kneading. We’ll carefully lift and fold the dough’s edges toward its center, rotating the bowl to ensure even development.
By mastering these shaping techniques, we transform our basic ingredients into a stunning artisan loaf with exceptional texture and appearance.
Baking Instructions
Achieving the perfect banneton bread requires precision and attention to detail during the baking process. Our expert techniques will transform your dough into a professional-quality artisan loaf with a crisp crust and beautiful rise.
Preheating the Oven
Proper oven preparation is crucial for creating the ideal baking environment. We recommend the following steps:
- Preheat a Dutch oven or heavy ceramic baker to 475°F (245°C)
- Allow the oven and baking vessel to heat for at least 45-60 minutes
- Ensure the oven rack is positioned in the lower third of the oven
| Preheating Technique | Temperature | Duration | Purpose |
|---|---|---|---|
| Dutch Oven Method | 475°F | 45-60 mins | Create steam and crisp crust |
| Cast Iron Combo | 475°F | 45-60 mins | Retain heat and develop structure |
Pro Tip: A thoroughly heated baking vessel is key to achieving that coveted crisp, golden crust characteristic of artisan bread.
Scoring Techniques
Scoring is an art form that not only creates beautiful bread patterns but also controls the bread’s expansion during baking:
- Use a sharp bread lame or razor blade
- Hold the blade at a 30-45 degree angle to the dough surface
- Make swift, confident cuts about 1/4 inch deep
- Create 3-4 parallel or decorative patterns
Recommended Scoring Patterns:
- Classic Single Slash
- Wheat Ear Pattern
- Spiral Score
- Cross Hatch Design
Baking Temperature and Time
Our precise baking method ensures a perfectly developed loaf:
- Initial Baking Phase:
- Covered baking: 475°F for 25-30 minutes
- Traps steam for optimal oven spring
- Uncovered Baking Phase:
- Reduce temperature to 425°F
- Bake for 15-20 minutes
- Develops deep golden-brown crust
| Baking Stage | Temperature | Duration | Outcome |
|---|---|---|---|
| Covered Baking | 475°F | 25-30 mins | Oven Spring & Steam |
| Uncovered Baking | 425°F | 15-20 mins | Crust Development |
Baker’s Secret: The two-stage baking process creates a professional-quality loaf with maximum flavor and texture development.
- Deep golden-brown crust
- Hollow sound when tapped on bottom
- Internal temperature of 205-210°F
- Visible steam release during initial baking
Cooling and Storing
Proper cooling and storage are crucial for maintaining the incredible texture and flavor of your freshly baked banneton bread. Let’s explore the best techniques to preserve your artisan loaf’s quality from the moment it leaves the oven.
Cooling Rack Method
We recommend transferring your hot bread to a wire cooling rack immediately after baking. This critical step prevents moisture accumulation and ensures a crisp crust. Place the bread with its bottom facing upward to allow maximum air circulation and prevent soggy bottoms.
| Cooling Technique | Duration | Purpose |
|---|---|---|
| Initial Cooling | 1-2 hours | Stabilize internal moisture |
| Complete Cooling | 4-6 hours | Develop full flavor profile |
Pro Tip: Never cut into the bread immediately. Allowing it to cool completely helps set the crumb structure and enhances overall texture.
Storage Tips
Preserving your banneton bread requires strategic storage to maintain its artisan quality. Consider these expert-recommended methods:
- Room Temperature Storage:
- Use a bread box or cloth bag
- Keep at room temperature
- Consume within 2-3 days
- Refrigeration:
- Wrap tightly in plastic or beeswax wrap
- Best for extending shelf life
- Recommended for humid environments
Bread Preservation
| Storage Method | Shelf Life | Recommended For |
|---|---|---|
| Countertop | 2-3 days | Fresh consumption |
| Refrigerator | 5-7 days | Extended preservation |
| Freezer | 2-3 months | Long-term storage |
Freezing Technique:
- Slice bread before freezing
- Wrap individually in plastic wrap
- Store in freezer-safe bag
- Thaw at room temperature
“The art of bread preservation is as important as the baking itself.” – Artisan Baker’s Wisdom
- Always use clean, dry storage containers
- Avoid plastic bags that trap moisture
- Slice only when ready to consume
- Revive day-old bread by briefly warming in oven
Troubleshooting
Even the most experienced bakers encounter challenges when crafting banneton bread. We’ve compiled essential troubleshooting tips to help you overcome common obstacles and achieve bakery-quality results.
Common Baking Issues
| Issue | Potential Cause | Solution |
|---|---|---|
| Dense Bread | Insufficient Fermentation | Extend proofing time by 30-60 minutes |
| Flat Loaf | Weak Gluten Development | Perform additional stretch and fold techniques |
| Uneven Crust | Inconsistent Oven Temperature | Use an oven thermometer and rotate bread midway |
Pro Tip: Always check your yeast’s freshness and ensure it’s actively fermenting before starting your bread-making process.
Texture Corrections
When your banneton bread doesn’t achieve the desired texture, consider these targeted interventions:
- Overly Dense Crumb:
- Increase hydration by 5-10%
- Perform more aggressive stretch and fold techniques
- Ensure proper gluten development during kneading
- Gummy Interior:
- Verify internal bread temperature reaches 205-210°F
- Allow complete cooling before slicing
- Check oven calibration for accurate temperature
“Texture is the soul of artisan bread—patience and technique are your greatest allies.” – Artisan Bread Masters
Proofing Problems
Proofing challenges can dramatically impact your bread’s final appearance and taste:
| Proofing Issue | Diagnostic Signs | Recommended Action |
|---|---|---|
| Under-Proofed | Tight Dense Dough | Extend proofing time by 25-50% |
| Over-Proofed | Collapsed Dough | Reduce proofing time or lower ambient temperature |
| Uneven Proofing | Inconsistent Surface | Maintain stable room temperature (68-72°F) |
Key Indicators of Perfect Proofing:
- Dough increases 50-75% in volume
- Gentle finger press leaves a slight indentation
- Visible air bubbles along the dough’s surface
- ✓ Consistent room temperature
- ✓ Draft-free proofing area
- ✓ Proper humidity levels
- ✓ Clean, well-maintained banneton
Serving Suggestions
Our perfectly crafted banneton bread deserves presentation that highlights its artisan qualities and complex flavor profile. The right serving approach can transform a simple loaf into a memorable culinary experience.
Slicing Techniques
Mastering the art of bread slicing is crucial for preserving texture and presentation:
- Wait for Complete Cooling: Always allow bread to cool fully before slicing to prevent gummy texture
- Use a Sharp Serrated Knife: Ensures clean cuts without compressing the delicate crumb
- Slice Thickness Recommendations:
| Slice Thickness | Best Used For |
|---|---|
| 1/4 inch | Delicate sandwiches |
| 1/2 inch | Toast and general eating |
| 3/4 inch | Robust open-faced preparations |
Pro Tip: “Cut with a gentle sawing motion, letting the knife do the work without pressing down heavily.”
Pairing Recommendations
Complement our banneton bread with these carefully selected pairings:
Savory Pairings:
- Artisan cheeses (aged cheddar, goat cheese)
- Olive oil and balsamic vinegar
- Charcuterie boards
- Herb-infused butter
Beverage Companions:
- Robust red wines
- Craft beers
- Rich coffee
- Herbal teas
Serving Temperature
Optimal serving temperatures enhance the bread’s sensory experience:
- Freshly Baked: 10-15 minutes after cooling
- Room Temperature: Ideal for maximum flavor development
- Slightly Warmed: 10-15 seconds in oven for crisp exterior
Temperature Range Guide:
| Temperature | Texture | Flavor Impact |
|---|---|---|
| 68-72°F | Soft crumb | Peak flavor |
| Warm (110-120°F) | Crisp crust | Enhanced aroma |
| Cold | Dense texture | Muted flavors |
Conclusion
We’ve explored the art of creating stunning banneton bread that transforms home baking into a professional experience. By mastering techniques from ingredient selection to precise baking methods we can elevate our bread-making skills and produce artisan-quality loaves with beautiful textures and designs.
The journey of banneton bread is about more than just following a recipe—it’s about understanding the nuanced processes that turn simple ingredients into extraordinary culinary creations. With practice patience and the right tools anyone can unlock the secrets of exceptional homemade bread.
Whether you’re a novice baker or an experienced bread enthusiast our guide provides the knowledge and confidence to create remarkable loaves that will impress family and friends. Happy baking!
Frequently Asked Questions
What is a Banneton Basket?
A banneton basket is a traditional proofing tool made from woven rattan or cane used in artisan bread baking. It helps shape and support dough during its final rise, creating distinctive spiral patterns and absorbing excess moisture. The basket’s unique design promotes air circulation and provides structural support, enabling home bakers to achieve professional-looking bread with beautiful surface textures.
How Does a Banneton Improve Bread Quality?
A banneton enhances bread quality by providing uniform support and structure during proofing. Its woven surface creates intricate patterns on the dough’s exterior, helps develop surface tension, and allows proper moisture absorption. The basket’s design enables better dough shaping, promotes even rising, and contributes to a more aesthetically pleasing and professionally structured loaf with an attractive, rustic appearance.
What Types of Bannetons Are Available?
Bannetons come in various shapes and sizes, including round, oval, rectangular, and combo sets. Round bannetons are ideal for boules, oval baskets work well for batards, and rectangular options suit different bread styles. They’re typically made from natural materials like rattan or cane, each offering unique characteristics to support different bread-making techniques and aesthetic preferences.
What Ingredients Work Best with Banneton Bread?
High-quality ingredients are crucial for banneton bread. Recommended flour types include bread flour, whole wheat flour, and rye flour. Use filtered water, active sourdough starter, and optional additions like sea salt, vital wheat gluten, and seeds. Room temperature ingredients and precise measurements are key to achieving optimal gluten development and flavor in your artisan bread.
How Do I Prepare a Banneton for Baking?
Prepare a banneton by dusting it generously with rice flour, which prevents dough from sticking better than regular flour. Ensure even coating, especially in the basket’s grooves and corners. Rice flour creates a barrier between dough and basket, facilitating easy bread removal and maintaining the intricate surface patterns during proofing and baking.
What Temperature is Best for Proofing Bread?
Ideal proofing temperatures range between 70-80°F (21-27°C) with moderate humidity. Consistent temperature promotes proper fermentation and prevents under or over-proofing. Use a proofing area free from drafts, like a turned-off oven with the light on or a warm kitchen corner. Monitor dough for signs of active fermentation like volume increase and visible bubbles.
How Long Should I Proof Bread in a Banneton?
Proofing time varies depending on room temperature and dough composition, typically ranging from 2-4 hours at room temperature or overnight in the refrigerator. Look for signs of proper proofing: dough should increase in volume by 50-75%, feel light and airy, and slowly spring back when gently pressed.
Can Beginners Use a Banneton Successfully?
Absolutely! Bannetons are user-friendly tools suitable for bakers of all skill levels. Start with simple recipes, follow instructions carefully, and practice techniques like gentle dough handling and proper flour dusting. With patience and practice, beginners can quickly master banneton bread-making and create professional-looking artisan loaves.
How Do I Clean and Maintain My Banneton?
Never wash a banneton with soap. Instead, brush out flour residue and allow it to dry completely between uses. Occasionally, you can lightly scrub with a dry brush to remove built-up flour. Store in a dry, well-ventilated area to prevent mold. Rotate between multiple bannetons to extend their lifespan.
What Common Mistakes Should I Avoid with Bannetons?
Common mistakes include using wet dough, insufficient flour dusting, over-proofing, and rough dough handling. Always use properly hydrated dough, generously dust with rice flour, monitor proofing time carefully, and handle dough gently to maintain its structure. Practice and patience are key to mastering banneton bread techniques.