
Making a flaky apple pie crust without a food processor might sound tricky but it’s totally doable and rewarding. We love sharing simple techniques that bring classic flavors to life without needing fancy gadgets. This recipe shows you how to create a tender buttery crust using just a few basic tools you already have in your kitchen.
Perfect for those who want to enjoy homemade pie but don’t own a food processor or prefer a hands-on approach. We’ll guide you through easy steps that ensure your crust turns out crisp and golden every time. Let’s dive into making a delicious apple pie crust that’s both approachable and impressive.
Ingredients
To create a perfectly flaky Apple Pie Crust Without Food Processor, we rely on simple, fresh ingredients that are easy to handle with just a few basic tools. Here’s what we need to get started:
- 2 1/2 cups (312g) all-purpose flour, sifted for a light texture
- 1 teaspoon salt, to enhance flavor
- 1 tablespoon granulated sugar, optional but helps with browning
- 1 cup (226g) unsalted butter, very cold and cut into small cubes
- 6 to 8 tablespoons ice water, kept chilled to bind the dough
Below is a clear table summarizing the ingredients with their precise measurements:
| Ingredient | Measurement | Notes |
|---|---|---|
| All-purpose flour | 2 1/2 cups (312g) | Sifted for lightness |
| Salt | 1 teaspoon | Enhances overall flavor |
| Granulated sugar | 1 tablespoon | Optional, adds slight sweetness |
| Unsalted butter | 1 cup (226g) | Very cold, cut into small cubes |
| Ice water | 6 to 8 tablespoons | Keep chilled, add gradually |
Pro Tip: Using very cold butter and ice water is crucial for achieving a tender and flaky crust. The coldness prevents the butter from melting before baking, creating layers that crisp up beautifully.
With these measured ingredients, we are set to craft a homemade apple pie crust that’s light, flaky, and buttery—all without a food processor.
Equipment Needed
To create the perfect apple pie crust without a food processor we rely on simple yet effective kitchen tools. These allow us to mix cold butter and flour evenly for that desirable flaky texture. Here is the essential equipment you’ll need:
- Large mixing bowl
Use a roomy bowl to combine flour, salt, and sugar comfortably. This gives us enough space to cut butter into flour without spilling.
- Pastry blender or fork
This tool helps us cut the cold butter into the dry ingredients efficiently. If you don’t have a pastry blender, a sturdy fork will work just as well to achieve pea-sized butter pieces.
- Measuring cups and spoons
Precise measurements of flour, salt, sugar, and water ensure consistency in our crust texture.
- Rolling pin
A medium-sized rolling pin is essential for rolling out the dough evenly to the desired thickness.
- Plastic wrap or parchment paper
For chilling the dough and preventing sticking while rolling it out.
- Bench scraper or sharp knife
Helps divide dough or clean the work surface easily.
- Cold plate or baking sheet (optional)
Keeping butter cold is critical—we can place the bowl or butter cubes on a cold surface or use a chilled baking sheet to retain cold temperature during preparation.
| Equipment | Purpose | Notes |
|---|---|---|
| Large mixing bowl | Mix dry and wet ingredients | Preferably glass or metal |
| Pastry blender/fork | Cut butter into flour for flaky texture | Fork works if blender not available |
| Measuring cups/spoons | Accurate ingredient measurement | Use precise tools for best results |
| Rolling pin | Roll out dough evenly | Medium sized for control |
| Plastic wrap/parchment | Chill & handle dough | Prevents sticking and drying out |
| Bench scraper/knife | Cut/handle dough | Clean edges and split dough |
| Cold plate/baking sheet | Maintain butter coldness | Optional but beneficial |
Prep Work
Before we dive into making our apple pie crust recipe without food processor, proper prep work is crucial. Taking these initial steps ensures a flaky, tender crust with minimal effort.
Chilling the Ingredients
Using cold ingredients is the foundation for a perfect pie crust. Here’s why and how we prepare them:
- Butter: Cut the unsalted butter into small cubes, then place it in the refrigerator for at least 30 minutes. Cold butter creates steam when baked, forming the characteristic flaky layers.
- Ice Water: Fill a measuring cup with water and add ice cubes. Keep this mixture in the fridge or freezer until ready to use. Using 6 to 8 tablespoons as needed ensures the dough binds without becoming sticky or tough.
Pro Tip: Always measure your ice water and keep it chilled. Even a slight increase in temperature can cause your butter to soften prematurely, compromising the crust’s texture.
| Ingredient | Prep Step | Suggested Time |
|---|---|---|
| Butter | Cut into cubes, chill | 30 minutes |
| Ice Water | Prepare with ice, chill | Until needed |
Preparing the Workspace
A clean and organized workspace helps streamline the process and maintains ingredient temperature:
- Clear a large area on your kitchen counter or table to allow ample room for mixing and rolling.
- Chill utensils by placing your mixing bowl and rolling pin in the fridge for 10-15 minutes before starting. This keeps dough cool and easier to handle.
- Lay out tools such as your pastry blender or fork, measuring cups, and plastic wrap within reach.
- Keep a cold plate or baking sheet nearby to rest the dough in between steps if it starts warming up.
Making the Apple Pie Crust Dough
Now that we have all our ingredients and tools ready, let’s dive into making the apple pie crust dough. This step is essential for achieving that flaky, tender, and buttery crust without a food processor.
Mixing Dry Ingredients
We start by combining our dry ingredients in a large mixing bowl. This includes:
- 2 1/2 cups sifted all-purpose flour
- 1 teaspoon salt
- 1 tablespoon optional granulated sugar
Tip: Sifting the flour ensures even mixing and a lighter dough texture.
Gently whisk these ingredients together until fully blended. This helps distribute the salt and sugar evenly for consistent flavor throughout the crust.
Cutting in the Butter by Hand
Next, we’ll cut in the very cold unsalted butter, which is key to creating flaky layers in our crust.
- Add 1 cup of small cubes of chilled butter to the dry mix.
- Using a pastry blender or two forks, press the butter into the flour using a cutting motion.
We want to reach a texture resembling coarse crumbs with some pea-size butter bits still visible. The cold butter pockets will create steam during baking and form delicate layers.
| Technique | Resulting Texture | Why It Matters |
|---|---|---|
| Large butter chunks | Pea-sized pieces in flour | Creates steam layers for flakiness |
| Over-mixed dough | Too fine and blended | Results in a tough, dense crust |
Avoid overworking the dough to maintain those butter chunks.
Adding Ice Water Gradually
gradually add 6 to 8 tablespoons of chilled ice water to bind the dough:
- Sprinkle 2 tablespoons of ice water over the mixture.
- Use a fork or your hands to gently mix after each addition.
Add more water by tablespoons as needed just until the dough starts coming together. It should be moist but not sticky or wet.
Important: Using ice water keeps the butter from melting prematurely, preserving that flaky texture.
Forming the Dough
Once the dough holds together when pinched, transfer it to a clean surface:
- Lightly gather it into a ball without kneading.
- Flatten into a disk about 1 inch thick.
- Wrap the dough disk tightly in plastic wrap.
- Chill in the refrigerator for at least 1 hour.
Chilling allows the gluten to relax and the butter to firm, making the dough easier to roll and enhancing flakiness when baked.
Rolling Out the Crust
Now that our dough has rested and chilled, it’s time to roll it out into the perfect apple pie crust. Rolling the dough properly ensures a crisp flaky base that holds our delicious filling without tearing or sticking.
Tips for Rolling Without Sticking
Rolling out dough without a food processor means we need to keep a few key points in mind to prevent sticking and tearing:
- Chill the Dough: Keep the dough cold. If it softens too much, return it to the refrigerator for 10-15 minutes before rolling.
- Lightly Flour the Surface: Sprinkle a small amount of flour on your countertop or rolling surface and on your rolling pin to reduce sticking. Avoid over-flouring as it can dry out the dough.
- Use Parchment Paper: Rolling the dough between two sheets of parchment paper or plastic wrap creates a non-stick surface and makes transfer easier.
- Roll From the Center Out: Roll the dough evenly starting from the center, pushing outward in all directions. Rotate the dough 90 degrees every few rolls to maintain a round shape.
- Apply Gentle, Even Pressure: Use steady gentle pressure to avoid tearing the dough while achieving an even thickness of about 1/8 inch (3 mm).
Shaping the Dough for the Pie Pan
After rolling, shaping the dough correctly will ensure a sturdy and visually appealing pie crust:
- Measure the Dough: Our dough should be about 2 inches larger in diameter than your pie pan to allow for ease handling and crimping.
- Transfer Carefully: Fold the dough into quarters or roll it onto your rolling pin, then gently unroll it over the pie pan.
- Fit the Dough: Gently press the dough into the pie pan bottom and sides, avoiding stretching. Stretched dough will shrink back during baking.
- Trim the Edges: Use a sharp knife or bench scraper to trim excess dough, leaving a 1-inch overhang around the rim.
- Create the Edge: Fold the overhang under itself to create a thick edge, then crimp or decorate as desired for a classic pie look.
- Chill Before Filling: Place the shaped crust in the refrigerator for 15-20 minutes to firm up before adding your apple pie filling.
| Step | Details | Measurements |
|---|---|---|
| Thickness | Roll dough evenly | 1/8 inch (3 mm) |
| Diameter | Dough size for a 9-inch pan | 11 inches (28 cm) including overhang |
| Edge Overhang | Overhang to trim and fold | 1 inch (2.5 cm) |
| Chill Time | Before filling | 15-20 minutes |
Assembling the Apple Pie
Now that our apple pie crust is perfectly rolled and chilled, it’s time to bring the elements together. This stage is crucial for ensuring the filling is well-contained and the crust bakes to a beautiful golden finish.
Placing the Bottom Crust
We begin by gently transferring the bottom crust into the pie pan. Use a rolling pin to help lift the dough carefully, avoiding any stretching or tearing.
- Align the crust’s center with the pan’s center.
- Let the dough drape naturally over the edges.
- Press it lightly into the pan, ensuring it fits snugly against the bottom and sides without gaps or air pockets.
Pro Tip: If the crust shrinks a bit while pressing, don’t worry — this will help prevent bubbling during baking and ensure a flaky edge.
Adding the Apple Filling
Our prepared apple filling is ready to go in once the base crust is set.
- Spoon the filling evenly and avoid overfilling for ease of sealing with the top crust.
- Spread the filling close to the edges but leave about ¼ inch gap to prevent spilling.
- Distribute the filling with care to balance thickness and keep the pie level.
| Step | Detail |
|---|---|
| Filling Amount | Approximately 5 to 6 cups of apples |
| Filling Thickness | About 1 to 1 ¼ inches in pie |
Sprinkle a light dusting of cinnamon sugar or nutmeg over the filling for added flavor and aroma.
Adding the Top Crust or Lattice
We have two attractive options to finish our pie’s crown:
Classic Top Crust
- Roll out the top crust to slightly larger than the pan diameter by 2 inches.
- Carefully place it over the filling.
- Trim excess dough to match the bottom crust edge.
- Pinch or crimp edges firmly to seal.
- Cut 3 to 4 small slits in the center to allow steam to escape during baking.
Lattice Crust
- Cut the dough into even strips (about ½ inch wide).
- Lay 4 strips horizontally over the filling with gaps.
- Weave 4 or more strips vertically using an over-under pattern.
- Trim edges and crimp tightly together.
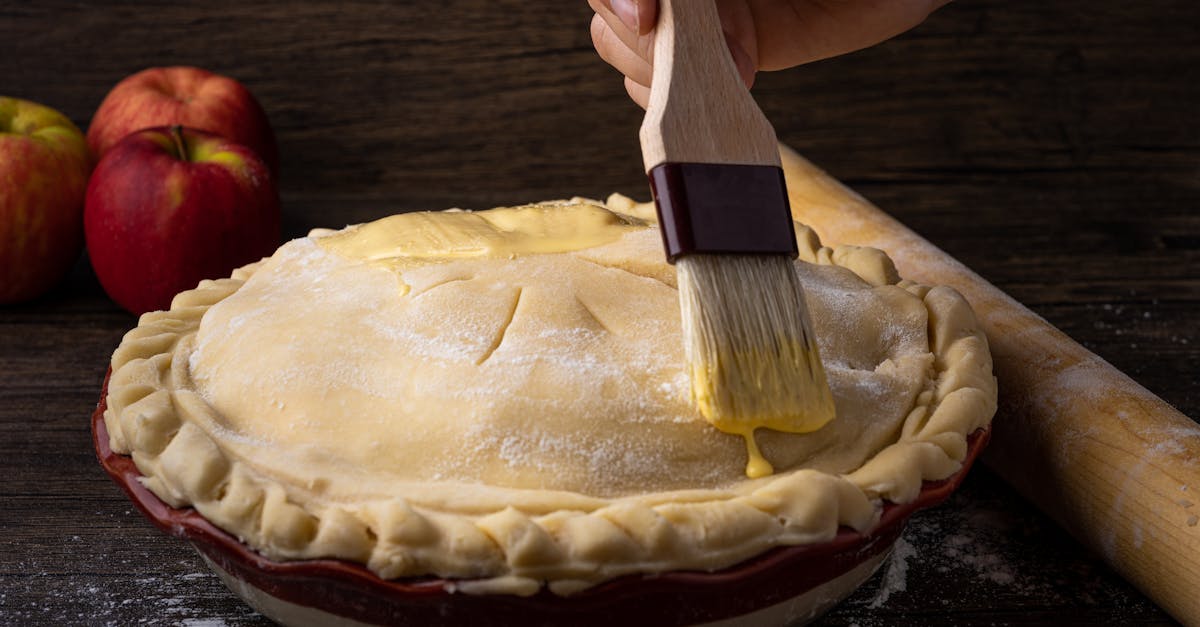
Note: Brushing the top crust or lattice with egg wash and sprinkling sugar provides a lustrous golden finish.
By expertly assembling the apple pie with these steps, we ensure beautiful presentation and perfect texture from crust to filling.
Baking Instructions
We will bake our Apple Pie Crust Without Food Processor to achieve a perfectly golden and flaky result. Follow these precise baking steps to ensure the crust sets beautifully while complementing our apple filling flawlessly.
Preheating the Oven
Preheat your oven to 425°F (220°C). This initial high heat jumpstarts the baking process, helping the crust to form a crisp outer layer while locking in moisture. Use the middle rack for even heat distribution. Make sure to preheat for at least 20 minutes prior to baking to ensure the oven reaches the correct temperature.
Baking Time and Temperature
- Bake the pie at 425°F (220°C) for the first 15 minutes.
- Then reduce the oven temperature to 350°F (175°C).
- Continue baking for an additional 40 to 50 minutes until the crust is golden brown and the filling is bubbling.
This two-step baking process ensures the pie crust becomes flaky and crisp without burning and the filling cooks evenly.
| Baking Stage | Temperature | Duration |
|---|---|---|
| Initial Bake | 425°F (220°C) | 15 minutes |
| Continued Baking | 350°F (175°C) | 40 to 50 mins |
Checking for Doneness
Check the pie’s doneness by following these steps:
- Observe the crust color: It should be a deep golden brown.
- Look for bubbling filling around the edges which signals it’s cooked through.
- Test the crust’s crispness by gently tapping the edges; it should sound firm and crisp not soft or doughy.
- If the edges brown too fast, tent them with foil to prevent burning while allowing the center more time to bake.
“A perfectly baked apple pie crust will have an inviting golden glow and hold its shape firmly, giving us those tender, flaky layers we worked for.“
Careful monitoring in the last 10 minutes is key to that flawless crust texture.
Tips for the Perfect Apple Pie Crust Without a Food Processor
To master the art of making a flaky apple pie crust without a food processor, we must focus on technique and detail. Here are our essential tips for achieving the perfect crust every time.
1. Keep Ingredients Ice Cold
Cold butter and ice water are non-negotiable for a tender, flaky crust. The cold temperature prevents butter from melting before baking, which creates those beautiful crisp layers. Always:
- Chill butter for at least 30 minutes before use.
- Use ice water straight from the fridge or add ice cubes, removing them before adding water to the dough.
- Consider chilling bowls and utensils to maintain cold temperatures.
2. Cut Butter into Flour by Hand
Since we are not using a food processor, the technique of cutting in butter is vital. Use a pastry blender, fork, or your fingertips to:
- Cut butter into small cubes (about pea-size) and mix into the flour mixture.
- Aim for a coarse crumb texture where you still see bits of butter.
- Avoid overmixing to prevent melting the butter or activating gluten excessively.
3. Gradually Add Chilled Water
Add ice water slowly—about 1 tablespoon at a time—to avoid adding too much moisture. Stop when the dough just holds together. The goal is a dough that is:
- Moist but not sticky
- Able to hold together when squeezed
- Not overworked to keep it tender
4. Form and Chill the Dough Properly
After mixing, shape the dough into a flat disk approximately 1 inch thick. Wrap tightly in plastic wrap and refrigerate for at least 1 hour. Chilling:
- Relaxes gluten for a tender crust
- Firms up butter for flakiness
- Makes rolling easier and less sticky
5. Roll Out Dough Carefully
Follow these key steps to roll the dough without tearing or sticking:
- Lightly flour your work surface and rolling pin.
- Roll from the center outward evenly using gentle pressure.
- Keep the dough cold—if it softens, chill for 10-15 minutes before continuing.
- Aim for a thickness of about 1/8 inch for perfect flakiness.
6. Measure Dough for Pie Pan Fit
Measure dough diameter to be 2 inches larger than your pie pan to allow for easy fitting and edge trimming. Transfer dough gently with the rolling pin to:
- Avoid overstretching, which can cause shrinkage during baking.
- Fit snugly against the pie plate without gaps for even baking.
7. Trim and Decorate Edges Before Chilling
Trim excess dough to about 1/2 inch beyond the pan rim and create decorative edges by pinching or fluting. Chill the shaped crust for 15-20 minutes to firm before filling to:
- Prevent shrinking
- Maintain shape and texture
8. Maintain Oven Temperature Accuracy
Preheat your oven fully to 425°F (220°C) before baking. Use an oven thermometer to confirm the temperature, as:
- A hot oven sets the crust quickly and creates a crisp outer layer
- The two-stage baking process ensures a golden crust with thoroughly cooked filling
| Baking Step | Temperature | Time | Purpose |
|---|---|---|---|
| Initial Bake | 425°F (220°C) | 15 minutes | Set crust and start browning |
| Final Bake | 350°F (175°C) | 40-50 minutes | Cook filling and finish crust |
9. Watch for Visual Cues
To know your crust is done:
- Look for a golden brown edge
- Check for bubbling from the filling vents
- Monitor closely during last 10 minutes to avoid overbrowning
“Patience and attention to detail transform a simple dough into the flaky heart of your perfect apple pie.”
By carefully following these tips for apple pie crust without a food processor, we ensure a crust that is both crunchy and tender—a true foundation for our delicious apple pie.
Make-Ahead and Storage Instructions
Preparing the Dough in Advance
We can prepare the apple pie crust dough up to 2 days ahead to save time on baking day. After mixing the dough and forming it into a disk, tightly wrap it in plastic wrap to prevent it from absorbing any fridge odors or drying out. Place the wrapped disk in the refrigerator for a minimum of 1 hour or up to 48 hours.
Pro tip: Allowing the dough to rest in the fridge relaxes the gluten and firms up the butter, which improves flake formation during baking.
Freezing the Dough
If we want to store the dough longer than 2 days, freezing is a reliable option. Follow these steps for freezing:
- Wrap the dough disk tightly in plastic wrap.
- Place the wrapped dough in a resealable freezer-safe bag.
- Label with the date and store in the freezer for up to 3 months.
Thawing Frozen Dough
To thaw frozen dough, transfer it from the freezer to the refrigerator and allow it to thaw slowly overnight. This gradual thawing ensures the dough maintains its texture and is easier to roll out.
| Storage Method | Preparation Time | Maximum Storage Duration |
|---|---|---|
| Refrigeration | Wrap and chill 1 hour | Up to 2 days |
| Freezing | Wrap, bag, freeze | Up to 3 months |
| Thawing (from frozen) | Overnight in refrigerator | Ready to roll and bake next day |
Storing Baked Pie Crust
If we bake the apple pie crust without filling and want to store it, allow it to cool completely after baking. Then place the crust in an airtight container or wrap it tightly in plastic wrap.
- At room temperature, it stays fresh for up to 2 days.
- Refrigeration extends freshness to up to 5 days; bring to room temperature before serving.
- For longer storage, wrap securely and freeze for up to 1 month.
Reheating Tips
To revive the crispness of stored baked crust, preheat the oven to 350°F (175°C) and warm the crust for 5 to 10 minutes. Avoid microwaving as it can soften the crust and reduce flakiness.
Conclusion
Making a flaky apple pie crust without a food processor is not only doable but also deeply satisfying. With just a few simple tools and the right techniques, we can achieve that perfect balance of tender and crisp.
By focusing on cold ingredients and gentle handling, we ensure every bite has those beautiful layers we crave. This hands-on approach connects us more closely to the baking process and lets us enjoy a homemade crust that’s truly worth the effort.
So let’s roll up our sleeves and embrace the art of crafting pie crust the traditional way—our apple pie will thank us for it.
Frequently Asked Questions
Can I make flaky apple pie crust without a food processor?
Yes, you can make a flaky apple pie crust by hand using simple tools like a pastry blender or fork. The key is to keep the butter and water ice cold and to cut the butter into the flour until it resembles coarse crumbs.
Why is cold butter important for pie crust?
Cold butter creates steam during baking, which forms flaky layers in the crust. Using very cold butter prevents it from melting too soon, resulting in a tender and crisp crust.
What tools do I need to make pie crust without a food processor?
You’ll need a large mixing bowl, pastry blender or fork, measuring cups and spoons, rolling pin, plastic wrap or parchment paper, and a bench scraper or sharp knife.
How much water should I add to the dough?
Add 6 to 8 tablespoons of chilled ice water gradually. Add just enough so the dough holds together without becoming sticky.
How do I prevent the dough from sticking when rolling it out?
Keep the dough cold, lightly flour your work surface and rolling pin, and roll the dough from the center outward using gentle, even pressure.
How long should I chill the dough before rolling?
Chill the dough for at least one hour to relax gluten and firm the butter, which helps achieve a tender, flaky crust.
Can I prepare the dough ahead of time?
Yes, you can prepare the dough up to 2 days in advance in the fridge or freeze it for up to 3 months. Thaw frozen dough overnight in the fridge before use.
What’s the best oven temperature for baking apple pie?
Start baking the pie at 425°F (220°C) for 15 minutes, then reduce the temperature to 350°F (175°C) for 40 to 50 minutes for a crisp and golden crust.
How do I know when my pie crust is done?
Look for a golden-brown crust and bubbling filling. Check during the last 10 minutes to prevent overbaking.
What are common mistakes to avoid when making pie crust by hand?
Avoid over-mixing the dough, using warm ingredients, and rolling the dough too thin or stretching it in the pan, as these can make the crust tough or shrink during baking.