
Chicken livers are a nutrient-packed ingredient that often gets overlooked in everyday cooking. When prepared right, they’re tender, flavorful, and make a deliciously rich dish. Using an air fryer takes this classic offal to the next level by delivering crispy edges and juicy centers without the mess of traditional frying.
We love how quickly the air fryer cooks chicken livers, locking in moisture while giving them a perfect golden finish. This method is not only healthier but also super convenient for busy weeknights or when you want a tasty snack in minutes. Whether you’re a liver lover or curious to try something new, this air fryer chicken liver recipe is sure to become a go-to in your kitchen.
Ingredients
To make our Air Fryer Chicken Liver Recipe delicious and perfectly cooked, we need to gather fresh and flavorful ingredients. Each component plays an essential role in balancing taste and texture while maintaining that crispy exterior and tender interior.
- 1 pound chicken livers, trimmed of fat and membranes, rinsed, and patted dry
- 2 tablespoons olive oil or melted butter for richness and to promote crispiness
- 1 teaspoon garlic powder for aromatic depth
- 1 teaspoon smoked paprika to add a subtle smoky flavor
- ½ teaspoon onion powder for mild sweetness
- ½ teaspoon salt, adjust to taste for seasoning
- ¼ teaspoon black pepper, freshly ground for mild heat
- ½ teaspoon dried thyme or your favorite herb for herbal notes
- Optional: 1 tablespoon all-purpose flour or cornstarch to lightly dust livers for extra crisp
| Ingredient | Quantity | Preparation Details |
|---|---|---|
| Chicken livers | 1 pound | Trimmed, rinsed, and patted dry |
| Olive oil or butter | 2 tablespoons | Melted or liquid form |
| Garlic powder | 1 teaspoon | |
| Smoked paprika | 1 teaspoon | |
| Onion powder | ½ teaspoon | |
| Salt | ½ teaspoon | Adjust as needed |
| Black pepper | ¼ teaspoon | Freshly ground |
| Dried thyme | ½ teaspoon | Optional herb seasoning |
| All-purpose flour or cornstarch | 1 tablespoon | Optional for coating |
Using these ingredients ensures that our chicken livers are seasoned evenly and get that perfect balance of savory and aromatic flavors when cooked in the air fryer.
Let’s get started on assembling and seasoning these ingredients precisely for a crisp and juicy finish.
Tools and Equipment
To achieve perfectly cooked Air Fryer Chicken Liver, having the right tools and equipment is essential. Below is a detailed list of what we use to make this recipe simple and efficient.
Essential Tools
- Air Fryer:
This is the heart of the recipe. We recommend an air fryer with a capacity of at least 3.5 quarts to allow enough space for the chicken livers to cook evenly without overcrowding. Look for models with adjustable temperature and timer settings for precise control.
- Mixing Bowls:
Use medium-sized bowls for marinating and seasoning the chicken livers. A glass or stainless-steel bowl works best to avoid any reaction with acidic ingredients, if added.
- Tongs:
For safely turning and removing chicken livers from the air fryer basket, sturdy kitchen tongs provide precision and keep hands safe from heat.
- Measuring Spoons:
Accurate seasoning is key, so use measuring spoons to portion garlic powder, smoked paprika, onion powder, salt, black pepper, and dried thyme precisely.
- Paper Towels:
Essential for patting dry the chicken livers before seasoning to ensure a crispy exterior after air frying.
- Basting Brush (Optional):
If using melted butter or olive oil for coating, a small silicone brush helps evenly spread the fat on the livers.
Recommended Equipment Specifications
| Tool | Recommended Features | Purpose |
|---|---|---|
| Air Fryer | 3.5+ quart capacity, adjustable temp, digital timer | Even cooking with crispy texture |
| Mixing Bowls | Glass or stainless steel, medium size | Marinating and seasoning |
| Tongs | Heat-resistant, sturdy grip | Safe handling and flipping livers |
| Measuring Spoons | Standardized sets (1/4 tsp to 1 tbsp) | Accurate seasoning measurement |
| Paper Towels | Absorbent, lint-free | Drying chicken livers for crispiness |
| Basting Brush | Silicone head, heat resistant (optional) | Even oil or butter application |
Additional Tips for Equipment Use
- Do not overcrowd the air fryer basket. Give each liver enough space for hot air to circulate. This guarantees a crispy and evenly cooked texture.
- Preheat your air fryer for about 3–5 minutes. This step enhances texture and reduces cooking time.
- Always clean your tools thoroughly after use to maintain hygiene and prolong their lifespan.
By having these tools at hand, we make the cooking process straightforward, fast, and reliable. This sets the stage perfectly for our next step: seasoning and preparing the chicken livers for air frying.
Prep Work
Before we start cooking our Air Fryer Chicken Liver recipe, it’s essential to prepare the livers properly. This ensures the best texture and flavor after air frying.
Cleaning and Trimming the Chicken Livers
We begin by rinsing the chicken livers under cold running water to remove any residual blood or impurities. After rinsing, pat them dry thoroughly using paper towels. This step is crucial for achieving a crispy exterior in the air fryer.
Next, inspect each liver and trim off any connective tissue, fat, or greenish bile spots. These parts can impart a bitter taste, so removing them helps us maintain a clean flavor profile.
| Step | Instruction |
|---|---|
| Rinse | Use cold water to wash the livers thoroughly. |
| Dry | Pat livers dry with paper towels completely. |
| Trim | Remove connective tissue, fat, and bile spots. |
Marinating the Chicken Livers
Marinating allows the flavors to penetrate deeply and tenderizes the livers. In a medium-sized bowl, combine olive oil or melted butter with the seasoning blend: garlic powder, smoked paprika, onion powder, salt, black pepper, and dried thyme. For added crispiness, we slightly toss the livers in all-purpose flour or cornstarch after marinating.
We coat every piece evenly by gently tossing the livers in the marinade. Let them sit for at least 15 minutes at room temperature, or up to 1 hour in the refrigerator. This resting time maximizes flavor absorption and helps develop a juicy interior when cooked.
| Ingredient | Amount | Purpose |
|---|---|---|
| Olive Oil/Melted Butter | 1-2 tablespoons | Helps coat and crisp the livers |
| Garlic Powder | 1 teaspoon | Adds savory aroma |
| Smoked Paprika | 1 teaspoon | Provides smoky depth |
| Onion Powder | 1/2 teaspoon | Enhances sweetness |
| Salt | 1 teaspoon | Balances and enhances flavors |
| Black Pepper | 1/2 teaspoon | Adds mild heat |
| Dried Thyme | 1/2 teaspoon | Brings herbal notes |
| All-Purpose Flour/Cornstarch | Optional, 2 tablespoons | Creates extra crispy texture |
“Tip: Do not overcrowd the livers during marination to ensure an even coating and better cooking results.”
This prep work equips us to cook air fryer chicken livers that boast a perfect blend of crispiness and tender juiciness every time.
Instructions
Follow these clear, step-by-step instructions to achieve perfectly cooked Air Fryer Chicken Liver—crispy on the outside, tender and juicy inside.
Preheating the Air Fryer
- Preheat your air fryer to 375°F (190°C) for 5 minutes.
- This step ensures even cooking temperature from the start.
- If your air fryer has a preheat function, use it for convenience. Otherwise, simply run it empty for 5 minutes.
| Step | Temperature | Time | Purpose |
|---|---|---|---|
| Preheat air fryer | 375°F | 5 min | Ensure consistent heat |
Tip: Preheating keeps the chicken livers crispy on the outside while sealing in moisture for a juicy interior.
Cooking the Chicken Livers in the Air Fryer
- Arrange the marinated chicken livers in a single layer inside the air fryer basket.
- Avoid overcrowding to allow hot air circulation for crispiness.
- Set the timer for 10 minutes at 375°F (190°C).
- Halfway through cooking (at 5 minutes), open the basket and carefully flip the livers with tongs.
- This promotes even browning on all sides.
- At the 10-minute mark, check for doneness. The livers should be firm to the touch but still slightly soft inside.
- If you prefer extra crispiness, cook an additional 1-2 minutes.
- Once cooked, remove the livers and let them rest for 3 minutes before serving.
- Resting allows juices to redistribute for optimal tenderness.
| Task | Temperature | Time | Notes |
|---|---|---|---|
| Air fry chicken livers | 375°F | 10 minutes | Flip at 5 minutes, avoid overcrowding |
| Optional extra cooking | 375°F | 1-2 minutes | For extra crispiness, monitor carefully |
| Resting time | Room temp | 3 minutes | Helps juices redistribute, enhance tenderness |
Remember: Always use tongs to flip the livers gently to maintain their shape and texture.
By following these instructions precisely, we ensure our Air Fryer Chicken Liver Recipe delivers the perfect balance of crisp exterior and tender interior every time.
Serving Suggestions
To make the most of our Air Fryer Chicken Liver Recipe we can pair this flavorful dish with a variety of sides and accompaniments that complement its rich texture and savory taste.
- Fresh Salads: A crisp garden salad with mixed greens, cherry tomatoes, and a tangy vinaigrette cuts through the richness of the chicken livers, adding a refreshing contrast.
- Creamy Mashed Potatoes: Smooth mashed potatoes provide a comforting base that balances the bold seasoning of the livers.
- Grilled Vegetables: Roasted or grilled veggies such as asparagus, zucchini, or bell peppers add a smoky depth and vibrant colors to the plate.
- Crusty Bread or Garlic Toast: Serving with warm, crusty bread or garlic toast allows us to scoop up the livers and savor every bite.
- Dipping Sauces: Offer sauces like a spicy aioli, tangy mustard, or a classic chimichurri for a burst of flavor and added dimension.
Here is a suggested pairing table to guide our serving choices:
| Side Dish | Flavor Profile | Purpose |
|---|---|---|
| Garden Salad | Fresh, tangy | Balances richness |
| Mashed Potatoes | Creamy, mild | Comforting starchy base |
| Grilled Vegetables | Smoky, savory | Adds texture and nutrients |
| Crusty Bread | Buttery, crunchy | For scooping and additional texture |
| Spicy Aioli | Bold, creamy | Enhances flavor complexity |
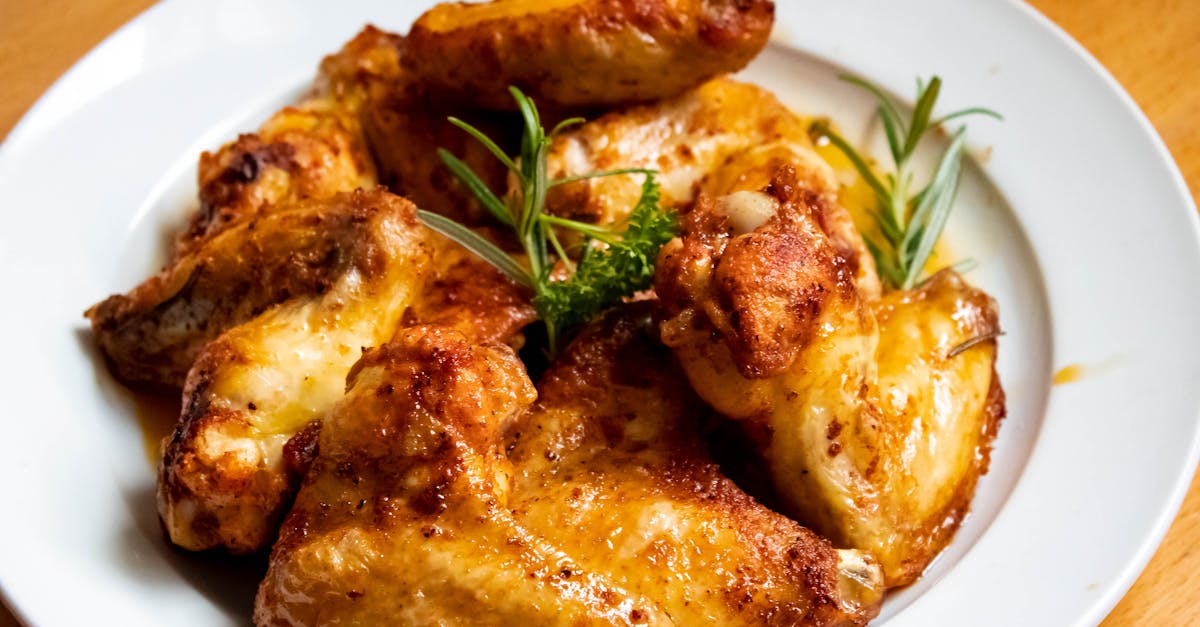
To maximize the dining experience, we recommend serving the air fryer chicken livers immediately after resting so they remain warm and juicy. Garnishing with fresh herbs like parsley or thyme not only enhances presentation but also adds a fresh herbal note that elevates the dish.
“Pairing the rich, crispy chicken livers with lighter and contrasting textures creates a well-rounded and satisfying meal every time.”
These Serving Suggestions bring out the best in our Air Fryer Chicken Liver Recipe and turn it into an inviting dish perfect for any occasion.
Storage and Leftovers
Proper storage of air fryer chicken livers preserves their flavor and texture while ensuring safety for later consumption. Follow these guidelines to keep our dish fresh and enjoyable.
Cooling and Storing
- Allow the chicken livers to cool completely at room temperature for about 15-20 minutes before refrigerating.
- Transfer the cooled livers into an airtight container or securely wrap them with plastic wrap or aluminum foil.
- Place the container in the coldest part of the refrigerator for optimal freshness.
Refrigerator Storage Times
| Storage Method | Duration | Notes |
|---|---|---|
| Airtight container | Up to 3 days | Maintain consistent refrigeration temperature at or below 40°F (4°C) |
| Wrapped tightly | Up to 2 days | Use quickly to avoid drying out |
Freezing Leftovers
If we want to store air fryer chicken livers longer:
- Use a freezer-safe container or heavy-duty freezer bags.
- Separate the livers with parchment paper to prevent sticking.
- Label the package with the date of freezing.
| Freezer Storage | Duration | Tips |
|---|---|---|
| Freezer bags | Up to 2 months | Defrost overnight in fridge for best results |
| Airtight container | Up to 1 month | Consume promptly after thawing |
Reheating Instructions
To retain the crispy texture and juicy interior:
- Preheat the air fryer to 350°F (175°C).
- Place the refrigerated or thawed livers in a single layer in the air fryer basket.
- Heat for 3-5 minutes, checking halfway through to avoid overcooking.
- Serve immediately for the best taste and texture.
Safety Reminder
“Consuming properly stored and reheated chicken livers helps prevent foodborne illnesses.” Always reheat leftovers to an internal temperature of 165°F (74°C).
This storage and reheating guidance helps us enjoy our air fryer chicken liver recipe safely and deliciously beyond the initial meal.
Tips for the Best Air Fryer Chicken Liver Recipe
To ensure our Air Fryer Chicken Livers come out perfectly every time, let’s focus on a few essential tips that elevate the taste, texture, and overall success of this dish.
1. Choose Fresh, High-Quality Chicken Livers
Select livers that are bright red with a firm texture and no discoloration. Fresh ingredients are the foundation of a flavorful and tender outcome.
2. Thoroughly Clean and Prep Livers
Rinse the livers under cold running water, then pat them dry completely with paper towels.
Trim away all visible connective tissue and any green bile spots to eliminate bitterness and ensure a clean flavor.
3. Marinate for Flavor and Tenderness
Marinate the livers in a combination of olive oil or melted butter and your chosen seasonings for at least 30 minutes. This step:
- Enhances flavor penetration
- Helps tenderize the liver
- Prevents drying during cooking
We recommend gently tossing the livers occasionally in the marinade for even coverage.
4. Use a Light Dusting of Flour or Cornstarch (Optional)
If you want extra crispiness, lightly coat the marinated livers with all-purpose flour or cornstarch before air frying. This creates a delicate crust while locking in moisture.
| Ingredient | Amount | Purpose |
|---|---|---|
| Flour or Cornstarch | 1-2 tablespoons | Adds crispiness to the exterior |
5. Preheat the Air Fryer Properly
We should always preheat the air fryer to 375°F (190°C) for 5 minutes before cooking. Preheating ensures even cooking and helps achieve that perfect crispy crust.
6. Arrange Livers in a Single Layer
Avoid overcrowding the basket. Spread the livers in a single layer for:
- Even hot air circulation
- Proper browning all around
Cook in batches if necessary.
7. Flip Halfway Through Cooking
Flip the livers at the 5-minute mark to brown them evenly on both sides. This guarantees a crispy crust and juicy interior.
8. Adjust Cooking Time According to Texture Preference
- 10 minutes for tender and juicy livers
- Add 1-2 extra minutes if you prefer them drier and crispier
Check the livers carefully to avoid overcooking, which can cause toughness.
9. Let Livers Rest Before Serving
Rest the cooked chicken livers for 3 minutes on a plate loosely covered with foil. This allows the juices to redistribute, enhancing tenderness and flavor.
10. Clean Air Fryer Basket After Each Use
To maintain optimal performance and prevent flavors from mixing, clean the air fryer basket and tray thoroughly after cooking. Residual oils and bits can burn and affect the next batch.
“Pro Tip: For added flavor complexity, sprinkle fresh herbs like thyme or parsley over the livers just before serving.”
By following these tips carefully, our Air Fryer Chicken Liver Recipe will consistently impress with a perfect balance of crispy texture and tender juiciness.
Conclusion
Mastering the air fryer chicken liver recipe opens up a world of quick, nutritious, and flavorful meals. With the right prep and cooking techniques, it’s easy to achieve that ideal crispy outside and tender inside every time.
This recipe fits perfectly into busy lifestyles without compromising on taste or health. Whether you’re a seasoned liver lover or trying it for the first time, it’s a versatile dish that’s sure to impress.
We encourage you to experiment with seasonings and sides to make it your own and enjoy the benefits of this nutrient-packed ingredient in a convenient, delicious way.
Frequently Asked Questions
What are the benefits of cooking chicken livers in an air fryer?
Cooking chicken livers in an air fryer results in a crispy exterior and juicy interior without the mess and extra oil from traditional frying. It’s quicker, healthier, and perfect for busy schedules.
What ingredients do I need for air fryer chicken livers?
You’ll need chicken livers, olive oil or melted butter, garlic powder, smoked paprika, onion powder, salt, black pepper, dried thyme, and optionally, flour or cornstarch for extra crispiness.
What equipment is essential for making air fryer chicken livers?
A 3.5-quart or larger air fryer, mixing bowls, tongs, measuring spoons, paper towels, and optionally a basting brush are needed for preparation and cooking.
How should I prepare chicken livers before cooking?
Rinse under cold water, pat dry, trim away connective tissue and bile spots, then marinate with oil or butter and seasonings to enhance flavor and tenderness.
How long and at what temperature do you cook chicken livers in an air fryer?
Preheat the air fryer to 375°F (190°C), cook the livers for 10 minutes, flipping halfway through. Add 1-2 minutes if you want them crispier.
Can I add flour or cornstarch to chicken livers?
Yes, lightly coating the livers with flour or cornstarch helps achieve an extra crispy texture when air-fried.
What are some good side dishes for chicken livers?
Great sides include fresh salads, mashed potatoes, grilled vegetables, crusty bread, garlic toast, and dips like spicy aioli or chimichurri.
How should I store leftover air fryer chicken livers?
Cool completely, then refrigerate in an airtight container for up to 3 days or freeze using a freezer-safe container with parchment paper between layers.
What’s the best way to reheat chicken livers?
Reheat in a preheated air fryer to retain crispiness, and ensure the internal temperature reaches 165°F (74°C) to keep leftovers safe to eat.
Any key tips for perfect air fryer chicken livers?
Use fresh livers, prep and marinate well, avoid overcrowding the basket, flip halfway, and let them rest before serving for juicy, crispy results.