
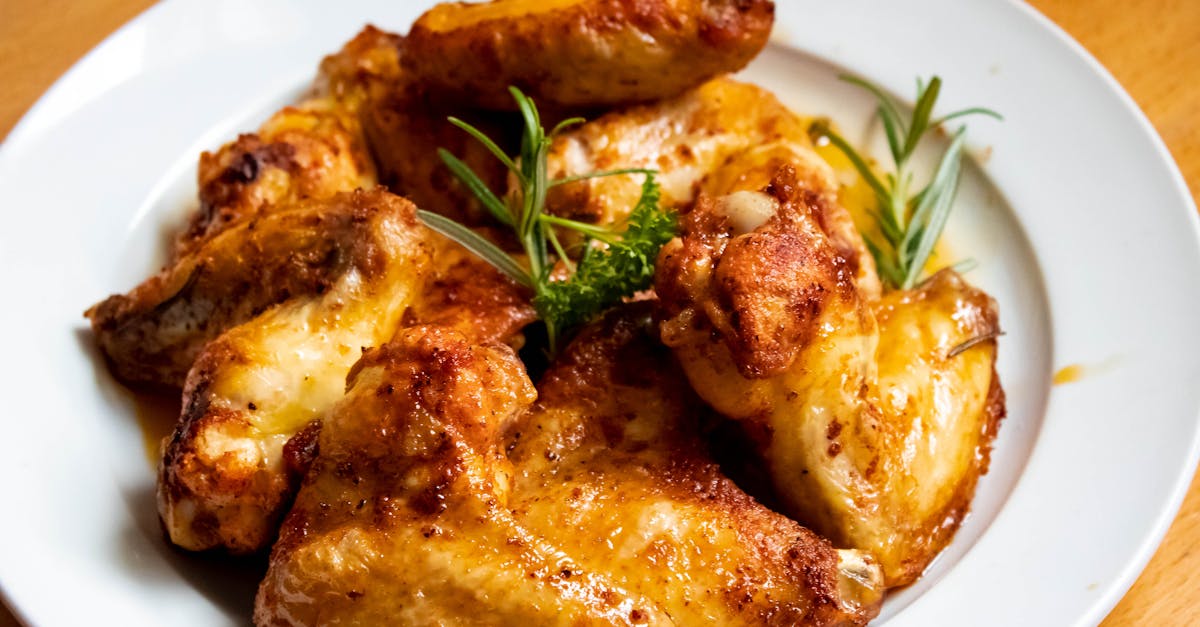
Chicken livers often get overlooked but they’re packed with rich flavor and nutrients. Using an air fryer makes it easier than ever to enjoy this classic ingredient with a crispy exterior and tender inside. Our Air Fry Chicken Livers Recipe brings out the best in this humble dish without the mess of deep frying.
We love how the air fryer locks in moisture while creating a perfectly golden crust in minutes. It’s a healthier way to enjoy a Southern favorite or a savory snack that pairs well with dips and sides. Whether you’re new to cooking chicken livers or looking for a quick, foolproof method, this recipe delivers consistently delicious results every time.
Ingredients
To create the perfect Air Fry Chicken Livers Recipe, we need to gather fresh, high-quality ingredients that ensure crispiness on the outside and juicy tenderness inside. Below is the detailed list of what we will need, along with any necessary preparation notes.
| Ingredient | Quantity | Preparation Notes |
|---|---|---|
| Chicken livers | 1 pound (450 grams) | Trimmed of fat and membranes |
| All-purpose flour | 1 cup (120 grams) | For coating |
| Cornmeal | ½ cup (60 grams) | Adds extra crunch |
| Garlic powder | 1 teaspoon | For seasoning |
| Onion powder | 1 teaspoon | For seasoning |
| Paprika | 1 teaspoon | Adds smoky flavor |
| Salt | 1 teaspoon | Adjust to taste |
| Black pepper | ½ teaspoon | Freshly ground preferred |
| Eggs | 2 large | Beaten, for dredging |
| Buttermilk | ½ cup (120 ml) | Soaking livers for tenderness |
| Cooking spray | As needed | For air fryer basket |
Key Ingredient Notes:
- Chicken livers should be fresh or fully thawed for the best texture and flavor.
- Soaking the livers in buttermilk for at least 30 minutes helps reduce any bitterness and enhances tenderness.
- The combination of all-purpose flour and cornmeal ensures a crispy golden crust once air fried.
- Seasonings like garlic powder, onion powder, paprika, salt, and pepper are essential to infuse flavor deep into each bite.
By gathering these thoughtfully chosen ingredients, we set the foundation for a delicious and healthier take on this classic Southern dish using the air fryer.
Tools and Equipment
To achieve perfectly cooked Air Fry Chicken Livers, having the right tools and equipment is essential. Here’s what we need to prepare our kitchen for this flavorful, crispy dish:
Essential Tools
- Air Fryer: Our primary cooking device, an air fryer, uses rapid air circulation to crisp the chicken livers with less oil, locking in moisture while creating that golden crust we love. Make sure your air fryer has a basket or tray suitable for small pieces like livers.
- Mixing Bowls: For marinating chicken livers in buttermilk and for mixing the coating ingredients (flour, cornmeal, seasonings).
- Tongs: For handling chicken livers safely and turning them in the air fryer basket without breaking the delicate crust.
- Measuring Cups and Spoons: Precision in measuring our ingredients ensures balanced flavor and perfect texture.
- Wire Rack or Plate with Paper Towels: To drain excess moisture or oil from the chicken livers after air frying.
- Whisk or Fork: For beating eggs and combining seasonings in the coating mix.
- Instant-Read Thermometer (optional): Helpful to check that chicken livers reach a safe internal temperature of 165°F without overcooking.
Equipment Table
| Tool | Purpose | Recommended Feature |
|---|---|---|
| Air Fryer | Crisp chicken livers without deep frying | Adjustable temperature, 3-5 quart capacity |
| Mixing Bowls | Marinate and coat livers | Multiple sizes for flexibility |
| Tongs | Handle and turn livers safely | Heat-resistant, non-slip grip |
| Measuring Cups/Spoons | Accurate ingredient measurement | Stainless steel or sturdy plastic |
| Wire Rack/Paper Towels | Drain excess moisture and oil | Raised wire rack preferred |
| Whisk/Fork | Mix eggs and seasonings | Easy-to-clean, durable design |
| Instant-Read Thermometer | Check internal temperature | Quick-response digital display |
Using this specialized equipment helps us maximize flavor and texture while maintaining the health benefits of air frying. Having everything on hand ensures a smooth cooking process and perfect results every time.
Preparation
To achieve perfectly crispy and tender Air Fry Chicken Livers, careful preparation is key. Let’s break down how to clean, trim, and marinate the livers for the best results.
Cleaning and Trimming Chicken Livers
Start by rinsing the chicken livers under cold water to remove any surface impurities. Next, gently pat them dry with paper towels to eliminate excess moisture, which helps the coating adhere better in later steps.
Carefully inspect each liver and trim away any visible fat, sinew, or greenish bile spots using a sharp paring knife or kitchen scissors. Removing these parts is essential to prevent bitterness and ensure a clean, rich flavor. Aim for uniform pieces around 1 to 1 ½ inches for even air frying.
| Step | Action | Purpose |
|---|---|---|
| Rinse | Cold water rinse | Clean off impurities |
| Dry | Pat with paper towels | Improve coating adhesion |
| Trim | Remove fat, sinew, bile spots | Prevent bitterness, enhance taste |
| Size uniformity | Cut or separate pieces to 1–1.5 inches | Ensure even cooking |
Marinating the Chicken Livers
Marinating the livers in buttermilk is a simple yet effective step that tenderizes the meat and mellows the strong flavor. Submerge the trimmed livers in a bowl filled with 1 cup of buttermilk. Cover and refrigerate for at least 30 minutes, or up to 2 hours for deeper flavor infusion.
This acidic soak breaks down proteins resulting in a more delicate texture after air frying. It also helps the flour and cornmeal coating stick evenly. Before dredging, drain the livers well and let excess buttermilk drip off to prevent sogginess.
“The buttermilk marinade is our secret weapon for tender, juicy chicken livers with just the right hint of tanginess.“
By following these preparation techniques, we set ourselves up for a perfectly crispy crust and rich, tender interior every time with our air fryer chicken livers.
Cooking Instructions
Follow these step-by-step instructions to create perfectly crispy and tender Air Fry Chicken Livers. Precision and timing are key to unlocking that golden crust and moist interior we all crave.
Preheating the Air Fryer
- Set the air fryer to 400°F (204°C). Preheating is essential for achieving an evenly crispy exterior.
- Allow the air fryer to run empty for 3-5 minutes. This ensures consistent temperature from the moment we start cooking.
- While preheating, arrange your breaded chicken livers on a wire rack. This keeps the coating intact and ready to crisp up evenly.
Air Frying the Chicken Livers
- Lightly spray the basket with cooking oil spray to prevent sticking and promote browning.
- Place the chicken livers in a single layer, making sure they don’t touch. Overcrowding will cause uneven cooking and reduce crispiness.
- Cook at 400°F (204°C) for 10 minutes. Halfway through, at 5 minutes, flip the livers using tongs and lightly spray the other side with oil spray.
- Check for doneness by ensuring the internal temperature reaches 165°F (74°C) using an instant-read thermometer.
- If needed, cook an additional 2 to 3 minutes for extra crispness. Avoid overcooking to maintain a tender interior.
- Remove the livers from the air fryer and transfer them immediately to a wire rack or paper towels. This step prevents sogginess by allowing excess oil to drain.
| Step | Temperature | Time | Notes |
|---|---|---|---|
| Preheat air fryer | 400°F (204°C) | 3-5 minutes | Empty air fryer |
| Cook first side | 400°F (204°C) | 5 minutes | Single layer, no overcrowding |
| Flip and cook second side | 400°F (204°C) | 5 minutes | Spray oil lightly on flipped side |
| Additional crispness | 400°F (204°C) | 2-3 minutes | Optional, avoid overcooking |
“Crispy on the outside, tender on the inside” — that’s the hallmark of perfectly air-fried chicken livers. By following these precise steps, we maximize flavor while keeping the dish healthier than traditional frying methods.
Serving Suggestions
To elevate our Air Fry Chicken Livers Recipe, let’s explore some delicious serving ideas that complement their crispy exterior and tender interior.
- Classic Southern Style
Serve the chicken livers with creamy mashed potatoes and tangy coleslaw. The smooth texture of mashed potatoes contrasts beautifully with the crunchy coating, while coleslaw adds freshness and acidity.
- Dipping Sauces
Offer a variety of dipping sauces to enhance the flavor profile:
- Spicy Sriracha Mayo for a kick
- Garlic Aioli for creamy richness
- Honey Mustard for a sweet and tangy balance
- Salad Topper
Place the chicken livers on a bed of mixed greens, cherry tomatoes, and red onions. Drizzle with a light vinaigrette to create a protein-packed gourmet salad.
- Sandwich Filling
Stuff the air-fried livers in a toasted brioche bun with lettuce, pickles, and a smear of spicy remoulade. This creates a satisfying sandwich perfect for lunch or casual dinner.
- Side Pairings
Pair the dish with traditional Southern sides like:
| Side Dish | Description | Flavor Profile |
|---|---|---|
| Collard Greens | Slow-cooked leafy greens | Earthy, slightly bitter |
| Hush Puppies | Cornmeal fritters with herbs | Crispy, savory |
| Mac and Cheese | Creamy baked pasta | Rich, cheesy |
Each side adds a complementary texture and flavor dimension to our crispy chicken livers.
- Beverage Pairings
For beverages, consider:
- A cold lager beer to cut through richness
- A dry white wine like Sauvignon Blanc for brightness
- Iced sweet tea for a classic Southern touch
By pairing the Air Fry Chicken Livers thoughtfully, we maximize their appeal and create a balanced meal full of bold flavors and textures.
Storage Tips
To maintain the freshness and flavor of our Air Fry Chicken Livers, proper storage is essential. Follow these steps to keep your chicken livers safe to eat and delicious for days.
Cooling Before Storage
- Allow the chicken livers to cool to room temperature but do not leave them out for more than two hours.
- Cooling properly prevents condensation which can lead to sogginess or bacterial growth.
Refrigeration
- Store the cooled chicken livers in an airtight container or wrap tightly with plastic wrap or aluminum foil.
- Place the container in the coldest part of your refrigerator, typically the back of the bottom shelf.
- Use within 3 to 4 days for best quality and safety.
| Storage Method | Recommended Duration | Temperature |
|---|---|---|
| Refrigerator | 3 to 4 days | 40°F (4°C) or below |
| Freezer | Up to 3 months | 0°F (-18°C) or below |
Freezing for Longer Storage
- We can freeze leftover chicken livers to extend their shelf life.
- Wrap each piece individually in plastic wrap then place in a freezer-safe bag or airtight container to prevent freezer burn.
- Label with the date and use within 3 months.
- Thaw frozen chicken livers overnight in the refrigerator before reheating.
Reheating Tips
- Reheat gently in the air fryer at 350°F (175°C) for 3 to 5 minutes to maintain the crisp exterior.
- Alternatively, warm in a conventional oven or microwave but avoid overheating to prevent toughness.
- Always check that reheated livers reach an internal temperature of 165°F (74°C) for food safety.
“For the best taste and texture, consume refrigerated or freshly prepared air fried chicken livers within 4 days.”
By following these Storage Tips we ensure that our Air Fry Chicken Livers retain their crispy outside and tender inside, ready to enjoy any time with minimal loss of quality.
Conclusion
Air frying chicken livers offers a delicious and healthier way to enjoy this flavorful dish without sacrificing texture or taste. With the right preparation and cooking techniques, we can achieve that perfect crispy exterior and tender interior every time. This method not only simplifies the cooking process but also reduces mess and oil consumption.
By experimenting with different seasonings and serving options, we can easily customize the recipe to suit our preferences. Whether as a snack or part of a full meal, air-fried chicken livers are sure to impress. Let’s keep exploring creative ways to bring classic Southern flavors into our kitchens with ease and confidence.
Frequently Asked Questions
What makes chicken livers a healthy choice?
Chicken livers are rich in protein, iron, vitamins A and B12, and minerals. They provide essential nutrients that support energy, immunity, and overall health, making them a nutritious addition to your diet.
Why use an air fryer for cooking chicken livers?
An air fryer crisps chicken livers with less oil than deep frying, locking in moisture for a tender interior and crispy exterior. It’s faster, less messy, and results in a healthier dish.
How should I prepare chicken livers before cooking?
Rinse under cold water, pat dry, trim off fat and bile spots, then soak the livers in buttermilk for at least 30 minutes. This tenderizes the meat and helps the coating stick better.
What is the ideal cooking temperature and time for air frying chicken livers?
Preheat the air fryer to 400°F (204°C). Cook the livers in a single layer for 10 minutes, flipping halfway through, until they reach an internal temperature of 165°F (74°C).
What coating ingredients are used in this recipe?
The recipe uses a mix of all-purpose flour and cornmeal combined with seasonings. This mix creates a crispy, flavorful crust for the chicken livers.
Can I use frozen chicken livers for this recipe?
Fresh chicken livers are best for taste and texture, but you can use frozen if fully thawed and patted dry. Avoid excess moisture to keep the coating crispy.
How should air fried chicken livers be stored?
Cool them to room temperature, then store in an airtight container in the refrigerator for 3–4 days. For longer storage, freeze for up to 3 months with proper wrapping.
What are some popular side dishes to pair with chicken livers?
Classic Southern sides like creamy mashed potatoes, coleslaw, collard greens, hush puppies, and mac and cheese complement air fried chicken livers well.
How can I reheat chicken livers without losing crispiness?
Reheat gently in an air fryer or conventional oven at a low temperature. This warms the livers through while maintaining their crispy crust.
Why soak chicken livers in buttermilk?
Buttermilk tenderizes the livers and reduces any strong flavor. It also helps the coating stick better, resulting in a crispier and more flavorful final dish.