
Nothing beats the smell of freshly baked bread filling the kitchen. Our 5 Ingredient Bread Recipe with Honey is a simple way to bring that warmth and comfort home without any fuss. Using just a handful of ingredients, this bread is perfect for beginners and busy bakers alike.
Honey adds a subtle sweetness that enhances the flavor while keeping the bread moist and tender. This recipe proves you don’t need complicated steps or a long ingredient list to enjoy homemade bread. Let’s dive into making a loaf that’s both delicious and easy to master.
Ingredients for 5 Ingredient Bread Recipe With Honey
To bake our 5 Ingredient Bread Recipe With Honey, we gather simple pantry staples that combine to create a moist, tender loaf with a hint of natural sweetness. Below is the precise list of ingredients, ordered as used, along with preparation notes to ensure perfect results.
| Ingredient | Quantity | Preparation Notes |
|---|---|---|
| Active dry yeast | 2 1/4 teaspoons | Ensure fresh for proper rising |
| Warm water | 1 1/4 cups (110°F) | Ideal temperature activates yeast |
| All-purpose flour | 3 1/2 cups | Measure by spooning into the cup |
| Salt | 1 1/2 teaspoons | Enhances flavor balanced with yeast |
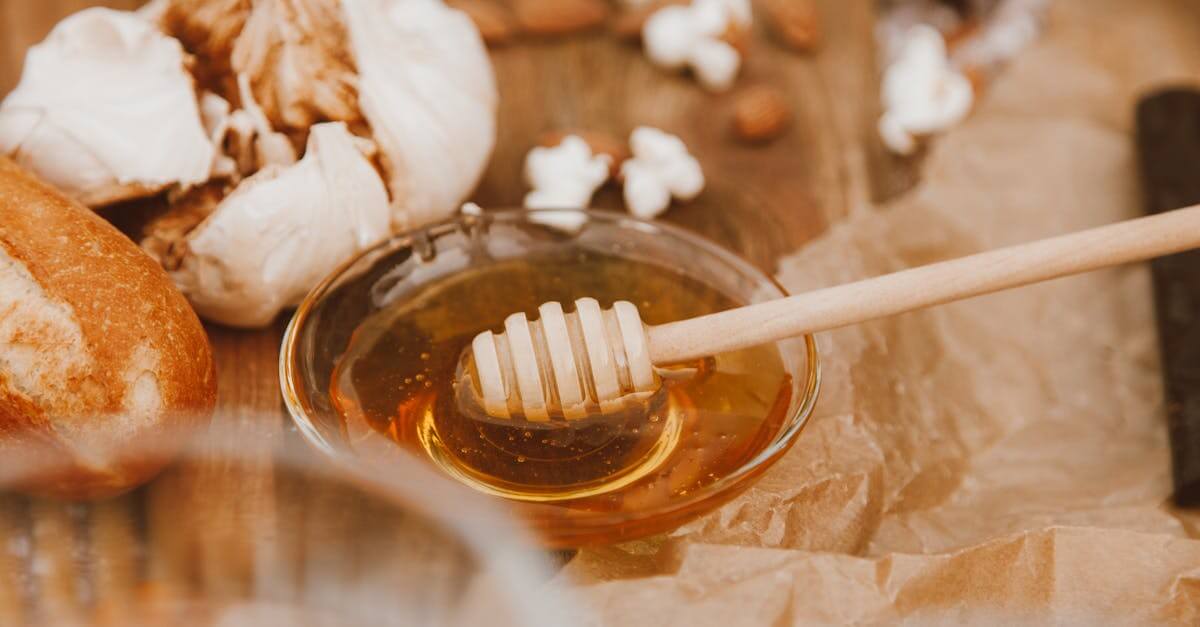
| Honey | 2 tablespoons | Adds subtle sweetness and moisture |
We always start by activating the active dry yeast in warm water between 105°F and 115°F to wake up the yeast without killing it. The honey dissolves easily in this warm water, feeding the yeast for even better rise.
Using all-purpose flour gives this bread a soft but sturdy crumb, while the salt balances the sweetness and controls yeast fermentation to develop flavor.
“The magic is in the simplicity of these ingredients working together to create a loaf that is both wholesome and delicious.”
By sticking to these five essential ingredients prepared as indicated, we ensure consistent texture and taste in every loaf baked with our 5 Ingredient Bread Recipe With Honey.
Equipment Needed
To bake our 5 Ingredient Bread Recipe With Honey successfully, having the right equipment is essential. Each tool plays a specific role in achieving the perfect loaf with a tender crumb and golden crust.
Essential Tools for Making the Bread
- Mixing Bowl
Use a large, sturdy mixing bowl to combine the active dry yeast, warm water, flour, salt, and honey. It needs to be big enough to accommodate the dough as it rises without spilling.
- Measuring Cups and Spoons
Accurate measurements guarantee consistent results. We recommend using a set of standard measuring cups for flour and water and measuring spoons for yeast, salt, and honey.
- Wooden Spoon or Silicone Spatula
To mix the dough thoroughly, a wooden spoon or silicone spatula helps incorporate ingredients evenly without overworking the dough.
- Kitchen Scale (Optional but Recommended)
For precise baking, especially with flour, a digital kitchen scale ensures accurate weights for perfect texture and rise every time.
- Loaf Pan or Baking Sheet
The dough can be baked in a standard 9×5 inch loaf pan for a traditional shape or on a baking sheet for a more rustic freeform loaf.
- Clean Kitchen Towel or Plastic Wrap
Cover the dough with a clean kitchen towel or plastic wrap during the rising period to retain warmth and moisture.
- Oven Mitts
Use sturdy oven mitts to safely handle the hot loaf pan or baking sheet.
- Cooling Rack
After baking, transfer the bread onto a cooling rack to let air circulate around the loaf, preventing sogginess and preserving the crust.
| Equipment | Purpose |
|---|---|
| Mixing Bowl | Combine and rise dough |
| Measuring Cups/Spoons | Accurate measurement of ingredients |
| Wooden Spoon/Spatula | Mix dough without overworking |
| Kitchen Scale | Precisely measure ingredients (optional but useful) |
| Loaf Pan/Baking Sheet | Shape the bread for baking |
| Kitchen Towel/Wrap | Cover dough during rising |
| Oven Mitts | Safely handle hot equipment |
| Cooling Rack | Cool bread evenly after baking |
Preparations Before Baking
Proper preparations before baking are crucial for achieving the perfect 5 Ingredient Bread Recipe with Honey. Paying close attention to measurements and dough preparation sets the foundation for a tender, flavorful loaf.
Measuring Ingredients
Accurate measuring of ingredients ensures consistent results and the ideal bread texture. We recommend using a kitchen scale for precision, especially with flour, as volume measurements can vary.
| Ingredient | Measurement | Notes |
|---|---|---|
| Active dry yeast | 2 1/4 teaspoons (1 packet) | Verify freshness |
| Warm water | 1 1/2 cups (about 110°F) | Use a thermometer for accuracy |
| All-purpose flour | 3 1/2 cups (about 420g) | Spoon and level for accuracy |
| Salt | 1 teaspoon | Use fine sea salt or kosher salt |
| Honey | 2 tablespoons | Use pure honey for best flavor |
Pro Tip: Use the spoon-and-level method if weighing ingredients isn’t possible. Dip a spoon into the flour, fill the measuring cup, then level it off with a knife.
Preparing the Dough
We begin by activating the yeast to ensure it’s alive and ready to work its magic. Combine the warm water with active dry yeast and let it sit for 5 to 10 minutes until bubbly and foamy.
Next, in a large mixing bowl, whisk together the flour and salt thoroughly. Create a well in the center to pour the yeast mixture and honey.
Steps to prepare the dough:
- Mix the yeast mixture and honey into the flour and salt gradually.
- Use a wooden spoon or silicone spatula to stir from the edges inward until a shaggy dough forms.
- Turn the dough onto a floured surface and knead gently for about 8 to 10 minutes until smooth and elastic.
- Place the dough in a lightly oiled bowl, cover it with a clean kitchen towel or plastic wrap.
- Let it rise in a warm, draft-free environment until it doubles in size, approximately 1 to 1 1/2 hours.
A properly prepared dough feels slightly tacky but should not stick excessively to our hands or the work surface. This consistency helps create that tender crumb that our honey bread is known for.
Instructions for Making 5 Ingredient Bread With Honey
Follow these clear and detailed steps to create a moist and tender 5 Ingredient Bread with Honey that delivers a perfect balance of sweetness and texture.
Mixing the Dough
- In a large mixing bowl, combine 2 1/4 teaspoons of active dry yeast with 1 1/4 cups of warm water (110°F). Stir gently and let it sit for 5-10 minutes until the yeast activates and bubbles form.
- Add 3 cups of all-purpose flour, 1 teaspoon of salt, and 2 tablespoons of honey to the yeast mixture.
- Using a wooden spoon or silicone spatula, mix all ingredients until a rough dough forms.
- Transfer the dough to a lightly floured surface and knead for 8 to 10 minutes until smooth and slightly tacky but not sticky. If the dough sticks excessively, sprinkle a little more flour as needed.
Tip: Proper kneading develops gluten ensuring a tender crumb and even rise.
First Rise
- Lightly oil a large bowl and place the dough inside.
- Cover the bowl with a clean kitchen towel or plastic wrap to lock in moisture.
- Let the dough rise in a warm, draft-free spot for 1 to 1 ½ hours or until it doubles in size.
| Step | Time | Condition |
|---|---|---|
| Yeast Activation | 5-10 minutes | Warm water (110°F) |
| First Rise | 60-90 minutes | Warm and covered |
“Patience here guarantees that airy, soft texture we want.”
Shaping the Bread
- Once risen, gently punch down the dough to release excess air.
- Turn it onto a lightly floured surface.
- Shape the dough into a round loaf or form it to fit your loaf pan.
- Place the shaped dough onto a greased baking sheet or inside the loaf pan.
Second Rise
- Cover the dough again with a kitchen towel or plastic wrap.
- Allow it to rise for 30-45 minutes until it puffs up noticeably but not doubles.
- Preheat the oven to 375°F (190°C) during the last 15 minutes of this rise to ensure it’s ready for baking.
Baking the Bread
- Place the risen dough on the middle oven rack.
- Bake for 30-35 minutes until the crust turns a rich golden brown and the bread sounds hollow when tapped.
- For an extra crunchy crust, place a small oven-safe dish with water on the bottom rack to create steam.
- Remove the bread with oven mitts and transfer to a wire rack.
- Let it cool completely before slicing to preserve its structure and moisture.
Tips for Perfect 5 Ingredient Honey Bread
To bake the perfect 5 ingredient honey bread, we must focus on key techniques that bring out both the texture and flavor. Here are essential tips to ensure each loaf rises beautifully, tastes balanced, and boasts a tender crumb.
1. Choose the Right Water Temperature for Yeast Activation
Use warm water between 105°F and 110°F to activate the yeast. Water hotter than 115°F can kill the yeast while cooler water slows the fermentation process. We recommend using a kitchen thermometer for accuracy.
| Water Temperature | Effect on Yeast |
|---|---|
| Below 95°F | Slow rise, weak yeast |
| 105°F–110°F | Ideal activation |
| Above 115°F | Kills yeast, no rise |
“Proper yeast activation sets the foundation for a perfect rise.”
2. Measure Ingredients with Precision
Accurate measurement is critical. We always use a kitchen scale for flour and honey to guarantee consistent results. Slight variations can affect dough hydration and sweetness balance.
3. Knead Until Dough Is Smooth but Slightly Tacky
Kneading develops gluten, creating structure and chew. Stop kneading when the dough feels smooth yet slightly tacky, not sticky. This balance ensures the finished bread is moist and tender without being gummy.
4. Give the Dough Enough Time to Rise
Patience is key. Allow the dough to rise in a warm, draft-free environment until it doubles in size. This first rise typically takes about 1 to 1.5 hours. Avoid rushing; under-proofed dough leads to dense bread.
5. Don’t Skip the Second Rise
After shaping, let the dough rest again for 30 to 45 minutes. This second rise relaxes the gluten and develops flavor, resulting in a lighter loaf with an open crumb.
6. Bake with Steam or a Water Bath
To achieve a golden crust with a slight crunch, place a shallow pan of hot water in the oven during the first 10 minutes of baking. The steam keeps the surface moist while helping with oven spring.
7. Cool on a Wire Rack
After baking, cool the bread fully on a wire rack. This step stops the cooking process and allows excess moisture to escape, preventing a soggy bottom crust.
By following these tips for perfect 5 ingredient honey bread, we harness the natural sweetness of honey and simple ingredients to create a loaf bursting with flavor and tender crumb every time.
Serving Suggestions
Our 5 Ingredient Bread Recipe with Honey yields a versatile loaf that pairs beautifully with a variety of toppings and dishes. To enhance your enjoyment of this moist, tender bread, consider the following serving ideas:
Classic Butter and Honey Drizzle
- Warm a slice slightly to bring out the soft texture.
- Spread a generous pat of butter to melt into the crumb.
- Drizzle pure honey on top for an extra touch of sweetness that complements the natural honey in the bread.
Savory Sandwich Base
- Use thick slices to build sandwiches with fresh vegetables, sliced cheese, and deli meats.
- Add mustard or mayonnaise to balance the sweetness.
- Toast lightly for added crunch and flavor complexity.
Sweet Breakfast Toast
- Toast slices until golden brown.
- Top with cream cheese and seasonal fruit preserves or fresh berries.
- Sprinkle with chopped nuts for texture and richness.
Accompaniment for Soups and Salads
- Serve warm bread slices alongside hearty soups such as tomato basil or butternut squash.
- Pair with crisp green salads and vinaigrettes to contrast the soft, slightly sweet notes of the bread.
Table of Flavor Pairings
| Serving Style | Suggested Add-ons | Flavor Notes |
|---|---|---|
| Classic Butter & Honey | Butter, Honey | Rich, sweet, and creamy |
| Savory Sandwich | Cheese, Vegetables, Mustard | Balanced sweet and savory |
| Sweet Breakfast | Cream cheese, Fruit preserves, Nuts | Fruity, creamy, and crunchy |
| Soup & Salad Side | Olive oil, Fresh herbs | Complementary and refreshing |
“The subtle honey undertones in our bread make every bite a harmony of sweet and savory, perfect for diverse serving options.”
We find that serving this bread slightly warm maximizes its moisture and flavor while allowing the natural honey aroma to shine through. Pair your loaf with these suggestions to elevate your homemade bread experience.
Storing and Shelf Life
To keep our 5 Ingredient Bread Recipe With Honey fresh and delicious, proper storage is essential. Here’s how we can maintain its texture and flavor over time.
Room Temperature Storage
- Wrap the cooled bread tightly in plastic wrap or place it in an airtight container.
- Store at room temperature away from direct sunlight or heat.
- Use within 2 to 3 days for optimal freshness and softness.
Refrigeration
- Avoid refrigerating if possible as it can dry out the bread faster.
- If needed, wrap the bread in plastic wrap and then foil to prevent moisture loss.
- Keep in the fridge up to 1 week but expect slight firmness in the crumb.
Freezing for Longer Shelf Life
- Slice the bread before freezing for easy portioning.
- Wrap slices or the whole loaf tightly in plastic wrap then a layer of foil or place in a freezer bag.
- Freeze for up to 3 months without significant loss of flavor or texture.
- To thaw, leave at room temperature for 1–2 hours or toast slices directly from frozen.
Shelf Life Summary Table
| Storage Method | Wrap Type | Duration | Notes |
|---|---|---|---|
| Room Temperature | Plastic wrap or airtight container | 2–3 days | Best for immediate consumption |
| Refrigeration | Plastic wrap + foil | Up to 1 week | May dry out crumb |
| Freezing | Plastic wrap + foil, freezer bag | Up to 3 months | Slice before freezing for convenience |
“Honey helps keep the bread moist by retaining moisture, which slightly extends its freshness compared to regular bread.“
By following these storage tips, we can savor our homemade honey bread’s tender crumb and subtle sweetness every time we enjoy it.
Conclusion
Baking this 5 Ingredient Bread with Honey is a rewarding experience that fits perfectly into our busy lives. With just a few simple ingredients and straightforward steps, we can create a loaf that’s both tender and flavorful. The subtle sweetness from honey adds a unique touch that elevates every bite.
By mastering this recipe, we open the door to endless possibilities in the kitchen—from quick breakfasts to savory sandwiches. It’s proof that homemade bread doesn’t have to be complicated to be delicious. Let’s keep enjoying the simple pleasures of baking and sharing fresh bread made with love.
Frequently Asked Questions
What are the main ingredients needed for the 5 Ingredient Honey Bread?
The main ingredients are active dry yeast, warm water, all-purpose flour, salt, and honey. These simple ingredients combine to create a tender, moist loaf with a subtle sweetness.
How do I activate yeast properly for this bread recipe?
Activate the yeast by dissolving it in warm water (around 100-110°F). Let it sit for 5-10 minutes until it becomes frothy. This ensures proper rising of the dough.
Can beginners easily make this bread at home?
Yes, this recipe is designed to be simple and perfect for beginners and busy bakers. The steps are straightforward, making homemade bread easy and enjoyable.
Why is honey used in this bread recipe?
Honey adds natural sweetness and helps keep the bread moist and tender, enhancing both flavor and texture.
What equipment do I need for baking this bread?
Essential tools include a large mixing bowl, measuring cups/spoons or a kitchen scale, a wooden spoon or silicone spatula, a loaf pan or baking sheet, oven mitts, and a wire rack for cooling.
How should I knead the dough for the best results?
Knead until the dough feels smooth but slightly tacky—not sticky. This consistency leads to a soft crumb and a well-risen loaf.
What is the best way to rise and bake the bread?
Allow the dough to rise twice: once after mixing and once after shaping. Bake at the recommended temperature until golden with a crunchy crust. Patience during rising yields airy bread.
How do I store this honey bread to keep it fresh?
Store at room temperature wrapped tightly for 2-3 days, refrigerate for up to a week, or freeze in an airtight bag for longer storage. Always cool completely before storing.
What are some serving ideas for the honey bread?
Enjoy it warm with butter and honey, use it for sandwiches, toast it for breakfast with jam, or serve alongside soups and salads for a tasty complement.
Can I make this bread without a kitchen scale?
While a kitchen scale is recommended for accuracy, you can use measuring cups and spoons carefully to achieve good results in this simple recipe.