
Brewing our own beer at home has never been easier or more fun thanks to 1 gallon beer recipe kits. These compact kits give us everything we need to craft small batches of delicious beer without overwhelming equipment or complicated processes. Whether we’re beginners or seasoned brewers looking to experiment, these kits offer a perfect way to explore different flavors and styles.
Using a 1 gallon kit means we can brew fresh beer in manageable quantities, ideal for testing new recipes or brewing just enough for a small gathering. Plus, the step-by-step instructions simplify the process so we can focus on enjoying the craft. Let’s dive into how these kits work and why they’re a great choice for anyone eager to start brewing quality beer at home.
What Are 1 Gallon Beer Recipe Kits?
1 Gallon Beer Recipe Kits are all-in-one homebrewing packages designed for crafting small, manageable batches of beer. These kits usually contain pre-measured ingredients and the essential equipment needed to brew approximately one gallon of beer. This size is perfect for those who want to experiment with flavors or styles without committing to larger volumes.
Components of 1 Gallon Beer Recipe Kits
Each kit typically includes:
- Malt Extract or Malt Extract Syrup — the fermentable sugar base for brewing
- Hops — for bitterness, flavor, and aroma
- Yeast — to ferment sugars and produce alcohol
- Priming Sugar — for carbonation during bottle conditioning
- Brewing Equipment — such as a fermenter jug, airlock, funnel, sanitizer, and sometimes bottles
The pre-measured ingredients and step-by-step instructions simplify the brewing process.
Why Choose 1 Gallon Beer Recipe Kits?
| Advantage | Description |
|---|---|
| Portability | Small batches fit easily in kitchens or tight spaces |
| Experimentation | Perfect size to test new recipes without waste |
| Cost-Effective | Lower ingredient cost and less loss if batch fails |
| Beginner-Friendly | Straightforward instructions make brewing accessible |
| Quick Turnaround | Smaller volume means faster fermentation and sampling |
How We Use 1 Gallon Beer Recipe Kits
- Sanitize all equipment to ensure no contamination.
- Boil the malt extract and hops as instructed to extract flavors.
- Cool the wort rapidly before pitching the yeast.
- Ferment in the included jug sealed with an airlock for about one to two weeks.
- Bottle with priming sugar for carbonation and cap securely.
- Age the bottles for a few weeks to develop flavor.
By using a 1 Gallon Beer Recipe Kit, we control every step with precision, resulting in fresh, flavorful beer at home.
Ingredients
To craft exceptional batches using 1 Gallon Beer Recipe Kits, precise measurements and quality ingredients are essential. Below we break down the basic ingredients you will find in these kits and the optional add-ins that elevate your brew to the next level.
Basic Ingredients in 1 Gallon Beer Recipe Kits
The foundation for every small batch brewed with these kits includes:
- Malt Extract: Usually liquid or dry, this provides fermentable sugars and the beer’s body. It acts as the base malt.
- Hops: Dried flower cones or pellets that add bitterness, aroma, and flavor profiles such as citrus, floral, pine, or spice.
- Yeast: Typically ale or lager strains designed for 1 gallon batches, critical for fermentation and alcohol production.
- Priming Sugar: A measured amount to carbonate the beer naturally during bottling.
- Water: Approximately 1 gallon of clean, filtered water as the brewing solvent.
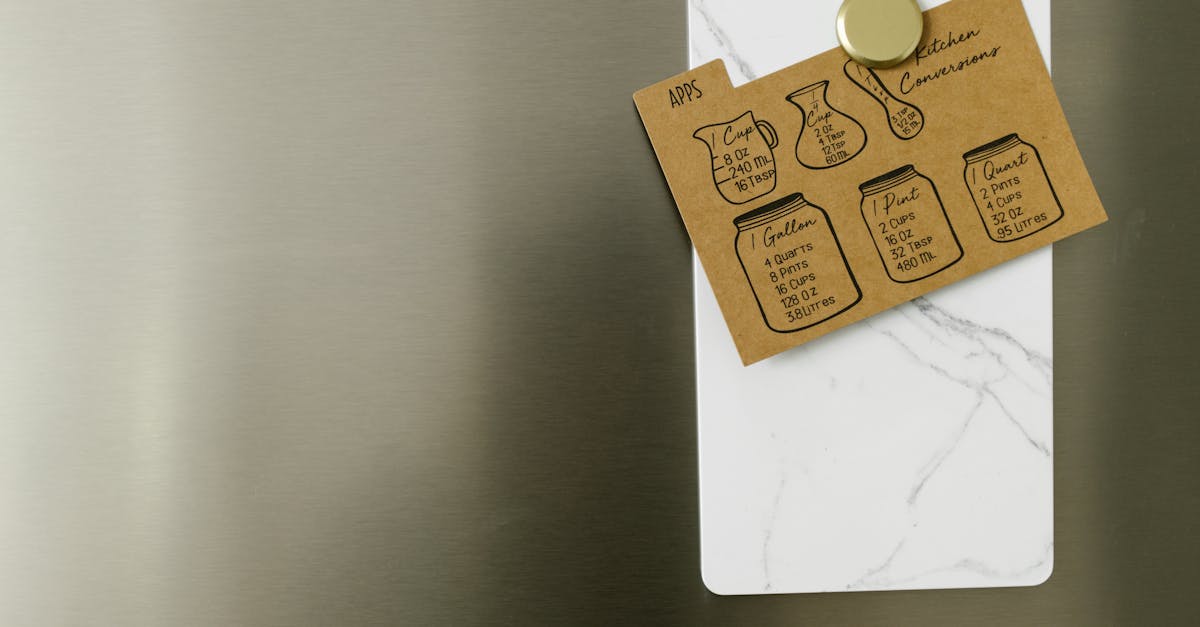
| Ingredient | Purpose | Typical Quantity per 1 Gallon Kit |
|---|---|---|
| Malt Extract | Sugar source, flavor, body | 1 to 1.5 lbs |
| Hops | Bitterness and aroma | 0.25 to 1 oz |
| Yeast | Fermentation agent | 1 packet (5 to 7 g) |
| Priming Sugar | Carbonation | 2 to 3 oz |
| Water | Brewing medium | ~1 gallon |
Optional Add-Ins and Flavor Enhancers
To customize and refine your brew, 1 Gallon Beer Recipe Kits often recommend these additions:
- Specialty Grains: Crushed malts like caramel, roasted, or chocolate grains steeped for extra color and flavor complexity.
- Flavor Extracts: Add natural or artificial extracts such as vanilla, coffee, or fruit essences to tailor your beer.
- Adjunct Sugars: Honey, maple syrup, or Belgian candi sugar to boost alcohol content and flavor diversity.
- Spices and Herbs: Coriander, orange peel, or ginger can be added during boil or fermentation for aromatic layers.
- Clarifiers: Irish moss or gelatin to improve beer clarity and presentation.
We find that experimenting with these optional ingredients can make each batch uniquely ours while still leveraging the convenience of the pre-measured basic kit components.
Equipment Needed for Brewing
To brew 1 gallon beer recipe kits successfully, gathering the right equipment is crucial. The tools we use ensure precise, clean, and efficient brewing, transforming simple ingredients into delicious craft beer. Below, we detail the essential brewing tools and sanitizing supplies that form the backbone of our homebrewing setup.
Essential Brewing Tools
When brewing a 1 gallon batch, the following equipment is indispensable. Each item helps us maintain control over the brewing process from start to finish, delivering the best possible results.
- 1 Gallon Fermentation Vessel: Typically a glass or food-grade plastic carboy or jug with an airlock to allow CO₂ to escape while preventing contaminants.
- Airlock and Bung: Creates a sealed environment for fermentation while releasing gases.
- Brewing Spoon: A long-handled stainless steel or food-grade plastic spoon for stirring the brew without contamination.
- Measuring Cup and Spoon: For accurate measurement of water and ingredients.
- Thermometer: A brewing thermometer ensures we maintain the correct temperatures during mashing, boiling, and fermenting.
- Hydrometer: Measures specific gravity before and after fermentation to track alcohol content and fermentation progress.
- Funnel: Helps transfer liquids cleanly into the fermentation vessel.
- Kitchen Scale: For precise measurement of dry ingredients when modifying the recipe.
- Brewing Pot (at least 2 gallons): Used for boiling the malt extract and hops; needs to accommodate the full volume plus boil-over space.
- Bottling Supplies:
- Bottles: Usually 12 oz or 16 oz glass bottles.
- Capper and Caps: For securely sealing bottles after priming.
- Siphoning Tube: Enables transfer of beer from fermenter to bottles while minimizing oxidation.
| Equipment | Purpose | Notes |
|---|---|---|
| 1 Gallon Fermentation Vessel | Holds fermenting beer | Glass preferred for purity |
| Airlock and Bung | Maintains airlock system | Prevents contamination |
| Brewing Spoon | Stirring ingredient mixtures | Stainless steel or food-safe plastic |
| Thermometer | Monitors brewing temperature | Digital preferred for accuracy |
| Hydrometer | Measures beer gravity for fermentation tracking | Essential for ABV calculation |
| Brewing Pot | Boiling wort | At least 2 gallons capacity |
| Funnels | Transfers liquids without spills | Food-grade plastic or stainless |
| Kitchen Scale | Measures dry ingredients | Accurate to 0.1 grams |
| Bottles & Capper | Bottling and sealing beer | Reuse glass bottles for sustainability |
Sanitizing Supplies
Sanitization is critical in brewing to prevent infection and off-flavors. Our 1 gallon beer recipe kits require diligent cleaning and sanitizing of every tool and container before and after use.
- No-Rinse Sanitizer: Products such as Star San or iodophor provide effective sanitization without additional rinsing, saving time and reducing contamination.
- Sanitizing Solution Bucket: A dedicated container for soaking small items like airlocks, spoons, and caps.
- Clean Towels or Paper Towels: Used to handle sanitized equipment with clean hands.
- Rubber Gloves (optional): Protect hands and prevent contamination during cleaning.
- Dish Soap: For initial cleaning before sanitizing.
“Sanitizing is the foundation of every successful batch, especially when working with small volumes like a gallon. A single contaminant can spoil the entire brew.”*
| Sanitizing Item | Purpose | Usage Tips |
|---|---|---|
| No-Rinse Sanitizer | Kills bacteria and wild yeast | Mix as per instructions and air dry |
| Sanitizing Bucket | Soaking small equipment | Use fresh solution before each batch |
| Clean Towels | Handling sanitized tools | Use only once to avoid cross-contamination |
| Dish Soap | Removes dirt and organic material | Rinse thoroughly before sanitizing |
With these tools and sanitizing supplies, we create an ideal environment to brew, ferment, and bottle our 1 gallon beer recipe kits with confidence and care.
Preparing Your Brewing Space
Creating an ideal environment is crucial when working with 1 Gallon Beer Recipe Kits. A clean, organized, and well-equipped brewing space sets the foundation for a successful and enjoyable brewing session. Below are the key steps we follow to prepare our area before starting the brew.
Step 1: Choose a Clean, Draft-Free Location
Select a space that is away from direct sunlight and temperature fluctuations. A clean countertop, kitchen table, or dedicated brewing station works well. Ensure the area is free from dust and debris to minimize the risk of contamination.
Step 2: Sanitize Your Surfaces
Before placing any equipment, thoroughly sanitize the preparation surface using a no-rinse sanitizer. This step eliminates unwanted bacteria and wild yeast that can spoil the beer. Wipe down counters, tables, and any tools you will handle.
Step 3: Organize Brewing Equipment and Ingredients
Lay out all necessary equipment such as the fermentation vessel, airlock, brewing spoon, thermometer, and bottle caps. Arrange the pre-measured ingredients from the 1 gallon kit including malt extract, hops, yeast, and priming sugar nearby for easy access.
| Equipment | Purpose |
|---|---|
| Fermentation vessel | Holds wort during fermentation |
| Airlock | Allows CO2 escape while preventing contaminants |
| Brewing spoon | Stirring ingredients |
| Thermometer | Monitoring temperature |
| Bottle caps & capsper | Sealing bottles securely |
Step 4: Prepare Sanitizing Solution for Equipment
Set up a bucket or container with your no-rinse sanitizing solution. Immerse fermentation vessel, airlock, bottles, and any utensils you’ll be using for at least 2 minutes to ensure full coverage. Remember “Sanitation is the foundation of all good brewing.”
Step 5: Check Temperature Controls
Keep a thermometer on hand and verify that your brewing space is within the optimal temperature range for fermentation. Typically, this is between 65–72°F (18–22°C) depending on yeast strain requirements.
Tips for an Efficient Brewing Space:
- Use trays or mats to catch spills and simplify cleanup.
- Label bottles or containers if brewing multiple kits or flavors.
- Keep a trash bin close for quick disposal of packaging and waste.
By thoughtfully preparing our brewing space, we prevent contamination, streamline the brewing process, and set ourselves up for producing fresh, flavorful beer from our 1 gallon kits every time.
Step-by-Step Brewing Instructions
Brewing with 1 Gallon Beer Recipe Kits is a rewarding process that becomes easy to follow when broken down into clear stages. Let’s walk through each step to ensure we get the freshest and most flavorful homebrew possible.
Prep Stage: Setting Up Your Ingredients and Equipment
Before we start brewing, it’s essential to organize everything for efficiency and cleanliness.
- Sanitize all brewing equipment using a no-rinse sanitizer. This step is crucial to avoid contamination.
- Lay out the 1 gallon beer recipe kit ingredients: malt extract, hops, yeast, priming sugar, and any optional flavorings.
- Prepare your brewing vessel, airlock, stirring spoon, and thermometer within easy reach.
- Fill a clean container with approximately 1.5 gallons of fresh water to compensate for evaporation during boiling and losses during transfer.
| Item | Preparation Tip |
|---|---|
| Brewing Vessel | Clean and sanitize thoroughly |
| Malt Extract | Keep sealed until use |
| Yeast | Store refrigerated until ready |
| Priming Sugar | Measure accurately for carbonation |
| Thermometer | Ensure accuracy for temperature |
“A clean and organized brewing space forms the backbone of a successful 1 gallon beer kit batch.”
Brew Stage: Brewing the Beer
Now we begin crafting our beer starting with the brew.
- Heat water to about 150°F in your brewing vessel.
- Slowly add the malt extract while stirring to dissolve fully and avoid scorching.
- Once dissolved, bring the mixture to a rolling boil.
- Add hops according to the kit’s schedule, typically at the beginning of the boil for bitterness and towards the end for aroma.
- Boil the wort for the recommended time, usually about 60 minutes, stirring occasionally.
- After boiling, quickly cool the wort using an ice bath or immersion cooler until it reaches around 70°F.
This cooling step prevents unwanted bacterial growth and prepares your wort for yeast pitching.
Fermentation Stage: Fermenting Your Beer
After boiling and cooling, it’s time to ferment.
- Transfer the cooled wort into your sanitized fermentation vessel.
- Pitch the yeast evenly over the wort surface.
- Seal the fermenter with the airlock filled with sanitized water or sanitizer solution.
- Store the fermenter in a dark, stable temperature environment, ideally between 65°F and 72°F.
- Allow fermentation to proceed for about 7 to 14 days until bubbling ceases or specific gravity readings stabilize.
| Fermentation Factor | Recommended Range |
|---|---|
| Temperature | 65°F to 72°F |
| Time | 7 to 14 days |
| Airlock Activity | Should bubble actively at first, then slow down |
“Patience during fermentation results in a clearer, smoother, and more flavorful beer.”
Bottling Stage: Packaging Your Brew
Once fermentation is complete, it’s time to bottle and carbonate the beer.
- Prepare and sanitize bottles and caps thoroughly.
- Boil the priming sugar in a small amount of water. Let cool slightly.
- Gently add the priming sugar solution to the beer to initiate carbonation during bottle conditioning.
- Carefully siphon or pour beer into bottles, leaving about an inch of headspace.
- Cap the bottles securely.
- Store bottles at room temperature (65°F – 70°F) for 10-14 days for carbonation.
- Chill and enjoy your fresh batch brewed with the 1 gallon beer recipe kit.
Tips for Brewing Success with 1 Gallon Beer Recipe Kits
Mastering the art of brewing with 1 gallon beer recipe kits requires attention to detail and consistent practice. Below are essential tips to ensure our small-batch brewing yields delicious results every time.
1. Prioritize Sanitation Throughout Brewing
Sanitation is the cornerstone of brewing success. Even minor contamination can spoil an entire batch.
- Use a no-rinse sanitizer for all equipment that contacts the wort, yeast, or finished beer.
- Sanitize hands before handling sterile materials.
- Keep brewing surfaces clean and free from dust and spills.
“Good sanitation isn’t optional; it’s the difference between a great beer and a wasted batch.”
2. Control Fermentation Temperature
Fermentation temperature dramatically affects yeast performance and beer flavor.
- Maintain fermentation between 65°F and 72°F (18°C to 22°C) for ale yeasts, unless otherwise specified.
- Use a thermometer with your fermentation vessel or place it in a temperature-controlled area.
- Avoid temperature swings by keeping the fermenter away from direct sunlight or drafts.
| Temperature Range | Yeast Type | Effect on Beer Flavor |
|---|---|---|
| 65°F – 72°F | Ale Yeast | Balanced, clean flavors |
| Below 65°F | Ale Yeast | Slow fermentation, possible off-flavors |
| Above 72°F | Ale Yeast | Fruity esters or undesirable fusel oils |
3. Accurately Measure and Follow Recipe Ingredients
Using the pre-measured ingredients as provided is crucial:
- Add malt extract, hops, yeast, and priming sugar exactly as instructed.
- Deviating from amounts or timing can affect bitterness, alcohol level, and carbonation.
- If experimenting, make small changes in future batches to isolate effects.
4. Optimize Wort Cooling
Rapidly cooling the wort after the boil prevents bacterial contamination and promotes clearer beer.
- Use an ice bath or a wort chiller immediately after boiling.
- Bring the wort temperature down to yeast pitching range (about 70°F / 21°C).
- Avoid letting the wort sit uncovered to reduce exposure to airborne microbes.
5. Pitch Fresh Yeast at the Right Time
Yeast health is key to fermentation vigor:
- Rehydrate dry yeast if recommended on instructions.
- Pitch yeast when wort temperature is within the yeast’s ideal range.
- Stir gently after pitching to evenly distribute yeast cells.
6. Use the Right Equipment and Follow Setup Protocols
Having proper brewing tools makes all the difference:
- Use a dedicated 1 gallon fermenter with airlock to prevent oxygen contamination while allowing CO₂ release.
- Employ a sanitized siphon or bottling wand for clean transfer to bottles.
- Maintain an organized setup to avoid cross-contamination or mix-ups.
Summary Table: Critical Brewing Factors for 1 Gallon Kits
| Factor | Best Practice | Result |
|---|---|---|
| Sanitation | Sanitize all contact surfaces and tools | Prevent infections and off-flavors |
| Fermentation temp | Maintain 65°F–72°F (18°C–22°C) | Balanced yeast activity and flavor |
| Ingredient handling | Use exact ingredient amounts | Consistent bitterness and alcohol levels |
| Wort cooling | Rapidly chill wort post-boil | Cleaner taste and safer fermentation |
| Yeast pitching | Pitch healthy yeast at correct temperature | Complete, vigorous fermentation |
| Equipment | Use dedicated sanitized fermenter and tools | Minimize contamination risks |
Implementing these proven tips will help us take full advantage of our 1 gallon beer recipe kits, empowering us to produce fresh and flavorful small-batch beer with confidence.
Troubleshooting Common Issues
When working with 1 gallon beer recipe kits, encountering challenges is part of the learning process. Addressing these issues promptly helps us achieve consistently excellent brews. Below are common problems with clear solutions that keep our small-batch brewing on track.
1. Slow or No Fermentation
Symptoms: Little to no bubbling in the airlock after the first 48 hours, flat beer after bottling.
Causes and Solutions:
- Inactive yeast: Check the yeast expiration date before use. Use fresh, properly stored yeast.
- Incorrect fermentation temperature: Maintain a steady temperature between 65°F and 72°F for ales. Too cold slows yeast activity; too hot can create off-flavors.
- Insufficient oxygen: Aerate wort thoroughly before pitching yeast to supply oxygen needed for fermentation.
- Improper pitching time: Pitch yeast as soon as the wort cools to around 70°F to promote vitality.
2. Off-Flavors or Unpleasant Aromas
Off-flavors may result from contamination or fermentation stress.
| Common Off-Flavor | Possible Cause | Prevention/Treatment |
|---|---|---|
| Diacetyl (buttery) | Premature yeast to rest stage | Extend fermentation by a few days to allow cleanup |
| Acetaldehyde (green apple) | Under-fermentation or yeast stress | Ensure complete fermentation, proper yeast pitch rate |
| Phenolic (clove) | Wild yeast or bacteria growth | Sanitize all equipment thoroughly, use no-rinse sanitizer |
| Sulfur (rotten egg) | Yeast strain or low oxygen | Proper aeration and yeast nutrition |
3. Cloudy Beer After Bottling
Causes:
- Residual yeast or protein haze
- Insufficient cold conditioning
- Over-priming causing yeast suspension
Solutions:
- Cold condition bottles at 35°F to 45°F for several days before serving.
- Use fining agents like Irish moss or gelatin during boil or fermentation to clarify.
- Avoid excessive priming sugar to prevent over-carbonation and yeast disturbance.
4. Low or No Carbonation
Symptoms: Flat beer even after recommended conditioning time.
Potential Causes and Fixes:
- Under-priming: Verify priming sugar amount matches 1-gallon batch.
- Insufficient bottling temperature: Store bottles at room temperature (68°F to 75°F) during carbonation.
- Bottled too early: Allow full fermentation to complete before bottling.
| Priming Sugar Amount (for 1 gallon) | Carbonation Level |
|---|---|
| 1 tsp | Low carbonation |
| 2 to 2.5 tsp | Moderate carbonation (ideal) |
| >3 tsp | Risk of over-carbonation |
5. Infection Signs in Fermentation
Indicators: Unpleasant sour or funky aroma, unusual film or pellicle on the surface.
Prevention Tips:
- Double sanitize all equipment touching the wort or beer.
- Use no-rinse sanitizers following manufacturer instructions.
- Avoid opening fermentation vessel unnecessarily.
“Sanitation is the first line of defense. Treat it like a ritual for every batch.”
By spotting these issues early and applying straightforward remedies, we empower ourselves to master the 1 gallon beer recipe kits process and craft small-batch beers that delight every time.
Storing and Aging Your Beer
Proper storing and aging are crucial for unlocking the full potential of our 1 gallon beer recipe kits. After bottling, we want to ensure the beer matures under the best conditions to develop its flavors and carbonation.
Ideal Storage Conditions
We store our bottles in a cool, dark place away from direct sunlight, maintaining a consistent temperature between 65°F and 75°F (18°C to 24°C). Fluctuations in temperature can stress the yeast and negatively impact flavor. Avoid storing beer near heat sources or areas exposed to excessive vibration.
| Storage Parameter | Ideal Range | Reason |
|---|---|---|
| Temperature | 65°F – 75°F (18°C – 24°C) | Optimal yeast activity and flavor aging |
| Light Exposure | None (dark space) | Prevents lightstruck “skunky” off-flavors |
| Humidity | Moderate (~50-70%) | Protects bottle caps and labels |
| Vibration | Minimal to none | Avoids disturbing yeast sediment |
Duration for Aging
Most beers brewed from 1 gallon kits reach peak flavor between 2 to 4 weeks after bottling. However, some styles benefit from extended aging:
- Lighter ales and lagers: Enjoy after 2–3 weeks.
- Stronger ales, stouts, and porters: May improve with 4–6 weeks of aging.
- Specialty or high-alcohol styles: Sometimes better with 2+ months.
During aging, we should position bottles upright to allow yeast sediment to settle at the bottom. This prevents off-flavors and promotes clarity when poured.
Monitoring Carbonation
Priming sugar added during bottling produces CO₂, carbonating the beer inside the bottle. To ensure proper carbonation:
- Store bottles at stable temperatures.
- Avoid premature chilling; allow at least 10–14 days at room temperature.
- Once fully carbonated, refrigerate bottles before tasting.
Signs Your Beer is Ready
“Patience is key.” With time, beer transforms from a freshly bottled brew into a well-rounded, flavorful beverage.
Indicators your beer is ready include:
- Clear to translucent appearance, depending on style.
- Balanced aroma free of sulfur or off-smells.
- Crisp carbonation that gently fizzes when poured.
- Flavors from hops, malt, and yeast fully integrated.
Storing Opened Bottles
If we open a bottle and want to keep leftovers:
- Use a clean reusable bottle cap.
- Refrigerate immediately.
- Consume within 24–48 hours to maintain freshness and carbonation.
By following these storing and aging practices, we maximize the quality of our beers brewed with 1 gallon beer recipe kits and enjoy richly crafted flavors batch after batch.
Serving Suggestions
Enjoying our 1 gallon beer recipe kits starts with serving the beer at its best. Here are key steps and tips to enhance the beer tasting experience:
1. Optimal Serving Temperature
Pour your beer chilled within the ideal temperature range to maximize flavor:
| Beer Style | Serving Temperature (°F) | Serving Temperature (°C) |
|---|---|---|
| Lagers & Pilsners | 38-45 | 3-7 |
| Ales & IPAs | 45-55 | 7-13 |
| Stouts & Porters | 50-55 | 10-13 |
Serving beer too cold masks flavors, while too warm can accentuate unwanted bitterness. We recommend using a thermometer to monitor precise temperatures before serving.
2. Choose the Right Glassware
Glass shape affects aroma, carbonation, and appearance. Here are our top choices for your small-batch brews:
- Pint Glass: Versatile for many ale styles.
- Snifter: Ideal for rich, aromatic beers such as porters or stouts.
- Tulip Glass: Excellent for IPAs and Belgian ales to enhance hop aromas.
Using appropriate glassware helps to showcase the full sensory profile of the beer you brewed.
3. Pouring Technique
Follow these steps for the perfect pour:
- Hold your glass at a 45-degree angle.
- Slowly pour the beer down the side to minimize foam.
- When the glass is half full, gradually straighten it upright.
- Aim for a 1 to 1.5-inch foam head to release aromas.
This technique preserves carbonation and highlights the beer’s complexity.
4. Food Pairings
Enhance flavors by pairing your homemade beer with complementary dishes. Here are some classic matches:
| Beer Style | Suggested Food Pairings |
|---|---|
| Light Lagers | Fresh salads, grilled chicken, seafood |
| Pale Ales & IPAs | Spicy foods, burgers, sharp cheeses |
| Stouts & Porters | Chocolate desserts, roasted meats, hearty stews |
| Wheat Beers | Light pasta, fruit-based desserts, mild cheeses |
Pairing thoughtfully elevates both the beer and the meal.
5. Storage After Opening
To keep your beer fresh after opening a bottle:
- Recap using a reusable bottle cap or stopper.
- Refrigerate and consume within 1-2 days.
- Avoid exposure to heat or sunlight to prevent flavor degradation.
Proper storage ensures every sip remains enjoyable.
Conclusion
1 gallon beer recipe kits offer a fantastic way to dive into home brewing with minimal hassle and maximum control. They let us experiment with flavors, perfect our techniques, and enjoy fresh beer without committing to large batches. With the right preparation, equipment, and attention to detail, these kits make brewing accessible and rewarding for everyone.
By embracing small-batch brewing, we can fine-tune recipes and gain confidence before scaling up. Whether we’re new to brewing or seasoned enthusiasts, these kits provide a convenient, cost-effective path to crafting quality beer right at home. Cheers to our brewing adventures ahead!
Frequently Asked Questions
What are 1 gallon beer recipe kits?
1 gallon beer recipe kits are compact home brewing kits containing pre-measured ingredients and essential equipment to brew about one gallon of beer. They include malt extract, hops, yeast, priming sugar, and simple instructions, making brewing easy and accessible.
Who are 1 gallon beer kits best suited for?
These kits are perfect for beginners exploring home brewing and experienced brewers wanting to experiment with small batch recipes without wasting larger volumes.
What ingredients come in a typical 1 gallon beer kit?
Typical ingredients include malt extract, hops, yeast, priming sugar, and water. Optional additives like specialty grains, spices, or flavor extracts can enhance and customize the brew.
What equipment is needed for brewing with these kits?
Essential tools include a fermentation vessel with airlock, brewing spoon, thermometer, sanitizer, and bottling supplies to ensure cleanliness and proper brewing.
How important is sanitization in home brewing?
Sanitization is critical to prevent infections and off-flavors. Using no-rinse sanitizers and thoroughly cleaning all equipment ensures a safe and successful brew.
How long does fermentation usually take with these kits?
Fermentation typically takes 7 to 14 days, depending on the yeast and beer style, followed by 10-14 days of bottle aging for carbonation and flavor development.
Can I customize the beer using 1 gallon kits?
Yes, you can add specialty grains, spices, or flavor extracts along with the kit ingredients to create unique flavor profiles and styles.
What storage conditions are best for aging beer from these kits?
Store bottles in a cool, dark place between 65°F and 75°F with minimal vibration. Avoid light exposure to maintain yeast activity and optimize flavor.
How should I serve beer brewed from 1 gallon kits?
Serve beer chilled at temperatures suited for the style, use the right glassware, and pour gently to preserve carbonation. Pair with complementary foods for a better tasting experience.
What are common brewing problems and how can I fix them?
Common issues include slow fermentation, off-flavors, cloudiness, and low carbonation. Most can be resolved by improving sanitation, controlling temperatures, and following instructions precisely.