
There’s something truly special about Grandma’s gingerbread recipe. It’s a timeless classic that brings warmth and nostalgia to any kitchen. Passed down through generations, this recipe captures the perfect blend of spices and sweetness that makes gingerbread so irresistible.
We love how this gingerbread fills the house with cozy aromas while delivering a soft yet flavorful bite. Whether you’re baking for the holidays or just craving a comforting treat, this recipe never disappoints. Let’s dive into Grandma’s secret to creating gingerbread that tastes like home.
Ingredients
To recreate Grandma’s Gingerbread Recipe with its signature warmth and rich flavor, we carefully select each ingredient to maintain the perfect balance. Below, we break down everything you need into Dry Ingredients, Wet Ingredients, and Spices and Flavorings for clear and easy preparation.
Dry Ingredients
Our gingerbread starts with a solid base of well-measured dry ingredients that form the structure and texture of the cookie:
- 3 cups all-purpose flour, sifted for lightness
- 1 teaspoon baking soda, for the perfect rise
- ¼ teaspoon salt, to enhance flavor depth
- ½ cup brown sugar, packed — adds moisture and a hint of caramel sweetness
| Ingredient | Quantity | Preparation |
|---|---|---|
| All-purpose flour | 3 cups | Sifted |
| Baking soda | 1 teaspoon | Measured precisely |
| Salt | ¼ teaspoon | Fine |
| Brown sugar | ½ cup | Packed |
Wet Ingredients
The wet ingredients bring moisture and richness, allowing us to craft that tender yet chewy bite Grandma’s recipe is renowned for:
- ½ cup unsalted butter, softened to room temperature
- ½ cup molasses, the heart of that traditional gingerbread flavor
- 1 large egg, at room temperature for easier mixing
- 2 tablespoons hot water, to dissolve and distribute the baking soda perfectly
| Ingredient | Quantity | Notes |
|---|---|---|
| Unsalted butter | ½ cup | Softened |
| Molasses | ½ cup | Dark or blackstrap preferred |
| Egg | 1 large | Room temperature |
| Hot water | 2 tablespoons | Freshly boiled |
Spices and Flavorings
No Grandma’s Gingerbread Recipe would be complete without the aromatic spices that create its iconic warm, inviting profile. We use a blend of:
- 2 teaspoons ground ginger, for sharp pungency and heat
- 1 teaspoon ground cinnamon, adding warmth and sweetness
- ½ teaspoon ground cloves, lending a slight smoky depth
- ¼ teaspoon freshly grated nutmeg, for a subtle nutty aroma
| Spice | Quantity | Flavor Profile |
|---|---|---|
| Ground ginger | 2 teaspoons | Pungent, spicy |
| Ground cinnamon | 1 teaspoon | Warm, sweet |
| Ground cloves | ½ teaspoon | Smoky, aromatic |
| Freshly grated nutmeg | ¼ teaspoon | Nutty, slightly sweet |
“The perfect gingerbread is all about the balance of these well-chosen spices and quality ingredients.” Together, these components set the stage for a gingerbread that is rich, flavorful, and irresistibly nostalgic.
Equipment Needed
To bring Grandma’s Gingerbread Recipe to life, having the right equipment makes all the difference. Here is the essential gear we use to ensure perfect results every time:
- Mixing Bowls: At least two medium-sized bowls, one for combining dry ingredients and one for wet ingredients. Glass or stainless steel are ideal for easy mixing and cleaning.
- Measuring Cups and Spoons: Accurate measurement is crucial. Use a complete set to measure flour, sugar, spices, and liquids precisely.
- Electric Mixer or Hand Whisk: An electric mixer speeds up the process and gives a smooth batter. A sturdy hand whisk works fine if you prefer or don’t have an electric mixer.
- Rubber or Silicone Spatula: For scraping down the sides of the bowl ensuring all ingredients are thoroughly incorporated.
- Wooden Spoon: Helpful for initially combining the wet and dry ingredients without overmixing.
- Saucepan: For gently melting butter and heating water with molasses to perfectly meld flavors.
- Baking Pan: A metal or glass 9×9 inch square pan is best for the classic gingerbread thickness and even baking.
- Parchment Paper or Nonstick Spray: To prevent sticking and make cleanup easier.
- Cooling Rack: Essential for allowing the gingerbread to cool evenly and retain texture.
| Equipment | Purpose |
|---|---|
| Mixing Bowls | Combine ingredients separately |
| Measuring Cups/Spoons | Precise ingredient measurement |
| Electric Mixer/Whisk | Efficient mixing |
| Rubber Spatula | Scrape batter from bowl |
| Wooden Spoon | Initial mixing without overmixing |
| Saucepan | Melt butter and warm liquids |
| Baking Pan 9×9 inch | Bake gingerbread evenly |
| Parchment Paper/ Spray | Non-stick surface |
| Cooling Rack | Cool gingerbread to maintain texture |
Tip: We always line our baking pan with parchment paper for smooth removal, keeping the nostalgic shape of Grandma’s gingerbread intact.
With these tools ready, we are perfectly equipped to start crafting that rich, warmly spiced gingerbread that evokes comfort and holiday magic.
Prep Work
Before diving into the mixing and baking, careful Prep Work ensures our Grandma’s Gingerbread Recipe turns out perfectly. Let’s organize our ingredients and prepare our baking space for flawless results.
Measuring Ingredients
Precise measuring sets the foundation for the iconic gingerbread texture and flavor we love. Use the following guidelines to measure with accuracy:
| Ingredient Type | Measuring Tips |
|---|---|
| Dry ingredients | Spoon flour lightly into the cup, level with a knife to avoid packing |
| Brown sugar | Pack firmly into the measuring cup for correct sweetness and moisture |
| Molasses | Use a liquid measuring cup at eye level to measure exactly |
| Butter | Measure using sticks marked with tablespoons or weigh on a kitchen scale |
| Spices | Use level teaspoons for ground ginger, cinnamon, cloves, and nutmeg |
| Hot water | Measure precisely to maintain batter consistency |
| Egg | Crack into a small bowl first to check quality before adding to mix |
Tip: Always measure dry ingredients first to keep your measuring cups clean for liquids, ensuring accuracy in every step.
Preparing the Baking Pan
Prepping our baking pan correctly guarantees the gingerbread releases cleanly and bakes evenly. Follow these steps:
- Use a 9×9 inch baking pan as specified.
- Choose between lining the pan with parchment paper or coating it with a nonstick spray.
Why parchment? It prevents stickiness without the need for extra fat and helps maintain the classic smooth bottom crust of Grandma’s gingerbread.
Step-by-step:
- Cut parchment paper slightly larger than the pan.
- Fit the parchment into the pan, pressing along edges and corners.
- Lightly spray parchment with nonstick spray for easy release.
- If not using parchment, spray the pan thoroughly and dust lightly with flour or cocoa powder for added nonstick protection.
Having the batter ready to pour into this well-prepped pan sets us up for that unmistakable tender crumb and nostalgic flavor that makes Grandma’s gingerbread a family favorite.
Instructions
Follow these steps carefully to bring Grandma’s Gingerbread Recipe to life with authentic flavors and perfect texture.
Making the Gingerbread Dough
- Melt the unsalted butter gently in a saucepan over low heat until just liquefied. Remove from heat.
- In a large mixing bowl, combine brown sugar, molasses, and the melted butter. Stir thoroughly until the mixture is smooth and glossy.
- Beat in the egg until fully incorporated.
- Slowly add the hot water, mixing constantly to maintain a smooth batter.
- In a separate bowl, whisk together the dry ingredients: all-purpose flour, baking soda, salt, and the blend of spices: ground ginger, cinnamon, cloves, and nutmeg.
- Gradually add the dry mixture to the wet ingredients, stirring gently with a wooden spoon or rubber spatula until a thick dough forms.
Do not overmix to preserve the tender crumb.
Chilling the Dough
- Wrap the dough tightly in plastic wrap to prevent drying.
- Refrigerate for at least 2 hours, ideally overnight.
This step is crucial for:
- Allowing the flavors to meld
- Firming the dough for easy rolling and cutting
Rolling and Cutting the Dough
- Lightly dust a clean surface with flour to prevent sticking.
- Roll out the chilled dough evenly to about 1/4 inch thickness.
- Use gingerbread cookie cutters or a sharp knife to cut out desired shapes.
- Arrange cutouts on a parchment-lined 9×9 inch baking pan, leaving about 1 inch of space between pieces to allow for expansion.
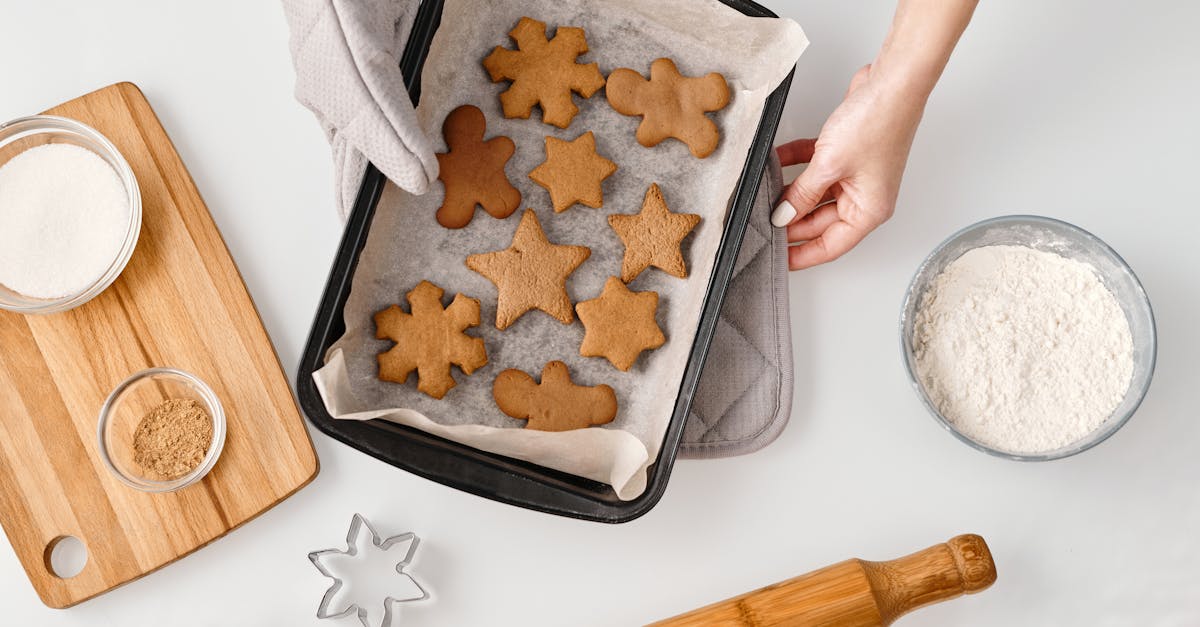
Baking the Gingerbread
| Step | Temperature | Time | Notes |
|---|---|---|---|
| Preheat oven | 350°F (175°C) | – | Ensure even heat distribution |
| Bake gingerbread | 350°F (175°C) | 8 to 10 minutes | Edges should be firm but not browned |
| Cooling | Room temperature | 5 minutes on pan | Transfer to a cooling rack afterward |
- Place the pan in the preheated oven.
- Bake until the edges are set and firm, but the cookies remain soft and tender inside.
- Remove from oven, let the gingerbread cool for 5 minutes on the pan.
- Transfer cookies to a wire rack to cool completely before decorating or serving.
By following these precise Instructions we ensure every bite of our Grandma’s Gingerbread delivers that rich aroma and nostalgic taste we cherish.
Decorating Tips and Tricks
Decorating our Grandma’s Gingerbread brings out the festive charm and makes every bite a feast for the eyes as well as the palate. Let’s explore foolproof icing preparation methods and inspiring decorating ideas to transform these nostalgic cookies into beautiful holiday treasures.
Icing Preparation
The icing is the foundation of every beautifully decorated gingerbread. For a smooth application and lasting detail, we recommend a classic royal icing recipe. Here’s how to prepare it perfectly:
- Ingredients:
| Ingredient | Measurement | Note |
|---|---|---|
| Powdered sugar | 2 cups | Sifted for smoothness |
| Egg whites | 2 large | Or 4 tablespoons meringue powder with water |
| Lemon juice | 1 tablespoon | Adds slight tartness and brightness |
| Vanilla extract | 1 teaspoon | Optional, for aroma |
- Steps:
- In a clean bowl, whip egg whites until frothy.
- Gradually beat in sifted powdered sugar.
- Add lemon juice and vanilla extract.
- Continue beating until the icing holds stiff peaks, about 5-7 minutes.
- Adjust consistency with a few drops of water for outlining (thicker) or flooding (thinner).
Pro tip: Use a piping bag with a fine round tip for precise lines. Keep icing covered with a damp cloth to prevent drying.
Decorating Ideas
Once our gingerbread cookies have cooled completely, it’s time to add personality with decorations. Here are our favorite ways to bring Grandma’s recipe to life:
- Classic Snowflake Patterns: Use white royal icing to pipe delicate snowflake designs. Add edible silver pearls or sparkling sugar crystals for a magical touch.
- Festive Faces: Draw eyes, mouths, and buttons on gingerbread people using icing of various colors. Incorporate mini chocolate chips or tiny candies for buttons and eyes.
- Holiday Scenes: Outline windows, wreaths, and bows in icing, then fill with colored sugar for a stained-glass effect.
- Rustic Charm: Dust cookies lightly with powdered sugar or cinnamon for a simple yet elegant finish that highlights the warm spices of the gingerbread.
Remember: Let each layer of icing dry before adding more details to avoid smudging. We suggest setting decorated cookies on parchment paper and placing in a cool dry spot.
“Decorating is where nostalgia meets creativity. Let your imagination and the spirit of tradition guide your hands.”
By mastering these decorating tips and tricks we can elevate Grandma’s gingerbread from a beloved recipe to a stunning centerpiece on any holiday table.
Storage and Shelf Life
Proper storage is essential to preserve the fresh, warm flavors and tender texture of Grandma’s Gingerbread Recipe. To keep our gingerbread at its best, we follow specific steps for storing and understanding its shelf life.
Storing Grandma’s Gingerbread
- Once fully cooled, place the gingerbread in an airtight container. This prevents moisture loss and keeps the cookies soft and flavorful.
- Store the container in a cool, dry place away from direct sunlight to maintain the gingerbread’s tender crumb.
- For longer storage, we recommend refrigerating the gingerbread. Wrap it tightly in plastic wrap or aluminum foil before placing it in an airtight container to avoid any absorption of fridge odors.
- To freeze gingerbread, wrap individual pieces or the whole batch tightly in plastic wrap, then place in a freezer-safe container or bag. Freeze up to 3 months for best quality. Defrost at room temperature before serving.
Shelf Life Table
| Storage Method | Duration | Tips |
|---|---|---|
| Room Temperature | 4 to 5 days | Use airtight container, avoid sunlight |
| Refrigeration | Up to 2 weeks | Wrap tightly to prevent drying out |
| Freezing | Up to 3 months | Wrap tightly, thaw at room temperature |
“The key to maintaining the nostalgic flavor and soft texture of Grandma’s Gingerbread is proper sealing and timely consumption.”
Signs of Gingerbread Spoilage
- Hard or stale texture rather than tender crumb
- Off or sour smell
- Visible mold or discoloration
If any of these appear, it is best to discard the gingerbread.
Reheating Tips
To revive softness and warm aroma, we gently warm the gingerbread in a preheated oven at 300°F (150°C) for 5–7 minutes before serving. This enhances the rich spices and brings back the freshly baked charm of Grandma’s recipe.
By following these storage guidelines, we ensure every bite of our gingerbread maintains the comforting, nostalgic taste we all cherish.
Conclusion
Grandma’s gingerbread recipe is more than just a dessert—it’s a timeless tradition that brings warmth and joy to any gathering. By following the steps and tips we’ve shared, you can recreate that perfect balance of flavors and textures that make this recipe so special. Whether you’re baking for the holidays or a cozy afternoon treat, this gingerbread will fill your home with inviting aromas and create sweet memories. Let’s keep this cherished recipe alive and continue sharing its comforting magic with family and friends.
Frequently Asked Questions
What makes Grandma’s gingerbread recipe special?
Grandma’s recipe is cherished for its perfect balance of warm spices and sweetness, creating a nostalgic flavor and comforting aroma that fills the home. It’s a timeless treat, especially popular during the holidays.
What are the essential dry ingredients in the recipe?
The dry ingredients include all-purpose flour, baking soda, salt, and brown sugar, which provide structure and sweetness to the gingerbread.
Which wet ingredients are used in Grandma’s gingerbread?
The wet ingredients are unsalted butter, molasses, an egg, and hot water, contributing to the rich texture and deep flavor.
What spices give the gingerbread its iconic flavor?
Ground ginger, cinnamon, cloves, and nutmeg blend to create the warm, inviting spice profile unique to Grandma’s gingerbread.
What equipment is needed to bake this gingerbread?
You need mixing bowls, measuring cups and spoons, an electric mixer or hand whisk, rubber spatula, wooden spoon, saucepan, 9×9 inch baking pan, parchment paper or nonstick spray, and a cooling rack.
How important is the prep work for this gingerbread?
Precise measuring, proper pan preparation, and using parchment paper or spray ensure even baking and the signature tender crumb and nostalgic flavor.
How should the dough be handled before baking?
Melt butter with brown sugar and molasses, mix gently without overmixing, then chill the dough for at least two hours for flavor melding and easier rolling.
What is the optimal baking temperature and time?
Preheat the oven as directed (usually around 350°F). Bake until the gingerbread is soft and tender, typically for 10-15 minutes, depending on shape and thickness.
Can you share tips for decorating Grandma’s gingerbread?
Use royal icing made with egg whites, powdered sugar, and lemon juice for a smooth finish. Decorate with snowflakes, faces, or holiday scenes, letting each layer dry before adding details.
How should Grandma’s gingerbread be stored?
Store in airtight containers at room temperature up to a week, refrigerate for longer freshness, or freeze for extended storage. Reheat gently to restore softness and aroma.
What are signs that gingerbread has gone bad?
Look for mold, off smells, or a stale texture. If any signs appear, it’s best to discard the gingerbread to ensure safety and quality.