
If you’re looking for a fun twist on classic cookies, our Cookie Spoon Recipe is exactly what you need. These bite-sized treats combine the convenience of a spoonful dessert with the irresistible flavor of homemade cookies. Perfect for parties or a quick sweet fix, they’re easy to make and even easier to enjoy.
Ingredients
To make our delicious Cookie Spoon Recipe, we’ll need specific ingredients for both the cookie spoons themselves and the complementary filling or toppings. Each part is simple yet essential to achieve the perfect balance of flavor and texture.
For the Cookie Spoons
Here are the ingredients required to create the sturdy yet tender cookie spoons:
| Ingredient | Amount | Preparation Notes |
|---|---|---|
| All-purpose flour | 1 ½ cups (180g) | Sifted |
| Unsalted butter | ½ cup (115g) | Softened |
| Granulated sugar | ⅓ cup (65g) | |
| Brown sugar | ¼ cup (50g) | Packed |
| Egg | 1 large | At room temperature |
| Vanilla extract | 1 tsp | Pure |
| Baking powder | ½ tsp | |
| Salt | ¼ tsp |
For the Filling or Topping
Complement your cookie spoons with these rich and flavorful options to fill or top them beautifully:
- Cream cheese frosting: ½ cup softened cream cheese, 2 tbsp unsalted butter, 1 cup powdered sugar, ½ tsp vanilla extract
- Chocolate ganache: ½ cup heavy cream, ½ cup semi-sweet chocolate chips
- Fresh fruit: sliced strawberries, blueberries, or raspberries for a fresh bite
- Nut butter: smooth peanut or almond butter for added richness
- Sprinkles or chopped nuts: optional for added texture and visual appeal
Each ingredient contributes to making our Cookie Spoon Recipe irresistible as a quick snack or a charming dessert centerpiece.
Tools and Equipment
To achieve perfect Cookie Spoons with crisp edges and tender centers, having the right tools and equipment is essential. Let’s walk through what you’ll need for this delightful baking project.
Essential Baking Tools
- Mixing Bowls: Use medium to large bowls to combine your dry and wet ingredients separately.
- Electric Mixer or Hand Whisk: For creaming butter and sugars smoothly, a stand mixer or hand mixer speeds up the process.
- Measuring Cups and Spoons: Accurate measuring of ingredients like flour and vanilla extract ensures consistent results every time.
- Rubber or Silicone Spatula: To scrape every bit of dough from the bowl without waste.
- Baking Sheet: A flat, rimmed baking sheet to place the cookie spoons evenly spaced.
Specialty Tools for Cookie Spoons
- Spoon-Shaped Cookie Cutters or Template: Using a cookie cutter designed like spoons helps shape the dough precisely. If unavailable, create a cardboard template and cut dough with a knife.
- Parchment Paper or Silicone Baking Mat: Prevents sticking and promotes even baking.
- Wire Cooling Rack: Allows the cookie spoons to cool completely without condensation that can soften them.
- Decorating Tools (Optional): Piping bags and small offset spatulas for applying frosting, ganache, or toppings neatly.
Recommended Equipment Table
| Tool/Equipment | Purpose | Notes |
|---|---|---|
| Mixing Bowls | Mixing wet and dry ingredients separately | Use stainless steel or glass |
| Electric Mixer | Cream butter and sugar, mix dough evenly | Stand or hand mixer works |
| Measuring Cups/Spoons | Measure dry and liquid ingredients precisely | Level off flour for accuracy |
| Spoon Cookie Cutter | Shape dough into spoon forms | Alternative: knife + template |
| Baking Sheet | Bake cookie spoons | Use heavy-gauge for best heat distribution |
| Parchment Paper/Mat | Prevent stickiness | Silicone mat reusable |
| Wire Cooling Rack | Cool cookies without sogginess | Essential for crisp texture |
| Piping Bags/Spatulas | Decorate fillings or toppings | Optional for presentation |
Pro Tip:
“When possible, chill your dough and tools slightly. Cooler dough helps maintain spoon shape during baking, enhancing the neatness of your Cookie Spoon Recipe.”
Instructions
Follow these steps carefully to create perfect Cookie Spoons that are crisp, tender, and ready to hold your favorite fillings or toppings.
Preparing the Cookie Dough
- In a large mixing bowl, combine 1 cup all-purpose flour, ½ teaspoon baking powder, and ¼ teaspoon salt. Whisk these dry ingredients together to ensure even distribution.
- In a separate bowl, cream together ½ cup unsalted butter (softened), ¼ cup granulated sugar, and ¼ cup brown sugar until the mixture is light and fluffy. Use an electric mixer or hand whisk.
- Beat in 1 large egg and 1 teaspoon vanilla extract until fully incorporated.
- Gradually add the dry ingredients into the wet mixture, folding gently with a rubber spatula. Mix just until combined to avoid overworking the dough.
- Cover the dough and refrigerate for at least 30 minutes. This step helps firm the dough for easier shaping and better spoon definition.
Shaping the Cookie Spoons
- Preheat the oven to 350°F (175°C).
- Line a baking sheet with parchment paper or a silicone baking mat to prevent sticking.
- On a lightly floured surface, roll out the chilled dough to about ¼ inch thickness.
- Using a spoon-shaped cookie cutter or a template, cut out the cookie spoons carefully.
- Transfer each cookie spoon onto the prepared baking sheet, spacing them about 1 inch apart.
- For better shape retention, place the baking sheet in the fridge for 10 minutes before baking.
Baking the Cookie Spoons
- Bake cookies at 350°F (175°C) for 10 to 12 minutes. Look for edges that are golden brown while centers remain slightly soft.
- Rotate the baking sheet halfway through for even browning.
- Remove the cookie spoons from the oven when done but keep them on the sheet for 5 minutes to firm up.
| Step | Temperature | Time | Notes |
|---|---|---|---|
| Preheat oven | 350°F | – | Prepare sheet with liner |
| Bake cookie spoons | 350°F | 10 to 12 min | Watch for golden edges |
| Rest on sheet | Room temp | 5 min | Helps set without breaking |
Cooling and Setting
- Transfer the cookie spoons gently to a wire cooling rack using a spatula. This prevents moisture buildup and keeps the bottoms crisp.
- Let them cool completely, about 20 minutes, before adding any fillings or toppings.
- For best results, chill cookie spoons for another 10 minutes after decorating to ensure toppings set firmly.
By following these precise steps we ensure every Cookie Spoon turns out beautifully shaped with the perfect texture to complement any filling or topping.
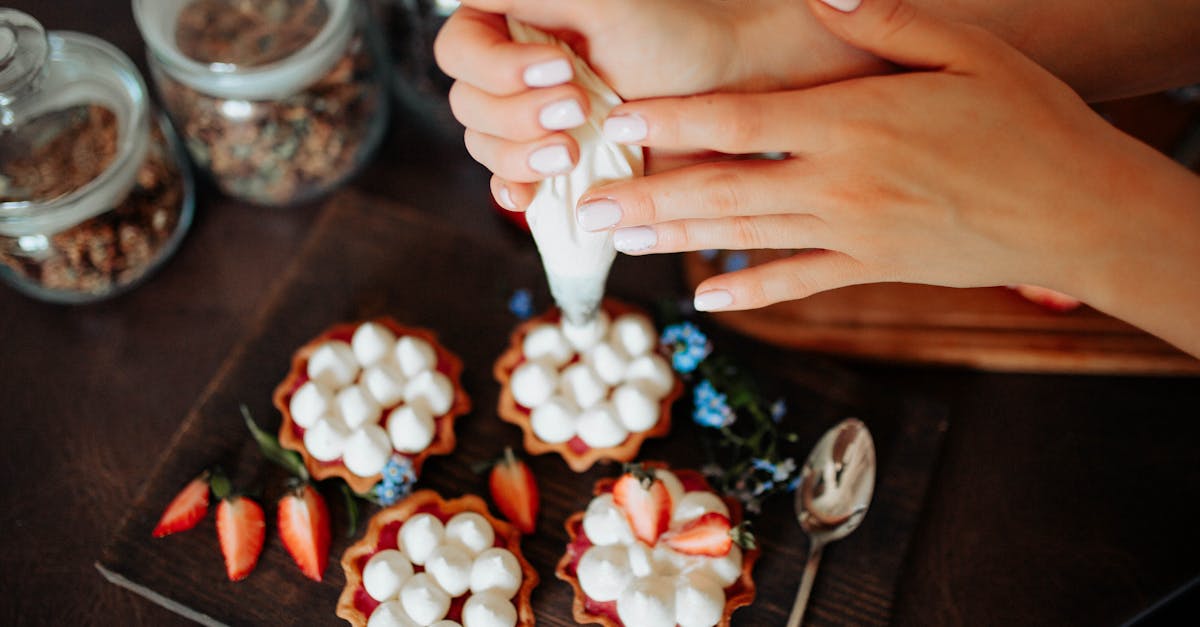
Assemble and Serve
Once our cookie spoons have cooled completely, it is time to creatively Assemble and Serve these bite-sized delights. This final step transforms our perfectly baked spoon-shaped cookies into visually appealing and delicious treats.
Adding Fillings or Toppings
To elevate our Cookie Spoon Recipe, we start by adding luscious fillings or toppings that complement the buttery, tender cookie base. Here are some options and how to apply them:
- Cream Cheese Frosting: Use a piping bag or a small offset spatula to spread a smooth layer inside each cookie spoon, adding a rich tanginess.
- Chocolate Ganache: Drizzle or gently spoon in ganache, allowing it to fill the bowl of the spoon for a decadent chocolate burst.
- Fresh Fruit: Top with sliced strawberries, blueberries, or raspberries for a fresh and colorful finish.
- Nut Butter: Add a dollop of peanut or almond butter for a creamy texture and nutty flavor.
- Sprinkles or Chopped Nuts: Sprinkle on to add a delightful crunch and aesthetic contrast.
We recommend chilling the cookie spoons after adding fillings or toppings for at least 15 minutes to help set everything in place without compromising crispness.
| Filling/Topping | Application Method | Flavor Notes |
|---|---|---|
| Cream Cheese Frosting | Piping bag or spatula spread | Tangy, creamy |
| Chocolate Ganache | Drizzle or spoon in | Rich, chocolatey |
| Fresh Fruit | Place on top | Fresh, sweet and tart |
| Nut Butter | Dollop with spoon | Nutty, creamy |
| Sprinkles/Nuts | Sprinkle over filling | Crunchy, textured |
Presentation Tips
Proper presentation turns our cookie spoons into a visually stunning treat perfect for any occasion. Here are some professional tips:
- Arrange cookie spoons on a decorative platter or tiered stand, spacing them slightly apart to showcase their unique shapes.
- Use fresh mint leaves or edible flowers as garnishes to add color and elegance.
- Serve with small bowls of additional toppings or fillings nearby to let guests customize their spoons.
- For added flair, drizzle chocolate or caramel sauce artistically around the serving plate.
- Consider placing each cookie spoon on a small parchment square or mini doily for a polished, individual look.
By focusing on these elements, we create a compelling and inviting display that impresses guests and enhances the enjoyment of our Cookie Spoon Recipe.
Make-Ahead and Storage Tips
To enjoy our Cookie Spoon Recipe at its freshest, proper make-ahead preparation and storage are essential. Here’s how we can ensure every bite stays crisp, flavorful, and ready whenever a sweet craving hits.
Make-Ahead Preparation
- Chill the Dough: After mixing, chill the cookie dough for at least 1 hour or up to 24 hours in the refrigerator. This step enhances the dough’s firmness, making it easier to roll and shape into perfect spoon forms.
- Prepare Cookie Spoons in Advance: We can bake the cookie spoons up to 3 days ahead. Store them cooled and uncovered on a wire rack before packaging to maintain their crisp edges.
- Freeze for Longer Storage: For longer storage, freeze baked cookie spoons in an airtight container. Wrap them individually in parchment paper or plastic wrap to prevent sticking.
- Tip: Thaw frozen cookie spoons at room temperature for about 30 minutes before decorating or serving.
Storage Methods
Proper storage preserves the texture and taste of our cookie spoons. Use the following guidelines based on timing:
| Storage Condition | Method | Duration | Notes |
|---|---|---|---|
| Room Temperature | Airtight container | 2–3 days | Store in a cool, dry place away from sunlight |
| Refrigerator | Airtight container | Up to 1 week | May lose some crunch; bring to room temp before serving |
| Freezer | Wrapped + airtight container | Up to 2 months | Best to freeze unfilled cookie spoons only |
Storing Filled or Decorated Cookie Spoons
- Fill or decorate cookie spoons just before serving to preserve their texture.
- If pre-filled with moist toppings, store them in an airtight container in the refrigerator and consume within 24 hours.
- Use wax or parchment paper between layers to avoid sticking.
Quick Tips for Maintaining Crispness
- Avoid sealing warm cookie spoons immediately; allow them to cool fully on a wire rack.
- Use silica gel packets or a slice of bread inside the storage container to absorb excess moisture.
By following these make-ahead and storage tips we ensure every Cookie Spoon remains deliciously crisp and ready to impress whether for a quick treat or dessert presentation.
Conclusion
Cookie spoons bring a fresh twist to classic cookies that’s both fun and versatile. They’re perfect for any occasion, whether you want a quick sweet bite or a stylish dessert centerpiece. With the right ingredients, tools, and a bit of creativity, we can easily craft these charming treats at home.
By mastering the technique and exploring different fillings and toppings, cookie spoons become an exciting way to impress guests or satisfy our own cravings. Plus, the make-ahead and storage tips ensure they stay fresh and delicious whenever we need them. Let’s get baking and enjoy every spoonful!
Frequently Asked Questions
What makes the Cookie Spoon Recipe different from regular cookies?
Cookie spoons are bite-sized, spoon-shaped cookies designed for easy filling and quick snacking, combining the charm of traditional cookies with a fun twist perfect for parties and desserts.
What ingredients are needed for the cookie spoons?
Basic ingredients include all-purpose flour, unsalted butter, granulated sugar, brown sugar, egg, vanilla extract, baking powder, and salt. Fillings or toppings can vary from cream cheese frosting to chocolate ganache.
Do I need special tools to make cookie spoons?
Yes, spoon-shaped cookie cutters or templates help shape the cookies precisely. Baking sheets, parchment paper, mixing bowls, and measuring tools are essential, while piping bags help with decorative toppings.
How do you maintain the spoon shape during baking?
Chilling the dough and tools before baking helps the cookie spoons keep their shape and prevents spreading, resulting in crisp edges and tender centers.
What’s the best way to bake cookie spoons?
Bake at a moderate temperature, typically around 350°F (175°C), for about 8–12 minutes until edges are golden. Let them cool completely before adding any toppings.
Can I prepare cookie spoons in advance?
Yes, you can bake cookie spoons up to three days ahead and store them uncovered to keep crispness. For longer storage, freeze and thaw properly before serving.
What are some popular toppings for cookie spoons?
Popular fillings include cream cheese frosting, chocolate ganache, fresh fruit, nut butters, and decorative sprinkles or chopped nuts to enhance both flavor and appearance.
How should cookie spoons be stored to keep fresh?
Store at room temperature uncovered for short-term freshness or freeze for longer storage. Refrigeration is optional but may soften cookies if left too long.
Can I customize the fillings for different occasions?
Absolutely! Cookie spoons are versatile and perfect for customizing with seasonal fruits, flavored frostings, nuts, or themed sprinkles to suit any event or preference.
What presentation tips make cookie spoons look more appealing?
Arrange on decorative platters, garnish with fresh mint or edible flowers, and offer extra toppings on the side for guests to create their own combinations.