
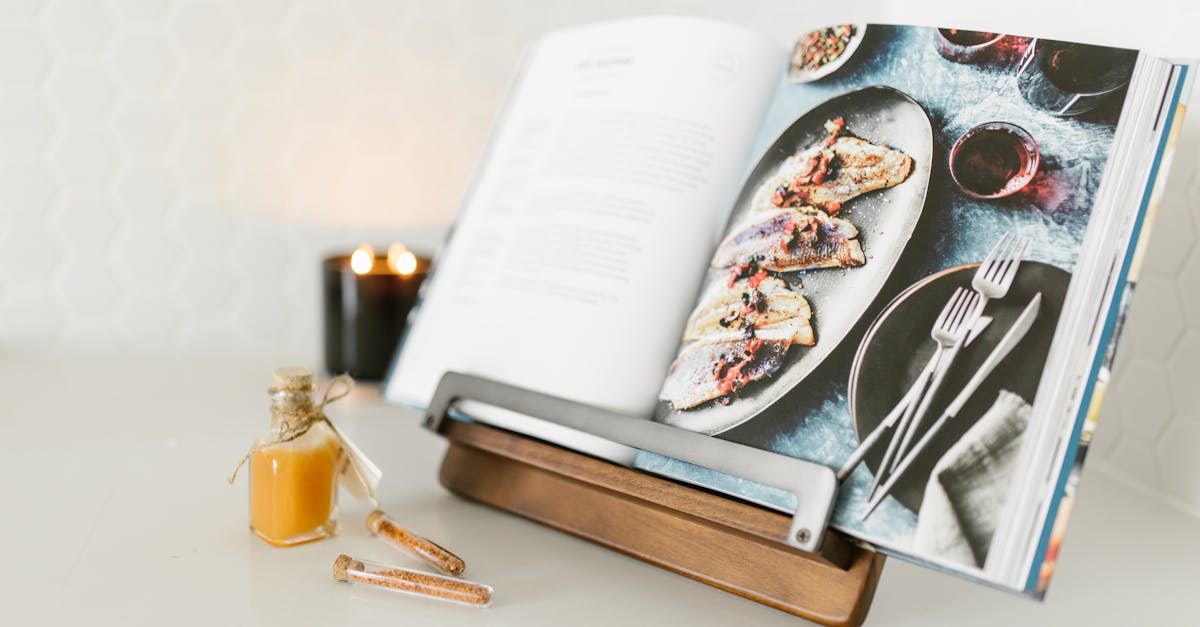
A wrought iron recipe book stand is the perfect blend of style and functionality for any kitchen. Its sturdy design keeps our favorite cookbooks open and easy to read while adding a touch of rustic charm to our cooking space. Whether we’re trying out a new recipe or revisiting a classic, this stand makes following instructions hassle-free.
Crafted from durable wrought iron, these stands are built to last and can hold even the heaviest cookbooks without tipping over. They also help keep our countertops organized and free from spills or messes. With a wrought iron recipe book stand, cooking becomes more enjoyable and efficient, letting us focus on creating delicious meals for family and friends.
Materials Needed for Wrought Iron Recipe Book Stand
To craft a durable and stylish wrought iron recipe book stand, gathering the right materials and tools is essential. Below, we outline the key supplies and accessories that will set the foundation for a successful project.
Essential Wrought Iron Supplies
For a sturdy and functional wrought iron recipe book stand, we require high-quality raw materials that ensure durability and aesthetic appeal. Here are the core supplies we will need:
- Wrought Iron Rods (1/4 inch diameter): Provide the main structural frame.
- Wrought Iron Sheets (optional): For decorative elements or base plate.
- Welding Wire: Compatible with wrought iron for secure joins.
- Rust-Resistant Primer: Protects the metal from corrosion.
- Heat-Resistant Black Spray Paint: Finishes the stand with an elegant rustic appearance.
- Metal Sandpaper or Wire Brush: Prepares the metal surfaces for painting and welding.
- Measuring Tape and Marker: For precise cutting and alignment marks.
| Material | Purpose | Specifications |
|---|---|---|
| Wrought Iron Rods | Main frame structure | 1/4 inch diameter, length varies |
| Welding Wire | Joining components securely | Compatible with wrought iron |
| Rust-Resistant Primer | Metal protection against corrosion | Covers entire metal surface |
| Heat-Resistant Spray Paint | Finish and protect the stand | Black, spray type recommended |
Additional Tools and Accessories
Our project also benefits from a collection of specialized tools and accessories to create precise cuts, secure joints, and achieve a professional finish:
- Angle Grinder with Metal Cutting Disc: To cut wrought iron rods and sheets accurately.
- Arc or MIG Welder: Essential for fusing rods and sheets into a solid framework.
- Clamps: Hold parts steadily during welding.
- Protective Gear: Welding helmet, gloves, and apron for safety.
- Metal File: Smoothes rough edges after cutting.
- Workbench or Strong Surface: Provides a stable workspace.
- Measuring Square: Ensures right-angle joins and precision.
Having the right tools and supplies not only improves the quality of our wrought iron recipe book stand but also simplifies the entire fabrication process.
With these materials and tools in hand, we can proceed confidently to construct a wrought iron recipe book stand that is both functional and visually striking.
Designing Your Wrought Iron Recipe Book Stand
When crafting our wrought iron recipe book stand, thoughtful design ensures it is both practical and a beautiful addition to our kitchen. Let’s focus on perfecting dimensions and visualizing the stand with an effective sketch.
Choosing the Right Dimensions
Selecting the right dimensions is crucial to balance stability, usability, and aesthetic appeal. Here are the core measurements we recommend considering:
| Component | Recommended Size | Purpose |
|---|---|---|
| Base Width | 12 to 15 inches (30 to 38 cm) | Ensures stability for heavy books |
| Height | 10 to 12 inches (25 to 30 cm) | Provides comfortable viewing angle |
| Depth (Front to Back) | 8 to 10 inches (20 to 25 cm) | Prevents books from tipping |
| Book Support Lip | 1 to 1.5 inches (2.5 to 4 cm) | Holds pages open securely |
We want the stand to easily hold large cookbooks yet remain compact enough to fit on most countertops. Adjust these measurements based on the typical size of your personal recipe books.
Sketching Your Design
Before cutting or welding, a detailed sketch brings clarity and precision to our project. Follow these steps for a clear plan:
- Draw the base using the chosen width and depth dimensions.
- Mark the vertical supports indicating height and angle for the recipe book’s incline. A slight backward tilt around 15 degrees enhances readability.
- Outline the book support lip at the bottom edge to prevent pages from slipping.
- Include decorative elements consistent with wrought iron style, like scrolls or curves, balancing sturdiness and charm.
- Label all parts with precise measurements for accurate fabrication.
“A well-executed sketch acts as a blueprint, guiding every cut and weld to produce a cohesive and functional recipe stand.”
Creating this design groundwork ensures our wrought iron recipe book stand combines rugged durability with elegant style tailored to our kitchen’s needs.
Preparing the Work Area
To craft our wrought iron recipe book stand efficiently and safely, setting up a well-organized work area is essential. This step ensures smooth progression and minimizes risks during metalworking.
Safety Precautions
Prioritizing safety protects us throughout the project. Here are the crucial safety measures to follow:
- Wear Protective Gear: Use welding helmets with proper filter lenses, heat-resistant gloves, long-sleeved flame-retardant clothing, and steel-toed boots.
- Ensure Proper Ventilation: Work in a well-ventilated area or use exhaust fans to avoid inhaling smoke and fumes from welding and paint.
- Clear Flammable Materials: Remove any paper, cloth, or solvents near the workspace to prevent fire hazards.
- Maintain a Clean Workspace: Keep floors free of metal scraps and tools to prevent trips and falls.
- Have Fire Extinguishers Handy: Place a Class ABC fire extinguisher within reach for emergencies.
- Check Electrical Connections: Inspect welding equipment and power cords for damage before use.
- Follow Manufacturer Instructions: Operate tools strictly according to their safety guidelines.
“Safety is not an option but a foundation for success in working with wrought iron.“
Setting Up Tools and Materials
Organizing our materials and specialized tools promotes efficiency and accuracy. Here is a recommended setup:
| Tool/Material | Placement Suggestion | Notes |
|---|---|---|
| Wrought iron rods | Within arm’s reach | Arrange by length and diameter for convenience |
| Welding machine | On a stable, grounded surface | Ensure easy access to controls |
| Angle grinder | Nearby on a secure stand | Keep grinding discs organized |
| Clamps | Fixed on the workbench | Use to hold parts steady during welding |
| Rust-resistant primer & paint | Separate clean table | Avoid contamination by dust or debris |
| Protective gear | Designated safety station | Store gloves, helmet, and goggles consistently |
| Measuring tape & sketches | Flat workspace | Keep blueprints visible at eye level |
We recommend setting a sturdy workbench in a location with ample lighting and ventilation. Position tools logically to reduce unnecessary movements and ensure a smooth workflow from measuring, cutting, welding, to painting.
By preparing our work area with attention to safety and efficient tool placement, we lay the groundwork for successfully building a durable, stylish wrought iron recipe book stand.
Crafting the Wrought Iron Recipe Book Stand
Now that our workspace is safely organized and fully equipped, let’s focus on crafting the wrought iron recipe book stand. We will take precise steps to cut, shape, weld, and finish the stand to ensure both durability and style.
Cutting the Iron Pieces
We start by cutting the wrought iron rods and flat bars according to our detailed sketch dimensions. Use the angle grinder fitted with a cutting disc for clean, accurate cuts. Precise measurements are critical here to ensure all components fit together perfectly.
| Component | Dimension Range | Notes |
|---|---|---|
| Base rods | 12 to 15 inches | Ensure equal length for balance |
| Vertical supports | 10 to 12 inches | Must be straight and smooth |
| Bookrest depth | 8 to 10 inches | Prevents book slipping |
We wear protective gloves and goggles during cutting to protect against sparks and metal shards.
Shaping and Bending Iron
Next, we proceed to shape and bend our iron pieces to create both structural and decorative elements. Using a metal bending brake or pipe bender, we carefully form curves and angles to match our design sketch. This step adds the rustic charm and artistic edge typical of wrought iron craftsmanship.
- Heat certain areas with a propane torch if needed to make bending easier and prevent the iron from cracking.
- Check each bend for symmetry and consistency to ensure the final stand is balanced and visually appealing.
Welding and Joining Components
We then join all pieces by welding. This stage requires precision to create strong, seamless joints.
- Arrange the cut and shaped pieces on the welding table according to the sketch.
- Use clamps to hold everything firmly in place.
- Tack weld initial joints to verify alignment.
- Complete full welding on all joints using a MIG or TIG welder for clean, strong bonds.
- After welding, use the angle grinder to smooth weld seams for a polished finish.
We make certain to maintain proper ventilation and wear our welding helmet and other protective gear throughout this phase.
Finishing the Stand
The final step is to protect and beautify the wrought iron recipe book stand.
- Remove any debris and dust with a wire brush.
- Apply a rust-resistant primer evenly to prevent corrosion.
- After the primer dries, spray a layer of heat-resistant black iron paint for an elegant and durable finish.
- Allow the paint to cure fully before handling.
Following these steps ensures our stand will withstand kitchen environments and maintain its rustic beauty over time.
Painting and Sealing the Stand
To protect and enhance the wrought iron recipe book stand, we focus on the crucial steps of painting and sealing. This process ensures durability against rust and everyday kitchen wear, while accentuating its rustic charm.
Selecting Paint and Sealant
Choosing the right paint and sealant is essential for preserving the stand’s integrity. We recommend:
- Rust-resistant primer: Provides a strong base layer to prevent corrosion.
- Heat-resistant black spray paint: Ideal for withstanding kitchen heat and maintaining a sleek finish.
- Clear protective sealant: Adds an extra barrier against moisture and fingerprints without altering the color.
| Product Type | Purpose | Recommended Features |
|---|---|---|
| Rust-resistant primer | Prevents metal oxidation | Fast drying, strong adhesion |
| Heat-resistant paint | Withstands kitchen heat exposure | Matte or semi-gloss finish |
| Clear sealant | Adds moisture and fingerprint protection | Transparent, durable, non-yellowing |
“Proper selection of paint and sealant lays the foundation for a long-lasting wrought iron stand that complements your kitchen’s rustic style.”
Applying Paint
We follow these steps to achieve an even and durable coating on the stand:
- Clean the surface thoroughly to remove grease and dust.
- Apply the rust-resistant primer evenly using a spray can or brush. Allow 30 minutes to dry.
- Spray the heat-resistant black paint in thin, even coats, holding the can 8-10 inches away from the surface.
- Wait 15 minutes between coats; apply 2-3 layers for full coverage.
- Avoid heavy layers to prevent drips and runs.
Tip: Work in a well-ventilated area or outdoors to prevent inhalation of fumes.
Curing and Drying
Proper curing and drying safeguard the finish and extend the stand’s life span.
| Stage | Duration | Notes |
|---|---|---|
| Paint drying | 15-30 minutes per coat | Lightly tacky before next coat |
| Full curing | 24-48 hours | Avoid handling or placing objects on it |
| Sealant drying | 1-2 hours | Applies after paint is fully cured |
| Sealant curing | 48 hours | Ensures maximum moisture resistance |
We advise leaving the wrought iron recipe book stand untouched during full curing to achieve a hard and resilient finish that protects against kitchen steam and spills.
Assembling the Recipe Book Stand
Now that we have all our components cut, shaped, welded, and painted, it is time to assemble the wrought iron recipe book stand. This phase brings all parts together, ensuring structural integrity and aesthetic harmony. Careful assembly guarantees both durability and a visually appealing finish.
Attaching the Base and Support
We start by securely attaching the base to the vertical supports. The base is the foundation, typically measuring between 12 to 15 inches in width to provide ample stability.
- Place the base flat on your workspace.
- Align the vertical supports at the designated points on the base according to your detailed sketch.
- Use clamps to hold the supports steady.
- Weld each vertical support to the base carefully, ensuring strong, even seams.
- Allow the welds to cool without disturbance to prevent cracks or weak joints.
| Step | Detail | Tip |
|---|---|---|
| Base Width | 12 to 15 inches | Ensures stability |
| Vertical Support Height | 10 to 12 inches | Provides comfortable viewing angle |
| Clamping | Use clamps to hold parts securely | Prevents shifting during welding |
| Welding | Perform solid, continuous welds | Promotes firm joint connections |
Reminder: Always wear protective gear such as welding gloves and a helmet during this process to prevent injury.
Adding Decorative Elements
After securing the main structure, we focus on adding the decorative wrought iron elements that enhance the stand’s rustic charm while maintaining function.
- Position the pre-shaped decorative scrolls and accents on the vertical supports and along the edges of the base.
- Use clamps to hold decorative pieces in place, ensuring symmetry and balance.
- Weld each element precisely at the contact points.
- Inspect each weld for completeness and strength.
- Gently file down any rough weld spots to keep the finish smooth.
“Decorative elements are not just embellishments. They reinforce the structure and reflect the handcrafted beauty of the wrought iron stand.”
We suggest applying a final inspection after assembly to check for any weak spots or areas requiring touch-up paint. This ensures the stand remains sturdy and retains its rustic black finish, protected against kitchen wear and rust.
By following these clear and confident steps, we ensure our wrought iron recipe book stand is both a practical kitchen tool and a statement piece.
Tips for Using and Maintaining Your Recipe Book Stand
To get the most from our wrought iron recipe book stand we must focus on its proper placement, thoughtful usage, and regular maintenance. These steps help preserve its durability and rustic charm while ensuring it remains a functional kitchen companion.
Placement and Usage Ideas
Position your wrought iron recipe book stand where it combines convenience with visibility. Ideal spots include:
- Countertop corners to keep recipes accessible but out of the main prep space.
- Near the stove or prep area for easy reference while cooking.
- On a kitchen island to serve multiple users.
Consider these tips to enhance usability:
- Place it against a non-slip surface or use rubber pads on the base to prevent sliding.
- Use the stand for books or tablets by adjusting the angle or adding a silicone grip.
- Avoid placing near sinks or steam to minimize moisture exposure.
| Recommended Placement | Purpose | Notes |
|---|---|---|
| Corner of countertop | Keeps recipes handy but safe | Use rubber pads for extra stability |
| Near stove or prep | Quick recipe reference | Keep away from direct heat or steam |
| Kitchen island | Shared cooking space | Ensure ample space for cooking utensils |
Cleaning and Care Instructions
Maintaining our wrought iron recipe book stand ensures it stays as stunning as the day we made it. Follow these steps for lasting beauty and performance:
- Dust regularly with a soft cloth to prevent dirt buildup.
- For stubborn spots, use a damp cloth with mild soap, then dry immediately.
- Avoid harsh chemicals or abrasive tools that can strip paint or damage the iron.
- Inspect periodically for rust spots; if found, gently sand and touch up with rust-resistant paint.
- Apply a thin coat of clear sealant annually to protect against moisture and kitchen humidity.
| Maintenance Task | Frequency | Recommended Products/Tools |
|---|---|---|
| Dusting | Weekly | Soft microfiber cloth |
| Wet cleaning | As needed | Mild dish soap, damp cloth, towel |
| Rust inspection & touch-up | Every 3-6 months | Fine sandpaper, rust-resistant paint |
| Sealant application | Annually | Clear protective sealant spray |
Conclusion
A wrought iron recipe book stand is more than just a kitchen accessory—it’s a blend of durability, style, and practicality that elevates our cooking experience. Crafting one ourselves allows us to customize its design and ensure it fits perfectly in our kitchen space.
By following careful preparation, precise construction, and thoughtful finishing steps, we create a stand that not only supports our favorite cookbooks but also adds a timeless rustic charm. With proper care and maintenance, this stand will remain a reliable and attractive kitchen companion for years to come.
Frequently Asked Questions
What are the main benefits of using a wrought iron recipe book stand in the kitchen?
A wrought iron recipe book stand offers sturdy support for heavy cookbooks, adds rustic charm, keeps countertops organized, and enhances the cooking experience by making recipes easier to follow.
What materials are needed to make a wrought iron recipe book stand?
Key materials include wrought iron rods, welding wire, rust-resistant primer, and heat-resistant black spray paint. Additional tools like an angle grinder, welder, clamps, and protective gear are also essential.
What dimensions are ideal for a recipe book stand?
A stable stand typically has a base width of 12-15 inches, a height of 10-12 inches for easy viewing, and a depth of 8-10 inches to prevent books from tipping over.
How should I prepare my workspace before starting the project?
Clear all flammable materials, ensure good ventilation, wear protective gear, keep the area clean and organized, and have fire extinguishers nearby to maintain safety and efficiency.
What are the main steps in crafting the stand?
Cut wrought iron pieces to size, shape and bend as needed, weld components together securely, then apply rust-resistant primer and heat-resistant paint for durability and style.
How do I properly paint and seal the wrought iron stand?
Clean the surface, apply a rust-resistant primer, spray paint thin even coats with heat-resistant paint, allow sufficient drying time, then finish with a clear protective sealant for long-lasting protection.
How do I assemble the stand for stability and aesthetics?
Align base and vertical supports carefully, use clamps during welding for stability, ensure strong welds, add decorative elements, then inspect and touch up weak spots with paint.
Where is the best place to use the recipe book stand in the kitchen?
Ideal locations include countertop corners, near the stove, or on a kitchen island, where the stand is easily accessible and complements kitchen organization and style.
What care and maintenance does the wrought iron recipe book stand need?
Regularly dust and gently clean the stand, inspect for rust periodically, and apply a clear sealant once a year to protect against moisture and maintain its rustic appearance.