
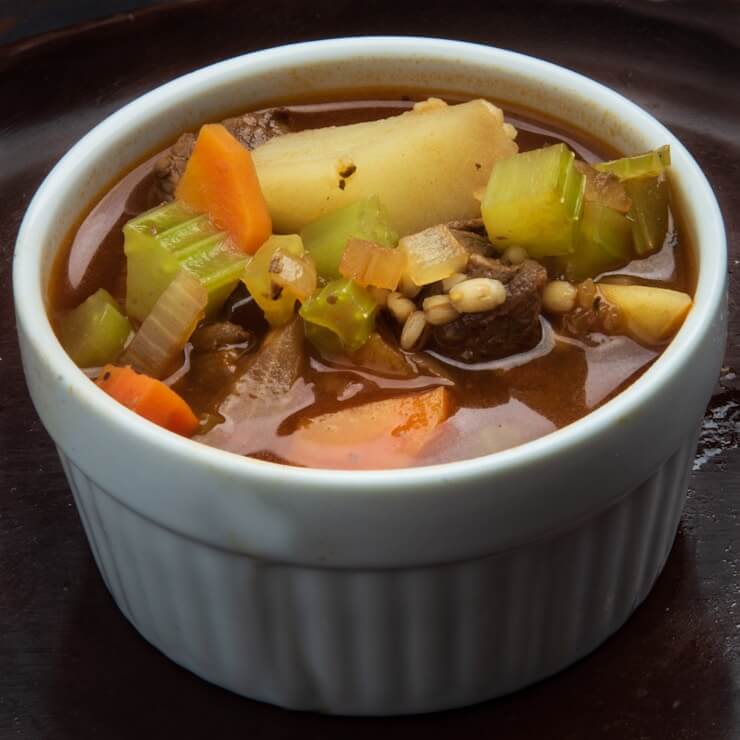
There’s something deeply comforting about a hearty bowl of beef vegetable soup, especially when it’s made from scratch and enjoyed all year round. But what if you could capture that warmth and flavor for months to come?
Enter home canning—a time-honored tradition that allows you to preserve your favorite soups at the peak of their flavor and nutrition. This beef vegetable soup canning recipe not only delivers a nourishing meal for busy weeknights, but also fills your pantry with jars of homemade goodness ready at a moment’s notice.
With the right ingredients, a bit of preparation, and a pressure canner, you’ll be amazed at how simple and rewarding it is to can your own soup. Whether you’re a seasoned canner or just getting started, this detailed guide will walk you step-by-step through the process.
Let’s fill those jars with rich, savory broth, tender beef, and colorful vegetables—your future self will thank you!
Why You’ll Love This Recipe
- Convenient Homemade Meals: With canned beef vegetable soup in your pantry, a wholesome meal is always within reach—no preservatives, no mystery ingredients, just real food.
- Economical: Buying ingredients in bulk and canning at home can save money compared to store-bought soups. Plus, you can use seasonal produce or even garden-fresh veggies.
- Customizable: Tailor the recipe to your family’s tastes by adjusting vegetables, herbs, or even swapping beef for another protein.
- Nutritious & Filling: Packed with protein, fiber, and vitamins, this soup is both hearty and healthy.
- Long Shelf Life: Properly canned soup can last up to a year (or longer), making it ideal for meal prepping, emergencies, or gifting.
Ingredients
Below is a comprehensive list of ingredients for a batch yielding approximately 7 quarts (or 14 pints) of soup. Adjust quantities as needed for your canner’s capacity.
| Ingredient | Amount | Notes |
|---|---|---|
| Beef stew meat | 3 lbs | Cut into 1-inch cubes; use chuck, round, or brisket |
| Carrots | 4 cups | Peeled and diced |
| Potatoes | 4 cups | Peeled and diced |
| Celery | 2 cups | Diced |
| Onions | 2 cups | Diced |
| Green beans | 2 cups | Cut into 1-inch pieces |
| Corn kernels | 2 cups | Fresh or frozen |
| Peas | 1 cup | Fresh or frozen |
| Tomatoes | 4 cups | Chopped; can use canned diced tomatoes (drained) |
| Beef broth | 10 cups | Low sodium preferred |
| Salt | 2-3 tbsp | To taste; can omit for low-sodium |
| Black pepper | 2 tsp | Freshly ground |
| Bay leaves | 2 | Optional, for flavor |
| Thyme | 1 tsp | Dried or 1 tbsp fresh |
| Garlic | 3 cloves | Minced |
| Water | As needed | To top off jars, if necessary |
Equipment
- Pressure canner (not a water bath canner—soup must be pressure canned for safety)
- Canning jars (quart or pint size, with matching lids and bands)
- Large stockpot
- Sharp knife & cutting board
- Ladle
- Jar funnel (for easy filling)
- Bubble remover/headspace tool
- Jar lifter
- Clean towels
- Measuring cups & spoons
- Bowl (for prepping veggies/meat)
- Timer
Instructions
-
Prepare the Ingredients:
Wash, peel, and dice all vegetables as listed in the ingredient table. Cut the beef into 1-inch cubes, trimming off excess fat.
Set everything aside in separate bowls for easy access.
-
Brown the Beef:
In a large stockpot, heat a small amount of oil over medium-high heat. Add the beef cubes in batches, browning on all sides for added flavor.
Remove the browned beef and set aside. (Browning is optional but recommended for depth of flavor.)
-
Saute Aromatics:
Add onions, celery, and garlic to the pot. Saute until softened and fragrant, about 3-5 minutes.
-
Combine and Simmer:
Return the beef to the pot along with carrots, potatoes, green beans, corn, peas, and tomatoes. Pour in the beef broth and add salt, pepper, bay leaves, and thyme.
Bring to a gentle boil, then reduce heat and simmer for 15-20 minutes. The goal is to partially cook the ingredients, not fully—this ensures the vegetables and meat don’t overcook during canning.
Do not add any thickening agents (like flour, cornstarch, or roux) to the soup before canning. Thicken after opening, if desired.
-
Prepare Jars and Canner:
While the soup simmers, wash jars, lids, and bands in hot soapy water. Rinse well.
Sterilize jars by placing them in simmering water or your dishwasher. Fill your pressure canner with a few inches of water (per manufacturer instructions) and begin heating it.
-
Fill the Jars:
Using a jar funnel, ladle the hot soup into prepared jars. Leave 1 inch headspace at the top of each jar.
If the soup is a bit chunky, use a slotted spoon to distribute solids evenly, then top off with broth. Remove air bubbles with a bubble remover or non-metallic utensil.
Wipe rims with a clean damp towel.
-
Seal the Jars:
Place lids on jars and screw on bands until fingertip tight (firm but not overly tight).
-
Process in the Pressure Canner:
Place jars into the preheated pressure canner. Lock the lid and vent steam for 10 minutes.
Then, bring the canner to the correct pressure: 10 pounds for dial-gauge canners; 11 pounds for weighted-gauge canners (adjust for altitude as needed).
Process quarts for 90 minutes and pints for 75 minutes. Start timing once the correct pressure is reached.
-
Cool and Store:
When processing time is complete, turn off heat and let the canner return to zero pressure naturally. Wait 10 minutes, then carefully remove the lid (away from your face).
Lift jars with a jar lifter and set on a towel to cool for 12-24 hours. Check seals: lids should not flex up and down.
Store sealed jars in a cool, dark place. Refrigerate and use any unsealed jars within a few days.
Tips & Variations
- Vegetable Choices: Feel free to swap in parsnips, turnips, lima beans, or bell peppers for variety. Avoid starchy thickeners or dairy, as they are unsafe for canning.
- Spice It Up: Add a pinch of crushed red pepper, a splash of Worcestershire sauce, or a sprinkle of smoked paprika for a new flavor profile.
-
Safety First:
Always use a pressure canner for soups containing meat, beans, or low-acid vegetables. Water bath canning is not safe for this recipe.
- Low-Salt Option: Omit or reduce salt for a heart-healthier version. Season to taste after opening.
- Batch Size: Halve or double the recipe as needed, but don’t fill your canner past its recommended capacity.
- Try More Homemade Staples: For another nutritious homemade pantry staple, check out our Allens Green Beans Recipe!
- Use Leftover Soup: If you have extra soup that won’t fit into jars, enjoy it fresh for dinner or freeze for later.
Nutrition Facts
The following values are per 1-cup serving (estimated):
| Nutrient | Amount |
|---|---|
| Calories | 180 |
| Protein | 14g |
| Fat | 6g |
| Carbohydrates | 18g |
| Fiber | 4g |
| Sodium | 450mg |
| Vitamin A | 40% DV |
| Vitamin C | 25% DV |
| Iron | 12% DV |
Nutrition may vary based on ingredients and serving size.
Serving Suggestions
- Quick Weeknight Meal: Warm a jar on the stove, add a dash of fresh herbs, and serve with crusty sourdough bread or homemade biscuits.
- Lunch on the Go: Pack in a thermos for a hearty, satisfying lunch at work or school.
- Make it a Full Dinner: Pair with a simple side salad or a grilled cheese sandwich for a complete meal.
- Elevate with Toppings: Sprinkle freshly grated Parmesan, chopped parsley, or a swirl of pesto for extra flavor.
- Use as a Base: Add cooked pasta, rice, or barley after opening for a heartier stew. For more protein, stir in some leftover roast beef or shredded chicken.
- Hosting Tip: Canned beef vegetable soup makes a thoughtful housewarming or new-parent gift—just add a ribbon and a recipe card!
Looking for more great homemade staples? Try our unique Alligator Pie Recipe or discover a light and healthy snack with the Almond Cashew Clusters Recipe.
Conclusion
Canning your own beef vegetable soup is more than a practical way to stock your pantry—it’s a celebration of wholesome, homemade food. Each jar captures the essence of slow-simmered comfort, ready to provide nourishment and warmth on the busiest days or coldest nights.
With just a bit of effort and the right technique, you’ll have a convenient, nutritious meal at your fingertips—free from preservatives and full of flavor.
As you master this recipe, feel free to make it your own, experimenting with different vegetables, herbs, or even proteins. The joy of canning is in the customization and the satisfaction of a job well done.
If you enjoyed this recipe, you might also like exploring international flavors like our Bak Chor Mee Recipe: Authentic Singaporean Noodle Guide or our crave-worthy Baja Chicken Tacos Cheesecake Factory Recipe Copycat Guacamole.
Happy canning—and even happier eating!
📖 Recipe Card: Beef Vegetable Soup (Canning Recipe)
Description: A hearty beef vegetable soup perfect for canning and enjoying year-round. Packed with tender beef, vegetables, and rich broth for a comforting meal.
Prep Time: PT45M |
Cook Time: PT2H |
Total Time: PT2H45M
Servings: 7 quarts
Ingredients
- 3 lbs beef stew meat, cubed
- 2 cups diced carrots
- 2 cups diced potatoes
- 1 1/2 cups chopped celery
- 1 1/2 cups chopped onion
- 2 cups green beans, cut into 1-inch pieces
- 1 cup corn kernels
- 1 can (15 oz) diced tomatoes, undrained
- 8 cups beef broth
- 2 tsp salt
- 1 tsp black pepper
- 2 cloves garlic, minced
Instructions
- Brown beef cubes in batches in a large pot; set aside.
- Add onions, garlic, carrots, and celery to the pot; sauté 5 minutes.
- Return beef to pot and add potatoes, green beans, corn, and diced tomatoes.
- Pour in beef broth, salt, and pepper; bring to a boil.
- Simmer for 30 minutes until vegetables are just tender.
- Ladle hot soup into sterilized canning jars, leaving 1-inch headspace.
- Wipe rims, apply lids, and process in a pressure canner at 10 lbs pressure: 90 minutes for quarts, 75 minutes for pints.
- Remove jars and cool completely before storing.
Nutrition: Calories: 180 | Protein: 14g | Fat: 6g | Carbs: 18g