
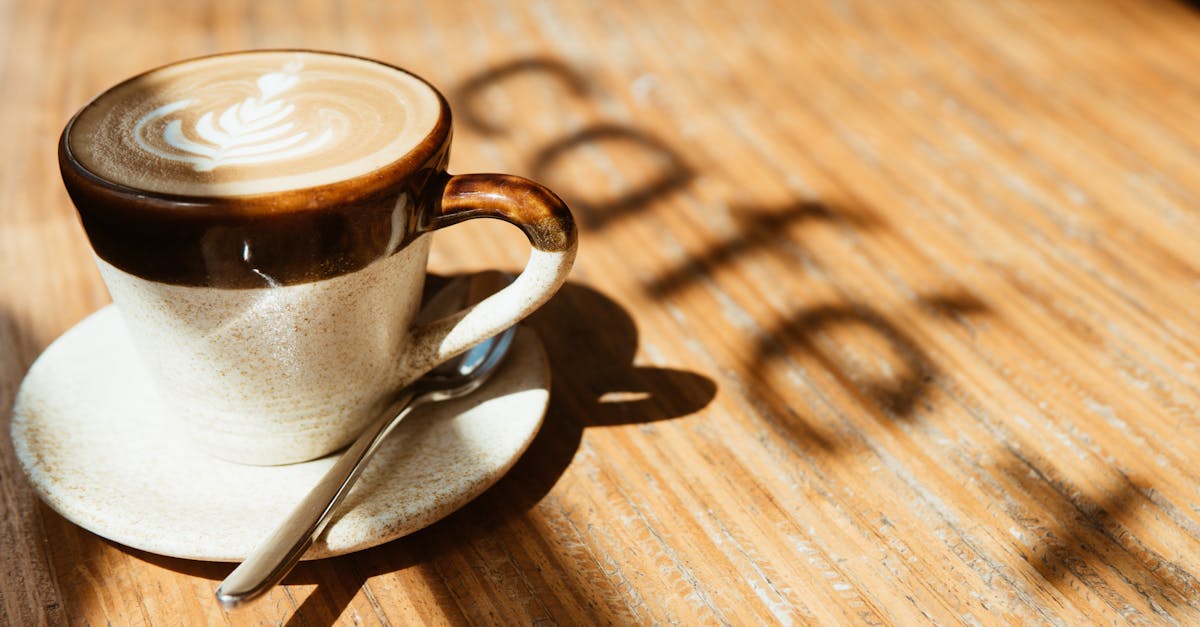
If you’re a coffee lover looking to elevate your morning routine the Ninja Barista System offers a perfect blend of convenience and quality. This versatile machine lets us craft everything from rich espresso shots to creamy lattes right at home without the need for a professional barista.
With the Ninja Barista System recipes we can explore a variety of delicious coffee drinks tailored to our taste. Whether you prefer a bold Americano or a frothy cappuccino these recipes unlock the full potential of the machine. Let’s dive into easy step-by-step guides that help us create café-style beverages and impress our friends with every cup.
Overview of Ninja Barista System Recipes
The Ninja Barista System unlocks a world of coffee possibilities by allowing us to craft a variety of café-style beverages right at home. These recipes combine precise brewing techniques with the machine’s versatile functions, giving us the ability to create everything from rich espresso shots to creamy lattes and frothy cappuccinos with ease.
Key Steps in Ninja Barista System Recipe Preparation
To make the most out of our Ninja Barista System recipes, we follow a clear process that ensures consistent and delicious results:
- Select the Coffee Type and Amount
Begin by choosing the coffee grounds suited to your drink—finely ground for espresso or medium grind for drip-style coffee. Measure the coffee accurately using the machine’s recommended settings.
- Water Temperature and Volume Settings
The Ninja Barista System offers temperature control to tailor the intensity and flavor. For espresso, use hotter water at around 200°F; for milder drinks, opt for a cooler temperature. Adjust water volume to control strength and cup size.
- Milk Frothing and Texturing
Use the built-in milk frother to steam and texture milk for lattes, cappuccinos, or macchiatos. The system allows us to create both thick and creamy foam or silky steamed milk.
- Layering and Serving
For layered drinks like a macchiato, pour espresso gently over the frothed milk to preserve separation. Serve immediately for the best sensory experience—rich aroma, velvety texture, and balanced flavor.
Recipes and Brewing Settings Table
| Recipe | Coffee Grind | Water Temperature | Water Volume | Milk Froth Setting | Brew Time |
|---|---|---|---|---|---|
| Espresso Shot | Fine | 200°F | 1 oz | None | 25-30 sec |
| Cafe Latte | Medium-Fine | 195°F | 6 oz | Thick Foam | 1-2 min |
| Cappuccino | Fine | 200°F | 4 oz | Dense Foam | 1-2 min |
| Macchiato | Fine | 200°F | 2 oz | Light Foam | 30-45 sec |
“With precise control over each element, Ninja Barista System recipes empower us to deliver barista-quality drinks tailored exactly to our taste.”
Essential Recipe Tips
- Always use fresh, filtered water for clean taste.
- Preheat the cup to maintain optimal drinking temperature.
- Experiment with grind size for perfect extraction.
- Froth milk immediately before pouring for maximum texture and flavor.
We rely on these structured steps and settings to master Ninja Barista System recipes, bringing professional-quality coffee into our daily lives with confidence and precision.
Ingredients for Ninja Barista System Recipes
To craft perfect café-style beverages using the Ninja Barista System, having the right ingredients is essential. Below we outline the core components that enable us to create rich, flavorful, and satisfying drinks every time.
Coffee Beans and Grounds
Choosing the right coffee beans or grounds is the foundation of any great recipe with the Ninja Barista System. We recommend:
- Fresh whole beans: Use freshly roasted beans for optimal flavor. Light, medium, or dark roasts can be selected depending on the drink type.
- Grind size: Adjust the grind for each recipe. Coarser for brew style, finer for espresso shots.
- Single-origin vs. blends: Single-origin beans highlight unique flavors, while blends deliver balanced, consistent profiles.
- Quantity: Use precise measurements, typically 14-18 grams for espresso shots and 20-22 grams for larger brews.
| Coffee Bean Type | Roast Level | Grind Size | Use Case |
|---|---|---|---|
| Arabica | Light-Medium | Medium-Coarse | Drip brew, regular coffee |
| Robusta | Dark | Fine | Espresso shots, intensity |
| Blend | Medium-Dark | Adjustable | Balanced lattes & cappuccinos |
Milk and Cream Options
Milk plays a vital role in creating the creamy texture and foam that enhance many Ninja Barista System recipes. Our preferred options include:
- Whole milk: For rich creaminess and stable froth.
- 2% milk: Lighter option with moderate frothing capability.
- Non-dairy alternatives: Almond, oat, or soy milk for dietary preferences. Note that frothing ability varies by brand.
- Heavy cream: For ultra-rich lattes or specialty drinks.
- Cold temperature: Always use cold milk for best frothing results.
Sweeteners and Flavorings
Sweetening and flavoring elevate each cup into a personalized delight. Essential options for our ninja barista recipes are:
- Simple syrup: Easy to dissolve and blend into hot or iced coffee.
- Raw sugar or brown sugar: Adds depth with molasses notes.
- Honey or maple syrup: Natural sweeteners with unique flavors.
- Vanilla extract or syrup: Classic flavor enhancer.
- Pumpkin spice, cinnamon, or nutmeg: Ideal for seasonal or specialty drinks.
Additional Ingredients for Specialty Drinks
To further expand our recipe repertoire, these ingredients help craft unique drinks that impress:
- Chocolate syrup or cocoa powder: Perfect for mochas or chocolate-infused beverages.
- Whipped cream: As a topping for lattes, hot chocolates, or cappuccinos.
- Ice cubes: For iced lattes and cold brews.
- Espresso shots: Pre-brewed and stored for layered drinks like macchiatos or affogatos.
- Flavored creamers: Dairy or non-dairy creamers with various flavor profiles to customize the drink.
By keeping these key ingredients on hand and experimenting with combinations, we unlock the full potential of our Ninja Barista System to create café-quality drinks at home with ease.
Tools and Equipment Needed
To craft exceptional coffee recipes using the Ninja Barista System, having the right tools and equipment is essential. Let’s explore the key components of the system and the recommended accessories that will elevate our coffee experience.
Ninja Barista System Components
The Ninja Barista System comes with several built-in components designed to deliver professional-quality coffee drinks effortlessly. Here are the main parts:
- Built-in Grinder: Freshly grinds coffee beans for maximum flavor extraction.
- Water Reservoir: Holds a large volume of water with adjustable temperature settings.
- Frother and Milk Reservoir: Creates rich, creamy foam for lattes and cappuccinos with ease.
- Control Panel: Intuitive touchscreen or button display to select recipes and customize settings.
- Brew Basket & Filter: Holds the coffee grounds or pods; compatible with various brewing methods.
- Coffee Carafe: Durable and heat-retentive to keep brewed coffee warm without bitterness.
| Component | Function | Importance |
|---|---|---|
| Built-in Grinder | Freshly grinds coffee beans | Ensures maximum freshness |
| Water Reservoir | Adjustable temperature water tank | Controls brewing temperature |
| Frother and Milk Reservoir | Produces creamy milk froth | Essential for specialty drinks |
| Control Panel | Selects brewing modes & recipes | Simplifies customization |
| Brew Basket & Filter | Holds coffee grounds or pods | Enables versatile brewing |
| Coffee Carafe | Collects brewed coffee | Keeps coffee hot and fresh |
Recommended Accessories
To fully unlock the Ninja Barista System recipes potential, we recommend adding a few key accessories to enhance preparation and presentation:
- Digital Kitchen Scale: Measures coffee grounds and milk for precise consistency.
- Thermometer: Monitors milk temperature during frothing to avoid scalding.
- Coffee Bean Storage Container: Airtight container to keep beans fresh longer.
- Reusable Mesh Filters: Eco-friendly alternative to paper filters for customized brewing.
- Milk Pitcher: Stainless steel pitcher designed for controlled frothing and pouring.
- Barista Cleaning Brush: Helps maintain the grinder and brew basket for optimal performance.
- Espresso Tamper: Ensures even tamping pressure when using espresso pods or grounds.
“Using these accessories not only improves our Ninja Barista System results but also mirrors professional barista tools, making every cup café-quality.”
By combining the Ninja Barista System components with these recommended accessories, we position ourselves to master an array of café-style drinks with confidence and precision.
Preparation Tips for the Ninja Barista System
Mastering the Ninja Barista System starts with proper preparation. Let’s ensure our machine is set up correctly and tailored to deliver the best brew strength for every coffee recipe we create.
Setting Up the Machine
To get the most out of our Ninja Barista System, follow these initial setup steps carefully:
- Place the machine on a sturdy, level surface near a power outlet.
- Fill the water reservoir with fresh, cold water. Using filtered water enhances flavor and reduces mineral buildup.
- Install the brew basket and filter ensuring they are properly seated to avoid leaks or grounds in the cup.
- Add fresh coffee beans to the built-in grinder hopper. For pre-ground coffee, dispense the appropriate amount directly into the basket.
- Attach the milk reservoir if preparing milk-based drinks. Make sure it clicks securely into place.
- Perform a cleansing brew cycle before the first use to ensure the system is clean and primed for brewing. Use water only for this step.
Taking these steps establishes a solid foundation for creating café-quality drinks with ease and reliability.
Adjusting the Settings for Desired Brew Strength
The Ninja Barista System offers customizable settings to control your coffee’s strength and flavor balance. Understanding these options guarantees our coffee matches personal preference every time.
| Setting | Description | Recommendation |
|---|---|---|
| Brew Strength | Adjusts the coffee to water ratio, affecting intensity | Use Strong for bold espresso-style shots. Choose Regular for balanced flavor. |
| Grind Size | Controls the coarseness of the coffee grounds | Select Fine grind for espresso, Medium for drip, Coarse for cold brew. |
| Water Temperature | Regulates the heat for optimal extraction | Set between 195°F and 205°F for rich extraction. |
| Brew Volume | Determines the amount of coffee brewed per serving | Adjust based on cup size: 6-8 oz for single serving, larger volumes for sharing. |
To adjust:
- Tap the display panel to select the brewing mode.
- Use the arrow buttons to increase or decrease brew strength.
- Customize grind size and temperature via the settings menu.
- Preview changes on the screen before starting the brew cycle.
As the Ninja Barista System masters precision, these adjustments empower us to customize each cup perfectly, whether we crave a quick espresso or a leisurely latte. Remember the mantra: precision in settings translates to perfection in your cup.
Instructions for Basic Coffee Recipes
Mastering the Ninja Barista System starts with perfecting the fundamentals. Here we detail step-by-step instructions for making Classic Brewed Coffee and Espresso Style Coffee that highlight the machine’s precision and versatility.
Classic Brewed Coffee
- Fill the Water Reservoir
Use filtered water and fill the reservoir to the desired brew size. We recommend starting with 10–12 ounces for a standard cup.
- Add Coffee Grounds
Scoop medium grind coffee into the brew basket. The ideal amount is 1 to 1.5 tablespoons per 6 ounces of water. Adjust to taste.
- Insert Filter and Close the Brew Basket
Use a paper or reusable filter and ensure it fits snugly for even extraction.
- Select Brew Strength
Choose the strength setting on the control panel: Classic for a smooth profile or Rich for a bolder taste.
- Start Brewing Cycle
Press the brew button. The Ninja Barista’s precise temperature and timing create a full-bodied cup.
- Serve Immediately
For optimal flavor, pour coffee straight from the carafe to your cup. Add milk or sweeteners as desired.
| Step | Measurement/Setting | Notes |
|---|---|---|
| Water | 10–12 oz per cup | Use filtered water for best taste |
| Coffee Grounds | 1–1.5 tablespoons per 6 oz | Medium grind preferred |
| Brew Strength | Classic or Rich | Adjust based on preference |
“Pro tip: Always pre-wet the filter briefly to eliminate paper taste and aid even coffee extraction.”
Espresso Style Coffee
- Prepare Fresh Espresso Grind
Use finely ground coffee specifically for espresso. Measure 14–16 grams for a double shot.
- Add Grounds to Brew Basket
Distribute grounds evenly, then tamp gently but firmly using an espresso tamper for an even compact puck.
- Fill Milk Reservoir and Engage Frother (Optional)
If making a latte or cappuccino, fill the milk reservoir with cold milk. Select the froth level from the settings.
- Select Espresso Brew Size
Use the control panel to choose Espresso or Strong Espresso. The Ninja Barista System will adjust water temperature and pressure accordingly.
- Start Brewing
Press brew and let the system extract a rich, aromatic espresso shot in approximately 25–30 seconds.
- Pour and Enjoy
Serve espresso immediately. Optionally layer frothed milk or cream to craft café-style beverages.
| Step | Measurement/Setting | Notes |
|---|---|---|
| Coffee Grounds | 14–16 grams | Fine espresso grind |
| Brew Time | 25–30 seconds | Expert extraction time for rich flavor |
| Milk Froth Level | Select from control panel | Optional for lattes or cappuccinos |
“Remember: Fresh beans and correct tamping create the crema—your signature espresso foam layer.”
By following these instructions, we tap into the full potential of the Ninja Barista System to brew exceptional coffee every time. Whether enjoying a classic cup or an espresso, these precise steps ensure consistent quality and café-style results.
Instructions for Specialty Ninja Barista System Recipes
Mastering specialty recipes with the Ninja Barista System unlocks a world of rich flavors and textures. Below, we break down the step-by-step instructions for creating café-style beverages that elevate your daily coffee routine.
Cappuccino Recipe
- Prepare the espresso: Use finely ground espresso beans. Add 18–20 grams of coffee to the brew basket.
- Brew an espresso shot: Select the espresso setting on the Ninja Barista System. Brew a 1.5 oz shot into your cup.
- Froth the milk: Pour 4 oz of cold whole milk into the frother reservoir. Select the froth setting for a thick, velvety foam.
- Combine espresso and milk: Pour the brewed espresso into a cappuccino cup. Slowly add the frothed milk, holding back the foam with a spoon.
- Top with foam: Spoon 1 to 2 inches of dense milk foam on top. Sprinkle with cocoa powder or cinnamon if desired.
Latte Recipe
- Brew espresso: Use the espresso setting to extract a 1.5 oz shot from 18–20 grams of finely ground coffee.
- Froth milk: Add 8 oz of whole or 2% milk to the frother reservoir. Choose the steamed milk setting for a smoother, less frothy result.
- Combine latte components: Pour espresso into a tall glass. Slowly add steamed milk, allowing for a thin layer of foam on top.
- Customize flavor: Stir in vanilla syrup or flavored creamers as preferred.
Macchiato Recipe
- Brew espresso shot: Use 18 grams of finely ground coffee to brew a concentrated 1.5 oz espresso shot.
- Froth small milk portion: Froth 1–2 oz of milk using the froth setting for a light foam.
- Assemble drink: Pour espresso into a small cup. Gently spoon the foamed milk on top to “mark” the espresso.
- Optional garnish: Add a dash of cinnamon or nutmeg for extra aroma.
Mocha Recipe
- Prepare espresso shot: Brew 1.5 oz espresso using 18 grams of fine grounds.
- Add chocolate syrup: Pour 1 to 2 tablespoons of rich chocolate syrup into the bottom of the mug.
- Mix espresso and chocolate: Pour hot espresso into the cup. Stir well to combine.
- Froth milk: Use 6 oz of whole milk in the frother reservoir. Select steamed milk for creamy texture.
- Top and garnish: Slowly add steamed milk, topping with a thin layer of foam. Decorate with whipped cream and a chocolate drizzle if desired.
| Drink | Espresso (oz) | Milk (oz) | Froth Type | Optional Extras |
|---|---|---|---|---|
| Cappuccino | 1.5 | 4 | Thick foam | Cocoa powder, cinnamon |
| Latte | 1.5 | 8 | Steamed milk | Vanilla syrup |
| Macchiato | 1.5 | 1-2 | Light foam | Cinnamon, nutmeg |
| Mocha | 1.5 | 6 | Steamed milk | Chocolate syrup, whipped cream |
Pro Tip: Adjust the froth settings on your Ninja Barista System to perfect the texture for each drink. This customization lets us achieve that barista-quality finish right at home.
How to Customize Your Ninja Barista Recipes
Customizing your Ninja Barista System recipes allows us to tailor every cup to our exact taste preferences. Here, we explore key ways to adjust and enhance our coffee creations for a truly personalized café experience at home.
Adjusting Milk Froth Levels
Control over milk froth is essential to crafting the perfect texture for lattes, cappuccinos, and more. The Ninja Barista offers versatile froth settings, which we can easily adjust:
- Light Froth: Ideal for creamy lattes with a smooth texture.
- Medium Froth: Perfect balance for cappuccinos with a moderate foam layer.
- Dense Froth: Best for macchiatos or espresso drinks requiring thick, velvety foam.
To adjust milk froth levels:
- Select the froth control on the machine’s panel.
- Choose the desired froth density based on your recipe or personal preference.
- Froth the milk until the froth reaches the selected richness and texture.
Pro Tip: Using cold whole milk generally produces the best froth with rich texture and stability.
Adding Flavor Syrups
Elevate your beverages by incorporating flavor syrups, which transform ordinary coffee into specialty creations. Popular syrup flavors for the Ninja Barista include:
- Vanilla
- Caramel
- Hazelnut
- Mocha
- Pumpkin spice (seasonal favorite)
How to add syrups properly:
| Step | Instruction |
|---|---|
| 1 | Brew your espresso or coffee base first to ensure hot temperature. |
| 2 | Add 1 to 2 tablespoons of syrup to the cup before pouring coffee. |
| 3 | Stir well to blend syrup evenly throughout the drink. |
| 4 | Add frothed milk or cream as required by your recipe. |
We recommend experimenting with syrup quantities to find your perfect balance. Start small and adjust based on sweetness preference.
Sweetener Options and Tips
Sweetening your coffee can vary widely depending on dietary needs and flavor goals. Here are our top sweetener recommendations to customize any Ninja Barista recipe:
- Granulated Sugar: Classic choice for a pure sweet taste.
- Brown Sugar: Adds warmth and slight molasses notes.
- Honey: Natural option with floral undertones, best added after brewing.
- Stevia or Monk Fruit: Low-calorie alternatives for sugar-free sweetness.
- Flavored Creamers: Double as sweetener and flavor enhancer (vanilla, hazelnut, etc.).
| Sweetener | Best Usage | Notes |
|---|---|---|
| Granulated Sugar | Brewed coffee, espresso | Dissolves better in hot liquid |
| Brown Sugar | Brewed coffee | Adds subtle caramel flavor |
| Honey | Brewed coffee or lattes | Add post-brew to preserve flavor |
| Stevia/Monk Fruit | Any coffee drink | Use sparingly to avoid bitterness |
| Flavored Creamer | Lattes, mochas, specialty drinks | Enhances creaminess and flavor |
Sweetener Tip: Dissolve sweeteners fully in hot coffee before adding milk or froth to maintain smooth texture.
By mastering milk froth adjustments, flavor syrups, and sweetening options, we unlock endless variations with the Ninja Barista System. This ensures every cup we craft reflects our personal taste perfectly.
Cleaning and Maintenance of Ninja Barista System
Maintaining our Ninja Barista System ensures consistent brewing quality and extends the life of the machine. Follow these step-by-step cleaning and maintenance instructions to keep your system running at peak performance.
Daily Cleaning Routine
- Empty and Rinse Brew Basket and Carafe
After each use, remove the brew basket and carafe.
Rinse thoroughly under warm water to remove coffee grounds and residue.
Wipe dry with a clean cloth.
- Clean the Milk Frother and Reservoir
Detach the milk reservoir.
Wash it with warm soapy water.
Rinse thoroughly and dry before reassembling.
Use a damp cloth to wipe the frother wand and surrounding area.
- Wipe Down the Machine Exterior
Use a soft, damp cloth to clean the control panel, water reservoir lid, and external surfaces.
Avoid abrasive cleaners to preserve the finish.
Weekly Deep Cleaning Procedure
| Step | Task | Details |
|---|---|---|
| 1 | Clean Brew Basket and Filter | Soak the brew basket and reusable filter in mild detergent for 10 minutes. Rinse well. |
| 2 | Descale Water Reservoir and Internal Components | Run a descaling cycle using a commercial coffee machine descaler or a mixture of white vinegar and water (1:1 ratio). Follow machine prompts or run a full brew cycle without coffee grounds. |
| 3 | Clean Milk Frother Thoroughly | Disassemble frother components and soak in warm soapy water for 15 minutes. Brush internal parts with a small cleaning brush. Rinse completely. |
| 4 | Clean Grinder Chamber | Remove coffee beans, then wipe grinder chamber with a dry brush or cloth to remove residual grounds. Avoid water contact. |
| 5 | Run Brew Cycle with Clean Water | After cleaning, run a full brew cycle using clean water only to flush out any residues. |
Best Practices and Tips
- Always use filtered water in the water reservoir to reduce scale buildup.
- Perform descaling once every 4-6 weeks depending on usage frequency and water hardness.
- Never immerse the base or electrical components in water.
- Use only Ninja-approved cleaners and follow manufacturer instructions for descaling.
- Regular cleaning prevents flavor contamination and keeps the Ninja Barista System in top condition.
“Consistent maintenance unlocks the full potential of your Ninja Barista System, ensuring every cup tastes fresh and perfectly brewed.”
Summary Table for Cleaning Frequency
| Component | Cleaning Frequency | Method |
|---|---|---|
| Brew Basket and Carafe | After every use | Rinse and dry |
| Milk Frother & Reservoir | After every use | Wash with warm soapy water |
| Exterior Surfaces | Daily | Wipe with damp cloth |
| Descaling | Every 4-6 weeks | Use descaler solution |
| Grinder Chamber | Weekly | Dry brush cleaning |
By embracing this cleaning and maintenance routine, we ensure our Ninja Barista System consistently delivers the rich flavors and perfect textures detailed throughout our recipes.
Make-Ahead and Storage Tips for Ninja Barista Beverages
To enjoy café-quality drinks anytime, mastering make-ahead and storage techniques for your Ninja Barista beverages is essential. We will cover crucial tips to preserve freshness, flavor, and texture for your favorite coffee recipes.
Preparing Beverages in Advance
- Brew coffee or espresso fresh using your Ninja Barista System according to the recipe.
- Allow the brewed coffee or espresso to cool slightly to prevent condensation in storage containers.
- For milk-based drinks, frothed milk is best made fresh; however, you can prepare it in advance and store it briefly with the following guidelines.
- Combine ingredients such as flavoring syrups or sweeteners just before serving to maintain taste intensity.
Storage Containers and Conditions
- Use airtight containers made of glass or BPA-free plastic to maintain aroma and prevent oxidation.
- Store beverages in the coldest part of the refrigerator (usually near the back).
- Avoid storing coffee or milk-based drinks in the refrigerator door to prevent temperature fluctuations.
| Storage Item | Container Type | Maximum Storage Time | Notes |
|---|---|---|---|
| Brewed Coffee | Airtight glass jar | Up to 24 hours | Refrigerate immediately |
| Espresso Shots | Small glass bottle | Up to 12 hours | Best consumed fresh or chilled |
| Frothed Milk | Sealed jar or cup | Up to 24 hours | Re-froth gently before use |
| Milk-Based Drinks | Airtight bottle | Up to 24 hours | Stir well before serving |
Reheating and Serving Tips
- Reheat brewed coffee or espresso gently on the stove or with a microwave set to medium power to avoid bitterness.
- For milk-based drinks, reheat slowly and avoid boiling to preserve texture and flavor.
- Gently stir or re-froth milk after reheating for a light, creamy consistency.
- Always taste and adjust sweetness or flavoring after reheating as some notes may mellow or intensify.
Freezing Options for Longer Storage
- Brewed coffee or espresso can be frozen in ice cube trays and added to recipes later for cool beverages like iced lattes or mochas.
- Wrap frozen coffee cubes in a zip-lock bag once solid to prevent freezer odor absorption.
- Defrost cubes as needed and incorporate into drinks directly without reheating.
Pro Tip: “When storing any Ninja Barista beverage, always prioritize airtight sealed containers and avoid exposure to heat or light. This ensures that every cup tastes fresh as if brewed moments before.”
By following these make-ahead and storage tips, we maximize the versatility of our Ninja Barista System and enjoy premium coffee beverages anytime with minimal effort.
Conclusion
Mastering the Ninja Barista System opens up a world of coffee possibilities right in our own kitchens. With its versatile features and customizable settings, we can confidently craft everything from bold espresso shots to creamy lattes and specialty drinks tailored to our tastes.
By combining the right ingredients, precise techniques, and proper maintenance, the Ninja Barista System consistently delivers café-quality beverages that impress every time. Whether we’re brewing for ourselves or entertaining friends, this system empowers us to enjoy professional-level coffee without leaving home.
Embracing these recipes and tips ensures that each cup we make is a perfect reflection of our coffee preferences, making every morning—and every coffee break—a truly satisfying experience.
Frequently Asked Questions
What types of coffee drinks can I make with the Ninja Barista System?
The Ninja Barista System can make a wide range of drinks, including espresso shots, classic brewed coffee, lattes, cappuccinos, macchiatos, and mochas—all from the comfort of your home.
Do I need professional barista skills to use the Ninja Barista System?
No, the machine’s intuitive controls and step-by-step guides make it easy for anyone to create barista-quality coffee without professional training.
What ingredients do I need for Ninja Barista recipes?
You’ll need fresh whole coffee beans or grounds, milk or cream (dairy or non-dairy), sweeteners like sugar or honey, and optional flavorings such as chocolate syrup or flavored creamers.
Can I customize the coffee strength and froth level?
Yes, the Ninja Barista System allows you to adjust brew strength, grind size, water temperature, and milk froth levels to tailor each drink to your personal taste.
What cleaning and maintenance does the Ninja Barista System require?
Daily cleaning involves rinsing the brew basket, carafe, and milk frother, while a weekly deep clean includes descaling and grinder chamber cleaning to ensure optimal performance.
Are there any recommended accessories to enhance my coffee experience?
Recommended accessories include a digital kitchen scale, thermometer, coffee bean storage container, reusable filters, milk pitcher, cleaning brush, and espresso tamper.
Can I prepare and store Ninja Barista drinks ahead of time?
Yes, brewed coffee and espresso can be cooled and stored in airtight containers in the fridge; frothed milk should be used fresh or stored briefly for best quality.
How do I get started with my Ninja Barista System?
Place the machine on a sturdy surface, fill the water reservoir with filtered water, run a cleansing brew cycle, and then customize settings before brewing your first cup.
Does the Ninja Barista include a built-in grinder?
Yes, it has a built-in grinder with adjustable settings to grind coffee beans precisely based on your chosen drink recipe.
Can I add flavor syrups to my coffee drinks?
Absolutely, you can add syrups such as vanilla or caramel to customize your beverages, following the machine’s syrup addition guidance for the best results.