
There’s something magical about the smell of freshly baked bread wafting through the kitchen, and the Food Nanny Bread recipe brings that magic to life. This recipe has become a beloved favorite for its simplicity and incredible flavor, making it perfect for both seasoned bakers and beginners alike. It’s a timeless classic that turns basic ingredients into a warm, comforting loaf every time.
What sets this bread apart is its versatility. Whether you’re serving it alongside a hearty soup, crafting the ultimate sandwich, or enjoying it with a smear of butter, it never disappoints. We love how this recipe brings people together—there’s just something about homemade bread that feels like a hug in every bite.
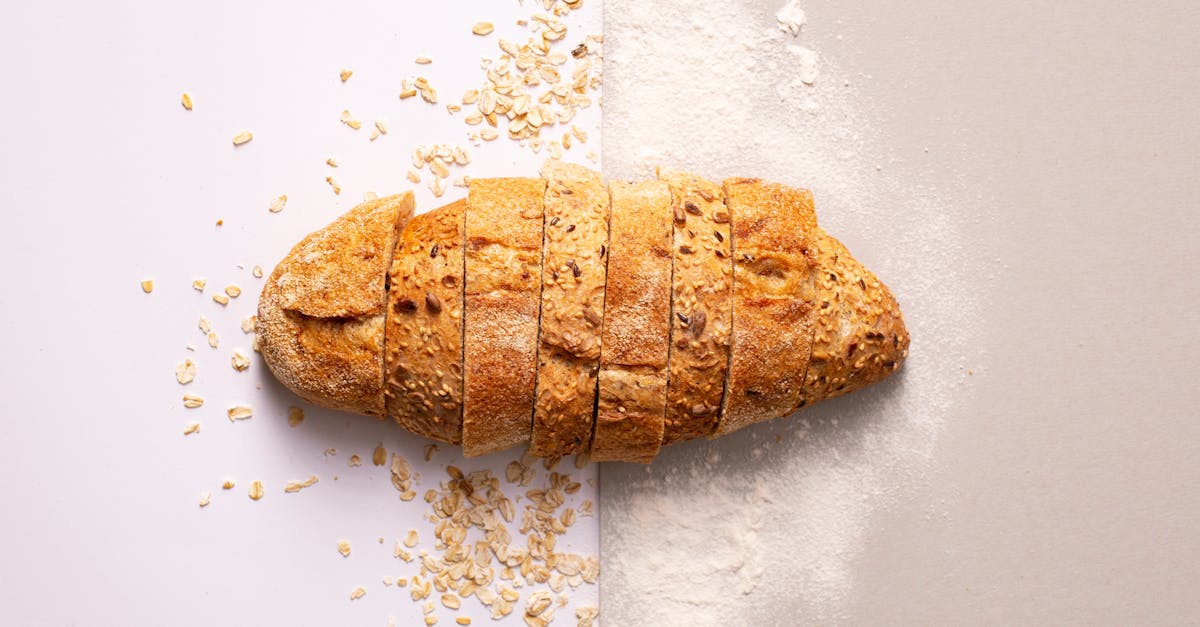
Food Nanny Bread Recipe
The Food Nanny Bread Recipe stands out for its ease and rewarding results. Let’s walk through the detailed steps to create this soft, fluffy, and versatile bread at home. Follow along, and you’ll have a batch of perfect homemade bread ready to share.
Ingredients
Here’s what we’ll need for this Food Nanny Bread recipe:
- 6 cups all-purpose flour (divided)
- 2 tablespoons sugar
- 1 tablespoon salt
- 1 tablespoon active dry yeast
- 2 ½ cups warm water (110°F to 115°F)
- 2 tablespoons olive oil or melted butter (optional, for softer texture)
Pro Tip: Use a kitchen thermometer to ensure water temperature is optimal for yeast activation.
Step-by-Step Instructions
1. Activate the Yeast
- In a large mixing bowl, combine 2 ½ cups warm water with 1 tablespoon active dry yeast and 2 tablespoons sugar. Stir gently and let the mixture rest for 5-7 minutes until it turns frothy.
- The froth indicates that the yeast is active and ready to help the dough rise.
2. Mix the Dry Ingredients
- In another bowl, combine 4 cups of flour and 1 tablespoon of salt. This forms the base of our bread.
3. Combine Wet and Dry
- Gradually add the dry mixture to the yeast mixture. Stir with a wooden spoon or dough hook on a stand mixer at low speed.
- Add the remaining 2 cups of flour slowly, ensuring the dough doesn’t become too sticky.
4. Knead the Dough
- If mixing by hand: Transfer the dough to a floured surface and knead for 5-7 minutes, pushing and folding it to develop gluten.
- If using a mixer: Let the stand mixer knead the dough for 3-4 minutes on medium speed until smooth and elastic.
5.First Rise
- Shape the dough into a smooth ball and place it in a lightly greased bowl. Cover with plastic wrap or a damp towel.
- Allow it to rise in a warm place for about 1 hour, or until it doubles in size.
| Step | Time |
|---|---|
| Yeast Activation | 5-7 minutes |
| Mixing & Kneading | 10-15 minutes |
| First Rise | 1 hour |
6. Shape the Dough
- Once risen, punch down the dough to release air pockets. Divide it in half, shaping each portion into a loaf. Place the loaves in greased 9×5-inch bread pans.
7. Second Rise
- Cover the pans with a towel and let the dough rise for another 30 minutes, or until the dough crowns just above the pan edges.
8. Bake
- Preheat the oven to 375°F (190°C).
- Bake the bread for 25-30 minutes, or until the top is golden brown and the loaf sounds hollow when tapped.
9. Cool and Serve
- Remove the bread from the pans and cool on wire racks. Slice and enjoy the warm, freshly baked loaf with butter, jam, or your favorite topping.
Ingredients
To create the Food Nanny Bread recipe, we’ll need a combination of pantry staples and a few optional additions to enhance flavor. Here’s a breakdown of what you’ll need:
For The Dough
- 5 ½ cups all-purpose flour
- 2 teaspoons salt
- 3 tablespoons sugar (granulated works best)
- 1 ½ tablespoons active dry yeast
- 2 cups warm water (between 105°F and 115°F to activate yeast effectively)
- 2 tablespoons olive oil (can substitute with melted butter, if preferred)
Optional Add-Ons
For those who love to customize, here’s how you can level up your bread:
- 1 teaspoon garlic powder (for a savory twist)
- 1 tablespoon dried rosemary (for a fragrant, herbal note)
- Sesame seeds or poppy seeds (for topping, adds texture and nuttiness)
- 1 tablespoon honey (for a slightly sweet undertone)
Markdown structured for accuracy and visual clarity! This list ensures you have everything for successful baking.
Tools And Equipment
To create the perfect Food Nanny Bread, assembling the right tools and equipment is just as important as having quality ingredients. Here’s everything we need for an effortless and enjoyable baking session:
Essential Tools
- Large mixing bowl: Ideal for combining and kneading dough.
- Measuring cups and spoons: For precise measurements of flour, sugar, salt, and liquids. Accuracy is key.
- Wooden spoon or silicone spatula: Sturdy tools for mixing the ingredients thoroughly.
- Whisk: Perfect for activating the yeast and integrating the dry ingredients.
Specialized Baking Equipment
- Stand mixer with a dough hook (optional): Speeds up kneading and ensures uniform bread texture. If not available, hands-on kneading works equally well.
- Proofing container or bowl with cling wrap: Keeps the dough moist and supports its rise. A towel is an alternative if cling wrap isn’t handy.
- Loaf pan or baking sheet: Choose depending on whether you prefer a shaped loaf or a rustic free-form style.
- Pastry brush (optional): Helps in evenly brushing olive oil or butter on top for added flavor during baking.
Heat and Timing Essentials
- Thermometer (optional): Ensures the water used for activating yeast is at the ideal temperature of 105–110°F.
- Oven thermometer: Verifies that the oven reaches and maintains the correct baking temperature.
- Timer: Keeps us aware of rising times and baking duration for precision and avoids overcooking.
Table: Tools Breakdown
Below is a table summarizing our essential tools:
| Category | Item | Purpose |
|---|---|---|
| Mixing & Measuring | Large mixing bowl | For combining and kneading the dough. |
| Mixing & Measuring | Measuring cups/spoons | Accuracy when measuring ingredients. |
| Mixing & Measuring | Wooden spoon/spatula | Thoroughly mixes ingredients. |
| Specialty Equipment | Stand mixer (optional) | Speeds up kneading. |
| Specialty Equipment | Proofing container/bowl | Helps the dough rise effectively. |
| Baking | Loaf pan or baking sheet | Shapes or supports the bread. |
| Additional Tools | Pastry brush (optional) | Adds toppings evenly. |
| Heat & Timing | Thermometer (optional) | Ensures proper yeast activation temp. |
Equipped with these tools, we transform simple ingredients into soft, fluffy Food Nanny Bread that feels and tastes like it came from the heart of a bakery.
Directions
Let’s dive right into creating soft, fluffy Food Nanny Bread. Follow these steps for a seamless baking journey filled with the comforting warmth of fresh bread.
Prep
- Gather all tools and ingredients before starting. See the equipment and ingredient list above.
- Preheat the oven to just 200°F for a minute, then turn it off. This warm space is perfect for helping the dough rise later.
- Prepare proofing container or bowl by lightly greasing it with olive oil or non-stick spray to prevent the dough from sticking.
Mixing The Dough
- In a small bowl, activate the active dry yeast:
- Combine 1 ½ tablespoons of yeast, 2 tablespoons of sugar, and 2 cups of warm water (110°F–115°F).
- Let the mixture sit for 5-7 minutes until frothy. This indicates the yeast is activated.
- Meanwhile, in a large mixing bowl, combine:
- 5 ½ cups of all-purpose flour, 2 teaspoons of salt, and the remaining 1 tablespoon of sugar. Whisk these together to evenly distribute the dry ingredients.
- Gradually pour the frothy yeast mixture into the dry ingredients while stirring with a wooden spoon or a stand mixer on low speed.
- Add 2 tablespoons of olive oil (or melted butter) for added flavor and moisture. Mix until the dough starts to come together.
Kneading The Dough
- Transfer the dough to a lightly floured surface. Knead for 8-10 minutes by hand until the dough becomes smooth and elastic. Or, use the dough hook attachment on a stand mixer for 5-7 minutes on medium speed.
- To check if the dough is ready, press a finger into it. If it slowly springs back, your kneading is complete.
First Rise
- Shape the dough into a ball and place it in the prepared greased bowl. Turn the dough to coat it lightly with oil to prevent drying out.
- Cover the bowl with plastic wrap or a damp kitchen towel. Place it in the warm (turned-off) oven or another draft-free location.
- Allow the dough to rise for 30-40 minutes, or until it has doubled in size. Use a timer to avoid over-proofing.
Shaping The Bread
- Once risen, punch down the dough gently to release air bubbles. Turn it out on a floured surface.
- Divide the dough into two equal portions for two loaves or keep it as a whole for one large loaf.
- Shape each portion by rolling it into a log for loaf pans or a round for a free-form bread shape. Follow desired consistency for specific add-ons or shapes, like braided loaves or boule.
- Place the shaped dough into a greased loaf pan or baking sheet.
Second Rise
- Cover the shaped dough again with plastic wrap or a towel. Allow it to rise for 20-30 minutes in a warm spot until it puffs up slightly.
- This second rise creates the essential airy, fluffy texture in the Food Nanny Bread.
Baking Instructions
In this section, we focus on the final steps to transform your dough into the soft and fluffy Food Nanny Bread we’ve been working toward. Follow these instructions closely to achieve golden, bakery-perfect loaves.
Oven Preparation
- Begin by preheating your oven to 375°F (190°C). A properly preheated oven ensures that the bread bakes evenly and achieves its characteristic golden crust.
- If using a loaf pan, lightly grease it with butter or olive oil, or line it with parchment paper for easy removal. For a baking sheet, prepare it by lining with parchment paper or a silicone baking mat for a non-stick surface.
- Optional: If you want a crispier crust, place a small heat-safe pan with water on the bottom rack of the oven. The steam will create a wonderfully crunchy exterior while keeping the inside soft.
Pro tip: Ensure the oven thermometer reads the exact temperature as accuracy is crucial for perfectly baked bread.
Baking The Bread
- Once the shaped dough has completed its second rise and is slightly springy to the touch, gently transfer it into the prepared loaf pan or onto the baking sheet. Avoid deflating the dough.
- Using a sharp knife or bread lame, make a shallow slash (about ¼ inch deep) across the top of the dough. This allows steam to escape and prevents uneven cracking during baking.
- Place the dough in the center of the oven and set a timer for 25-30 minutes.
| Doneness Check | Instructions |
|---|---|
| Visual | Look for a golden-brown crust. |
| Sound | Tap the bottom of the loaf—if it sounds hollow, it’s done. |
| Internal Temp | Use a thermometer; the bread should register 190°F to 200°F. |
- Once baked, carefully remove the bread from the oven, and if in a pan, turn it out onto a cooling rack immediately. This prevents moisture build-up at the bottom.
- Allow the bread to cool for at least 20-30 minutes before slicing. This crucial step ensures the crumb sets properly and slices cleanly.
Expert Advice: If you’re craving a custom touch, brush melted butter over the top of the bread right after removing it from the oven. This adds a slight sheen and deeper flavor to the crust.
Tips For Success
Baking the perfect Food Nanny Bread is a rewarding experience, but a few pro tips can make the process even smoother. Let’s dive into some essential techniques to ensure a flawless result every time.
Mastering Dough Consistency
- Use the “windowpane test” to check if the dough is kneaded enough. After kneading, stretch a small piece of dough between your fingers. If it forms a thin, elastic sheet without tearing, your dough is ready.
- Add flour gradually when kneading to avoid over-drying the dough. The mixture should feel soft and slightly tacky, but not sticky.
Importance of Water Temperature
- Yeast thrives at specific temperatures. Keep your water between 105°F and 110°F to properly activate the yeast. A thermometer is your best friend here—guessing can lead to inactive or overheated yeast.
| Water Temperature | Effect on Yeast |
|---|---|
| Below 105°F | Slow or no activation |
| 105°F to 110°F | Optimal yeast activation |
| Above 110°F | Yeast begins to die, affecting rise |
Rise Like a Pro
- Place the dough in a warm, draft-free place for it to rise. If your kitchen is cool, try these tips:
- Preheat your oven to 200°F for 1-2 minutes, then turn it off and place your dough inside with the door ajar.
- Cover the bowl with a damp towel to retain moisture while the dough rises.
- Time is key! Let the dough double in size rather than sticking strictly to the clock. Rise times can vary due to temperature and yeast activity.
Shaping and Second Rise
- When shaping the dough, be gentle to avoid losing all the lovely air pockets from the first rise. Use a light dusting of flour and avoid pressing down too hard.
- For the second rise, let the dough expand slightly above the top edge of the loaf pan, ensuring a beautiful domed shape. Check frequently to prevent over-proofing, which can cause collapse during baking.
Achieving the Perfect Crust
- To get a bakery-style crispy crust, place a shallow pan of water on the bottom rack of the oven during baking. The steam will work wonders!
- For a softer crust, brush the dough with melted butter before and after baking.
Expert-Touch Baking
- Monitor doneness by internal temperature. Bread is ready when the internal temperature hits 190°F to 200°F. This is more reliable than just checking color.
- Avoid slicing too soon. Cooling the bread for 20-30 minutes is crucial as it helps the interior fully set, preventing a gummy texture.
Customization Magic
Experiment with add-ons:
- Sprinkle sesame seeds, poppy seeds, or coarse sea salt on top before baking for extra flavor and texture.
- For sweeter bread, mix in honey, raisins, or a pinch of cinnamon into the dough before kneading.
Bonus Pro Tip
“Homemade bread requires patience and care. Every step adds character to your loaf, so don’t rush. Enjoy the journey as much as the destination!”
Make-Ahead And Storage Instructions
Preparing Food Nanny Bread ahead of time can save effort and ensure fresh, homemade bread is always at our fingertips. Let’s explore how to freeze the dough and store the baked bread effectively.
Freezing The Dough
Freezing bread dough allows us to have freshly baked Food Nanny Bread whenever the craving strikes. Follow these steps to freeze the dough correctly:
- Prepare the dough as per the recipe instructions, stopping after the first rise.
- Divide the dough into portions if needed or shape it into loaves.
- Place the shaped dough on a baking sheet lined with parchment paper and flash-freeze it by placing it in the freezer for about 1-2 hours.
- Once the dough is firm to the touch, transfer it to an airtight freezer-safe container or wrap it tightly in plastic wrap, followed by aluminum foil.
- Label the container with the date and store it in the freezer for up to 3 months.
When ready to bake:
- Take the frozen dough out and place it in a greased loaf pan or on a baking sheet.
- Cover with a kitchen towel and allow it to thaw and rise at room temperature. This process can take 3-4 hours, depending on your kitchen temperature.
- Once fully risen, bake as directed in the recipe.
Storing The Bread
Proper storage ensures the softness and freshness of homemade bread. Use these tips for storing Food Nanny Bread:
- Room Temperature:
- Keep the bread in a bread box, resealable plastic bag, or airtight container to prevent it from drying out.
- Store it at room temperature for up to 3 days.
- Refrigerator:
- While refrigeration can extend shelf life, it can cause the bread to dry out or become stale faster. If refrigerating is necessary, wrap the bread tightly in plastic wrap and consume it within 5 days.
- Freezing Baked Bread:
- For longer storage, freeze the baked bread by letting it cool completely first.
- Slice the bread for convenience, then wrap individual slices or the whole loaf in plastic wrap and foil before placing it in a freezer bag.
- Freeze for up to 3 months.
Table For Storage Timelines
| Storage Method | Duration | Notes |
|---|---|---|
| Room Temperature | Up to 3 days | Keep in an airtight container or bread box. |
| Refrigerator | Up to 5 days | May cause drying or staling; wrap tightly. |
| Freezer (Dough) | Up to 3 months | Freeze after the first rise; thaw and bake when ready. |
| Freezer (Baked Bread) | Up to 3 months | Cool completely before freezing; wrap slices or whole loaf as needed. |
Serving Suggestions
When the Food Nanny Bread comes out of the oven, golden, airy, and irresistible, it serves as the perfect canvas for endless culinary possibilities. Below are some delicious serving ideas to inspire us:
1. Everyday Meals
- Slice the bread and serve it with homemade soups like tomato basil, hearty vegetable, or creamy potato for an elevated comfort meal.
- Use it as the base for sandwiches—layer it with deli meat, fresh veggies, and spreads like mustard or mayo for a fresh lunch or dinner option.
- Toast it lightly, spread it with butter and jam, and pair it with tea or coffee for a simple breakfast.
2. Appetizers and Party Pleasers
- Cut the bread into cubes and toast it for homemade croutons to sprinkle over salads or soups.
- Create a bread platter with various toppings, such as garlic butter, cream cheese spreads, and olive tapenades.
- Pair slices with a cheeseboard featuring rich brie, aged cheddar, or tangy goat cheese, along with olives and dried fruits.
3. Kid-Friendly Ideas
- Transform the bread into grilled cheese sandwiches by adding cheddar or mozzarella and grilling to golden perfection.
- Make mini personal pizzas by adding marinara sauce, shredded cheese, and toppings before toasting in the oven.
- Serve it with a spread of peanut butter and honey for a sweet, satisfying snack.
4. Special Occasions
- Offer the bread with creamy dips like spinach artichoke dip or roasted red pepper hummus for holiday gatherings.
- Serve alongside a festive roast dinner, soaking up gravies and sauces perfectly.
- Use it as a base for elegant crostini by toasting thin slices and topping them with combinations like smoked salmon and cream cheese or bruschetta made from fresh tomatoes and basil.
5. Sweet Breakfast Treat Ideas
- Create classic French toast by dipping slices in a mixture of eggs, milk, and vanilla, then frying until golden brown.
- Serve it as bread pudding—tear it into chunks, soak it in spiced custard, and bake until warm and fluffy.
- Top with whipped cream and berries to make an indulgent yet simple breakfast treat.
Suggested Pairings
Here’s a quick reference table for pairing Food Nanny Bread with complementary dishes:
| Dish Type | Pairing Idea |
|---|---|
| Soups | Tomato Basil, Creamy Mushroom |
| Sandwiches | Turkey Avocado, Tuna Melt |
| Cheese Board | Brie, Gouda, Goat Cheese |
| Dips | Spinach Artichoke, Hummus, Fondue |
| Desserts | Bread Pudding, Honey-Butter Toast |
With its versatility, Food Nanny Bread elevates almost every meal, whether it’s a quiet family dinner or an extravagant event.
Conclusion
Baking the Food Nanny Bread is more than just a recipe—it’s an opportunity to create something truly special in our kitchens. With its soft texture, rich flavor, and endless versatility, this bread brings warmth and joy to any meal. Whether we’re serving it fresh out of the oven or customizing it with our favorite toppings, it’s a recipe that never disappoints.
By following the detailed steps and incorporating a bit of patience and care, we can achieve bakery-quality results right at home. Let’s embrace the magic of homemade bread and enjoy the simple pleasures it brings to our tables.
Frequently Asked Questions
What makes the Food Nanny Bread recipe special?
The Food Nanny Bread recipe is celebrated for its simplicity, fluffy texture, and versatility. Its ingredients are easy to find, and it’s suitable for both beginner and experienced bakers. The recipe creates soft, homemade bread perfect for any meal, from soups to sandwiches, ensuring a comforting and rewarding baking experience.
What ingredients do I need to make Food Nanny Bread?
Key ingredients include 5 ½ cups of all-purpose flour, 2 teaspoons of salt, 3 tablespoons of sugar, 1 ½ tablespoons of active dry yeast, 2 cups of warm water, and 2 tablespoons of olive oil or melted butter. Optional add-ons like garlic powder, rosemary, or seeds can enhance the flavor.
What tools are essential for baking Food Nanny Bread?
Essential tools include a mixing bowl, measuring cups, a whisk, and a silicone spatula. While optional, a stand mixer with a dough hook, a proofing container, and a loaf pan will make the process smoother. A thermometer and timer are also recommended for precise baking.
How long does it take to bake Food Nanny Bread?
The process, including preparation, kneading, rising, and baking, typically takes around 2-3 hours total. The dough needs two rising periods, and baking takes 25-30 minutes, depending on your oven.
Can I customize the Food Nanny Bread recipe?
Absolutely! You can add garlic powder, dried herbs like rosemary, or sprinkle seeds such as sesame or poppy on top. For a sweeter version, mix in honey or cinnamon. Customization options allow you to tailor the bread to your taste.
How can I ensure fluffy and soft bread?
Use warm (not hot) water to activate the yeast and knead the dough until elastic. Ensure the dough rises properly in a warm, draft-free place, and don’t rush the process. Gentle handling during shaping also helps retain air pockets for a soft texture.
How can I achieve a crispy crust?
For a crispy crust, place a pan of water in the oven while baking to create steam. You can also brush the loaf with olive oil or melted butter before baking for added flavor and crispiness.
Can I make the dough ahead of time?
Yes, you can make the dough ahead and freeze it. Shape the dough, flash-freeze it, and store it in an airtight container or bag for up to three months. Thaw and let it rise before baking for fresh bread anytime.
How should I store baked Food Nanny Bread?
Store baked bread at room temperature for 2-3 days in an airtight bag or container. For longer storage, refrigerate for up to 5 days or freeze for up to 3 months. Slice it before freezing for easier use.
What meals pair well with Food Nanny Bread?
Food Nanny Bread pairs well with soups, stews, salads, and sandwiches. It’s perfect for appetizers like bruschetta or dips and makes delicious breakfast options like French toast. Its versatility complements both everyday meals and festive spreads.