
If you’re craving a dessert that combines rich, fudgy brownies with a delightful surprise in every bite, our Brownie Bomb Bars recipe is exactly what you need. These bars pack intense chocolate flavor and a gooey center that will keep you coming back for more. Perfect for sharing or indulging solo, they’re a crowd-pleaser that’s simple to make.
Ingredients
To create these irresistible Brownie Bomb Bars with their signature fudgy texture and gooey center, we need to gather specific ingredients for each component of the recipe. Below, we break down exactly what you’ll need to craft the perfect bar, from the decadent brownie base to the luscious filling and the final topping.
Brownie Base Ingredients
These ingredients form the rich, dense, and fudgy foundation of our Brownie Bomb Bars:
- 1 cup (2 sticks) unsalted butter, melted
- 2 cups granulated sugar
- 3/4 cup unsweetened cocoa powder
- 1 teaspoon baking powder
- 1/2 teaspoon salt
- 4 large eggs
- 1 1/2 teaspoons vanilla extract
- 1 1/3 cups all-purpose flour
Bomb Filling Ingredients
The gooey center is what makes these bars truly a bomb. Here’s what we use to achieve the perfect filling:
- 1 cup semi-sweet chocolate chips
- 1/2 cup sweetened condensed milk
- 1/3 cup creamy peanut butter (optional but highly recommended for extra indulgence)
Topping Ingredients
The finishing touch combines texture and taste to complete our Brownie Bomb Bars:
- 1/2 cup chopped walnuts (or your choice of nuts)
- 1/2 cup more semi-sweet chocolate chips (for melting or sprinkling on top)
- Powdered sugar, for dusting (optional)
| Ingredient Group | Key Components |
|---|---|
| Brownie Base | Butter, sugar, cocoa powder, flour, eggs, vanilla |
| Bomb Filling | Semi-sweet chocolate chips, condensed milk, peanut butter |
| Topping | Chopped walnuts, semi-sweet chocolate chips, powdered sugar |
With these precise ingredients assembled we’re ready to move confidently into creating our decadent and crowd-pleasing Brownie Bomb Bars.
Equipment Needed
To make our Brownie Bomb Bars flawlessly, we need the right equipment to ensure consistent texture and delicious results. Here’s what we recommend:
- 9×9-inch baking pan
Use this size for even baking and perfect bar thickness.
- Mixing bowls (medium and large)
Essential for combining dry and wet ingredients separately.
- Electric mixer or hand whisk
For blending ingredients smoothly and achieving the fudgy brownie batter.
- Measuring cups and spoons
Accurate measurements are key to balancing flavors and texture.
- Spatula or wooden spoon
Use to fold ingredients gently without deflating the batter.
- Saucepan
Needed to melt butter and prepare the chocolate filling.
- Double boiler or microwave-safe bowl
Helpful for melting chocolate chips gently without burning.
- Parchment paper
To line the pan for easy removal and cleanup.
- Cooling rack
Allows the bars to cool evenly, preventing sogginess.
| Equipment | Purpose |
|---|---|
| 9×9-inch baking pan | Baking the brownie base evenly |
| Mixing bowls | Separating and mixing dry and wet ingredients |
| Electric mixer/whisk | Achieving smooth, fudgy batter |
| Measuring cups & spoons | Precise ingredient measurement |
| Spatula/wooden spoon | Folding batter without deflating |
| Saucepan | Melting butter and preparing filling |
| Double boiler/microwave | Controlled chocolate melting |
| Parchment paper | Prevents sticking and aids in removing bars easily |
| Cooling rack | Cooling bars evenly to maintain texture |
Make-Ahead Instructions
To enjoy our Brownie Bomb Bars with ease, preparing them ahead of time is a wonderful option. Here’s how we can make sure they stay fresh, delicious, and ready to serve whenever we want.
Baking and Cooling
- Bake the brownie base and assemble the bomb filling and topping as directed in the recipe.
- Allow the bars to cool completely on a cooling rack to avoid sogginess.
- Once cooled, cover the baking pan tightly with plastic wrap or aluminum foil.
Storing Before Serving
- We can store the covered bars in the refrigerator for up to 3 days to maintain the gooey center and keep the flavors intense.
- For longer storage, freeze the bars wrapped tightly in plastic wrap and then placed in a freezer-safe container or bag.
Reheating for Best Texture
- To enjoy warm Brownie Bomb Bars, remove them from the refrigerator or freezer and let them thaw at room temperature.
- Warm individual portions in the microwave for 15 to 20 seconds to restore their fudgy, gooey texture without drying them out.
| Storage Method | Duration | Notes |
|---|---|---|
| Refrigerator | Up to 3 days | Keeps bars fresh and gooey |
| Freezer | Up to 1 month | Wrap tightly to prevent freezer burn |
| Microwave Heat | 15-20 seconds | Restores fudginess and warmth |
Tips for Make-Ahead Success
- Use parchment paper under the bars for easy removal before wrapping.
- Avoid cutting the bars before storing; slice after reheating to keep the gooey center intact.
- If freezing, wrap each bar individually for quick grab-and-go desserts.
By following these make-ahead instructions, we can prepare our Brownie Bomb Bars in advance, ensuring they remain a decadent, crowd-pleasing dessert whenever we need them.
Instructions
Follow these detailed steps to create our irresistible Brownie Bomb Bars. We will guide you through preparing the brownie base, making the bomb filling, assembling, baking, and cooling for perfect results every time.
Preparing the Brownie Base
- Preheat the oven to 350°F (175°C). Line a 9×9-inch baking pan with parchment paper, leaving enough overhang on the sides for easy removal.
- In a medium saucepan, melt 1/2 cup (1 stick) of unsalted butter over low heat until fully liquid.
- Remove the saucepan from the heat. Whisk in 1 cup granulated sugar and 1/3 cup cocoa powder until smooth.
- Add 1/4 teaspoon baking powder and 1/4 teaspoon salt. Stir well.
- Beat in 2 large eggs one at a time, then add 1 teaspoon vanilla extract.
- Gently fold in 3/4 cup all-purpose flour until just combined. Avoid overmixing to keep the brownies tender.
Making the Bomb Filling
- In a microwave-safe bowl or double boiler, combine:
- 1 cup semi-sweet chocolate chips
- 1/2 cup sweetened condensed milk
- Optional: Add 2 tablespoons creamy peanut butter for added richness.
- Heat gently in 30-second intervals, stirring between each, until completely melted and smooth.
- Set aside to cool slightly. The filling should be thick and gooey but pourable.
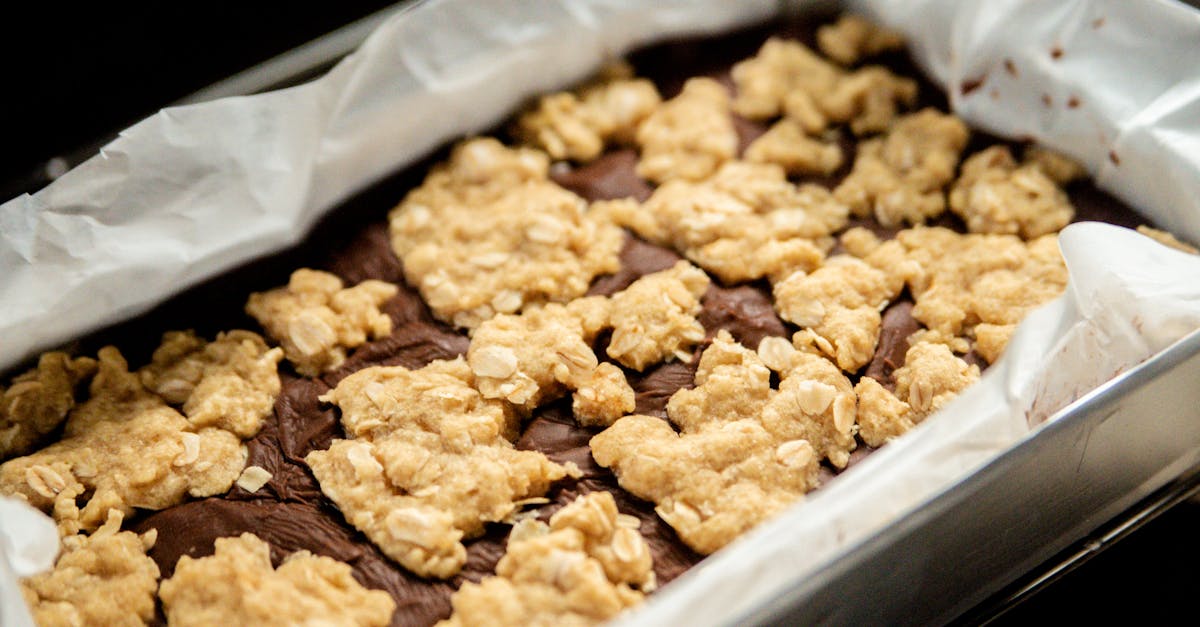
Assembling the Brownie Bomb Bars
- Pour half of the prepared brownie batter into the lined pan. Spread evenly with a spatula.
- Carefully spoon the bomb filling over the brownie layer, spreading to the edges but leaving a small border.
- Pour the remaining brownie batter over the filling. Use a spatula to gently spread it without disturbing the filling.
- Sprinkle the top with:
- 1/2 cup chopped walnuts
- 1/4 cup additional chocolate chips
| Assembly Step | Ingredient | Amount |
|---|---|---|
| Brownie base – first layer | Brownie batter (half) | Half of prepared batter |
| Filling | Bomb filling | Entire batch |
| Brownie base – top layer | Brownie batter (second half) | Remaining batter |
| Topping | Chopped walnuts | 1/2 cup |
| Topping | Chocolate chips | 1/4 cup |
Baking the Bars
- Place the pan in the preheated oven.
- Bake for 30 to 35 minutes or until the edges are set but the center is still slightly soft. A toothpick inserted near the edges should come out with moist crumbs.
- Avoid overbaking to maintain the gooey texture inside.
Cooling and Setting
- Remove from the oven and allow the bars to cool completely in the pan on a cooling rack.
- Use the parchment paper overhang to lift the brownies out of the pan carefully.
- For best results, chill the bars in the refrigerator for at least 1 hour to set the bomb filling before slicing.
- Use a sharp knife to cut into squares. Optional: dust with powdered sugar before serving for an elegant touch.
Serving Suggestions
To elevate the enjoyment of our Brownie Bomb Bars, we suggest pairing them with accompaniments that complement their rich, fudgy texture and gooey chocolate center. Here are some ideas to serve these decadent bars with style and flavor:
- Warm Serving: Serve the bars slightly warmed. Reheat each portion in the microwave for 10 to 15 seconds. This enhances the gooey center making the bars even more indulgent.
- Ice Cream Pairing: A scoop of vanilla or coffee ice cream perfectly balances the rich chocolate flavors. The cold creaminess contrasts wonderfully with the warm brownie bars.
- Fresh Berries: Add tartness with fresh raspberries, strawberries, or blueberries on the side. Their natural acidity cuts through the sweetness creating a harmonious bite.
- Drizzled Sauces: Enhance presentation and flavor by drizzling warmed caramel sauce, chocolate ganache, or a raspberry coulis over the bars before serving.
- Whipped Cream: A dollop of lightly sweetened whipped cream brings additional lightness and creaminess that pairs well with the dense brownie texture.
- Nut Topping: Sprinkle extra chopped walnuts or pecans for an added crunch and nutty aroma that works with the existing toppings.
Use the chart below for quick pairing options and serving temperature recommendations:
| Serving Suggestion | Flavor Profile | Serving Temperature | Quantity per Portion |
|---|---|---|---|
| Vanilla Ice Cream | Creamy, sweet | Cold | 1 large scoop (½ cup) |
| Fresh Mixed Berries | Tart, fresh | Room temperature | ¼ cup |
| Caramel Sauce Drizzle | Sweet, buttery | Warm or room temp | 1 tablespoon |
| Whipped Cream | Light, fluffy | Cold | 2 tablespoons |
| Chopped Walnuts | Crunchy, nutty | Room temperature | 1 tablespoon |
Presentation Tips:
Place bars on a decorative plate lined with parchment. Add a small scoop of ice cream to one side. Drizzle sauces artistically in zigzags. Garnish with a sprig of fresh mint or dust with powdered sugar for an elegant touch.
We recommend serving our Brownie Bomb Bars fresh or within a few hours of assembling accompaniments to maintain the perfect texture contrast that makes this dessert so irresistible.
Storage Tips
To maintain the rich fudgy texture and gooey center of our Brownie Bomb Bars, proper storage is essential. Follow these tips to keep them fresh and delicious:
Refrigeration
- Once the bars have completely cooled, cover the baking pan tightly with plastic wrap or place the bars in an airtight container.
- Store the bars in the refrigerator for up to 3 days.
- For best flavor and texture, bring the bars to room temperature before serving or warm individual servings in the microwave for 15 to 20 seconds.
Freezing
- To freeze, wrap each Brownie Bomb Bar individually in plastic wrap or parchment paper to prevent freezer burn.
- Place the wrapped bars in a resealable freezer bag or airtight container.
- Freeze for up to 1 month.
- When ready to enjoy, thaw bars in the refrigerator overnight or at room temperature for 1 to 2 hours.
- Reheat slightly in the microwave as needed to restore the soft, gooey center.
Additional Storage Tips
| Tip | Recommendation |
|---|---|
| Use Parchment Paper | Line the baking pan with parchment paper for easy removal and storage. |
| Avoid Pre-Cutting | Do not slice bars before storing to prevent drying out and maintain freshness. |
| Wrapping Individually | Wrap bars separately for convenient portion control and freshness. |
“Proper storage preserves the signature fudgy and gooey layers that make our Brownie Bomb Bars irresistible every time.“
By following these storage guidelines, we can ensure that our Brownie Bomb Bars stay fresh and ready for indulgence whether enjoyed immediately or saved for later.
Conclusion
Brownie Bomb Bars bring together rich chocolate and a gooey center in a way that’s both indulgent and easy to make. With the right ingredients and a few simple steps, we can create a dessert that’s perfect for any occasion.
By storing them properly, we ensure every bite stays just as fudgy and delicious as when they first come out of the oven. Whether we’re sharing with friends or treating ourselves, these bars are sure to satisfy any chocolate craving with confidence and ease.
Frequently Asked Questions
What ingredients are needed to make Brownie Bomb Bars?
You need unsalted butter, granulated sugar, cocoa powder, baking powder, salt, eggs, vanilla extract, all-purpose flour, semi-sweet chocolate chips, sweetened condensed milk, optional creamy peanut butter, chopped walnuts, and optional powdered sugar.
What equipment is required for this recipe?
Essential equipment includes a 9×9-inch baking pan, mixing bowls, electric mixer or hand whisk, measuring cups and spoons, spatula or wooden spoon, saucepan, double boiler or microwave-safe bowl, parchment paper, and a cooling rack.
Can I prepare Brownie Bomb Bars ahead of time?
Yes, bake and cool completely, then store in the refrigerator for up to 3 days or freeze for up to 1 month. Use parchment paper for easy removal and wrap bars individually.
How do I make the brownies gooey in the center?
Use the bomb filling made of semi-sweet chocolate chips and sweetened condensed milk, assemble it between the brownie layers, and bake as directed. Cooling and chilling before slicing helps set the gooey texture.
What are some serving suggestions for Brownie Bomb Bars?
Serve warm or chilled, paired with ice cream, fresh berries, drizzled sauces, whipped cream, or topped with nuts for extra crunch.
How should I store Brownie Bomb Bars to keep them fresh?
Store in an airtight container tightly covered in the refrigerator for up to 3 days or freeze individually wrapped bars for up to 1 month. Avoid cutting before storing to maintain freshness.
Can I add peanut butter to the filling?
Yes, creamy peanut butter is an optional ingredient to mix into the bomb filling for added flavor and richness.
Is it necessary to chill the bars before slicing?
Yes, chilling the bars in the refrigerator after baking helps firm up the gooey center for clean, neat slices.
How long should I bake the Brownie Bomb Bars?
Bake according to the recipe instructions, typically until the edges are set but the center remains slightly soft to preserve the gooey texture.
Can these bars be made gluten-free?
The original recipe uses all-purpose flour, but you can substitute gluten-free flour blends. Adjust baking time as needed for best results.