
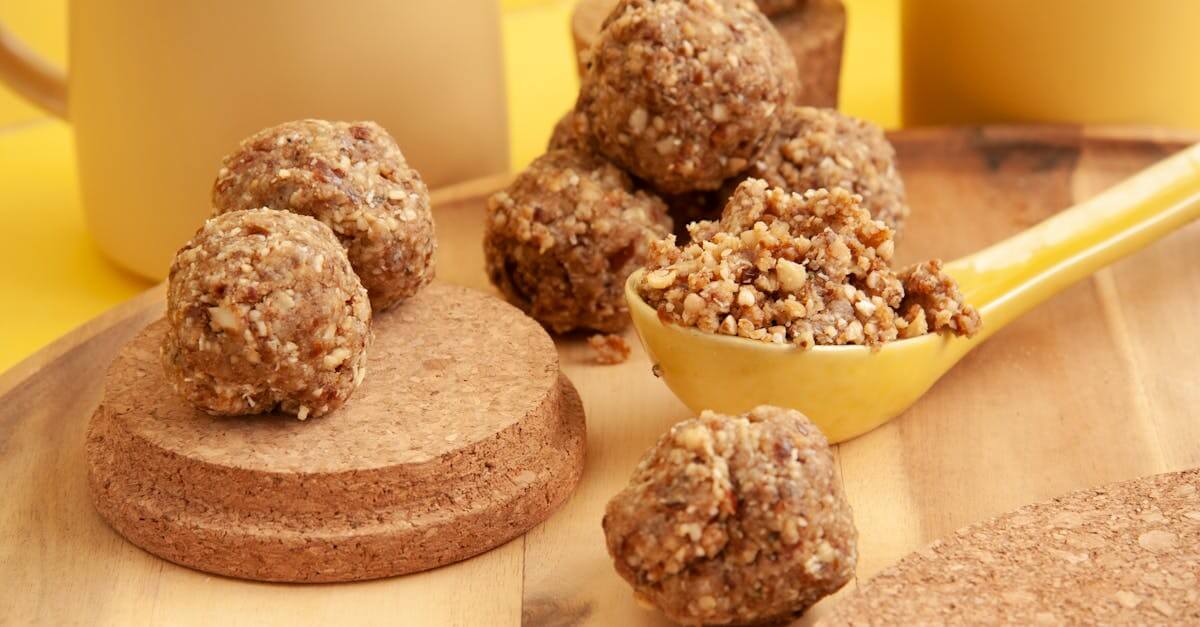
When we’re craving something sweet but want to keep things simple and gluten free, peanut butter balls always come to the rescue. These little treats blend creamy peanut butter with just a few pantry staples to create a snack that’s rich, satisfying, and naturally gluten free. They’re perfect for sharing at parties or packing in lunchboxes for a quick pick-me-up.
We love how easy it is to make these no-bake bites—no oven required and minimal cleanup. Whether we’re looking for a healthier dessert option or a quick energy boost, peanut butter balls never disappoint. Let’s whip up a batch and enjoy a classic treat everyone can feel good about.
Why You’ll Love This Gluten Free Peanut Butter Balls Recipe
Our Gluten Free Peanut Butter Balls Recipe quickly becomes a favorite for several reasons. We craft these treats to be naturally gluten-free so everyone can enjoy them without worry. Let’s break down the features we love most about this simple and satisfying snack.
1. Simple No-Bake Preparation
We don’t need an oven to make these delicious peanut butter balls. Every step happens in one bowl with a sturdy spatula or spoon. No-bake recipes like this mean minimal cleanup and absolutely no fuss.
Step-by-Step Simplicity Table
| Step | Description |
|---|---|
| Mix | Combine all dough ingredients in one bowl |
| Roll | Shape the mixture into small balls |
| Chill | Set in the refrigerator or freezer for less than 30 minutes |
2. Short Ingredient List
This recipe uses wholesome pantry staples. Only a handful of ingredients—like creamy peanut butter, gluten-free oats, and chocolate chips—are needed for wonderful results. We don’t hunt for specialty items, keeping everything accessible for busy families.
3. Perfect Bite-Sized Snack
With each ball, we pack in satisfying sweet and salty peanut flavor. The bite-size portions make them perfect for lunchboxes, after-school snacks, or dessert trays. Their firm yet creamy interior creates a melt-in-your-mouth texture that’s both indulgent and energizing.
4. Kid-Friendly and Customizable
Kids love to help roll the dough and shape each ball. We can easily make these treats dairy free or nut free by switching peanut butter for sunflower seed butter or almond butter. Adding mini chocolate chips, shredded coconut, or chopped nuts lets us tailor the recipe for everyone’s favorite flavors.
5. Naturally Gluten Free
All ingredients in our Gluten Free Peanut Butter Balls Recipe are free from gluten. Using certified gluten-free oats guarantees safety for celiac and gluten-sensitive eaters. “Everyone deserves a sweet treat they can trust.”
6. Perfect for Make-Ahead Snacking
We love how these peanut butter balls store in the fridge or freezer for days. Make a batch on Sunday, and we’ll have grab-and-go fuel all week long.
| Storage Method | Duration | Texture Maintained |
|---|---|---|
| Refrigerator (airtight) | Up to 7 days | Firm & chewy |
| Freezer (airtight) | Up to 3 months | Extra firm, easy to thaw |
Ingredients
To make our gluten free peanut butter balls recipe both delicious and worry-free, we use simple pantry staples. Each ingredient keeps the recipe safe, satisfying, and easy to prepare.
Peanut Butter Selection
For perfect peanut butter balls, we recommend:
- 1 cup creamy natural peanut butter (no added sugar or hydrogenated oils)
- Chunky peanut butter for added crunch, if preferred
We use natural, unsweetened peanut butter for the best texture and to keep the recipe gluten-free. If allergies are a concern, feel free to substitute with almond or sunflower seed butter.
Sweeteners and Binding Agents
The right sweetener creates a balanced flavor and binds everything together:
- 1/4 cup honey – natural binding and sweetness
- Or 1/4 cup pure maple syrup for a vegan option
- 3/4 cup gluten-free powdered sugar
- 1 teaspoon vanilla extract for warm flavor undertones
| Ingredient | Amount | Notes |
|---|---|---|
| Honey | 1/4 cup | Or substitute pure maple syrup |
| Gluten-free powdered sugar | 3/4 cup | |
| Vanilla extract | 1 teaspoon | Adds depth of flavor |
Chocolate Coating Options
We love adding a chocolate finish to our peanut butter balls:
- 1 cup semisweet chocolate chips (certified gluten-free)
- Or 1 cup dark chocolate melting wafers
- 1 tablespoon coconut oil for a glossy coating
For a dairy-free version, choose allergen-friendly chocolate chips.
Optional Add-Ins and Toppings
Customize your gluten free peanut butter balls with your favorite textures and flavors:
- 1/2 cup gluten-free crispy rice cereal for crunch
- 1/4 cup unsweetened shredded coconut
- 2 tablespoons mini chocolate chips (gluten-free)
- Chopped roasted peanuts
- Multi-colored sprinkles (gluten-free, for a fun finish)
- Pinch of flaky sea salt for a savory touch
Tools and Equipment Needed
To make our Gluten Free Peanut Butter Balls Recipe with ease and minimal cleanup, let’s prepare the following essentials:
Mixing and Measuring
- Large Mixing Bowl: We use a sturdy bowl for combining our peanut butter, sweetener, and add-ins in one place.
- Measuring Cups and Spoons: Accurate measurements ensure the perfect balance of sweet and salty in every batch of peanut butter balls.
Shaping and Handling
- Rubber Spatula or Wooden Spoon: A flexible spatula scrapes every bit of batter from the bowl and makes mixing easy.
- Small Cookie Scoop or Tablespoon: To portion out even-sized balls for uniform texture and presentation.
- Clean Hands: Essential for rolling the mixture into smooth, bite-sized rounds.
Chocolate Coating (Optional)
- Microwave-Safe Bowl or Double Boiler: We melt chocolate evenly to coat or drizzle for a glossy finish.
- Fork or Dipping Tool: Useful for dipping each peanut butter ball smoothly in melted chocolate.
- Parchment or Wax Paper: Prevents sticking and ensures easy removal after chilling.
Storage
- Baking Sheet: Assembles and chills the shaped balls before and after dipping in chocolate.
- Airtight Container: Keeps our peanut butter balls fresh in the fridge or freezer for easy grab-and-go snacking.
Table: Essential Tools for Gluten Free Peanut Butter Balls
| Tool/Equipment | Purpose |
|---|---|
| Large Mixing Bowl | Mixing ingredients |
| Measuring Cups/Spoons | Ensuring accurate measurements |
| Rubber Spatula/Spoon | Combining and scraping mixture |
| Cookie Scoop/Tablespoon | Portioning balls evenly |
| Clean Hands | Rolling balls smoothly |
| Microwave-Safe Bowl | Melting chocolate |
| Fork/Dipping Tool | Coating balls in chocolate |
| Parchment/Wax Paper | Non-stick surface for chilling |
| Baking Sheet | Laying out and chilling peanut butter balls |
| Airtight Container | Storing finished treats |
By organizing these simple kitchen tools in advance, we streamline our preparation and ensure our gluten free peanut butter balls come together effortlessly for every craving or event.
Directions
Let’s get started on our Gluten Free Peanut Butter Balls Recipe. We will walk through each step from creating the creamy dough to finishing the bite-sized treats with a glossy chocolate coating.
Prep the Peanut Butter Mixture
- In a large mixing bowl add 1 cup creamy natural peanut butter.
- Pour in 1/4 cup honey or pure maple syrup.
- Add 1 teaspoon pure vanilla extract.
- Sprinkle in 1/2 cup gluten free powdered sugar.
- Stir thoroughly with a rubber spatula or wooden spoon until the mixture is smooth and slightly thickened. The dough should easily pull away from the bowl sides and hold its shape.
- If adding texture, gently fold in optional add-ins such as crisped rice cereal, shredded coconut, or mini chocolate chips.
Shape the Peanut Butter Balls
- Line a baking sheet with parchment or wax paper for easy removal.
- Using a small cookie scoop or tablespoon, portion the mixture into equal amounts.
- With clean hands, roll each scoop into a tight, smooth ball. Uniform shapes ensure even coating.
- Arrange the balls on the prepared baking sheet, spaced slightly apart.
Chill the Balls
- Place the baking sheet in the refrigerator.
- Chill for a minimum of 30 minutes until the balls feel firm to the touch and easy to handle.
Melt the Chocolate
- In a microwave-safe bowl, combine 1 cup semisweet or dark chocolate chips and 1 teaspoon coconut oil (optional for shine).
- Microwave in 20-second intervals, stirring in between, until melted and smooth.
- Alternatively, melt chocolate in a double boiler over simmering water, stirring frequently.
Tip: Avoid overheating the chocolate to keep it glossy and smooth.
Dip and Coat the Peanut Butter Balls
- Remove the chilled peanut butter balls from the refrigerator.
- Using a fork or dipping tool, lower each ball into the melted chocolate. Roll or spoon chocolate over the top to coat fully.
- Lift and tap off excess chocolate, then place each ball back onto the lined baking sheet.
Add Toppings or Decorations
- While the coating is still wet, immediately sprinkle each ball with chopped peanuts, shredded coconut, mini chips, or festive sprinkles for added texture and color.
- Press toppings in gently to help them adhere.
Final Chill and Set
- Return the baking sheet to the refrigerator.
- Chill for 15 to 20 minutes until the chocolate coating is completely set and firm to the touch.
Peanut Butter Balls Key Steps Table
| Step | Key Action | Estimated Time |
|---|---|---|
| Prep Mixture | Mix peanut butter, sweetener, sugar, vanilla | 5 minutes |
| Shape Balls | Portion and roll into smooth balls | 7 minutes |
| Initial Chill | Refrigerate for firming | 30 minutes |
| Melt Chocolate | Microwave or double boiler method | 3 minutes |
| Dip & Coat | Cover each ball in chocolate | 10 minutes |
| Decorate | Add toppings while chocolate is wet | 2 minutes |
| Final Chill & Set | Refrigerate for coating to harden | 15 to 20 minutes |
With these simple steps our Gluten Free Peanut Butter Balls are deliciously ready to enjoy or store for later snacking.
Make-Ahead and Storage Tips
When it comes to making our Gluten Free Peanut Butter Balls ahead of time, we have several options for convenient snacking and entertaining.
Prepare in Advance:
We can easily prepare the peanut butter ball mixture up to two days in advance. After mixing and forming the balls, let them chill uncovered in the refrigerator for 30 minutes until firm. Once chilled, transfer them to an airtight container.
“Chilling before storing helps the balls hold their shape and prevents sticking.”
Short-Term Storage:
For freshness throughout the week, store the peanut butter balls in an airtight container in the refrigerator. They maintain their flavor and texture best if eaten within 7 days. Lay a piece of parchment or wax paper between layers to avoid sticking.
Freezing Instructions:
To extend their shelf life, we freeze our gluten free peanut butter balls following these steps:
- Arrange the chilled balls in a single layer on a baking sheet lined with wax paper.
- Freeze for 1 hour until solid.
- Transfer to a freezer-safe, airtight container or resealable bag.
- Separate layers with parchment for easy removal.
Refer to the guide below for optimal storage options:
| Storage Method | Container Type | Duration | Notes |
|---|---|---|---|
| Refrigeration | Airtight container | Up to 7 days | Best texture with parchment between layers |
| Freezer | Freezer-safe container | Up to 2 months | Thaw in fridge for 1 hour before serving |
Serving After Storage:
If frozen, let the peanut butter balls thaw in the refrigerator for at least 1 hour or at room temperature for 20 minutes before serving. The flavor and creamy texture will be restored, making them perfect for a quick dessert or energy boost.
No-Bake Convenience:
Since these treats require no baking, we can make a double or triple batch in one go—saving time for busy weekdays or special events.
Variations and Substitutions
We can easily adapt our Gluten Free Peanut Butter Balls Recipe to suit a range of tastes and dietary needs. Here are our favorite ways to customize these no-bake treats:
Nut and Seed Butters
- Swap peanut butter for almond butter, cashew butter, or sunflower seed butter for a nut-free school-safe option.
- Ensure the substitute is creamy and natural for the best texture and to keep everything gluten free.
Sweetener Options
- Substitute honey with pure maple syrup or agave nectar for a vibrant flavor and a vegan-friendly version.
- For lower sugar, consider monk fruit maple syrup or sugar-free powdered sugar.
Chocolate Coating
- Use dairy-free or vegan chocolate chips to keep the recipe suitable for all diets.
- Mix in white chocolate or dark chocolate for a bolder or creamier flavor profile.
| Chocolate Options | Suitability |
|---|---|
| Semisweet chips | Classic, kid-friendly |
| Dark chocolate | Intense, less sweet |
| White chocolate | Extra sweet, creamy |
| Vegan chocolate | Dairy-free, allergy-safe |
Crunch and Flavor Boosts
- Add gluten free crispy rice cereal for crunch.
- Stir in mini chocolate chips, shredded coconut, sprinkles, or crushed gluten free pretzels for fun color and texture.
- For a salty-sweet pop, roll in finely chopped gluten free roasted peanuts.
Binding and Texture
- Replace powdered sugar with gluten free oat flour for a less sweet, higher-fiber alternative.
- Substitute with coconut flour—start with only half the amount for a drier consistency.
Quote from Our Kitchen
“With just a few pantry swaps, our gluten free peanut butter balls transform into brand new treats—everyone can find their perfect combination.”
Allergen-Friendly Options
- For nut allergies, always choose sunflower seed butter and confirm all ingredients are certified gluten free.
- To go dairy free, select vegan chocolate and avoid toppings that contain milk or butter.
Table: Common Substitutions
| Ingredient | Substitution | Suitability |
|---|---|---|
| Peanut butter | Sunflower seed butter | Nut free, gluten free |
| Honey/maple syrup | Agave/vegan syrup | Vegan, lower glycemic |
| Powdered sugar | Oat flour/coconut flour | Less sweet, more fiber |
| Semisweet chocolate | Dark/vegan chocolate | Dairy free, allergy safe |
| Crispy rice cereal | Mini chips/coconut | Texture, extra flavor |
Experimenting with gluten free peanut butter balls is easy and fun. We encourage everyone to try new flavors and textures for a customized experience every time.
Serving Suggestions
We love getting creative with how we serve our Gluten Free Peanut Butter Balls Recipe for every occasion. These bite-sized treats are equally at home on a simple snack tray or as a star dessert at celebrations. Below are our favorite serving ideas and presentation tips to help elevate your peanut butter ball experience.
Snack Platters and Lunchboxes
Arrange the gluten free peanut butter balls on a platter with fresh fruit, gluten-free pretzels, and veggie sticks for an easy, balanced snack spread. They tuck perfectly into lunchboxes for a sweet midday treat or post-practice energy boost.
“Place peanut butter balls in reusable silicone cups for no-mess school snacks or road trip fuel.”
Dessert Boards
Showcase these bite-sized delights alongside gluten-free cookies, berries, and mini chocolate bars for a tempting dessert board. Drizzle with extra melted chocolate and sprinkle with chopped nuts or coarse sea salt for visual appeal and added texture.
Party and Holiday Displays
Arrange the peanut butter balls on a tiered serving tray for birthday parties, baby showers, or holidays. Top each ball with festive sprinkles, edible glitter, or colored chocolate drizzle to match the theme. For a sophisticated touch, use mini cupcake liners to give each piece its own “wrapper.”
Custom Flavors and Dips
Set up a “decorate-your-own” station with small bowls of:
- Mini chocolate chips
- Toasted coconut
- Crushed pretzels
- Chopped dried fruit
- Rainbow nonpareils
Invite guests to roll or dip their own gluten free peanut butter balls to customize both flavor and texture.
Pairing Suggestions Table
| Occasion | Suggested Pairings |
|---|---|
| After-school Snack | Sliced apples, celery sticks, gluten-free crackers |
| Coffee or Tea Break | Dark roast coffee, chai tea, matcha latte |
| Party Treat | Fruit skewers, chocolate-dipped strawberries, sparkling water |
| Holiday Dessert | Spiced hot cocoa, mulled cider, gluten-free holiday cookies |
Storage and Travel Tips
When hosting gatherings or packing for picnics, keep the peanut butter balls chilled in an insulated container until ready to serve. For large parties, display them on a chilled marble or ceramic tray to help maintain shape and texture.
“Store leftovers in an airtight container in the fridge to keep them fresh and delicious for days after your event.”
With endless possibilities for presentation and pairing, Gluten Free Peanut Butter Balls easily adapt to fit any menu or special moment.
Conclusion
Gluten Free Peanut Butter Balls bring together convenience and delicious flavor in every bite. Whether we’re prepping snacks for the week or looking for a quick dessert to share with friends these treats fit right in with our busy lives.
With endless ways to customize and serve them we can enjoy a sweet treat that’s both satisfying and safe for gluten-free diets. Let’s keep this recipe handy for those moments when we want something easy homemade and always crowd-pleasing.