
Satsuma marmalade captures the bright, sweet-tart flavor of these easy-to-peel citrus fruits in a jar. Originating from Japan but beloved worldwide, satsumas offer a unique twist on traditional marmalade with their delicate zest and juicy segments. Making our own satsuma marmalade lets us enjoy a fresh burst of citrus any time of year.
This recipe is straightforward and rewarding, perfect for both beginners and seasoned cooks. With just a few simple ingredients and some patience, we can create a vibrant marmalade that’s great on toast, in desserts, or as a glaze. Let’s dive into a delicious way to preserve the sunny taste of satsumas and brighten up our breakfast table.
Ingredients
To create the perfect Satsuma Marmalade, we gather a handful of simple yet essential ingredients. Each component plays a crucial role in balancing the sweet-tart flavor and achieving the ideal texture and consistency.
- Satsumas – 2 pounds (about 6–8 medium satsumas), peeled and segmented, removing seeds and membranes for smooth marmalade.
- Granulated sugar – 3 cups, to sweeten and preserve the citrus brightness.
- Water – 3 cups, to extract flavor and aid in setting the marmalade.
- Lemon juice – 2 tablespoons, fresh-squeezed, to enhance acidity and help natural pectin set the marmalade.
- Pectin (optional) – 1 tablespoon, if you prefer a firmer set, though satsumas naturally contain enough pectin for a good consistency.
| Ingredient | Quantity | Preparation Details |
|---|---|---|
| Satsumas | 2 pounds | Peeled, segmented, seeds and membranes removed |
| Granulated sugar | 3 cups | Measured precisely for sweetness and preservation |
| Water | 3 cups | Fresh, filtered preferred |
| Lemon juice | 2 tablespoons | Freshly squeezed |
| Pectin (optional) | 1 tablespoon | Powdered, only if firmer set is desired |
By carefully measuring these ingredients, we ensure our Satsuma Marmalade captures the authentic zest and vibrant color of satsumas, delivering a luscious spread with every spoonful.
Equipment Needed
To make the Satsuma Marmalade Recipe successfully, having the right equipment on hand is essential. Each tool plays a specific role in measuring, cooking, and preserving the marmalade, ensuring we achieve the perfect texture and vibrant flavor.
Essential Tools for Satsuma Marmalade
| Equipment | Purpose |
|---|---|
| Large heavy-bottomed pot | For simmering the satsumas and sugar evenly without burning |
| Sharp paring knife | To peel and segment the satsumas precisely |
| Cutting board | Provides a stable surface for prepping satsumas |
| Citrus juicer or reamer | Extracts fresh lemon juice efficiently |
| Measuring cups and spoons | Measures exact quantities of sugar, water, and lemon juice |
| Wooden spoon or heatproof spatula | For stirring the marmalade mixture gently and thoroughly |
| Candy thermometer | Monitors the marmalade temperature to reach setting point (around 220°F or 104°C) |
| Sterilized glass jars with lids | For safely storing and preserving the finished marmalade |
Additional Helpful Equipment
- Fine mesh strainer (optional): Removes seeds or large pith pieces for a smoother texture if desired
- Large bowl filled with ice water: To test marmalade set by dropping a small spoonful and checking firmness after cooling
- Jar funnel: Makes transferring the hot marmalade into jars easier and cleaner
By preparing these tools before starting, we can focus on cooking and achieve a consistent satsuma marmalade with a perfect balance of sweetness and citrus tang. Having the right equipment helps us control every step from peeling to preserving with confidence.
Preparing the Satsumas
To create a perfectly balanced satsuma marmalade, proper preparation of the satsumas is essential. This step ensures our marmalade captures the fruit’s natural sweetness and vibrant citrus flavor.
Washing and Peeling
We start by thoroughly washing the satsumas under cold running water. This removes any dirt, wax, or residues on the skin, which is especially important as we will be using the peel in the marmalade for that characteristic zest and texture.
- Use a soft brush to gently scrub each satsuma.
- Pat dry with a clean kitchen towel.
- Using a sharp paring knife, carefully peel the satsumas, removing thin strips of the colored zest while avoiding the bitter white pith underneath.
- Once peeled, set aside the zest strips—these will infuse our marmalade with aromatic oils.
- After zest removal, peel the satsumas fully to access the juicy segments inside.
Removing Seeds and Pith
The seeds and excess pith can introduce unwanted bitterness, so we remove them meticulously.
- Separate the satsuma segments carefully by hand over a bowl to catch juice.
- Inspect each segment and remove all seeds with the tip of a paring knife or tweezers.
- Trim off any thick white pith remnants from the segments to reduce bitterness while preserving some thin pith pieces for natural pectin.
| Step | Task | Tips |
|---|---|---|
| Washing | Rinse and scrub under cold water | Use a soft brush |
| Peeling | Remove peel zest strips | Avoid white pith |
| Segmenting | Separate fruit segments | Collect juice for marmalade |
| Seed and pith removal | Extract seeds and trim pith | Retain thin pith for pectin |
With clean, peeled, and seeded satsumas ready, we can move confidently to the cooking stage—ensuring our marmalade is bright, tangy, and free of bitterness.
Making the Marmalade
Now that our satsumas are perfectly prepped let’s move on to making the marmalade. This stage is where the vibrant flavors of satsumas come alive, turning into a luscious spread.
Combining Ingredients
First, we combine the essential ingredients in our large heavy-bottomed pot to develop the base for our marmalade. Here is how we do it:
- Add 2 pounds of peeled and segmented satsumas to the pot.
- Pour in 3 cups of water.
- Stir in 3 cups of granulated sugar evenly over the fruit and water.
- Add 2 tablespoons of fresh lemon juice to brighten the flavors.
- Optionally, include 1 tablespoon of pectin if we prefer a firmer set for the marmalade.
| Ingredient | Quantity | Purpose |
|---|---|---|
| Peeled and segmented satsumas | 2 pounds | Main flavor and texture |
| Water | 3 cups | Medium for cooking |
| Granulated sugar | 3 cups | Sweetness and preservation |
| Fresh lemon juice | 2 tablespoons | Balances sweetness and acidity |
| Pectin (optional) | 1 tablespoon | For firmer marmalade texture |
We gently stir the mixture to dissolve the sugar before starting the cooking process. This ensures an even blend of sweetness and citrus throughout.
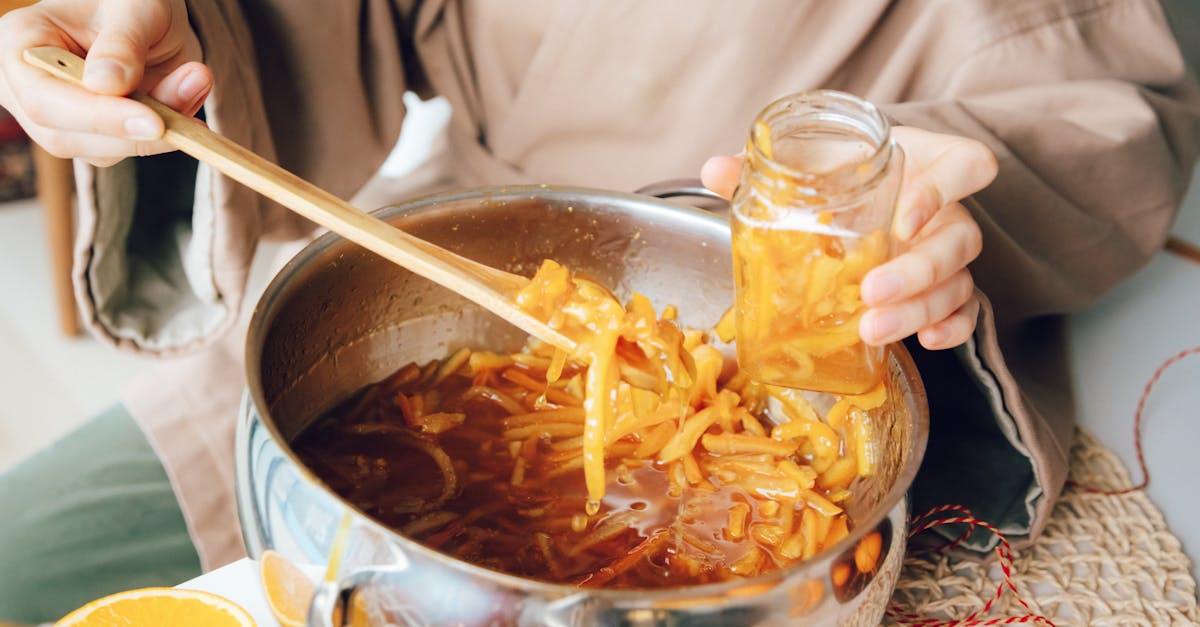
Cooking Process
Now we start the exciting cooking phase. Follow these steps carefully to achieve the perfect consistency and flavor:
- Place the pot over medium heat and bring the mixture to a gentle boil.
- Stir frequently with a wooden spoon to prevent burning or sticking to the bottom.
- Maintain the boil and cook until the mixture thickens. This usually takes about 25 to 30 minutes.
- To test the set for marmalade, place a small amount on a chilled plate and let it cool. If it wrinkles when pushed with a finger, the marmalade is ready.
- If using pectin, follow the package instructions for when to add it during cooking, usually midway or in the last 5 minutes.
- Remove the pot from heat and let the marmalade sit for 5 minutes to settle.
During cooking, you will notice the satsuma peel becoming translucent while the mixture thickens into a glossy, amber-hued marmalade. The aroma will be a delightful balance of sweet and tangy citrus zest mixed with warm caramel notes.
Tip: Use a candy thermometer to monitor the temperature reaching approximately 220°F (104°C) which is the perfect jelly point for marmalade to set.
By carefully combining ingredients and following the precise cooking steps we ensure our satsuma marmalade captures the authentic zest and sweet-tart flavor perfectly.
Setting and Storing the Marmalade
Once our satsuma marmalade reaches the desired consistency, the next crucial steps involve testing for the perfect set and properly sterilizing jars to ensure long-lasting freshness and safety. Let’s walk through these final stages carefully.
Testing for Set
To confirm that our satsuma marmalade has achieved the ideal thickness, we rely on simple, reliable tests. These help gauge the marmalade’s gel-like texture and prevent undercooking or overcooking.
- Spoon Test:
Dip a cold metal spoon into the boiling marmalade, lift it out, and watch how it drips. If it falls in thick, slow drops, the marmalade is nearing set.
- Plate Test:
Place a small spoonful of hot marmalade on a cold plate. Let it cool for 1–2 minutes, then gently push the marmalade with your finger. If the surface wrinkles and resists movement, the set is perfect.
- Temperature Test (optional):
Using a candy thermometer, the target temperature for a proper set is approximately 220°F (104°C) at sea level.
Keep in mind that altitude can affect this temperature.
| Test Method | Indicator of Set | Notes |
|---|---|---|
| Spoon Test | Thick slow drops | Visual check during cooking |
| Plate Test | Wrinkled surface when pushed | Quick, reliable post-cooling test |
| Temperature | ~220°F (104°C) | Precise but requires thermometer |
If our marmalade hasn’t set, we return it to heat and cook a few more minutes, repeating the tests until perfect.
Jar Sterilization and Filling
Proper sterilization of jars is essential to preserve the fresh quality of our satsuma marmalade and avoid spoilage. Here’s our step-by-step guide:
- Sterilizing Jars:
- Wash jars and lids thoroughly with hot soapy water.
- Rinse well to remove any soap residue.
- Place jars upright on a baking tray and heat in a 275°F (135°C) oven for 10–15 minutes.
- Boil lids and bands in water for 5 minutes separately.
- Use sterilized tongs to handle jars and lids to keep them clean.
- Filling the Jars:
- Remove hot jars from the oven carefully.
- Ladle the hot marmalade into jars, leaving about ¼-inch headspace to allow for expansion.
- Wipe the rims clean with a damp cloth to ensure a good seal.
- Place lids on jars and screw bands on firmly but not too tight.
- Invert jars for 5 minutes for an improved seal, then return upright to cool completely.
- Storage Tips:
- Once cooled, check seals by pressing the jar lid center; it should not flex up and down.
- Label jars with date and contents.
- Store in a cool, dark, and dry place for up to one year.
- Refrigerate after opening.
By following these steps, we ensure our satsuma marmalade remains vibrant, fresh, and ready to enjoy anytime.
Serving Suggestions
Our satsuma marmalade offers versatile and delicious ways to elevate everyday meals and treats. Here are our top Serving Suggestions to fully enjoy its vibrant citrus sweetness and enticing tang:
- Spread on Toast or Scones
Warm toast or freshly baked scones become irresistible when slathered generously with satsuma marmalade. The bright citrus flavor cuts through the richness of butter creating a perfect balance.
- Glaze for Meats
Use the marmalade as a glaze for roasted chicken, pork, or duck. Brush it on during the last 10-15 minutes of cooking to add a glossy finish and a punch of zesty sweetness.
- Topping for Yogurt or Cottage Cheese
Add a spoonful of satsuma marmalade to plain Greek yogurt or cottage cheese. The marmalade enhances the creaminess with refreshing fruit notes making for a simple healthy snack or breakfast.
- Mix into Salad Dressings
Whisk satsuma marmalade with olive oil, vinegar, and Dijon mustard to create a citrusy vinaigrette that livens up green salads or grain bowls.
- Complement for Cheese Boards
Pair our marmalade with creamy cheeses like Brie or tangy goat cheese. The contrast of sweet and savory delights the palate making it a standout on any cheese platter.
| Serving Option | Description | Best Paired With |
|---|---|---|
| Toast or Scones | Spread liberally for a bright citrus burst | Butter, warm bread |
| Meat Glaze | Brush during last cooking minutes for shine | Chicken, pork, duck |
| Yogurt or Cottage Cheese | Spoon on top to add fruity sweetness | Greek yogurt, cottage cheese |
| Salad Dressing | Mix with oil and vinegar for tangy vinaigrette | Green salads, grain bowls |
| Cheese Boards | Serve alongside creamy cheeses | Brie, goat cheese |
“A spoonful of satsuma marmalade can transform simple dishes into memorable delights.”
With these serving suggestions we invite you to enjoy the bold and fresh character of our homemade marmalade throughout your meals. Experimenting is encouraged — this citrus treasure pairs well beyond traditional uses.
Tips for the Perfect Satsuma Marmalade
Creating the perfect satsuma marmalade requires attention to detail and a few insider tips to ensure it turns out flavorful and beautifully textured. Below are key pointers to elevate our satsuma marmalade-making experience.
1. Choose the Right Satsumas
Always select fresh, ripe satsumas that are firm with a vibrant orange color. Avoid any fruits with soft spots or blemishes as they can affect both flavor and shelf life.
| Quality Factor | Ideal Characteristics |
|---|---|
| Ripeness | Bright orange skin, slight firmness |
| Freshness | No soft spots, no mold, smooth skin |
| Size | Medium size for optimal peel-to-pulp ratio |
“The best oranges make the best marmalade,” so sourcing quality satsumas sets the foundation.
2. Master the Peeling and Pith Removal
The bitterness in marmalade often comes from the white pith on citrus peels. We carefully remove as much pith as possible, leaving only the zest, to preserve a sweet-tart balance without overpowering bitterness.
- Use a sharp paring knife or zester to strip only the colored outer peel.
- Slice peels into thin strips ~1/4 inch wide for texture.
- Segment fruit gently and extract all seeds to avoid bitterness.
3. Optimize Sugar and Acid Balance
Our recipe calls for 3 cups of granulated sugar and 2 tablespoons of fresh lemon juice. This ratio balances sweetness and helps the pectin set while enhancing the citrus brightness.
- Adjust sugar slightly if using very sweet satsumas.
- Lemon juice is essential to help natural pectin gel and enhance flavor.
4. Use Proper Cooking Techniques
- Cook over medium heat to prevent burning sugar.
- Stir continuously especially toward the end of cooking to keep peels suspended in the mixture.
- Test the set regularly using the Spoon or Plate Test for accuracy.
5. Testing the Perfect Set
| Test Method | How to Perform | Ideal Result |
|---|---|---|
| Spoon Test | Dip spoon in marmalade, drip edge | Marmalade should hold shape and wrinkle |
| Plate Test | Place a spoonful on cold plate, chill 1-2 min | Marmalade should wrinkle when pushed |
| Temperature Test | Use candy thermometer | Aim for 220°F (104°C) for full set |
If the set is shy, return marmalade to heat for a few minutes and re-test.
6. Sterilize Jars Correctly
Sterilized jars reduce contamination risk and preserve marmalade freshness:
- Wash jars and lids in hot soapy water.
- Heat jars in a preheated 225°F oven for 10 minutes.
- Boil lids for 5 minutes before sealing.
7. Enhance Marmalade Texture (Optional)
For a firmer set, add 1 tablespoon of pectin during the early cooking stage as per package instructions to improve gel strength without altering flavor.
By following these expert tips and paying close attention to each step, we ensure our satsuma marmalade bursts with authentic zesty sweetness and spreads perfectly every time.
Conclusion
Making satsuma marmalade is a rewarding way to capture the bright, sweet-tart flavors of this unique citrus. With just a few simple ingredients and some careful preparation, we can create a versatile spread that enhances everything from breakfast to dinner.
By paying attention to the details—from peeling the fruit to testing the set and sterilizing jars—we ensure a delicious result that lasts. Whether enjoyed on toast or used as a glaze, satsuma marmalade brings a fresh burst of flavor to our kitchen all year round.
Frequently Asked Questions
What are the key ingredients for making satsuma marmalade?
The main ingredients are 2 pounds of peeled and segmented satsumas, 3 cups of granulated sugar, 3 cups of water, and 2 tablespoons of fresh lemon juice. Optionally, 1 tablespoon of pectin can be added for a firmer set.
How do I prepare satsumas for marmalade?
Wash the satsumas thoroughly, peel them carefully to remove zest without white pith, segment the fruit, and remove all seeds and excess pith to avoid bitterness.
What equipment do I need to make satsuma marmalade?
You need a large heavy-bottomed pot, a sharp paring knife, measuring cups, and optionally a fine mesh strainer and candy thermometer for best results.
How long should I cook the satsuma marmalade?
Cook the mixture for about 25 to 30 minutes, stirring frequently, until it thickens and passes a set test.
How can I test if the marmalade has set properly?
Use the Spoon Test, Plate Test, or Temperature Test. If it hasn’t set, cook a bit longer and retest.
How do I sterilize jars for preserving marmalade?
Wash jars thoroughly, heat them in the oven, boil the lids, and fill jars with hot marmalade immediately to ensure proper sealing.
How long does satsuma marmalade last?
Stored in a cool, dark place, sealed jars last up to one year. Refrigerate after opening for best freshness.
What are some serving ideas for satsuma marmalade?
Try it on toast, scones, as a meat glaze, with yogurt or cottage cheese, in salad dressings, or on cheese boards for versatile flavor.
Can I use pectin in satsuma marmalade?
Yes, adding 1 tablespoon of pectin helps achieve a firmer set but is optional depending on your texture preference.
What tips can help make perfect satsuma marmalade?
Use ripe satsumas, peel carefully to avoid bitterness, balance sugar and acid, follow proper cooking times, and sterilize jars correctly for freshness.