
There’s something truly special about a cheesecake that wins hearts and ribbons alike. Our Blue Ribbon Cheesecake recipe captures that perfect balance of creamy richness and subtle sweetness that makes every bite unforgettable. Whether you’re celebrating a special occasion or simply craving a decadent dessert, this cheesecake delivers a classic flavor with a smooth, velvety texture.
Ingredients
To create the perfect Blue Ribbon Cheesecake, we need to gather a few essential components. Each part works together to deliver the creamy richness and classic flavor this dessert is known for.
Crust Ingredients
Our crust forms the foundation of this cheesecake, providing a crisp and buttery base that perfectly complements the smooth filling.
- 1 ½ cups graham cracker crumbs (finely crushed)
- ⅓ cup granulated sugar
- 6 tablespoons unsalted butter, melted
Filling Ingredients
The filling is where the magic happens. Using cream cheese and fresh eggs, we achieve that iconic velvety texture and subtle sweetness.
| Ingredient | Quantity | Notes |
|---|---|---|
| Cream cheese | 4 packages (8 oz each) | softened |
| Granulated sugar | 1 ¼ cups | |
| Sour cream | 1 cup | room temperature |
| Heavy cream | ½ cup | freshly whipped (optional) |
| Large eggs | 4 | room temperature |
| Pure vanilla extract | 2 teaspoons | |
| All-purpose flour | 2 tablespoons | sifted |
Topping Ingredients
To finish our Blue Ribbon Cheesecake with elegance, we’ll prepare a simple topping that enhances every bite without overpowering the filling.
- 1 cup sour cream
- 2 tablespoons powdered sugar
- 1 teaspoon pure vanilla extract
Each of these ingredients plays a vital role in delivering the richness, smoothness, and balanced sweetness that define this award-winning cheesecake.
Tools and Equipment
To craft the perfect Blue Ribbon Cheesecake, having the right Tools and Equipment is vital. These not only help us maintain precision but also ensure the cheesecake’s texture and appearance reach their full potential.
Essential Tools
- Springform Pan (9-inch)
This pan allows easy removal of the cheesecake without damaging its smooth edges. A 9-inch size is ideal for the recipe’s proportions.
- Mixing Bowls
We recommend using large mixing bowls for combining ingredients thoroughly, especially for the creamy filling.
- Electric Mixer or Stand Mixer
To achieve that signature velvety texture, a hand or stand mixer gently blends the cream cheese and sugar until smooth with no lumps.
- Spatula and Whisk
These help in folding in delicate ingredients like sour cream and eggs, preserving the filling’s creaminess.
Additional Equipment
- Food Processor or Blender
Perfect for crushing graham crackers finely and evenly, forming the crisp buttery crust base.
- Measuring Cups and Spoons
Accurate measurement is key to balancing sweetness and creaminess.
- Aluminum Foil
Essential for wrapping the springform pan when using a water bath, preventing water from seeping into the cheesecake during baking.
- Roasting Pan or Deep Baking Dish
For the water bath method that provides even heat and prevents cracking on the cheesecake surface.
Table of Tools and Their Functions
| Tool | Purpose | Notes |
|---|---|---|
| Springform Pan (9-inch) | Cake baking & easy removal | Non-stick recommended |
| Mixing Bowls | Ingredient combining | Use glass or metal for best results |
| Electric Mixer | Achieving smooth, lump-free filling | Stand or hand mixer |
| Spatula and Whisk | Folding and mixing without over-beating | Silicone spatula preferred |
| Food Processor | Crushing graham crackers fine for crust | Alternate: Ziplock bag and rolling pin |
| Measuring Cups/Spoons | Precise ingredient measurement | Level ingredients for accuracy |
| Aluminum Foil | Wrapping pan for water bath baking | Heavy-duty foil recommended |
| Roasting Pan | Creating water bath to bake cheesecake evenly | Ensure pan is at least 2-inch deep |
We suggest organizing these tools before starting to keep your workflow smooth. Preparing the Blue Ribbon Cheesecake with the correct equipment helps us focus on flavor and texture, making the baking process as enjoyable as the dessert itself.
Instructions
Follow these steps carefully to create the perfect Blue Ribbon Cheesecake with a smooth, creamy texture and a flavorful crust. Precision and patience during each phase will yield the best results.
Preparing the Crust
- Preheat oven to 350°F (175°C).
- In a medium bowl, combine:
- 1 ½ cups finely crushed graham crackers
- 2 tablespoons granulated sugar
- 6 tablespoons melted unsalted butter
- Mix thoroughly until the crumbs resemble wet sand.
- Press the mixture evenly into the bottom and about 1 inch up the sides of a 9-inch springform pan.
- Bake the crust for 8 minutes to set firmly.
- Remove from oven and allow to cool while preparing the filling.
Making the Cheesecake Filling
- In a large mixing bowl, beat 4 packages (8 oz each) of softened cream cheese on medium speed until smooth and creamy, about 3 to 4 minutes.
- Gradually add 1 ¼ cups granulated sugar, continuing to beat until well combined.
- Add eggs one at a time, blending well after each addition to maintain a smooth texture.
- Mix in:
- 1 cup sour cream
- ½ cup heavy cream
- 1 tablespoon vanilla extract
- 2 tablespoons all-purpose flour
- Scrape down the sides of the bowl to ensure all ingredients are fully incorporated.
- Beat on low speed for an additional 30 seconds to remove excess air, preventing cracks during baking.
Baking the Cheesecake
- Wrap the bottom and sides of the springform pan tightly with aluminum foil to prevent water from seeping in during the water bath.
- Place the pan in a larger roasting pan and fill the roasting pan with hot water until it reaches halfway up the sides of the springform pan.
- Pour the cheesecake filling into the prepared crust, smoothing the top gently with a spatula.
- Bake at 325°F (163°C) for 60 to 70 minutes. The center should be slightly jiggly but not liquid.
- Turn off the oven and leave the cheesecake inside with the door slightly ajar for 1 hour to cool gradually.
Cooling and Setting
- Remove the cheesecake from the water bath and take off the aluminum foil.
- Run a thin knife around the edges to loosen the cheesecake from the pan sides to prevent cracking.
- Chill the cheesecake in the refrigerator for at least 6 hours or overnight to fully set.
- Before serving, prepare the topping by mixing:
- 1 cup sour cream
- 2 tablespoons powdered sugar
- 1 teaspoon vanilla extract
- Spread the topping evenly over the chilled cheesecake.
- Return the cheesecake to the fridge for 30 more minutes to set the topping perfectly.
| Task | Temperature | Time | Notes |
|---|---|---|---|
| Prebake crust | 350°F (175°C) | 8 minutes | Cool before filling |
| Bake cheesecake | 325°F (163°C) | 60 – 70 minutes | Slightly jiggly center |
| Cool in oven | Oven off, ajar | 1 hour | Prevents cracks |
| Chill cheesecake | Refrigerator | 6+ hours or overnight | Essential for setting |
| Set topping | Refrigerator | 30 minutes | Ensures smooth finish |
Serving Suggestions
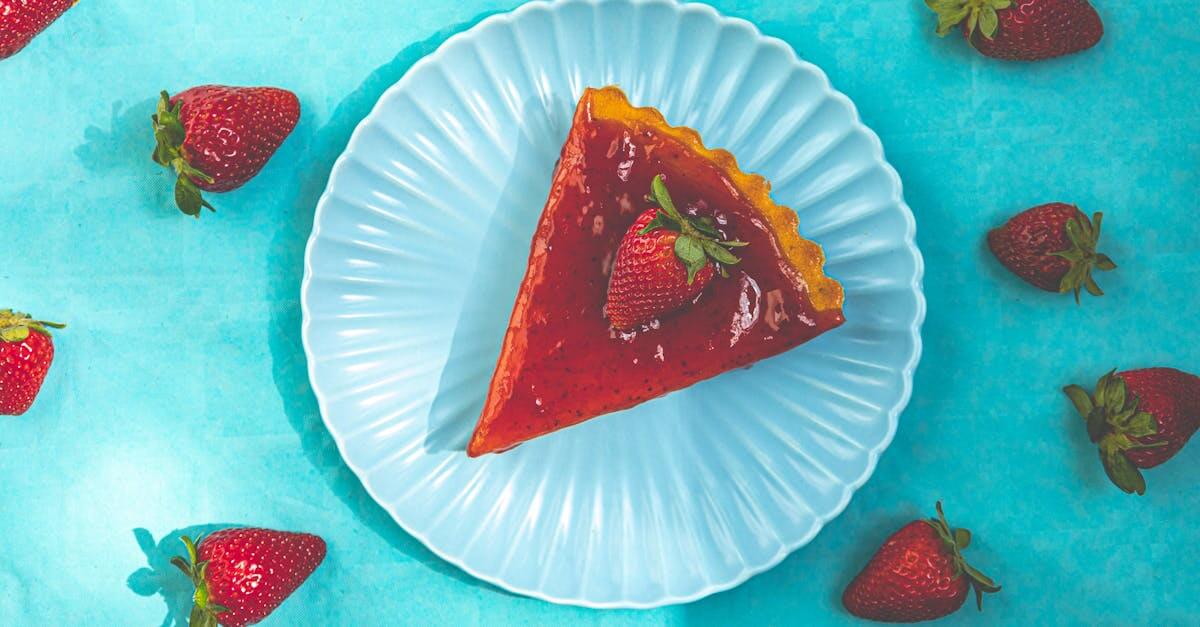
To truly enjoy our Blue Ribbon Cheesecake, we recommend presenting it with complementary flavors and textures that enhance its rich, creamy profile.
Classic Presentation
- Slice the cheesecake evenly using a warm, clean knife for smooth cuts.
- Serve each portion topped with a dollop of lightly whipped cream to add a soft, airy contrast.
- Garnish with fresh berries such as strawberries, blueberries, or raspberries to introduce a burst of natural sweetness and color.
Fruity Accents and Sauces
Drizzle the cheesecake slices with fruit sauces to elevate the flavor experience:
| Sauce | Description | Serving Tip |
|---|---|---|
| Raspberry coulis | Tangy, pureed fresh raspberries | Drizzle sparingly to avoid overpowering |
| Blueberry compote | Cooked blueberries with a hint of lemon juice | Warm slightly before serving |
| Mango puree | Smooth tropical puree with subtle sweetness | Adds vibrant color and exotic taste |
Nutty and Crunchy Combos
Add texture by sprinkling chopped toasted nuts like almonds, pecans, or walnuts over the whipped cream topping. This introduces a pleasing crunch and nutty aroma to complement the velvety cheesecake.
Beverage Pairings
To round out the dessert experience, pair the Blue Ribbon Cheesecake with drinks that enhance its creamy richness:
- Coffee or espresso: The bold bitterness contrasts beautifully with the sweet filling.
- Dessert wine: Try a late harvest Riesling or a Sauternes for a luscious pairing.
- Herbal teas: Chamomile or peppermint tea cleanse the palate between bites.
“Serving our Blue Ribbon Cheesecake with thoughtfully chosen accompaniments transforms every slice into a celebration of flavors and textures.”
Serving Temperature
Serve the cheesecake chilled but not overly cold—ideally between 40°F and 50°F. This allows the filling to maintain its smooth, velvety texture while releasing its full flavor.
| Serving Element | Ideal Temperature |
|---|---|
| Cheesecake | 40°F – 50°F |
| Whipped cream topping | 35°F – 40°F |
| Fruit sauces | Room temperature or slightly warmed |
By following these Serving Suggestions, we create a memorable dessert experience that honors the classic essence of our Blue Ribbon Cheesecake.
Make-Ahead Tips
Preparing a Blue Ribbon Cheesecake in advance ensures stress-free serving and perfectly set flavors. Here are our essential make-ahead tips to guarantee a flawless dessert every time.
Chill Thoroughly for Optimal Texture
After baking and cooling your cheesecake slowly in the oven, refrigerate it for at least 6 hours, ideally overnight. This resting period allows the filling to firm up and develop its signature smooth and velvety texture.
| Step | Temperature | Time |
|---|---|---|
| Bake | 325°F (163°C) | 60 to 70 minutes |
| Cool in oven | Oven off, door ajar | 1 hour |
| Refrigerate (minimum) | 36°F to 40°F (2°C to 4°C) | 6 hours or overnight |
“Patience is key with cheesecakes — the longer it chills, the creamier it becomes.”
Wrap and Store Properly
To prevent the cheesecake from absorbing odors or drying out, wrap it tightly after chilling:
- Use plastic wrap pressed gently against the surface.
- For extra protection, wrap with aluminum foil after plastic wrap.
- Store in the refrigerator until ready to serve.
Apply Toppings Just Before Serving
Keep your classic Blue Ribbon Cheesecake topping fresh and vibrant by adding it right before serving. The sour cream topping or fresh berries maintain their texture and flavor best this way.
Freeze for Longer Storage
If you want to prepare well in advance:
- Wrap the fully cooled and sliced cheesecake in plastic wrap and aluminum foil.
- Freeze at 0°F (-18°C) for up to 1 month.
- Thaw overnight in the refrigerator before serving.
| Storage Method | Duration | Notes |
|---|---|---|
| Refrigeration | 6 hours to 3 days | Keeps fresh and creamy |
| Freezing | Up to 1 month | Best for extended make-ahead |
Transporting Tips
If bringing your cheesecake to an event, keep it cold inside a well-insulated cooler with ice packs. This preserves the filling’s texture and prevents melting.
Following these make-ahead strategies for our Blue Ribbon Cheesecake ensures every slice is rich, creamy, and perfectly structured with effortless preparation on your part.
Storage Instructions
Proper storage is essential to maintain the creamy texture and rich flavor of our Blue Ribbon Cheesecake. Follow these guidelines to keep your cheesecake fresh and delicious for days or even weeks.
Refrigeration
- After baking and cooling, wrap the cheesecake tightly with plastic wrap to prevent it from absorbing refrigerator odors.
- Place the wrapped cheesecake in an airtight container or cover it with foil for extra protection.
- Store the cheesecake in the coldest part of the refrigerator, ideally between 35°F and 40°F.
- Keep refrigerated for up to 5 days. For best taste and texture consume within this timeframe.
Freezing
- To freeze, first wrap the cheesecake securely in plastic wrap then in aluminum foil. This double layer prevents freezer burn and maintains moisture.
- Place the wrapped cheesecake in a freezer-safe airtight container or heavy-duty freezer bag.
- Freeze for up to 3 months.
- When ready to serve, thaw the cheesecake overnight in the refrigerator. Avoid thawing at room temperature to prevent texture loss.
| Storage Method | Temperature Range | Duration | Wrapping Requirement |
|---|---|---|---|
| Refrigeration | 35°F to 40°F | Up to 5 days | Plastic wrap + airtight container |
| Freezing | 0°F or below | Up to 3 months | Plastic wrap + foil + airtight container |
Serving After Storage
- For optimal flavor, remove the cheesecake from the refrigerator about 20 minutes before serving to soften slightly.
- Apply toppings such as the sour cream glaze or fresh berries just before serving to preserve freshness and presentation.
- If frozen, gently reapply any toppings after thawing, as moisture may cause slippage.
Tips for Transporting
- Use a springform pan bottom or sturdy cake carrier with padding to transport without damage.
- Keep cheesecake chilled during transport using ice packs or cooler bags to maintain texture integrity.
By adhering to these storage instructions we ensure every slice of our Blue Ribbon Cheesecake remains as irresistibly smooth and flavorful as the moment it’s first baked.
Conclusion
Crafting the perfect Blue Ribbon Cheesecake is a rewarding experience that brings a touch of elegance to any occasion. With the right ingredients, tools, and techniques, we can achieve that signature creamy texture and balanced sweetness every time.
By paying attention to details like baking temperature, cooling, and storage, we ensure each slice is as delightful as the first. Whether served plain or with your favorite toppings, this cheesecake is sure to impress and satisfy.
Frequently Asked Questions
What makes Blue Ribbon Cheesecake special?
Blue Ribbon Cheesecake is known for its creamy richness, subtle sweetness, and classic velvety texture. Its balanced flavor and smooth consistency make it a favorite dessert for special occasions and satisfying treats.
What are the key ingredients in Blue Ribbon Cheesecake?
The essential ingredients include a graham cracker crust (graham crackers, sugar, melted butter), and a filling made of cream cheese, eggs, sugar, sour cream, heavy cream, vanilla extract, and flour. A simple sour cream topping completes the dessert.
What tools are needed to bake this cheesecake?
You’ll need a 9-inch springform pan, large mixing bowls, an electric mixer, a food processor for crushing crackers, measuring cups, and aluminum foil for water bath baking.
How do I prepare the crust for the cheesecake?
Mix finely crushed graham crackers, sugar, and melted butter, press into the pan, and bake for 8 minutes to create a crisp, buttery base.
What is the baking process for Blue Ribbon Cheesecake?
Bake the cheesecake in a water bath at 325°F for 60 to 70 minutes. Then cool it gradually in the oven to prevent cracks before chilling it in the fridge for at least 6 hours.
How should I serve Blue Ribbon Cheesecake?
Serve chilled between 40°F and 50°F with a dollop of whipped cream, fresh berries, or fruit sauces like raspberry coulis. Toasted nuts and coffee or dessert wine make excellent accompaniments.
Can I make the cheesecake ahead of time?
Yes, chill the cheesecake thoroughly, store it wrapped and refrigerated, apply toppings just before serving, or freeze it for longer storage to maintain freshness and texture.
How do I store leftover cheesecake?
Wrap the cheesecake tightly in plastic wrap and keep it in an airtight container in the fridge for up to 5 days, or freeze it wrapped in plastic and foil for up to 3 months.
What is the best way to transport Blue Ribbon Cheesecake?
Keep the cheesecake chilled in a sturdy, insulated carrier. Use a springform pan to secure it, and avoid shaking or tilting to prevent damage.
How do I avoid cracks in the cheesecake?
Bake using a water bath and cool the cheesecake gradually in the oven with the door slightly open. This helps maintain moisture and reduces the chances of cracks forming.