
Few desserts capture the elegance and indulgence of the Cheesecake Factory’s Tuxedo Cheesecake. This rich and creamy treat combines layers of luscious chocolate and classic cheesecake, creating a perfect harmony of flavors that’s hard to resist. Its striking black-and-white appearance makes it as visually stunning as it is delicious.
We love recreating this iconic dessert at home because it brings that restaurant-quality experience right to our kitchen. Whether you’re celebrating a special occasion or simply craving a decadent slice, this tuxedo cheesecake recipe delivers every time. Let’s dive into the steps that make this show-stopping dessert a favorite for cheesecake lovers everywhere.
Ingredients
To recreate the Tuxedo Cheesecake from the Cheesecake Factory at home, we need to gather high-quality ingredients that deliver rich flavors and the perfect texture. Below is a detailed list segmented by each component of the dessert.
Crust Ingredients
For the foundation of our Tuxedo Cheesecake, we choose a chocolate cookie crust to enhance the decadent chocolate notes.
- 1 ½ cups chocolate cookie crumbs (finely crushed)
- ¼ cup granulated sugar
- 6 tablespoons unsalted butter, melted
Cheesecake Filling Ingredients
The cheesecake filling blends classic creamy cheese with velvety chocolate, creating that signature tuxedo appearance and taste.
| Ingredient | Quantity | Preparation Notes |
|---|---|---|
| Cream cheese | 4 packages (8 oz each) | Softened to room temperature |
| Granulated sugar | 1 ¼ cups | |
| Sour cream | 1 cup | For richness and tang |
| Vanilla extract | 1 teaspoon | |
| Eggs | 4 large | Room temperature |
| Semi-sweet chocolate chips | 6 ounces | Melted and slightly cooled |
Chocolate Ganache Ingredients
The luxurious chocolate ganache adds the perfect glossy finish and deep chocolate flavor.
- 8 ounces semi-sweet or bittersweet chocolate, chopped
- 1 cup heavy cream
- 2 tablespoons unsalted butter (optional for extra shine)
Whipped Cream Topping Ingredients
The light whipped cream topping balances the richness and adds a smooth finish, essential for the complete Tuxedo Cheesecake experience.
- 1 ½ cups heavy whipping cream
- 3 tablespoons powdered sugar
- 1 teaspoon vanilla extract
This comprehensive list ensures we have all the essential ingredients ready to build our Tuxedo Cheesecake from scratch, capturing the iconic flavors and presentation of the Cheesecake Factory favorite.
Equipment Needed
To perfectly craft the Tuxedo Cheesecake Recipe Cheesecake Factory style, having the right equipment is crucial. Each tool plays a vital role in achieving the signature smooth texture and striking black-and-white presentation.
Essential Baking Tools
- 9-inch springform pan: This pan ensures easy removal of the cheesecake without damaging its delicate sides.
- Mixing bowls: Use multiple bowls for mixing the crust, chocolate and vanilla cheesecake batters, and ganache.
- Electric mixer or stand mixer: Provides consistent, smooth batter by thoroughly blending cream cheese and other ingredients.
- Measuring cups and spoons: Accurate measurements guarantee perfect texture and flavor balance.
- Rubber spatula: Ideal for folding ingredients gently and scraping the mixing bowl clean.
- Whisk: For beating eggs and mixing ganache until smooth.
- Double boiler or microwave-safe bowl: Required to melt chocolate gently without burning.
- Offset spatula or butter knife: Useful for spreading cheesecake layers evenly and smoothing ganache.
Additional Helpful Equipment
| Equipment | Purpose |
|---|---|
| Food processor | Crumbles cookies finely for the chocolate crust |
| Parchment paper | Prevents sticking, especially at the pan’s base |
| Cooling rack | Allows the cheesecake to cool evenly |
| Serrated knife | For clean, neat slices when serving |
Notes on Equipment
“Using a high-quality springform pan is non-negotiable for this cheesecake— it makes the assembly and serving process flawless.”
For the silky ganache, melting chocolate slowly in a double boiler is essential to preserve its glossy sheen and smooth finish.
With these tools in hand, we can now move forward confidently to assemble our Tuxedo Cheesecake, ensuring its rich layers meld flawlessly for a stunning final presentation.
Make-Ahead Instructions
To enjoy our Tuxedo Cheesecake Recipe Cheesecake Factory with minimal effort on the day of serving, preparing key components in advance is essential. This approach enhances flavors and ensures a smooth assembly process.
Prepare the Crust Ahead of Time
- Crush the chocolate cookies and mix with melted butter.
- Press the mixture firmly into the 9-inch springform pan.
- Chill in the refrigerator for at least 1 hour to set the crust firmly.
Make the Cheesecake Filling Early
- Blend the cream cheese, sugar, eggs, and vanilla until smooth.
- Divide the batter into two portions for the chocolate and classic layers.
- Mix melted chocolate gently into one portion for the tuxedo effect.
- Pour layers carefully into the crust and refrigerate uncovered for 1 hour before baking.
Bake and Cool Completely
- Bake the cheesecake according to the recipe instructions.
- Allow the baked cheesecake to cool at room temperature for 2 hours.
- Then chill in the refrigerator for a minimum of 4 hours, ideally overnight to achieve a firm texture.
Prepare the Ganache and Whipped Cream
- Melt chocolate slowly for the ganache using a double boiler or microwave, then cool to room temperature.
- Whip the cream with sugar and vanilla until soft peaks form.
- Refrigerate both ganache and whipped cream until ready to assemble and decorate.
Storing and Timing Table
| Component | Preparation Time | Storage | Notes |
|---|---|---|---|
| Chocolate Cookie Crust | 15 minutes + 1 hour chilling | Refrigerate until assembly | Firm crust supports all layers |
| Cheesecake Filling | 30 minutes + 1 hour chilling | Refrigerate before baking | Divide batter for tuxedo effect |
| Baked Cheesecake | 1 hour baking + 2 hour cooling | Refrigerate 4 hours or overnight | Essential for firm slicing |
| Chocolate Ganache | 10 minutes | Refrigerate until use | Cool slowly to keep glossy finish |
| Whipped Cream Topping | 10 minutes | Refrigerate until decorating | Soft peaks for light texture |
“Tip: Preparing your cheesecake components ahead allows the flavors to meld together, resulting in a richer and more decadent Tuxedo Cheesecake experience when served.”
By following these make-ahead instructions we can ensure every layer of our Tuxedo Cheesecake Recipe Cheesecake Factory is perfectly set and ready for a flawless final presentation.
Instructions
Follow these detailed steps to create our Tuxedo Cheesecake Recipe Cheesecake Factory style, ensuring each layer shines with flavor and texture. We’ll guide you through preparing the crust, filling, ganache, and assembly for a flawless dessert.
Preparing the Crust
- Preheat the oven to 350°F (175°C).
- In a medium bowl, combine 1¾ cups of chocolate cookie crumbs and 5 tablespoons of melted unsalted butter.
- Stir the mixture until the crumbs are evenly moistened and hold together when pressed.
- Press the crust mixture firmly and evenly into the bottom of a 9-inch springform pan.
- Bake the crust for 10 minutes until set. Remove from oven and let it cool completely on a wire rack.
Making the Cheesecake Filling
- Reduce oven temperature to 325°F (163°C).
- In a large mixing bowl, beat 4 (8-ounce) packages of cream cheese with an electric mixer on medium speed until smooth and creamy, about 3 minutes.
- Gradually add 1 cup granulated sugar, beating until fully incorporated.
- Add 4 large eggs, one at a time, mixing well after each addition.
- Mix in 1 cup sour cream, 2 teaspoons vanilla extract, and 2 tablespoons all-purpose flour until smooth.
- Reserve ⅓ of the batter and fold in ½ cup melted semi-sweet chocolate to create the chocolate layer.
- Pour the plain cheesecake batter evenly over the cooled crust. Carefully spoon the chocolate batter on top in dollops.
Baking the Cheesecake
- Place the springform pan in a large roasting pan.
- Pour hot water into the roasting pan until it reaches halfway up the side of the springform pan, creating a water bath.
- Bake at 325°F (163°C) for 55-65 minutes. The center should still jiggle slightly when gently shaken.
- Turn off the oven, crack the oven door, and let the cheesecake cool inside for 1 hour.
- Remove the cheesecake from the water bath and cool completely at room temperature for an additional hour.
- Refrigerate the cheesecake for at least 4 hours or overnight to set fully.
Preparing the Chocolate Ganache
- Heat ½ cup heavy cream in a small saucepan over medium heat until it just begins to simmer.
- Place ½ cup semi-sweet chocolate chips in a heatproof bowl.
- Pour hot cream over the chocolate and let sit for 2 minutes.
- Stir gently until the ganache is smooth and glossy.
- Allow ganache to cool to room temperature but still pourable before spreading.
| Ingredient | Quantity | Notes |
|---|---|---|
| Heavy cream | ½ cup | Heated to simmer |
| Semi-sweet chocolate | ½ cup chips | Melted into ganache |
Assembling the Tuxedo Cheesecake
- Remove the cheesecake from the springform pan and place it on a serving plate.
- Pour the cooled ganache evenly over the top, gently smoothing it toward the edges for full coverage.
- Let the ganache set at room temperature for 30 minutes or refrigerate for 15 minutes to firm up.
Adding Whipped Cream and Final Touches
- Prepare the whipped cream by beating 1 cup heavy cream with 2 tablespoons powdered sugar and 1 teaspoon vanilla extract until soft peaks form.
- Pipe or spread the whipped cream around the edges of the cheesecake for a decorative tuxedo effect.
- Optionally, garnish with shaved chocolate or chocolate curls.
- Refrigerate until ready to serve to keep the whipped cream firm and the cheesecake chilled.
Serving Suggestions
To fully enjoy our Tuxedo Cheesecake Recipe Cheesecake Factory style creation, consider these serving tips to enhance its decadent flavors and elegant presentation.
- Chill Before Serving
Always refrigerate the cheesecake for at least 4 hours, preferably overnight. This ensures the flavors meld beautifully and the texture becomes perfectly firm yet creamy.
- Portioning with Precision
Use a sharp serrated knife dipped in hot water before slicing. Clean the blade between cuts to achieve clean, smooth slices that showcase the striking black-and-white layers.
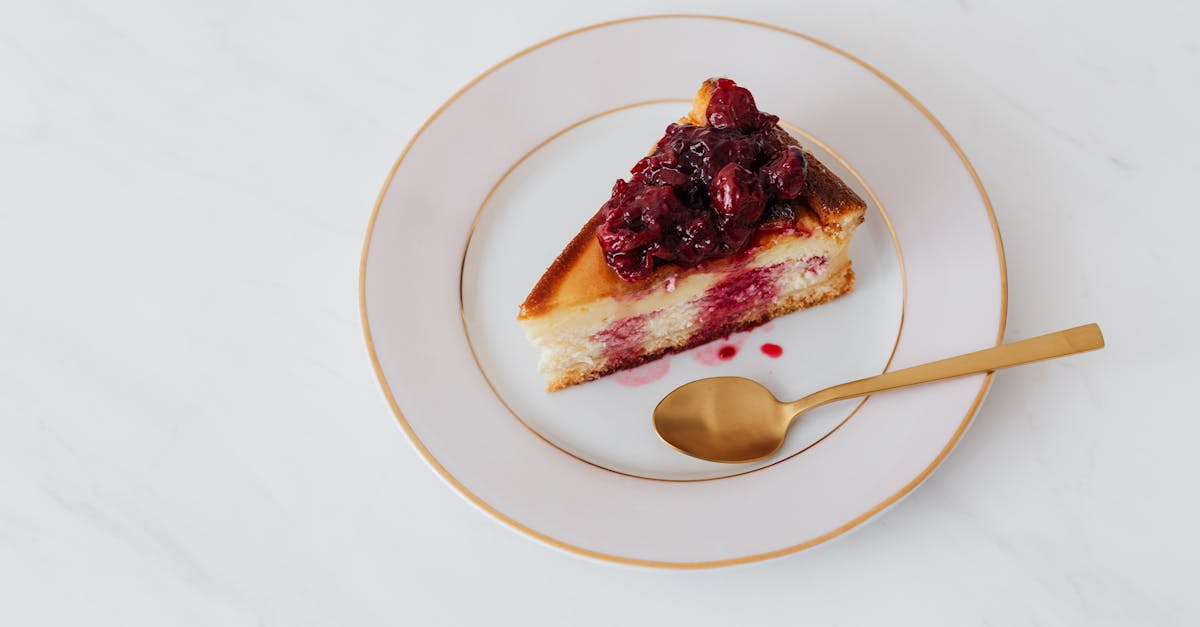
- Ideal Plate Presentation
Place each slice on a dessert plate. Garnish with a dollop of freshly whipped cream on the side to complement the rich ganache topping.
- Complementary Add-ons
Consider serving with fresh berries such as raspberries or strawberries. The tartness and vibrant colors balance the cheesecake’s richness.
- Beverage Pairings
Our favorite pairings include:
| Beverage | Flavor Profile | Why It Works |
|---|---|---|
| Espresso | Bold, slightly bitter | Cuts through richness, enhances mocha notes |
| Cabernet Sauvignon | Full-bodied red wine | Complements chocolate depth |
| Sparkling Water | Crisp, light bubbles | Cleanses palate between bites |
- Room Temperature Tip
Let the cheesecake sit out for 10–15 minutes before serving. This softens the ganache slightly and amplifies the chocolate flavor.
- Decorative Touches
Sprinkle finely shaved dark or white chocolate over the top just before serving for extra elegance and sensory appeal.
- Portion Size Recommendation
Serve slices approximately 1½ inches wide. The richness demands smaller portions, perfect for savoring each bite.
Storage Tips
Proper storage is essential to maintain the rich texture and decadent flavors of our Tuxedo Cheesecake Recipe Cheesecake Factory style. Follow these key steps to keep your cheesecake fresh and delicious:
Refrigeration
- Always store the cheesecake in the refrigerator immediately after serving or assembling.
- Wrap the cheesecake loosely with plastic wrap or place it in an airtight container to prevent it from absorbing other odors.
- Keep the cheesecake refrigerated at a temperature between 36°F and 40°F (2°C to 4°C).
- Consume the cheesecake within 5 to 7 days for optimal freshness.
Freezing
If you want to store the cheesecake for a longer period:
- Slice the cheesecake into individual servings to make thawing easier.
- Wrap each slice tightly in plastic wrap, then in aluminum foil to prevent freezer burn.
- Place the wrapped slices into a freezer-safe container or heavy-duty freezer bag.
- Label with the date of freezing.
| Storage Method | Preparation | Storage Duration | Recommended Temperature |
|---|---|---|---|
| Refrigeration | Wrap with plastic wrap or airtight container | 5 to 7 days | 36°F to 40°F (2°C to 4°C) |
| Freezing | Individually wrap and double wrap | Up to 2 months | 0°F (-18°C) or below |
Thawing
- To thaw, transfer the wrapped cheesecake slices from the freezer to the refrigerator.
- Allow them to thaw overnight (8 to 12 hours) for even defrosting.
- For best flavor and texture, serve within 24 hours after thawing.
- Avoid thawing at room temperature to prevent condensation affecting the cheesecake’s surface.
Tips for Maintaining Texture and Flavor
- Avoid exposing the cheesecake to humidity or temperature fluctuations, as this can cause condensation and soggy crust.
- Do not slice the cheesecake until ready to serve, as pre-cutting increases exposure to air and accelerates drying.
- When reheating a slice slightly, warm it at room temperature for 10–15 minutes before serving to bring out the signature chocolate richness.
By following these storage steps we ensure every bite of our Tuxedo Cheesecake Recipe Cheesecake Factory style remains indulgently creamy and visually stunning just like when freshly made.
Conclusion
Making the Tuxedo Cheesecake at home lets us enjoy a luxurious dessert that rivals the Cheesecake Factory’s original. With the right ingredients, tools, and techniques, we can create a stunning and delicious treat perfect for any occasion.
By following the steps carefully and paying attention to details like chilling and presentation, we ensure every slice delivers that rich, creamy texture and balanced chocolate flavor. This recipe is a rewarding way to impress guests or satisfy our own cheesecake cravings with confidence.
Frequently Asked Questions
What is a Tuxedo Cheesecake?
Tuxedo Cheesecake is a rich dessert combining classic cheesecake and chocolate flavors, featuring a distinctive black-and-white layered design inspired by a tuxedo’s color scheme.
Can I make Tuxedo Cheesecake at home?
Yes, the article provides a detailed recipe and step-by-step instructions to recreate the Tuxedo Cheesecake at home for an elegant, restaurant-quality dessert.
What ingredients are needed for the Tuxedo Cheesecake?
You’ll need chocolate cookie crumbs, cream cheese, sugar, eggs, sour cream, vanilla, chocolate chips, heavy cream, and whipping cream, among other quality ingredients for crust, filling, ganache, and topping.
What equipment is essential to bake this cheesecake?
Key tools include a 9-inch springform pan, electric mixer, mixing bowls, measuring cups and spoons, rubber spatula, whisk, and a double boiler or microwave-safe bowl for melting chocolate.
Can parts of the cheesecake be made ahead?
Yes, the crust, filling, ganache, and whipped cream topping can be prepared in advance and refrigerated, helping enhance flavors and simplify assembly.
How is the cheesecake baked to avoid cracks?
Baking in a water bath ensures even cooking and helps prevent cracks by maintaining a gentle, consistent heat.
How do I serve the Tuxedo Cheesecake?
Chill for at least four hours, slice with a sharp serrated knife dipped in hot water, garnish with whipped cream and fresh berries, and optionally add shaved chocolate for an elegant touch.
What are the best beverage pairings?
Espresso, Cabernet Sauvignon wine, and sparkling water complement the rich flavors of the cheesecake well.
How should I store leftover cheesecake?
Wrap it tightly to avoid odor absorption and refrigerate for up to 5–7 days or freeze for up to 2 months. Thaw frozen cheesecake overnight in the fridge for best results.
Why is a high-quality springform pan recommended?
A high-quality springform pan ensures easy release and clean edges, crucial for the cheesecake’s smooth assembly and impressive presentation.