
There’s something magical about homemade ice cream—it’s creamy, fresh, and bursting with flavor in a way store-bought just can’t match. With Immergood ice cream makers, we can take this timeless treat to the next level, crafting dreamy, velvety creations right in our own kitchens. These recipes are perfect for anyone who loves experimenting with flavors or simply enjoys the nostalgia of homemade desserts.
Tools And Equipment Needed
Creating delicious homemade ice cream with an Immergood Ice Cream Maker requires a blend of specialized tools and kitchen essentials. Let’s ensure we have everything we need to make this process smooth and enjoyable.
1. Immergood Ice Cream Maker
This is the star of the recipe. The Immergood machine is designed for ultimate durability and performance. Its triple-layer construction ensures optimal insulation, keeping the mixture cold throughout the churning process.
2. Mixing Bowls
We’ll need at least one large mixing bowl to prepare and combine the ice cream base. Stainless steel or glass bowls work best as they are non-reactive.
3. Measuring Tools
Precise measurements are vital for perfect ice cream consistency. Keep these on hand:
- Measuring cups (1 cup, ½ cup, ⅓ cup, ¼ cup sizes)
- Measuring spoons (Tablespoon, teaspoon, ½ teaspoon sizes)
4. Whisk or Electric Mixer
A whisk or electric hand mixer will be helpful for blending ingredients thoroughly. This ensures we incorporate the perfect amount of air into our ice cream mixture.
5. Ice and Rock Salt
For the freezing process, the Immergood Ice Cream Maker requires crushed ice and rock salt. The combination of these helps create the perfect chilled environment for churning.
| Item | Recommended Amount |
|---|---|
| Crushed Ice | Approximately 8 pounds |
| Rock Salt | 2-3 cups |
6. Spatulas
A rubber spatula is essential to scrape every luscious bit of ice cream mixture from the bowl into the churn.
7. Thermometer (Optional)
To ensure our custard base reaches the proper temperature without overcooking, a digital kitchen thermometer can be incredibly helpful.
8. Storage Containers
Once the ice cream is churned to perfection, transfer it into airtight containers. Freezer-safe options help maintain the texture and flavor.
9. Ice Cream Scoop
For serving, a sturdy ice cream scoop is a must. It’s perfect for serving neat, satisfying scoops.
With these tools, we’re fully equipped to transform simple ingredients into rich, creamy, and flavorful homemade ice cream. Everything listed here plays a vital role in ensuring the best results with our Immergood ice cream recipes.
Ingredients
To craft the creamiest and most delightful homemade ice cream with our Immergood Ice Cream Maker, precise ingredients are essential. Below is a detailed list of what you’ll need for a basic vanilla ice cream recipe. Feel free to customize the flavors after mastering this base.
Ice Cream Base:
- 2 cups heavy cream (well-chilled for smooth texture)
- 2 cups whole milk (cold)
- 3/4 cup granulated sugar (adjust sweetness to taste)
- 1 tablespoon pure vanilla extract
- 1/8 teaspoon fine sea salt (enhances the flavor balance)
Add-Ons (Optional):
- 1/2 cup chocolate chips or chopped nuts (for extra texture)
- 1/3 cup fruit puree (strawberries or mango for a fruity twist)
- 1/4 teaspoon mint extract (for a refreshing kick)
Freezing & Mixing Essentials:
- Crushed ice (~5 pounds; finely crushed works best for even freezing)
- Rock salt (1 1/2 cups; aids in temperature regulation during the freezing process)
Optional Garnishes:
- Whipped cream, fresh berries, or sprinkles (to elevate presentation)
For best results, ensure all ingredients are fresh. The quality of your heavy cream and vanilla extract directly influences the final flavor, so we recommend premium ingredients.
Ingredient Measurement Table:
| Ingredient | Quantity | Use/Purpose |
|---|---|---|
| Heavy cream | 2 cups | Rich base for creaminess |
| Whole milk | 2 cups | Balances texture and flavor |
| Granulated sugar | 3/4 cup | Sweetens the mixture |
| Pure vanilla extract | 1 tablespoon | Adds depth of flavor |
| Fine sea salt | 1/8 teaspoon | Enhances taste |
| Rock salt | 1 1/2 cups | Temperature regulation |
| Crushed ice | ~5 pounds | Freezing medium |
Directions
Let’s dive into the step-by-step process to create a creamy, velvety ice cream with the help of your Immergood Ice Cream Maker. Follow these instructions to ensure your homemade ice cream turns out perfect every time.
Prep
- Start by gathering all the necessary tools and ingredients. This includes your Immergood Ice Cream Maker, pre-measured ingredients, and equipment like bowls and spoons.
- Chill your mixing bowl and whisk in the refrigerator for about 30 minutes. This helps maintain the cool temperature of the mixture during preparation.
- Pre-crush the required amount of ice, and ensure you have enough rock salt ready for the churning process.
Mix The Ice Cream Base
- In a chilled mixing bowl, combine:
- 2 cups heavy cream
- 1 cup whole milk
- ¾ cup granulated sugar
- 2 teaspoons pure vanilla extract
- A pinch of fine sea salt
- Using a whisk or an electric mixer, blend the ingredients until the sugar completely dissolves. If you’re unsure, run a clean spatula along the bottom to confirm no granules remain.
- If adding optional flavorings (like chocolate chips or fruit purees), gently fold them into the mixture after whisking to avoid overmixing.
Churn The Ice Cream
- Set up your Immergood Ice Cream Maker and position it in a sturdy area.
- Pour the mixed ice cream base into the canister. Close it securely with the lid.
- Layer crushed ice and rock salt around the canister in the freezing bucket. Use a 3:1 ratio (3 parts ice to 1 part salt) to maintain optimal freezing.
| Ice | Rock Salt |
|---|---|
| 3 cups | 1 cup |
- Begin churning. Follow the specific churning method your Immergood Ice Cream Maker requires (manual or electric). Continue churning until the texture thickens, usually about 20-30 minutes.
Freeze And Store
- Once churning is complete, transfer the ice cream to an airtight storage container. Smooth the top with a spatula to ensure even freezing.
- Place the container into the freezer for at least 2-4 hours to allow the ice cream to firm up properly.
- When ready to serve, let the ice cream sit at room temperature for 2-5 minutes to soften slightly for easy scooping.
- Use a sturdy ice cream scoop for serving and enjoy!
Flavor Variations
Homemade ice cream offers endless opportunities for creativity, allowing us to explore a range of delicious flavors with every batch. Let’s dive into some exciting Flavor Variations that are simple to make using the Immergood Ice Cream Maker.
Classic Vanilla
There’s nothing like a scoop of classic vanilla ice cream made with fragrant pure vanilla extract for a timelessly creamy treat.
- To accentuate the vanilla flavor, we recommend using Madagascar Bourbon vanilla extract.
- For a visually appealing twist, mix in specks of real vanilla bean for that gourmet touch.
- Serving Tip: Pair this with a slice of pie or top it with fresh berries for an elegant dessert.
Rich Chocolate
For chocolate lovers, rich chocolate ice cream is a must-try.
- Use ½ cup of cocoa powder and 6 ounces of melted semi-sweet chocolate in the base mixture for a deep, indulgent flavor.
- Adding a pinch of espresso powder enhances the chocolate notes beautifully.
- If you love texture, fold in chunks of dark chocolate or fudge pieces after churning.
Pro Tip: Serve with toasted almonds or a drizzle of homemade caramel for a gourmet touch.
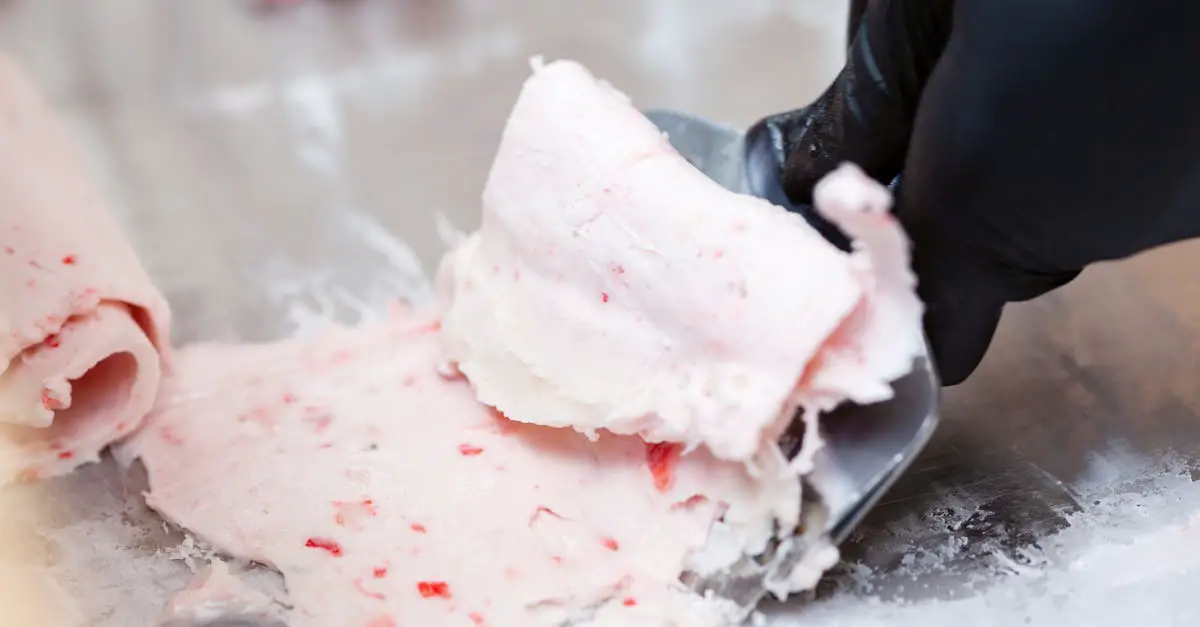
Fresh Strawberry
Capture the essence of summer with fresh strawberry ice cream, bursting with natural sweetness and vibrant color.
- Puree 2 cups of fresh strawberries into a smooth consistency and stir the mixture into the vanilla base.
- Add 1 teaspoon of lemon juice to balance the sweetness and enhance the fruity flavor.
- For extra texture, fold in diced strawberries during the last few minutes of churning.
Flavor Boost: Use peak-season strawberries or roast them beforehand to deepen their flavor.
Mint Chocolate Chip
This refreshing mint chocolate chip variation is ideal for anyone who loves cool, crisp flavors paired with creamy textures.
- Add 1 teaspoon of pure peppermint extract to your ice cream base. If desired, a few drops of green food coloring can give it a classic minty hue.
- Chop 3 ounces of semi-sweet or dark chocolate into fine shards for mixing into the churned ice cream.
- For a subtle variation, experiment with white chocolate chips or a combination of both.
Mint chocolate chip dreams come true in every scoop!
Unique Flavor Ideas
For adventurous palates, there’s no limit to exploring outside the traditional flavors. Consider trying these unique ideas for your next batch:
| Flavor | Key Ingredients |
|---|---|
| Salted Caramel | Homemade caramel sauce and a pinch of sea salt |
| Cookies & Cream | Crushed chocolate sandwich cookies mixed into vanilla base |
| Lavender Honey | Dried culinary lavender and a drizzle of local honey |
| Peanut Butter Swirl | Swirls of creamy peanut butter stirred into the churned base |
| Espresso Crunch | Espresso powder and crushed chocolate-covered espresso beans |
| Tropical Coconut | Cream of coconut with toasted coconut flakes |
Experimentation is half the fun of homemade ice cream. These specialty flavors are perfect for impressing guests or indulging in a midday treat.
Tips For Perfect Ice Cream
Crafting perfect homemade ice cream with an Immergood Ice Cream Maker is both an art and a science. To ensure a creamy texture, balanced flavor, and optimal consistency, follow these essential tips:
1. Choose Quality Ingredients
- Always opt for high-quality cream, milk, and flavorings, as these form the backbone of your ice cream.
- Use pure vanilla extract or natural flavorings instead of artificial ones for a more authentic taste.
- Avoid low-fat substitutes, as they compromise texture and richness, which are key to premium ice cream.
2. Chill Everything
- Pre-chill your mixing bowls, whisk, and spatulas before starting to prevent the mixture from warming too quickly.
- Refrigerate or freeze the ice cream base for a couple of hours before churning for faster freezing and fewer ice crystals.
3. Master the Ice-to-Salt Ratio
For the Immergood Ice Cream Maker, maintaining the correct proportion of crushed ice and rock salt is crucial to achieve the ideal freezing point. Use the table below for guidance:
| Item | Amount |
|---|---|
| Crushed Ice | 4 parts (e.g., 4 cups) |
| Rock Salt | 1 part (e.g., 1 cup) |
- Add ice and salt in alternating layers to surround the canister evenly.
4. Don’t Overfill the Canister
- Leave about 1 inch at the top of the churning canister to allow space for the mixture to expand as it freezes.
5. Set the Right Churning Time
- Overchurning can cause a grainy texture, while underchurning leads to soft, incomplete freezing. Follow these guidelines for optimal results:
- Hand-crank models: Churn for 25–30 minutes or until the ice cream firms up.
- Electric models: Follow the manufacturer’s instructions, usually about 20–25 minutes.
6. Avoid Large Ice Crystals
- For smooth ice cream, avoid unnecessary delays in freezing. Ensure ice surrounds the canister well and that rock salt is evenly distributed.
7. Incorporate Add-ins Correctly
- Stir in chunky ingredients like nuts, cookies, or chocolate chips in the last 5 minutes of churning to keep them evenly distributed and prevent sinking.
8. Proper Storage
- Use airtight, freezer-safe containers to store your ice cream. Press a piece of parchment paper or plastic wrap on the surface to prevent ice crystals from forming.
- For best enjoyment, consume your ice cream within 1–2 weeks of making.
9. Experiment and Adjust
- Feel free to customize sugar levels, flavorings, or fat percentages to align with your tastes. Ice cream is a blank canvas for your unique creations!
“The secret to perfect ice cream lies not just in the recipe but in the careful attention to each step of the process. With the right techniques and a touch of patience, magic happens.”
Following these tips ensures every batch of ice cream is a delicious success.
Serving Suggestions
Once we’ve churned the creamiest homemade ice cream with our Immergood Ice Cream Maker, the next step is serving it in ways that elevate its flavor and presentation. Here are some creative and crowd-pleasing serving ideas to make every scoop unforgettable:
1. Classic Scoops in Bowls or Cones
Serve generous scoops of ice cream in colorful bowls or on freshly baked waffle cones. For an extra special touch, sprinkle toppings like crushed nuts, rainbow sprinkles, mini chocolate chips, or a dusting of cocoa powder.
2. Ice Cream Sundae Bar
Set up an interactive sundae bar at parties or gatherings. Provide a variety of toppings such as:
| Sundae Essentials | Toppings for Variety |
|---|---|
| Whipped Cream | Chopped fruit (bananas, strawberries) |
| Chocolate or Caramel Sauces | Crushed cookies (Oreos, biscotti) |
| Maraschino Cherries | Gummy candies or jellybeans |
| Chopped Nuts | Shredded coconut |
| Mini Marshmallows | Warm fudge or peanut butter drizzle |
Encourage guests to create their personalized sundaes using their favorite flavors, textures, and garnishes.
3. Pair with Freshly Baked Treats
Nothing complements a scoop of homemade ice cream quite like warm baked goods. Pair our vanilla or chocolate flavors with:
- Warm brownies
- Freshly baked cookies (chocolate chip or oatmeal raisin)
- Classic pound cake slices
- Fruit cobblers or crisps (peach, apple, or berry)
The contrast between the warm pastry and the cold ice cream creates a sensational dessert experience.
4. Milkshakes and Floats
Transform our creamy ice cream into indulgent milkshakes or classic floats. To make a milkshake, blend:
- 2 generous scoops of ice cream
- 1/3 cup of milk (adjust for desired thickness)
- Toppings or mix-ins like chocolate syrup, caramel, or fresh fruit
For floats, combine a scoop of vanilla ice cream with soda or sparkling beverages such as root beer, orange soda, or even sparkling lemonade.
5. Gourmet Ice Cream Sandwiches
Use soft cookies, brownies, or thin waffles to sandwich a layer of ice cream. Wrap them in parchment paper and freeze them for a homemade treat that feels like it came right out of a specialty dessert shop.
6. Elegant Plating for Special Occasions
For dinner parties or celebrations, serve small scoops on a chilled plate with garnishes like edible flowers, a drizzle of raspberry coulis, or a sprinkle of fleur de sel. Pair with a light glass of dessert wine or coffee for an upscale touch.
7. Family-Style Desserts
Create a large dessert plate to share. Layer ice cream scoops with brownies, cookies, and sauces to assemble a “dessert charcuterie board.” Perfect for a family movie night or a small gathering, this allows everyone to share and enjoy.
8. Seasonal Inspirations
Enhance our ice cream with seasonal fruits and themes. In summer, serve with fresh berries or grilled peaches. During the winter, top with a warm spiced apple compote or crumbled gingerbread cookies.
Pro Tip: Keep It Chilled
Always use chilled bowls for serving to maintain the perfect texture of our homemade ice cream. If serving multiple dishes in one sitting, store batches in the freezer between servings to prevent melting.
Each of these Serving Suggestions adds a unique flair to the rich, homemade flavors of our ice cream. By presenting it in thoughtful and creative ways, we enhance the joy and indulgence of every bite.
Make-Ahead Instructions
Homemade ice cream is not only a treat to savor but also incredibly convenient to prepare ahead of time. Whether gearing up for a summer party or planning a family dessert night, following these make-ahead tips ensures the smoothest, creamiest results when using your Immergood Ice Cream Maker.
Preparing the Ice Cream Base
Starting in advance lets flavors develop and reduces stress on the preparation day. Here’s how to prepare the base ahead of time:
- Mix Ingredients: Combine your heavy cream, whole milk, granulated sugar, pure vanilla extract, and fine sea salt. If creating a flavored variation, add any liquid or puree mix-ins at this stage.
- Chill the Mixture: Pour the base into an airtight container. Refrigerate for at least 4 hours or, ideally, overnight. Letting the base rest enhances its flavor while ensuring it stays cold enough for efficient churning.
- Add Fresh Ingredients Later: For mix-ins like chocolate chunks or fruit pieces, stir them into the mixture during the last minutes of churning for optimal texture.
Freezing the Canister
For effective churning, the Immergood Ice Cream Maker’s inner canister must be properly prepared.
- Store the canister in the freezer for 12–24 hours before use.
- Ensure the freezer temperature is set to 0°F (-18°C) or lower to properly chill.
Pre-Churn and Store
You can pre-churn the ice cream ahead of time and store it for later enjoyment. Follow these steps:
- Churn the base in your Immergood Ice Cream Maker until it reaches a soft-serve consistency.
- Transfer the ice cream into freezer-safe, airtight containers.
- For longer storage, press a sheet of parchment paper or plastic wrap directly on the surface to prevent ice crystals from forming.
Storage Tips for the Best Texture
Proper storage is key to maintaining the creamy texture of homemade ice cream.
- Store at the Back of the Freezer: Keep the container toward the rear where temperatures fluctuate less.
- Optimal Storage Time: Homemade ice cream is best enjoyed within 1–2 weeks for peak freshness.
| Storage Component | Action Required |
|---|---|
| Airtight Container | Prevents freezer burn and preserves flavor |
| Parchment/Plastic Wrap | Minimizes surface ice crystal formation |
| Freezer Temperature | Maintain at or below 0°F (-18°C) |
Serving Make-Ahead Ice Cream
When ready to serve, follow these steps:
- Allow the ice cream to sit at room temperature for 5–10 minutes if it’s too firm.
- Use a warmed scoop, dipped in hot water, to create smooth and clean servings.
Adopting these make-ahead strategies makes it easy to savor your homemade treats, whether you’re indulging solo or impressing guests with your Immergood Ice Cream Maker’s velvety creations.
Conclusion
Homemade ice cream is more than just a dessert; it’s an experience that brings creativity, nostalgia, and indulgence together. With the Immergood Ice Cream Maker and the right tools, we can craft rich, velvety treats that rival even the finest store-bought options.
By experimenting with flavors, using high-quality ingredients, and following essential tips, we unlock endless possibilities for creating gourmet ice cream at home. Whether it’s a classic scoop or a bold new creation, every batch is an opportunity to savor something truly special.
Let’s embrace the joy of homemade ice cream and turn every recipe into a memorable treat worth sharing.
Frequently Asked Questions
What makes homemade ice cream better than store-bought options?
Homemade ice cream offers a creamier texture and richer flavors because it’s made with fresh, high-quality ingredients. Plus, it allows for endless customization, making it a truly personal and unique treat.
What is an Immergood Ice Cream Maker, and why is it recommended?
The Immergood Ice Cream Maker is a high-quality tool designed to simplify the process of making rich, velvety homemade ice cream. It’s durable, easy to use, and delivers consistently excellent results.
What tools do I need to make homemade ice cream?
Essential tools include an ice cream maker, mixing bowls, measuring tools, a whisk or mixer, crushed ice, rock salt, storage containers, and an ice cream scoop. These ensure a smooth and enjoyable process.
What ingredients do I need for basic vanilla ice cream?
You’ll need heavy cream, whole milk, granulated sugar, pure vanilla extract, and fine sea salt. Optional add-ins include chocolate chips, fruit purees, or flavor extracts for unique variations.
How do I use the Immergood Ice Cream Maker?
Prepare by chilling bowls and combining ingredients. Pour the mixture into the ice cream maker, layer with ice and rock salt, and churn as instructed. Follow freezing and storage tips for the best results.
What are some flavor ideas for homemade ice cream?
Classic options include vanilla, chocolate, and mint chocolate chip. Unique flavors like salted caramel, lavender honey, or espresso crunch can add a gourmet twist. Feel free to experiment!
How can I prevent large ice crystals in homemade ice cream?
Ensure your ice cream base and tools are well-chilled before use. Maintain the proper ice-to-salt ratio and avoid overfilling the ice cream maker to ensure smooth consistency.
Can I make ice cream in advance?
Yes! You can prepare the base in advance, chill it, and churn later. Store the finished ice cream in an airtight container to maintain its creamy texture and prevent ice crystals.
How do I store homemade ice cream?
Store it in an airtight, freezer-safe container to prevent air exposure. Place plastic wrap directly on the surface to avoid ice crystal formation. Let it soften slightly before serving.
What are some fun serving suggestions for homemade ice cream?
Serve classic scoops in bowls or cones with toppings, create sundaes, make milkshakes, or pair with baked goods. Try making ice cream sandwiches or seasonal-themed desserts for creative plating.
How do I ensure the best results with homemade ice cream?
Use fresh, high-quality ingredients, chill all tools and the ice cream base, and follow proper churning times. Pay attention to ratios, avoid overfilling, and store ice cream correctly for the perfect texture.