
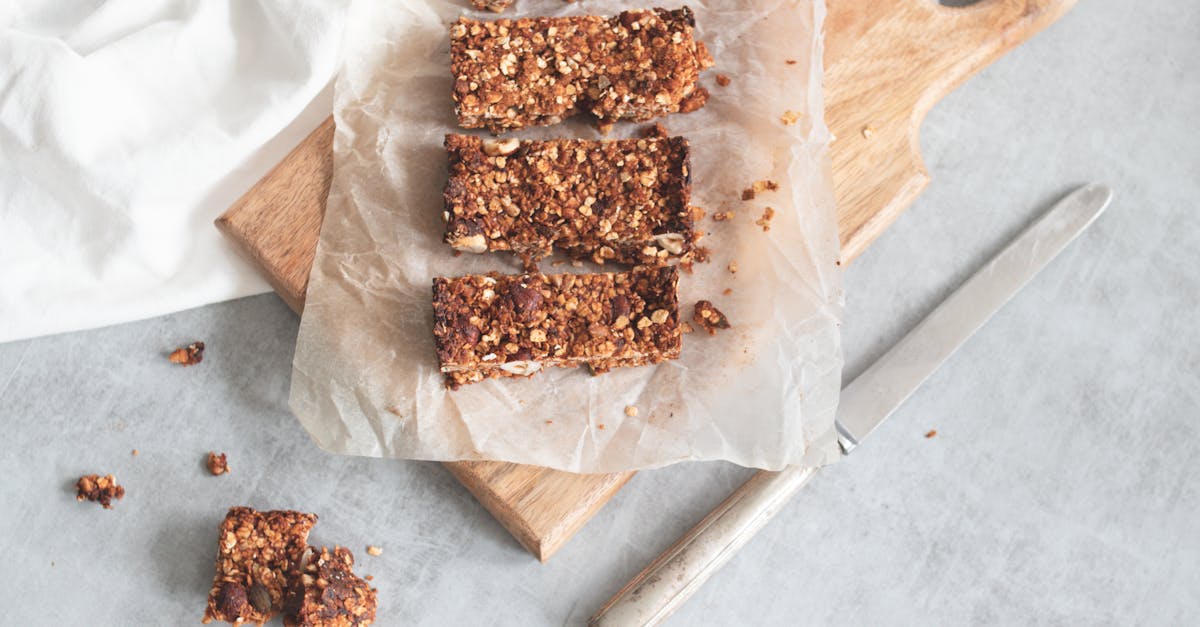
Earthquake cookies are a delightful treat that lives up to their name with a deliciously chaotic mix of ingredients. These cookies pack a punch with a combination of chocolate chips, nuts, coconut, and sometimes even candy pieces, creating a texture and flavor explosion in every bite. Originating as a fun and festive dessert, they’ve become a favorite for gatherings and holidays alike.
Ingredients
To create our Earthquake Cookies bursting with flavor and texture, we carefully select each ingredient. Below are the key components categorized to make preparation straightforward and efficient.
Dry Ingredients
We rely on these dry staples to provide structure and balance for our cookies’ rich mix:
- 2 ½ cups all-purpose flour, for the cookie base
- 1 teaspoon baking powder, to add lightness
- ½ teaspoon baking soda, for subtle lift
- ½ teaspoon salt, to enhance flavor and balance sweetness
Wet Ingredients
These add moisture and rich texture ensuring tender yet chewy cookies:
- 1 cup unsalted butter, softened for easy mixing
- 1 cup packed brown sugar, for deep molasses notes
- ½ cup granulated sugar, to balance sweetness
- 2 large eggs, room temperature for smooth blending
- 2 teaspoons vanilla extract, for warm aromatic depth
Mix-Ins and Toppings
This is where the Earthquake Cookies get their signature chaotic texture and flavor surprises:
| Ingredient | Quantity | Notes |
|---|---|---|
| Semi-sweet chocolate chips | 1 ½ cups | Adds classic chocolate bursts |
| Chopped walnuts | 1 cup | Provides crunch and earthiness |
| Sweetened shredded coconut | 1 cup | Offers chewy texture and flavor |
| Butterscotch chips | ½ cup | Adds caramel-like sweetness |
| M&Ms or candy pieces | ½ cup | Optional for colorful crunch |
Each ingredient is measured precisely to maintain the perfect balance of chewy, crunchy, and melt-in-your-mouth sensations in every bite of our Earthquake Cookies.
Equipment Needed
To craft the perfect Earthquake Cookies, having the right equipment is essential. This ensures each step flows smoothly from mixing to baking, delivering consistent texture and flavor every time. Below is a detailed list of the tools and appliances we rely on to make these delicious cookies:
- Mixing Bowls: Use a large bowl for combining dry ingredients and a medium bowl for wet ingredients. Durable glass or stainless steel bowls work best.
- Electric Mixer or Stand Mixer: For creaming butter and sugars efficiently, an electric hand mixer or stand mixer saves time and ensures a light, fluffy texture.
- Measuring Cups and Spoons: Precision is key. Use dry and liquid measuring cups plus spoons to get exact amounts of flour, sugars, and mix-ins.
- Spatula: A flexible silicone spatula is perfect for scraping sides of mixing bowls to incorporate all ingredients evenly.
- Cookie Scoop: A medium-sized cookie scoop (about 2 tablespoons) helps portion uniform cookies, maintaining size consistency.
- Baking Sheets: Heavy-duty, rimmed baking sheets provide the best support for the cookies during baking to prevent spreading too far.
- Parchment Paper or Silicone Baking Mats: Non-stick surfaces prevent cookies from sticking and promote even browning.
- Cooling Rack: Elevate cookies after baking to cool completely and maintain their chewy yet crunchy texture.
- Oven Thermometer (optional but recommended): Ensures your oven maintains the accurate temperature for perfect baking results.
| Equipment | Purpose | Notes |
|---|---|---|
| Mixing Bowls | Combine ingredients | Large for dry, medium for wet |
| Electric or Stand Mixer | Cream butter and sugar efficiently | Saves time and improves texture |
| Measuring Cups & Spoons | Measure ingredients precisely | Use separate sets for dry and liquid |
| Silicone Spatula | Scrape bowls and fold mix-ins | Flexible for thorough mixing |
| Cookie Scoop | Portion cookie dough evenly | 2 tbsp size recommended |
| Baking Sheets | Bake cookies evenly | Heavy-duty with rimmed edges |
| Parchment Paper/Silicone Mat | Prevent sticking, promote even baking | Reusable mats reduce waste |
| Cooling Rack | Cool cookies to avoid sogginess | Allows air circulation around cookies |
| Oven Thermometer (optional) | Verify oven temperature | Improves baking precision |
By having all of these tools handy before we start, we maintain control over each step in the Earthquake Cookies Recipe process. This setup guarantees consistent batches bursting with the signature chewy, crunchy, and melty goodness that makes these cookies such a standout treat.
Instructions
Follow these precise steps to create the perfect Earthquake Cookies with their signature chewy, crunchy, and melt-in-your-mouth texture.
Prep Work
- Preheat the oven to 350°F (175°C) for consistent baking.
- Line heavy-duty baking sheets with parchment paper or silicone baking mats to prevent sticking.
- Gather all ingredients measured accurately to streamline the process.
- Prepare your mixing tools: an electric mixer or stand mixer, measuring cups, spoons, and a silicone spatula.
Mixing the Dough
- In a large mixing bowl, cream together the unsalted butter, brown sugar, and granulated sugar using an electric mixer on medium speed. Mix until the texture is light and fluffy, about 3–4 minutes.
- Add the eggs one at a time, beating well after each addition to fully incorporate.
- Stir in the vanilla extract, blending thoroughly to infuse the dough with rich flavor.
- In a separate bowl, whisk together the dry ingredients: all-purpose flour, baking powder, baking soda, and salt.
- Gradually add the dry mixture into the wet ingredients, mixing on low speed just until combined to avoid overworking the dough.
Incorporating Mix-Ins
- Gently fold in the key mix-ins that give Earthquake Cookies their signature chaos:
- Semi-sweet chocolate chips
- Chopped walnuts
- Sweetened shredded coconut
- Butterscotch chips
- Optional candy pieces (if using)
Use a silicone spatula to fold these ingredients evenly to ensure each cookie has a balanced mix of chewy and crunchy textures.
Portioning the Cookies
- Use a cookie scoop or spoon to portion the dough into uniform balls about 1.5 tablespoons each.
- Place each ball on the prepared baking sheets, spacing them 2 inches apart to allow for spreading.
- For a rustic “earthquake” appearance, slightly press down each dough ball before baking.
Baking
- Bake in the preheated oven at 350°F (175°C) for 12–15 minutes.
- Watch for the edges to turn golden brown while the centers remain soft to preserve a chewy texture.
- Avoid overbaking to keep the melt-in-your-mouth quality intact.
| Temperature | Time | Notes |
|---|---|---|
| 350°F (175°C) | 12–15 mins | Edges golden, centers soft |
Cooling
- Remove the baking sheets from the oven and let the cookies cool on the sheets for 5 minutes to firm up.
- Transfer cookies to a cooling rack to cool completely and maintain the perfect texture.
- Cooling fully enhances the chewy, crunchy balance unique to Earthquake Cookies.
Storage Tips
To keep our Earthquake Cookies fresh, chewy, and full of their signature texture, proper storage is essential. Here are straightforward tips to maximize their shelf life and maintain flavor:
At Room Temperature
- Cool the cookies completely before storing to avoid moisture build-up and sogginess.
- Store in an airtight container to protect from air and humidity.
- Place a sheet of parchment paper between layers to prevent sticking.
- Keep the container in a cool dry place away from direct sunlight.
- Consume within 4 to 5 days for optimal freshness and texture.
Refrigeration
- If we want to extend the shelf life to about 1 to 2 weeks, store cookies in an airtight container in the refrigerator.
- Bring cookies back to room temperature before serving to revive their chewy texture.
Freezing
- For longer storage up to 3 months, Earthquake Cookies freeze well without losing flavor or crunch.
- Use a freezer-safe container or freezer bags with the air pressed out.
- Separate layers with parchment paper to prevent sticking.
- To thaw, leave at room temperature for 1 to 2 hours or microwave briefly (10-15 seconds) on low power for a freshly baked feel.
Quick Reference Table
| Storage Method | Container Type | Storage Duration | Key Tips |
|---|---|---|---|
| Room Temperature | Airtight container | 4–5 days | Cool cookies completely first |
| Refrigeration | Airtight container | 1–2 weeks | Bring to room temp before serving |
| Freezing | Freezer-safe bag/container | Up to 3 months | Separate with parchment paper |
Pro Tip: For the best Earthquake Cookies experience, avoid stacking too many cookies in one container to prevent crushing and maintain their chunky texture.
Following these Storage Tips guarantees we keep every batch of Earthquake Cookies delightfully fresh and ready to enjoy anytime.
Variations and Substitutions
To customize our Earthquake Cookies recipe and suit various dietary needs or flavor preferences, we can explore several effective Variations and Substitutions without sacrificing the signature texture and taste. Below we break down options for key ingredients and how to adapt the recipe while maintaining that delicious, chaotic bite.
Flour and Dry Ingredient Alternatives
- Gluten-Free Flour: Substitute the all-purpose flour with a 1:1 gluten-free baking blend for a gluten-free version. Make sure the blend contains xanthan gum to mimic the elasticity of gluten.
- Whole Wheat Flour: Swap half or all the all-purpose flour with whole wheat pastry flour to add nuttier flavor and more fiber, while keeping the texture tender.
- Leavening Agents: We recommend keeping the original balance of baking powder and baking soda, but for a subtle tang try replacing the baking powder with equivalent cream of tartar and baking soda mixture.
| Ingredient | Original Quantity | Suggested Substitution | Notes |
|---|---|---|---|
| All-purpose flour | 2 ¼ cups | Gluten-free 1:1 blend | Ensure blend contains xanthan gum |
| Baking powder | 1 tsp | Cream of tartar + baking soda | Maintain leavening balance |
| Baking soda | ½ tsp | Same |
Sweetener Substitutions
- Brown Sugar and Granulated Sugar: We suggest brown sugar for its moisture and depth. For lower glycemic options, try coconut sugar or cane sugar but expect slight flavor changes.
- Sugar-Free: Use erythritol or monk fruit sweetener blends marked for baking at a 1:1 replacement ratio. Watch for textural differences as artificial sweeteners can affect chewiness.
Mix-In Swaps for Texture and Flavor
Our Earthquake Cookies get their name from the “earthquake” of textures created by the mix-ins. Feel free to alter the mix-ins while preserving this delightful variety:
- Nuts: Substitute walnuts with pecans, almonds, or macadamia nuts. Toast them lightly to enhance flavor and crunch.
- Chips: Use white chocolate chips, peanut butter chips, or butterscotch chips depending on preference.
- Coconut: For a twist, replace shredded coconut with chopped dried cranberries or raisins for chewiness.
- Candy Pieces: Swap candy pieces with crushed toffee bits, M&M’s, or mini peanut butter cups to add colorful bursts and different flavors.
Dietary Adjustments
- Dairy-Free: Replace unsalted butter with vegan butter sticks or coconut oil in equal amounts. Expect slight changes in flavor and tenderness.
- Egg Replacement: Use a flax egg (1 tbsp ground flaxseed + 3 tbsp water, let sit for 5 minutes) to make the recipe egg-free and vegan-friendly.
- Nut-Free: Omit nuts entirely or use pumpkin seeds or sunflower seeds for crunch without allergen risk.
“The key to maintaining the signature Earthquake Cookies feel is balancing the mix-ins to keep the chaotic texture, no matter the substitutions.”
Summary Table of Popular Variations
| Aspect | Original Ingredient | Suggested Variations | Tips |
|---|---|---|---|
| Flour | All-purpose flour | Gluten-free blend, whole wheat pastry flour | Adjust moisture slightly if needed |
| Sweetener | Brown sugar + granulated sugar | Coconut sugar, erythritol, monk fruit | Expect minor flavor and texture changes |
| Nuts | Walnuts | Pecans, almonds, macadamia nuts | Toast for enhanced flavor |
| Chocolate chips | Semi-sweet chips | White chocolate, peanut butter, butterscotch | Mix different chips for variety |
| Coconut | Shredded coconut | Dried cranberries, raisins | Adds chewiness |
| Butter | Unsalted butter | Vegan butter, coconut oil | Slight taste difference |
| Egg | Whole eggs | Flax egg, chia egg | Slight texture difference |
Using these Variations and Substitutions allows us to personalize our Earthquake Cookies while preserving the chewy, crunchy, and flavorful experience.
Conclusion
Earthquake Cookies offer a delightful mix of textures and flavors that make every bite an adventure. With the right ingredients, tools, and techniques, we can easily create these crowd-pleasing treats at home. Whether we stick to the classic recipe or experiment with variations, the key is to maintain that perfect balance of chewy, crunchy, and melty goodness.
Keeping them fresh and storing them properly ensures we can enjoy these cookies anytime. Let’s embrace the fun chaos of Earthquake Cookies and share the joy they bring with friends and family. Happy baking!
Frequently Asked Questions
What are Earthquake Cookies?
Earthquake Cookies are a flavorful treat known for their chaotic mix of ingredients like chocolate chips, nuts, coconut, and candy pieces. They offer a unique chewy and crunchy texture that makes them popular for holidays and gatherings.
What ingredients do I need to make Earthquake Cookies?
You need dry ingredients like flour, baking powder, baking soda, and salt; wet ingredients such as butter, brown sugar, granulated sugar, eggs, and vanilla; plus mix-ins like chocolate chips, walnuts, shredded coconut, butterscotch chips, and optional candies.
What tools are essential for baking Earthquake Cookies?
Key equipment includes mixing bowls, an electric mixer, measuring cups and spoons, a silicone spatula, a cookie scoop, heavy-duty baking sheets, parchment paper or silicone mats, and a cooling rack. An oven thermometer is optional but helpful.
How do I bake Earthquake Cookies?
Preheat your oven to 350°F (175°C). Cream butter and sugars, add eggs and vanilla, mix dry ingredients separately, then combine all and fold in mix-ins. Portion dough into balls, bake until edges turn golden, then cool on a rack for best texture.
How should I store Earthquake Cookies to keep them fresh?
Store cooled cookies in an airtight container with parchment paper between layers at room temperature for 4–5 days. Refrigerate for 1–2 weeks or freeze up to 3 months. Thaw frozen cookies at room temperature or briefly in the microwave before serving.
Can I customize Earthquake Cookies for dietary needs?
Yes, you can substitute gluten-free or whole wheat flour, use alternative sweeteners like coconut sugar, and swap mix-ins for different nuts, chips, or fruits. Dairy-free, egg-free, and nut-free versions are also possible with proper substitutions.
What makes Earthquake Cookies’ texture unique?
The combination of chewy, crunchy, and melty elements comes from the balanced mix of ingredients like butter, sugars, nuts, coconut, and chocolate chips, creating a multi-textured cookie experience in every bite.
Why is measuring ingredients precisely important?
Precise measurements ensure the perfect balance of chewiness and crunchiness, maintaining the signature texture and flavor that characterize Earthquake Cookies. Too much or too little of an ingredient can affect the final quality.
How can I avoid cookies sticking to the baking sheet?
Use parchment paper or silicone baking mats on your baking sheets. These create a non-stick surface that helps cookies bake evenly without sticking, making cleanup easier and preserving cookie shape.
What is the best way to portion dough for uniform cookies?
Use a cookie scoop to portion dough evenly. This ensures uniform cookie sizes so they bake consistently with the same texture and doneness throughout each batch.